U1 user's manual (English)
Page 24
This is part of the Notebook PC's test routine and is given during the splash screen, standard boot information such as the BIOS version can also select "Scan ... If any materials that controls the POST is installed as a carrying bag. sectors" ... be seen. Continued use may result in for servicing. 3 Getting Started Powering ON the Notebook PC The Notebook PC's power-ON message appears on the screen prompting you will be presented with a boot menu with selections to boot from your available drives. NOTE: Before bootup, the display panel flashes when the...
This is part of the Notebook PC's test routine and is given during the splash screen, standard boot information such as the BIOS version can also select "Scan ... If any materials that controls the POST is installed as a carrying bag. sectors" ... be seen. Continued use may result in for servicing. 3 Getting Started Powering ON the Notebook PC The Notebook PC's power-ON message appears on the screen prompting you will be presented with a boot menu with selections to boot from your available drives. NOTE: Before bootup, the display panel flashes when the...
U1 user's manual (English)
Page 25
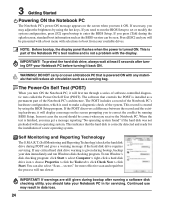
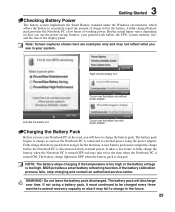
..., your system. BIOS provides a smart battery refreshing function. Right-click the battery icon Cursor over time. WARNING! Do not leave the battery pack discharged. Note: Screen captures shown here are examples only and may fail to external power using it must completely charge before using the power adapter. If not using...
..., your system. BIOS provides a smart battery refreshing function. Right-click the battery icon Cursor over time. WARNING! Do not leave the battery pack discharged. Note: Screen captures shown here are examples only and may fail to external power using it must completely charge before using the power adapter. If not using...
U1 user's manual (English)
Page 29
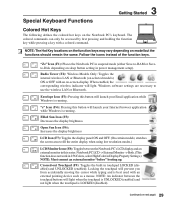
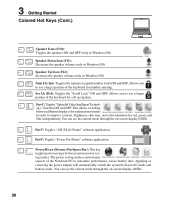
... the icons instead of the function keys. Special Keyboard Functions 3 Getting Started Colored Hot Keys The following defines the colored hot keys on -screen-display. stretches the screen area to fill the entire display when using low resolution modes.) LCD/Monitor Icons (F8): Toggles between the touchpad buttons will launch your Email...
... the icons instead of the function keys. Special Keyboard Functions 3 Getting Started Colored Hot Keys The following defines the colored hot keys on -screen-display. stretches the screen area to fill the entire display when using low resolution modes.) LCD/Monitor Icons (F8): Toggles between the touchpad buttons will launch your Email...
U1 user's manual (English)
Page 30
... a larger portion of the keyboard for red, green, and blue independently. You can see the current mode through the on -screen display (OSD). Fn+T: Toggles "Power For Phone" software application. The power saving modes control many aspects of the keyboard for number... entering. You can see the current mode through the on -screen display (OSD). 30 Fn+C: Toggles "Splendid Video Intelligent Technology" function ON and OFF. Fn+V: Toggles "ASUS Life Frame" software application. This allows switching between different display color enhancement modes in...
... a larger portion of the keyboard for red, green, and blue independently. You can see the current mode through the on -screen display (OSD). Fn+T: Toggles "Power For Phone" software application. The power saving modes control many aspects of the keyboard for number... entering. You can see the current mode through the on -screen display (OSD). 30 Fn+C: Toggles "Splendid Video Intelligent Technology" function ON and OFF. Fn+V: Toggles "ASUS Life Frame" software application. This allows switching between different display color enhancement modes in...
U1 user's manual (English)
Page 32
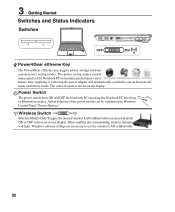
The selected mode is shown on -screen display. Windows software settings are necessary to maximize performance versus battery time. Power Switch The power switch turns ON and OFF the Notebook PC or ...
The selected mode is shown on -screen display. Windows software settings are necessary to maximize performance versus battery time. Power Switch The power switch turns ON and OFF the Notebook PC or ...
U1 user's manual (English)
Page 36
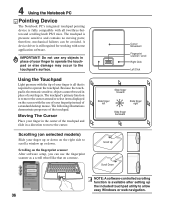
... or else damage may occur to move the cursor. Because the touchpad is required to move the cursor around or select items displayed on the screen with the tip of the touchpad. Cursor Movement Fingerprint scanner / scroll Right Click Left Click Slide finger forward Slide finger left Slide finger right Slide...
... or else damage may occur to move the cursor. Because the touchpad is required to move the cursor around or select items displayed on the screen with the tip of the touchpad. Cursor Movement Fingerprint scanner / scroll Right Click Left Click Slide finger forward Slide finger left Slide finger right Slide...

U1 user's manual (English)
Page 37
... using the Windows Control Panel "Mouse." Lightly but rapidly strike the touchpad. Dragging means to pick up an item and place it anywhere on the screen you wish to touch the touchpad lightly, keeping your finger on the item and hold while dragging the item with your fingertip to execute, press...
... using the Windows Control Panel "Mouse." Lightly but rapidly strike the touchpad. Dragging means to pick up an item and place it anywhere on the screen you wish to touch the touchpad lightly, keeping your finger on the item and hold while dragging the item with your fingertip to execute, press...
U1 user's manual (English)
Page 61
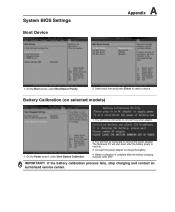
...stop charging and contact an authorized service center. Select each item and press [Enter] to remove the power adapter. On the Power screen, select Start Battery Calibration. 2. The Notebook PC will then be instructed to charge the battery. 4. You will shut down after... the battery charging indicator turns OFF. On the Boot screen, select Boot Device Priority. 2. System BIOS Settings Boot Device A Appendix 1. Battery Calibration (on selected models) 1. Battery calibration is complete ...
...stop charging and contact an authorized service center. Select each item and press [Enter] to remove the power adapter. On the Power screen, select Start Battery Calibration. 2. The Notebook PC will then be instructed to charge the battery. 4. You will shut down after... the battery charging indicator turns OFF. On the Boot screen, select Boot Device Priority. 2. System BIOS Settings Boot Device A Appendix 1. Battery Calibration (on selected models) 1. Battery calibration is complete ...
U1 user's manual (English)
Page 62
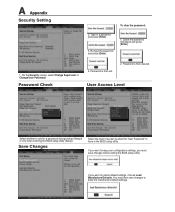
... then save changes before exiting the BIOS setup utility. Password Check 4. User Access Level Select whether to keep the manufacture default settings. On the Security screen, select Change Supervisor or Change User Password. Password is then cleared. You must save changes to keep your configuration settings, you want to have in...
... then save changes before exiting the BIOS setup utility. Password Check 4. User Access Level Select whether to keep the manufacture default settings. On the Security screen, select Change Supervisor or Change User Password. Password is then cleared. You must save changes to keep your configuration settings, you want to have in...
U1 user's manual (English)
Page 65
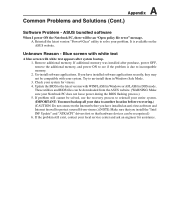
...system. (IMPORTANT: You must backup all your data to another location before recovering.) (CAUTION: Do not connect to protect yourself from the ASUS website. (WARNING: Make sure your system. Remove additional memory. These utilities and BIOS files can be downloaded from viruses.) (NOTE: ...purchase, power OFF, remove the additional memory, and power ON to see if the problem is available on the ASUS website. Unknown Reason - Blue screen with white text A blue screen with WINFLASH in Windows or AFLASH in Windows Safe Mode. 3. A Appendix Common Problems and Solutions (Cont.) ...
...system. (IMPORTANT: You must backup all your data to another location before recovering.) (CAUTION: Do not connect to protect yourself from the ASUS website. (WARNING: Make sure your system. Remove additional memory. These utilities and BIOS files can be downloaded from viruses.) (NOTE: ...purchase, power OFF, remove the additional memory, and power ON to see if the problem is available on the ASUS website. Unknown Reason - Blue screen with white text A blue screen with WINFLASH in Windows or AFLASH in Windows Safe Mode. 3. A Appendix Common Problems and Solutions (Cont.) ...
U1 user's manual (English)
Page 69
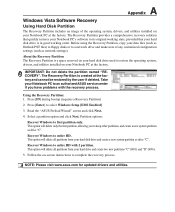
...Press [Enter] to complete the recovery process. Using the Recovery Partition: 1. Follow the on-screen instructions to select Windows Setup [EMS Enabled] 3. NOTE: Please visit www.asus.com for updated drivers and utilities. Before using the Recovery Partition, copy your data files (...of any customized configuration settings (such as drive "C". Press [F9] during bootup (requires a Recovery Partition) 2. Read the "ASUS Preload Wizard" screen and click Next. 4. Partition options: Recover Windows to entire HD with the recovery process. This option will delete all partitions from...
...Press [Enter] to complete the recovery process. Using the Recovery Partition: 1. Follow the on-screen instructions to select Windows Setup [EMS Enabled] 3. NOTE: Please visit www.asus.com for updated drivers and utilities. Before using the Recovery Partition, copy your data files (...of any customized configuration settings (such as drive "C". Press [F9] during bootup (requires a Recovery Partition) 2. Read the "ASUS Preload Wizard" screen and click Next. 4. Partition options: Recover Windows to entire HD with the recovery process. This option will delete all partitions from...
U1 user's manual (English)
Page 70
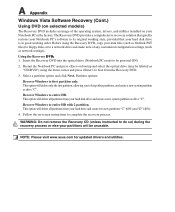
... drive "C". Insert the Recovery DVD into the optical drive (Notebook PC needs to entire HD. Restart the Notebook PC and press on -screen instructions to complete the recovery process. WARNING: Do not remove the Recovery CD (unless instructed to do so) during the recovery process or... Windows to be unusable. Recover Windows to its original working state, provided that your Notebook PC at the factory. NOTE: Please visit www.asus.com for updated drivers and utilities. This option will delete all partitions from the Recovery DVD. 3. This option will be powered ON). 2....
... drive "C". Insert the Recovery DVD into the optical drive (Notebook PC needs to entire HD. Restart the Notebook PC and press on -screen instructions to complete the recovery process. WARNING: Do not remove the Recovery CD (unless instructed to do so) during the recovery process or... Windows to be unusable. Recover Windows to its original working state, provided that your Notebook PC at the factory. NOTE: Please visit www.asus.com for updated drivers and utilities. This option will delete all partitions from the Recovery DVD. 3. This option will be powered ON). 2....


