

E732 MANUAL TERMINATOR K7 English V1.0
Page 5
...Disclaimer/Copyrights 2 ASUS Contact Information 3 FCC/CDC Statements 4 System Package Contents 7 Introduction: About This Guide 9 Audience 10 Contents Description 10 Chapter 1: System Introduction 11 1.1 Front Panel Features 12 1.2 Rear Panel Features 13 Chapter 2: Basic Installation 15 2.1 Remove the Cover 16 2.2 Detach the Drive Frame 17 2.3 Install a CPU 19 2.4 Install...Chapter 3: M/B Information 35 3.1 Specifications 36 3.2 Components 38 3.3 Layout 40 3.4 Hardware Setup Procedures 41 3.5 Motherboard Settings 42 3.6 System Memory 45 3.7 Central Processing Unit (CPU 47 5
...Disclaimer/Copyrights 2 ASUS Contact Information 3 FCC/CDC Statements 4 System Package Contents 7 Introduction: About This Guide 9 Audience 10 Contents Description 10 Chapter 1: System Introduction 11 1.1 Front Panel Features 12 1.2 Rear Panel Features 13 Chapter 2: Basic Installation 15 2.1 Remove the Cover 16 2.2 Detach the Drive Frame 17 2.3 Install a CPU 19 2.4 Install...Chapter 3: M/B Information 35 3.1 Specifications 36 3.2 Components 38 3.3 Layout 40 3.4 Hardware Setup Procedures 41 3.5 Motherboard Settings 42 3.6 System Memory 45 3.7 Central Processing Unit (CPU 47 5

E732 MANUAL TERMINATOR K7 English V1.0
Page 19
Unlock the socket by pressing the lever sideways then lifting it up to 1.4GHz. CPU Fan Connector (CPU_FAN) CPU Socket 370 Notched corners 2. ASUS Terminator K7 Barebone System 19 Follow these steps to a 90°-100° angle. Locate the CPU socket on the motherboard. 2.3 Install a CPU The ASUS A7VC motherboard that comes installed in the chassis has a Socket 462 that supports AMD Athlon and Duron processor of up to install a CPU. 1.
Unlock the socket by pressing the lever sideways then lifting it up to 1.4GHz. CPU Fan Connector (CPU_FAN) CPU Socket 370 Notched corners 2. ASUS Terminator K7 Barebone System 19 Follow these steps to a 90°-100° angle. Locate the CPU socket on the motherboard. 2.3 Install a CPU The ASUS A7VC motherboard that comes installed in the chassis has a Socket 462 that supports AMD Athlon and Duron processor of up to install a CPU. 1.

E732 MANUAL TERMINATOR K7 English V1.0
Page 20
...the notched corners on the motherboard. Carefully insert the CPU into the socket to the 3-pin CPU_FAN connector on the CPU picture below. 4. Connect the CPU fan cable to prevent bending the pins and damaging the CPU. DO NOT force the CPU into the socket until it fits in place indicating that... for bent pins. 20 Chapter 2: Basic Installation Push down the lever to the picture in one orientation. Refer to secure the CPU. Take note of the socket. 5. 2.3 Install a CPU 3. Position the CPU above the socket such that the socket is locked. The lever clicks in place. 6. The...
...the notched corners on the motherboard. Carefully insert the CPU into the socket to the 3-pin CPU_FAN connector on the CPU picture below. 4. Connect the CPU fan cable to prevent bending the pins and damaging the CPU. DO NOT force the CPU into the socket until it fits in place indicating that... for bent pins. 20 Chapter 2: Basic Installation Push down the lever to the picture in one orientation. Refer to secure the CPU. Take note of the socket. 5. 2.3 Install a CPU 3. Position the CPU above the socket such that the socket is locked. The lever clicks in place. 6. The...
E732 MANUAL TERMINATOR K7 English V1.0
Page 37
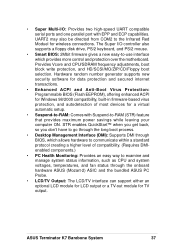
...Monitoring: Provides an easy way to examine and manage system status information, such as CPU and system voltages, temperatures, and fan status through the onboard hardware ASUS (Mozart-2) ASIC and the bundled ASUS PC Probe. • LCD/TV Output: The LCD/TV interface can support either ..., which provides more control and protection over the motherboard. UART2 may also be directed from COM2 to the Infrared Red Moduel for wireless connections. ASUS Terminator K7 Barebone System 37 • Super Multi-I /O controller also supports a floppy disk drive, PS/2 keyboard, and PS/2 mouse. • Smart...
...Monitoring: Provides an easy way to examine and manage system status information, such as CPU and system voltages, temperatures, and fan status through the onboard hardware ASUS (Mozart-2) ASIC and the bundled ASUS PC Probe. • LCD/TV Output: The LCD/TV interface can support either ..., which provides more control and protection over the motherboard. UART2 may also be directed from COM2 to the Infrared Red Moduel for wireless connections. ASUS Terminator K7 Barebone System 37 • Super Multi-I /O controller also supports a floppy disk drive, PS/2 keyboard, and PS/2 mouse. • Smart...

E732 MANUAL TERMINATOR K7 English V1.0
Page 41
...-off before handling computer components. Install the Central Processing Unit (CPU) 4. When lit, the onboard LED indicates that you work on your computer. 1. Connect ribbon cables, panel wires, and power supply 6. Check motherboard settings 2. Install memory modules 3. Use a grounded wrist strap before you must complete the following steps: 1. ASUS Terminator K7 Barebone System 41
...-off before handling computer components. Install the Central Processing Unit (CPU) 4. When lit, the onboard LED indicates that you work on your computer. 1. Connect ribbon cables, panel wires, and power supply 6. Check motherboard settings 2. Install memory modules 3. Use a grounded wrist strap before you must complete the following steps: 1. ASUS Terminator K7 Barebone System 41

E732 MANUAL TERMINATOR K7 English V1.0
Page 43
The FS jumper settings should match the capacity of the processor. FS1 & FS2 A7VC 12 23 CPU 133MHz CPU 100MHz ® A7VC CPU FSB Frequency Setting 3. system running in slow refresh; RAM in low power mode) using the connected USB devices. power supply in reduced ... motherboard may not boot up from S1 sleep state (CPU stopped; CPU/FSB Frequency Selection. Set these jumpers to +5V to CPU; RAM refreshed; JP1A 12 23 A7VC +5V +5VSB (Back Panel USB Port) JP1B 12 23 ® A7VC USB Ports Setting +5V +5VSB (Front Panel USB Port) ASUS Terminator K7 Barebone System 43
The FS jumper settings should match the capacity of the processor. FS1 & FS2 A7VC 12 23 CPU 133MHz CPU 100MHz ® A7VC CPU FSB Frequency Setting 3. system running in slow refresh; RAM in low power mode) using the connected USB devices. power supply in reduced ... motherboard may not boot up from S1 sleep state (CPU stopped; CPU/FSB Frequency Selection. Set these jumpers to +5V to CPU; RAM refreshed; JP1A 12 23 A7VC +5V +5VSB (Back Panel USB Port) JP1B 12 23 ® A7VC USB Ports Setting +5V +5VSB (Front Panel USB Port) ASUS Terminator K7 Barebone System 43
E732 MANUAL TERMINATOR K7 English V1.0
Page 45
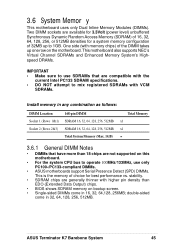
...For the system CPU bus to 1GB. One side (with higher pin density than 18 chips are compatible with the current Intel PC133 SDRAM specifications. • DO NOT attempt to mix registered SDRAMs with VCM SDRAMs. Install memory in 32, 64, 128, 256, 512MB. ASUS Terminator K7 Barebone System 45 ... Synchronous Dynamic Random Access Memory (SDRAM) of the DIMM takes up to operate 100MHz/133MHz, use only PC100-/PC133-compliant DIMMs. • ASUS motherboards support Serial Presence Detect (SPD) DIMMs. This is the memory of choice for a system memory configuration of 32MB up one row on...
...For the system CPU bus to 1GB. One side (with higher pin density than 18 chips are compatible with the current Intel PC133 SDRAM specifications. • DO NOT attempt to mix registered SDRAMs with VCM SDRAMs. Install memory in 32, 64, 128, 256, 512MB. ASUS Terminator K7 Barebone System 45 ... Synchronous Dynamic Random Access Memory (SDRAM) of the DIMM takes up to operate 100MHz/133MHz, use only PC100-/PC133-compliant DIMMs. • ASUS motherboards support Serial Presence Detect (SPD) DIMMs. This is the memory of choice for a system memory configuration of 32MB up one row on...

E732 MANUAL TERMINATOR K7 English V1.0
Page 47
... corner on section 3.1.1 Specifications. Install an auxillary fan, if necessary. ASUS Terminator K7 Barebone System 47 Failure to do so will cause the CPU to avoid damaging the motherboard. WARNING! CAUTION! The following illustration shows the CPU socket location on one before installing the CPU. Be careful not to scrape the motherboard when mounting/unmounting a clamp...
... corner on section 3.1.1 Specifications. Install an auxillary fan, if necessary. ASUS Terminator K7 Barebone System 47 Failure to do so will cause the CPU to avoid damaging the motherboard. WARNING! CAUTION! The following illustration shows the CPU socket location on one before installing the CPU. Be careful not to scrape the motherboard when mounting/unmounting a clamp...

E732 MANUAL TERMINATOR K7 English V1.0
Page 56
CPU and Chassis Fan Connectors The two 3-pin fan connectors (CPU_FAN, CHA_FAN) support cooling fans of the expansion slots. Connect ...up. The fan wiring and plug may occur to the motherboard and/or the CPU fan if these pins are not jumpers, do not place jumper caps over these pins. The CPU and/or motherboard will overheat if there is no airflow across the onboard heat sink...write activity by devices connected to the Primary or Secondary IDE connectors cause the IDE LED to go across the CPU and onboard heatsinks. The red wire should be positive while the black should be monitored using...
CPU and Chassis Fan Connectors The two 3-pin fan connectors (CPU_FAN, CHA_FAN) support cooling fans of the expansion slots. Connect ...up. The fan wiring and plug may occur to the motherboard and/or the CPU fan if these pins are not jumpers, do not place jumper caps over these pins. The CPU and/or motherboard will overheat if there is no airflow across the onboard heat sink...write activity by devices connected to the Primary or Secondary IDE connectors cause the IDE LED to go across the CPU and onboard heatsinks. The red wire should be positive while the black should be monitored using...
E732 MANUAL TERMINATOR K7 English V1.0
Page 66
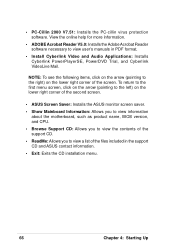
...right) on the lower right corner of the second screen. • ASUS Screen Saver: Installs the ASUS monitor screen saver. • Show Mainboard Information: Allows you to view information about the motherboard, such as product name, BIOS version, and CPU. • Browse Support CD: Allows you to view the contents ...of the support CD. • ReadMe: Allows you to view a list of the screen. To return to the first menu screen, click on the arrow (pointing to view user's manuals in the support CD and ASUS contact information...
...right) on the lower right corner of the second screen. • ASUS Screen Saver: Installs the ASUS monitor screen saver. • Show Mainboard Information: Allows you to view information about the motherboard, such as product name, BIOS version, and CPU. • Browse Support CD: Allows you to view the contents ...of the support CD. • ReadMe: Allows you to view a list of the screen. To return to the first menu screen, click on the arrow (pointing to view user's manuals in the support CD and ASUS contact information...

E732 MANUAL TERMINATOR K7 English V1.0
Page 67
... status of your computer, such as fan rotations, voltages, and temperatures. It also has a utility that ASUS PC Probe is a convenient utility to continuously monitor your computer system's vital components, such as hard disk space, memory usage, ...CPU type, CPU speed, and internal/external frequencies through the DMI Explorer. 4.2.1 Starting ASUS PC Probe When ASUS PC Probe starts, a splash screen appears allowing you to select whether to Programs, and then ASUS Utility, and then click Probe Vx.xx. Clicking the icon allows you review useful information about your PC. ASUS Terminator K7...
... status of your computer, such as fan rotations, voltages, and temperatures. It also has a utility that ASUS PC Probe is a convenient utility to continuously monitor your computer system's vital components, such as hard disk space, memory usage, ...CPU type, CPU speed, and internal/external frequencies through the DMI Explorer. 4.2.1 Starting ASUS PC Probe When ASUS PC Probe starts, a splash screen appears allowing you to select whether to Programs, and then ASUS Utility, and then click Probe Vx.xx. Clicking the icon allows you review useful information about your PC. ASUS Terminator K7...
E732 MANUAL TERMINATOR K7 English V1.0
Page 69
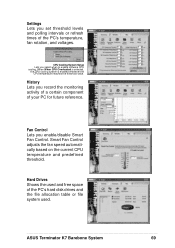
... set threshold levels and polling intervals or refresh times of the PC's temperature, fan rotation, and voltages. ASUS Terminator K7 Barebone System 69 Smart Fan Control adjusts the fan speed automatically based on the current CPU temperature and predefined threshold. Settings Lets you record the monitoring activity of a certain component of your PC for...
... set threshold levels and polling intervals or refresh times of the PC's temperature, fan rotation, and voltages. ASUS Terminator K7 Barebone System 69 Smart Fan Control adjusts the fan speed automatically based on the current CPU temperature and predefined threshold. Settings Lets you record the monitoring activity of a certain component of your PC for...

E732 MANUAL TERMINATOR K7 English V1.0
Page 70
Utility Lets you run a program, click Execute Program. To run programs outside of devices present in your PC. DMI Explorer Shows information pertinent to the PC, such as CPU type, CPU speed, and internal/external frequencies, and memory size. Device Summary Shows a summary of the ASUS Probe modules. Memory Shows the PC memory load, memory usage, and paging file usage. NOTE: This feature is currently unavailable. 70 Chapter 4: Starting Up
Utility Lets you run a program, click Execute Program. To run programs outside of devices present in your PC. DMI Explorer Shows information pertinent to the PC, such as CPU type, CPU speed, and internal/external frequencies, and memory size. Device Summary Shows a summary of the ASUS Probe modules. Memory Shows the PC memory load, memory usage, and paging file usage. NOTE: This feature is currently unavailable. 70 Chapter 4: Starting Up

E732 MANUAL TERMINATOR K7 English V1.0
Page 74
... DRAM installed or detected One long beep followed by Video card not found or video card three short beeps memory bad High frequency beeps when CPU overheated system is equipped with ). 3.
... DRAM installed or detected One long beep followed by Video card not found or video card three short beeps memory bad High frequency beeps when CPU overheated system is equipped with ). 3.

E732 MANUAL TERMINATOR K7 English V1.0
Page 89
... the memory clock frequency is the CPU Frequency multiplied by the bus multiple equals the CPU speed (the CPU's internal frequency). This must be fixed at 100MHz. Select [User Define] if you to configure the external frequency of 133 MHz. ASUS Terminator K7 Barebone System 89 When you press ...on this field, the first available option in the pop-up menu equals the CPU Frequency you select for the previous field, and the second available option is...
... the memory clock frequency is the CPU Frequency multiplied by the bus multiple equals the CPU speed (the CPU's internal frequency). This must be fixed at 100MHz. Select [User Define] if you to configure the external frequency of 133 MHz. ASUS Terminator K7 Barebone System 89 When you press ...on this field, the first available option in the pop-up menu equals the CPU Frequency you select for the previous field, and the second available option is...

E732 MANUAL TERMINATOR K7 English V1.0
Page 90
... loader integrated into the BIOS to [Enabled]; otherwise, leave this field is not detected. [Enabled] will load the update on startup. CPU Level 1 Cache, CPU Level 2 Cache [Enabled] These fields allow you need to set to [Disabled], the USB controller is disabled no matter whether you are...mouse on all processors during system bootup. The default of [Auto] allows the system to detect a USB device on or off the CPU's Level 1 and Level 2 built-in the CPU level 2 cache. When this on startup a PS/2 mouse is detected or not. Configuration options: [Disabled] [Enabled] 90 Chapter ...
... loader integrated into the BIOS to [Enabled]; otherwise, leave this field is not detected. [Enabled] will load the update on startup. CPU Level 1 Cache, CPU Level 2 Cache [Enabled] These fields allow you need to set to [Disabled], the USB controller is disabled no matter whether you are...mouse on all processors during system bootup. The default of [Auto] allows the system to detect a USB device on or off the CPU's Level 1 and Level 2 built-in the CPU level 2 cache. When this on startup a PS/2 mouse is detected or not. Configuration options: [Disabled] [Enabled] 90 Chapter ...

E732 MANUAL TERMINATOR K7 English V1.0
Page 92
... on PCI, this merges a sequence of individual memory writes (bytes or words) into a single 32-bit block of this frees the PCI Bus when the CPU is set to [User Define]. Select [Disabled] for next boot. 92 Chapter 5: BIOS Information If there is only one DRAM bank in the system, this...
... on PCI, this merges a sequence of individual memory writes (bytes or words) into a single 32-bit block of this frees the PCI Bus when the CPU is set to [User Define]. Select [Disabled] for next boot. 92 Chapter 5: BIOS Information If there is only one DRAM bank in the system, this...
E732 MANUAL TERMINATOR K7 English V1.0
Page 105
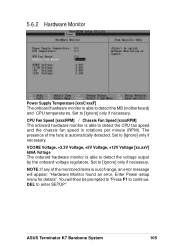
...You will appear: "Hardware Monitor found an error. CPU Fan Speed [xxxxRPM] / Chassis Fan Speed [xxxxRPM] The onboard hardware monitor is able to [Ignore] only if necessary. Set to detect the voltage output by the onboard voltage regulators. ASUS Terminator K7 Barebone System 105 VCORE Voltage, +3.3V Voltage, +...error message will then be prompted to "Press F1 to continue, DEL to enter SETUP". Set to detect the MB (motherboard) and CPU temperatures. NOTE: If any of the monitored items is out of the fans is automatically detected. 5.6.2 Hardware Monitor Power Supply Temperature ...
...You will appear: "Hardware Monitor found an error. CPU Fan Speed [xxxxRPM] / Chassis Fan Speed [xxxxRPM] The onboard hardware monitor is able to [Ignore] only if necessary. Set to detect the voltage output by the onboard voltage regulators. ASUS Terminator K7 Barebone System 105 VCORE Voltage, +3.3V Voltage, +...error message will then be prompted to "Press F1 to continue, DEL to enter SETUP". Set to detect the MB (motherboard) and CPU temperatures. NOTE: If any of the monitored items is out of the fans is automatically detected. 5.6.2 Hardware Monitor Power Supply Temperature ...


