User Manual
Page 1
TW100-E5 Workstation User's Manual
TW100-E5 Workstation User's Manual
User Manual
Page 9
...front panel and rear panel specifications. 2. ix Chapter 1: Product Introduction This chapter describes the general features of configuring a workstation. Chapter 2: Hardware setup This chapter lists the hardware setup procedures that comes with at least basic knowledge of the... sections on how to perform when installing or removing system components. 3. This chapter also describes the software applications that the barebone workstation supports. 7. Chapter 5: RAID configuration This chapter provides information on how to change system settings through the BIOS Setup menus and...
...front panel and rear panel specifications. 2. ix Chapter 1: Product Introduction This chapter describes the general features of configuring a workstation. Chapter 2: Hardware setup This chapter lists the hardware setup procedures that comes with at least basic knowledge of the... sections on how to perform when installing or removing system components. 3. This chapter also describes the software applications that the barebone workstation supports. 7. Chapter 5: RAID configuration This chapter provides information on how to change system settings through the BIOS Setup menus and...
User Manual
Page 11
ASUS TW100-E5 1- Product introduction Chapter 1 This chapter describes the general features of the workstation, including sections on front panel and rear panel specifications.
ASUS TW100-E5 1- Product introduction Chapter 1 This chapter describes the general features of the workstation, including sections on front panel and rear panel specifications.
User Manual
Page 12
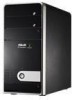
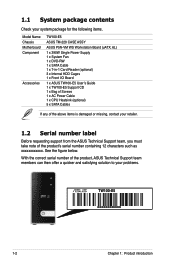
... for the following items. Model Name Chassis Motherboard Component Accessories TW100-E5 ASUS TM-220 CASE ASSY ASUS P5N-VM WS Workstation Board (uATX, 6L) 1 x 390W Single Power Supply 1 x System Fan 1 x DVD-RW 1 x SATA Cable 1 x 7-in-1 Card Reader (optional) 3 x Internal HDD Cages 1 x Front I/O Board 1 x ASUS TW100-E5 User's Guide 1 x TW100-E5 Support CD 1 x Bag of Screws 1 x AC Power Cable 1 x CPU...
... for the following items. Model Name Chassis Motherboard Component Accessories TW100-E5 ASUS TM-220 CASE ASSY ASUS P5N-VM WS Workstation Board (uATX, 6L) 1 x 390W Single Power Supply 1 x System Fan 1 x DVD-RW 1 x SATA Cable 1 x 7-in-1 Card Reader (optional) 3 x Internal HDD Cages 1 x Front I/O Board 1 x ASUS TW100-E5 User's Guide 1 x TW100-E5 Support CD 1 x Bag of Screws 1 x AC Power Cable 1 x CPU...
User Manual
Page 13
... Hardware RAID 0, 1, 10 and 5) 3 x Internal SATA HDD Cages Networking LAN 2 x Realtek® RTL8111C Gigabit LAN controllers - Model Name Processor / System Bus supported TW100-E5 1 x Socket LGA775 Quad-Core Intel® Core™ 2 QX9000/Q9000 series (45nm) Dual-Core Intel® Core™ 2 Duo E8000/E7000 series (45nm) Quad...-E 4-port SAS Add-on Card (Support LSI® Integrated RAID 0, 1, and 1E) Option 2: SASsaby M PCI-E 4-port SAS Add-on the next page) ASUS TW100-E5 1-3 1.3 System specifications The ASUS TW100-E5 is a workstation featuring the ASUS P5N-VM WS motherboard.
... Hardware RAID 0, 1, 10 and 5) 3 x Internal SATA HDD Cages Networking LAN 2 x Realtek® RTL8111C Gigabit LAN controllers - Model Name Processor / System Bus supported TW100-E5 1 x Socket LGA775 Quad-Core Intel® Core™ 2 QX9000/Q9000 series (45nm) Dual-Core Intel® Core™ 2 Duo E8000/E7000 series (45nm) Quad...-E 4-port SAS Add-on Card (Support LSI® Integrated RAID 0, 1, and 1E) Option 2: SASsaby M PCI-E 4-port SAS Add-on the next page) ASUS TW100-E5 1-3 1.3 System specifications The ASUS TW100-E5 is a workstation featuring the ASUS P5N-VM WS motherboard.
User Manual
Page 15
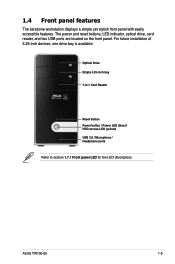
The power and reset buttons, LED indicator, optical drive, card reader, and two USB ports are located on the front panel. For future installation of 5.25-inch devices, one drive bay is available. ASUS TW100-E5 1-5 Optical Drive Empty 5.25-inch bay 7-in-1 Card Reader Reset button Power button / Power LED (blue) / HDD access LED (yellow) USB 2.0 / Microphone / Headphone ports Refer to section 1.7.1 Front panel LED for the LED descriptions. 1.4 Front panel features The barebone workstation displays a simple yet stylish front panel with easily accessible features.
The power and reset buttons, LED indicator, optical drive, card reader, and two USB ports are located on the front panel. For future installation of 5.25-inch devices, one drive bay is available. ASUS TW100-E5 1-5 Optical Drive Empty 5.25-inch bay 7-in-1 Card Reader Reset button Power button / Power LED (blue) / HDD access LED (yellow) USB 2.0 / Microphone / Headphone ports Refer to section 1.7.1 Front panel LED for the LED descriptions. 1.4 Front panel features The barebone workstation displays a simple yet stylish front panel with easily accessible features.

User Manual
Page 17
Optical drive 6. 5.25-inch drive bay 7. 7-in-1 Card Reader (hidden) 8. CPU Heatsink 5. Internal HDD bays ASUS TW100-E5 1-7 ASUS P5N-VM WS motherboard 4. Power supply unit 2. 92mm system fan 3. Front I/O board (hidden) 9. 1.6 Internal features The barebone workstation includes the basic components as shown. 1 4 2 3 5 6 7 9 8 1.
Optical drive 6. 5.25-inch drive bay 7. 7-in-1 Card Reader (hidden) 8. CPU Heatsink 5. Internal HDD bays ASUS TW100-E5 1-7 ASUS P5N-VM WS motherboard 4. Power supply unit 2. 92mm system fan 3. Front I/O board (hidden) 9. 1.6 Internal features The barebone workstation includes the basic components as shown. 1 4 2 3 5 6 7 9 8 1.
User Manual
Page 31
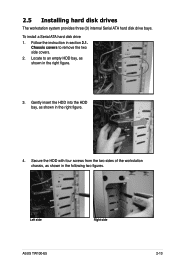
Chassis covers to an empty HDD bay, as shown in the following two figures. Gently insert the HDD into the HDD bay, as shown in the right figure. 3. 2.5 Installing hard disk drives The workstation system provides three (3) internal Serial ATA hard disk drive bays. To install a Serial ATA hard disk drive 1. Secure the HDD with four screws from the two sides of the workstation chassis, as shown in section 2.1. Left side Right side ASUS TW100-E5 2-13 Locate to remove the two side covers. 2. Follow the instruction in the right figure. 4.
Chassis covers to an empty HDD bay, as shown in the following two figures. Gently insert the HDD into the HDD bay, as shown in the right figure. 3. 2.5 Installing hard disk drives The workstation system provides three (3) internal Serial ATA hard disk drive bays. To install a Serial ATA hard disk drive 1. Secure the HDD with four screws from the two sides of the workstation chassis, as shown in section 2.1. Left side Right side ASUS TW100-E5 2-13 Locate to remove the two side covers. 2. Follow the instruction in the right figure. 4.
User Manual
Page 35
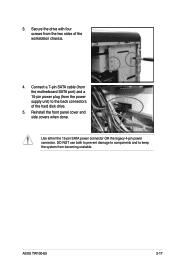
DO NOT use both to prevent damage to components and to the back connectors of the workstation chassis. 4. Reinstall the front panel cover and side covers when done. Secure the drive with four screws from becoming unstable. Connect a 7-pin SATA cable (from the motherboard SATA port) and a 15-pin power plug (from the power supply unit) to keep the system from the two sides of the hard disk drive. 5. Use either the 15-pin SATA power connector OR the legacy 4-pin power connector. ASUS TW100-E5 2-17 3.
DO NOT use both to prevent damage to components and to the back connectors of the workstation chassis. 4. Reinstall the front panel cover and side covers when done. Secure the drive with four screws from becoming unstable. Connect a 7-pin SATA cable (from the motherboard SATA port) and a 15-pin power plug (from the power supply unit) to keep the system from the two sides of the hard disk drive. 5. Use either the 15-pin SATA power connector OR the legacy 4-pin power connector. ASUS TW100-E5 2-17 3.

User Manual
Page 41
This chapter includes the motherboard layout, jumper settings, and connector locations. Motherboard info Chapter 3 This chapter gives information about the motherboard that comes with the workstation. ASUS TW100-E5 3-
This chapter includes the motherboard layout, jumper settings, and connector locations. Motherboard info Chapter 3 This chapter gives information about the motherboard that comes with the workstation. ASUS TW100-E5 3-

User Manual
Page 99
ASUS TW100-E5 3- Driver installation Chapter 6 This chapter provides information on how to install the drivers for system components. This chapter also describes the software applications that the barebone workstation supports.
ASUS TW100-E5 3- Driver installation Chapter 6 This chapter provides information on how to install the drivers for system components. This chapter also describes the software applications that the barebone workstation supports.
User Manual
Page 135
ASUS TW100-E5 3- Reference information Appendix This section provides a troubleshooting guide for solving common problems when using the barebone workstation.
ASUS TW100-E5 3- Reference information Appendix This section provides a troubleshooting guide for solving common problems when using the barebone workstation.
User Manual
Page 136
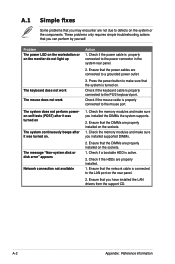
... to a grounded power outlet. 3. Ensure that you may encounter are not due to make sure you installed supported DIMMs. 2. Problem The power LED on the workstation or on the monitor do not light up The keyboard does not work The mouse does not work The system does not perform poweron self...
... to a grounded power outlet. 3. Ensure that you may encounter are not due to make sure you installed supported DIMMs. 2. Problem The power LED on the workstation or on the monitor do not light up The keyboard does not work The mouse does not work The system does not perform poweron self...