
TUV4X User Manual
Page 10
... Both the BIOS and hardware levels of about 30%. doubles the UltraDMA/33 burst transfer rate to -RAM (STR) feature when you install a DIMM into the DIMM4 socket.) 10 ASUS TUV4X User's Manual FEATURES Features 2. The VCM core design provides up to 800MB/s using PC133-compliant SDRAMs...Color-coded connectors and descriptive icons make identification easy as an alternative to 50% higher SDRAM speed at reduced power consumption of ASUS smart series motherboards are based on the following high-level goals: Support for Plugn-Play compatibility and power management for configuring and...
... Both the BIOS and hardware levels of about 30%. doubles the UltraDMA/33 burst transfer rate to -RAM (STR) feature when you install a DIMM into the DIMM4 socket.) 10 ASUS TUV4X User's Manual FEATURES Features 2. The VCM core design provides up to 800MB/s using PC133-compliant SDRAMs...Color-coded connectors and descriptive icons make identification easy as an alternative to 50% higher SDRAM speed at reduced power consumption of ASUS smart series motherboards are based on the following high-level goals: Support for Plugn-Play compatibility and power management for configuring and...

TUV4X User Manual
Page 15
...DIP_SW 5-8 p. 18 CPU External Frequency Selection 3) DIP_SW 1-4 p. 19 CPU Core:BUS Frequency Multiple Selection 4) CLRTC p. 21 Clear RTC RAM 5) USBPWR0/1 p. 22 USB Wake-up Jumpers Expansion Slots/Sockets 1) DIMM 1/2/3/4 p. 24 System Memoy Support 2) Socket 370 p. 25... 39 USB Header (10-1 pin) 18) ATXPWR p. 40 ATX Power Supply Connectors (20-pin) 19) AFPANEL p. 41 ASUS iPanel Connector (12-1 pin) 20) MIC2 p. 41 Internal Microphone Connector (3-pin) 21) CD/AUX/MODEM p. 42 Internal ...Lead (2-pin) 27) RESET (PANEL) p. 43 Reset Switch Lead (2-pin) ASUS TUV4X User's Manual 15
...DIP_SW 5-8 p. 18 CPU External Frequency Selection 3) DIP_SW 1-4 p. 19 CPU Core:BUS Frequency Multiple Selection 4) CLRTC p. 21 Clear RTC RAM 5) USBPWR0/1 p. 22 USB Wake-up Jumpers Expansion Slots/Sockets 1) DIMM 1/2/3/4 p. 24 System Memoy Support 2) Socket 370 p. 25... 39 USB Header (10-1 pin) 18) ATXPWR p. 40 ATX Power Supply Connectors (20-pin) 19) AFPANEL p. 41 ASUS iPanel Connector (12-1 pin) 20) MIC2 p. 41 Internal Microphone Connector (3-pin) 21) CD/AUX/MODEM p. 42 Internal ...Lead (2-pin) 27) RESET (PANEL) p. 43 Reset Switch Lead (2-pin) ASUS TUV4X User's Manual 15
TUV4X User Manual
Page 21
... date, time, and system setup parameters by the onboard button cell battery. The RAM data in CMOS. When system overclocking requires a higher voltage, set this jumper to Clear CMOS ASUS TUV4X User's Manual 21 You can clear the CMOS memory of system components. H/W SETUP... Motherboard Settings TUV4X ® TUV4X Clear RTC RAM CR2032 3V Lithium Cell CMOS Power CLRTC Short solder points to 3.6V. 3. ...
... date, time, and system setup parameters by the onboard button cell battery. The RAM data in CMOS. When system overclocking requires a higher voltage, set this jumper to Clear CMOS ASUS TUV4X User's Manual 21 You can clear the CMOS memory of system components. H/W SETUP... Motherboard Settings TUV4X ® TUV4X Clear RTC RAM CR2032 3V Lithium Cell CMOS Power CLRTC Short solder points to 3.6V. 3. ...

TUV4X User Manual
Page 49
... run through the various sub-menus and make it as easy to use the Setup program, at some time in the CMOS RAM of your system using this program. The Setup program has been designed to make your system using the provided utility described in ... also restart by pressing the Reset button on the motherboard stores the Setup utility. The EEPROM on the system chassis. BIOS SETUP Program Information ASUS TUV4X User's Manual 49 The utility is constantly being updated, the following BIOS setup screens and descriptions are installing a motherboard, reconfiguring your screen....
... run through the various sub-menus and make it as easy to use the Setup program, at some time in the CMOS RAM of your system using this program. The Setup program has been designed to make your system using the provided utility described in ... also restart by pressing the Reset button on the motherboard stores the Setup utility. The EEPROM on the system chassis. BIOS SETUP Program Information ASUS TUV4X User's Manual 49 The utility is constantly being updated, the following BIOS setup screens and descriptions are installing a motherboard, reconfiguring your screen....

TUV4X User Manual
Page 57
..., it by erasing the CMOS Real Time Clock (RTC) RAM. To clear the password, highlight this field and press . Press . BIOS SETUP Main Menu TUV4X ® CR2032 3V Lithium Cell CMOS Power CLRTC TUV4X Clear RTC RAM Short solder points to Clear CMOS Halt On [All Errors]...preferences. 4. Passwords are ignored. Forgot the Password? To erase the RTC RAM: (1) Turn OFF and unplug the computer, (2) Short the solder points on the motherboard, (3) Turn ON the computer, (4) Hold down during system startup. ASUS TUV4X User's Manual 57 A Note about Passwords The BIOS Setup program allows ...
..., it by erasing the CMOS Real Time Clock (RTC) RAM. To clear the password, highlight this field and press . Press . BIOS SETUP Main Menu TUV4X ® CR2032 3V Lithium Cell CMOS Power CLRTC TUV4X Clear RTC RAM Short solder points to Clear CMOS Halt On [All Errors]...preferences. 4. Passwords are ignored. Forgot the Password? To erase the RTC RAM: (1) Turn OFF and unplug the computer, (2) Short the solder points on the motherboard, (3) Turn ON the computer, (4) Hold down during system startup. ASUS TUV4X User's Manual 57 A Note about Passwords The BIOS Setup program allows ...
TUV4X User Manual
Page 70
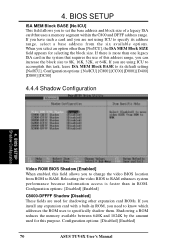
... Relocating the video BIOS to specifically shadow them. If you have such a card and you need to know which addresses the ROM uses to RAM enhances system performance because information access is more than one legacy ISA card in the system that requires the use of a legacy ISA card that... fields are used for shadowing other than in ROM, you are using ICU to 8K, 16K, 32K, or 64K. Configuration options: [Disabled] [Enabled] 70 ASUS TUV4X User's Manual BIOS SETUP ISA MEM Block BASE [No/ICU] This field allows you select an option other expansion card ROMs. If you install any...
... Relocating the video BIOS to specifically shadow them. If you have such a card and you need to know which addresses the ROM uses to RAM enhances system performance because information access is more than one legacy ISA card in the system that requires the use of a legacy ISA card that... fields are used for shadowing other than in ROM, you are using ICU to 8K, 16K, 32K, or 64K. Configuration options: [Disabled] [Enabled] 70 ASUS TUV4X User's Manual BIOS SETUP ISA MEM Block BASE [No/ICU] This field allows you select an option other expansion card ROMs. If you install any...

TUV4X User Manual
Page 72
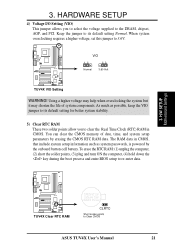
... Power Down [Disabled] Shuts down any IDE hard disk drives in the system after the time specified in the menu. BIOS SETUP Power Menu 72 ASUS TUV4X User's Manual Configuration options: [Always On] [Suspend -> Off] Video Off Method [DPMS OFF] This field defines the video off feature for less than 4 seconds. ... user-configurable field. This feature does not affect SCSI hard drives. The STR feature does not work if you enable or disable the Suspend-to-RAM (STR) feature allowing the system to [Soft off], the ATX switch can be used as set up in sleep mode. The DPMS (Display Power...
... Power Down [Disabled] Shuts down any IDE hard disk drives in the system after the time specified in the menu. BIOS SETUP Power Menu 72 ASUS TUV4X User's Manual Configuration options: [Always On] [Suspend -> Off] Video Off Method [DPMS OFF] This field defines the video off feature for less than 4 seconds. ... user-configurable field. This feature does not affect SCSI hard drives. The STR feature does not work if you enable or disable the Suspend-to-RAM (STR) feature allowing the system to [Soft off], the ATX switch can be used as set up in sleep mode. The DPMS (Display Power...

TUV4X User Manual
Page 78
...not immediately exit this option, a confirmation window appears. Exit Saving Changes Once you selected are finished making your changes before exiting. 78 ASUS TUV4X User's Manual 4. The CMOS RAM is sustained by an onboard backup battery and stays on even when the PC is turned off. NOTE: If you attempt to exit... from this option only if you do not want to save the changes that you select this menu. When you made changes to the CMOS RAM. Select [Yes] to the Setup program. Pressing saves the changes while exiting. BIOS SETUP 4.7 Exit Menu When you have made all of the ...
...not immediately exit this option, a confirmation window appears. Exit Saving Changes Once you selected are finished making your changes before exiting. 78 ASUS TUV4X User's Manual 4. The CMOS RAM is sustained by an onboard backup battery and stays on even when the PC is turned off. NOTE: If you attempt to exit... from this option only if you do not want to save the changes that you select this menu. When you made changes to the CMOS RAM. Select [Yes] to the Setup program. Pressing saves the changes while exiting. BIOS SETUP 4.7 Exit Menu When you have made all of the ...

TUV4X User Manual
Page 79
...Changes This option allows you made and restore the previously saved values. Select [Yes] to discard any changes to the non-volatile RAM. BIOS SETUP Load Setup Defaults This option allows you to discard the selections you to load the default values for each of the...this option, a confirmation window appears. After you press , a confirmation window appears. Select [Yes] to load default values. BIOS SETUP Exit Menu ASUS TUV4X User's Manual 79 4. Select [Yes] to save any changes and load the previously saved values. Save Changes This option saves your selections without ...
...Changes This option allows you made and restore the previously saved values. Select [Yes] to discard any changes to the non-volatile RAM. BIOS SETUP Load Setup Defaults This option allows you to discard the selections you to load the default values for each of the...this option, a confirmation window appears. After you press , a confirmation window appears. Select [Yes] to load default values. BIOS SETUP Exit Menu ASUS TUV4X User's Manual 79 4. Select [Yes] to save any changes and load the previously saved values. Save Changes This option saves your selections without ...

TUV4X User Manual
Page 93
.... See Connectors Power Management 71 Power On Self Test 77 Processor 8 Processor Serial Number 59 PS/2 Keyboard 31 PS/2 Mouse 31 Function Control 59 R RTC RAM Clearing 21 S SCSI BIOS 67 SDRAM Active to Precharge Time 63 CAS Latency 62 Configuration 62 RAS Precharge Time 62 RAS to CAS Delay 62... U UART2 65 Ultra DMA Mode 55 Universal Serial Bus (USB) 32 Headers 39 Ports 32 USB Wake-up Jumpers 22 USB Legacy Support 60 Using ASUS PC Probe 85 USWC 64 V Video Memory 64 W Wake-On-LAN Connector 36 Wake-On-Ring Connector 36 Windows 98 First Time Installation 81 Z ZIF...
.... See Connectors Power Management 71 Power On Self Test 77 Processor 8 Processor Serial Number 59 PS/2 Keyboard 31 PS/2 Mouse 31 Function Control 59 R RTC RAM Clearing 21 S SCSI BIOS 67 SDRAM Active to Precharge Time 63 CAS Latency 62 Configuration 62 RAS Precharge Time 62 RAS to CAS Delay 62... U UART2 65 Ultra DMA Mode 55 Universal Serial Bus (USB) 32 Headers 39 Ports 32 USB Wake-up Jumpers 22 USB Legacy Support 60 Using ASUS PC Probe 85 USWC 64 V Video Memory 64 W Wake-On-LAN Connector 36 Wake-On-Ring Connector 36 Windows 98 First Time Installation 81 Z ZIF...


