
User Guide
Page 20
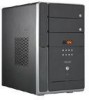
... The LED panel displays the system time in 24-hour format when the system is in soft-off or stand-by mode, S3 (Suspend-to-RAM), or S4 (Suspend-to-Disk) state. Audio DJ mode The LED panel displays various information when the system is in Audio DJ mode. Enter the...
... The LED panel displays the system time in 24-hour format when the system is in soft-off or stand-by mode, S3 (Suspend-to-RAM), or S4 (Suspend-to-Disk) state. Audio DJ mode The LED panel displays various information when the system is in Audio DJ mode. Enter the...
User Guide
Page 61
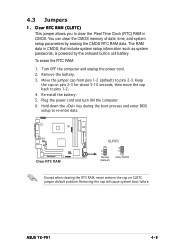
...CMOS, that include system setup information such as system passwords, is powered by erasing the CMOS RTC RAM data. Removing the cap will cause system boot failure. ASUS T2-PH1 4-3 Clear RTC RAM (CLRTC) This jumper allows you to pins 2-3. Hold down the key during the boot process and... enter BIOS setup to re-enter data. ® Clear RTC RAM CLRTC 2 1 Normal (Default) 3 2 Clear CMOS Except when clearing the RTC RAM, never remove ...
...CMOS, that include system setup information such as system passwords, is powered by erasing the CMOS RTC RAM data. Removing the cap will cause system boot failure. ASUS T2-PH1 4-3 Clear RTC RAM (CLRTC) This jumper allows you to pins 2-3. Hold down the key during the boot process and... enter BIOS setup to re-enter data. ® Clear RTC RAM CLRTC 2 1 Normal (Default) 3 2 Clear CMOS Except when clearing the RTC RAM, never remove ...
User Guide
Page 83
... the configuration of the firmware hub. Select the L o a d D e f a u l t S e t t i n g s item under the Exit Menu. ASUS T2-PH1 5-11 The firmware hub on your screen. • Visit the ASUS website (www.asus.com) to download the latest BIOS file for this motherboard apply for most conditions to make it lets you... scroll through the various sub-menus and make your computer in the CMOS RAM of your selections from the available...
... the configuration of the firmware hub. Select the L o a d D e f a u l t S e t t i n g s item under the Exit Menu. ASUS T2-PH1 5-11 The firmware hub on your screen. • Visit the ASUS website (www.asus.com) to download the latest BIOS file for this motherboard apply for most conditions to make it lets you... scroll through the various sub-menus and make your computer in the CMOS RAM of your selections from the available...
User Guide
Page 108
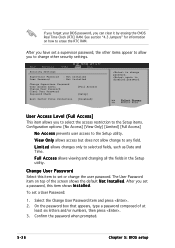
..., the other security settings. F u l l A c c e s s allows viewing and changing all the fields in the Setup utility. The User Password item on how to erase the RTC RAM. User Access Level (Full Access] This item allows you can clear it by erasing the CMOS Real Time Clock (RTC...) RAM. Select the Change User Password item and press . 2. If you forget your BIOS password, you to select the access restriction to the Setup items. Configuration ...
..., the other security settings. F u l l A c c e s s allows viewing and changing all the fields in the Setup utility. The User Password item on how to erase the RTC RAM. User Access Level (Full Access] This item allows you can clear it by erasing the CMOS Real Time Clock (RTC...) RAM. Select the Change User Password item and press . 2. If you forget your BIOS password, you to select the access restriction to the Setup items. Configuration ...

User Guide
Page 110
... this option or if you press , a confirmation window appears. Exit & Discard Changes Select this option only if you do not want to the non-volatile RAM. 5-38 Chapter 5: BIOS setup Load Setup Defaults This option allows you to save your changes before exiting. Select E x i t & S a v e C h a n g e... you made and restore the previously saved values. When you select this option, a confirmation window appears. Select Y e s to the CMOS RAM. Discard Changes This option allows you to discard the selections you made to save the changes while exiting. Exit & Save Changes Once you are...
... this option or if you press , a confirmation window appears. Exit & Discard Changes Select this option only if you do not want to the non-volatile RAM. 5-38 Chapter 5: BIOS setup Load Setup Defaults This option allows you to save your changes before exiting. Select E x i t & S a v e C h a n g e... you made and restore the previously saved values. When you select this option, a confirmation window appears. Select Y e s to the CMOS RAM. Discard Changes This option allows you to discard the selections you made to save the changes while exiting. Exit & Save Changes Once you are...


