User Guide
Page 4
Table of contents Chapter 3: Starting up 3.1 Installing an operating system 3-2 3.2 Powering up 3-2 3.3 Support CD information 3-2 3.3.1 Running the support CD 3-3 3.3.2 Drivers menu 3-3 3.3.3 Utilities menu 3-4 3.3.4 ASUS contact information 3-6 3.3.5 Other information 3-6 3.4 Software information 3-7 3.4.1 ASUS Radio Player 3-7 3.4.2 ASUS Instant Music 3-9 3.5 Audio DJ 3-11 3.5.1 Playing an audio CD/DVD 3-11 3.5.2 Tuning into an FM radio station 3-11 3.5.3 Presetting a station 3-12...
Table of contents Chapter 3: Starting up 3.1 Installing an operating system 3-2 3.2 Powering up 3-2 3.3 Support CD information 3-2 3.3.1 Running the support CD 3-3 3.3.2 Drivers menu 3-3 3.3.3 Utilities menu 3-4 3.3.4 ASUS contact information 3-6 3.3.5 Other information 3-6 3.4 Software information 3-7 3.4.1 ASUS Radio Player 3-7 3.4.2 ASUS Instant Music 3-9 3.5 Audio DJ 3-11 3.5.1 Playing an audio CD/DVD 3-11 3.5.2 Tuning into an FM radio station 3-11 3.5.3 Presetting a station 3-12...
User Guide
Page 8
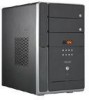
... that comes with hardware knowledge of the ASUS T2-PH1. The chapter lists the system features, including introduction on how to change system settings through the BIOS Setup menus and describes the BIOS parameters. 6. Chapter 3: Starting up This chapter helps you power up the system and install drivers and utilities from the support CD...
... that comes with hardware knowledge of the ASUS T2-PH1. The chapter lists the system features, including introduction on how to change system settings through the BIOS Setup menus and describes the BIOS parameters. 6. Chapter 3: Starting up This chapter helps you power up the system and install drivers and utilities from the support CD...
User Guide
Page 22
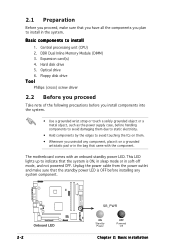
... power LED is ON, in sleep mode or in soft-off mode, and not powered OFF. Optical drive 6. Floppy disk drive Tool Phillips (cross) screw driver 2.2 Before you proceed Take note of the following precautions before you install components into the system. • Use a grounded wrist strap or touch a safely grounded...
... power LED is ON, in sleep mode or in soft-off mode, and not powered OFF. Optical drive 6. Floppy disk drive Tool Phillips (cross) screw driver 2.2 Before you proceed Take note of the following precautions before you install components into the system. • Use a grounded wrist strap or touch a safely grounded...
User Guide
Page 23
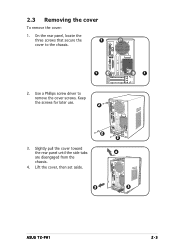
Keep the screws for later use. 2 3. Lift the cover, then set aside. 2 2 4 3 3 ASUS T2-PH1 2-3 2.3 Removing the cover To remove the cover: 1. Slightly pull the cover toward the rear panel until the side tabs are disengaged from the chassis. 4. On the rear panel, locate the three screws that secure the 1 cover to remove the cover screws. Use a Phillips screw driver to the chassis. 1 1 2.
Keep the screws for later use. 2 3. Lift the cover, then set aside. 2 2 4 3 3 ASUS T2-PH1 2-3 2.3 Removing the cover To remove the cover: 1. Slightly pull the cover toward the rear panel until the side tabs are disengaged from the chassis. 4. On the rear panel, locate the three screws that secure the 1 cover to remove the cover screws. Use a Phillips screw driver to the chassis. 1 1 2.
User Guide
Page 35
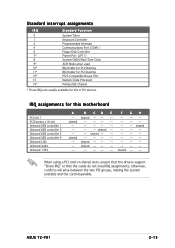
shared -- -- F shared GH shared When using a PCI card on shared slots, ensure that the drivers support "Share IRQ" or that the cards do not need IRQ assignments; shared -- -- -- shared -- -- -- -- -- shared -- -- -- shared -- -- -- -- ASUS T2-PH1 2-15 Standard interrupt assignments IRQ Standard Function 0 System Timer 1 Keyboard Controller 2 Programmable Interrupt 4 Communications Port (COM1) 6 Floppy Disk Controller 7* Printer Port...
shared -- -- F shared GH shared When using a PCI card on shared slots, ensure that the drivers support "Share IRQ" or that the cards do not need IRQ assignments; shared -- -- -- shared -- -- -- -- -- shared -- -- -- shared -- -- -- -- ASUS T2-PH1 2-15 Standard interrupt assignments IRQ Standard Function 0 System Timer 1 Keyboard Controller 2 Programmable Interrupt 4 Communications Port (COM1) 6 Floppy Disk Controller 7* Printer Port...
User Guide
Page 40
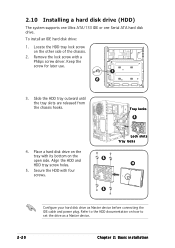
... the drive as Master device before connecting the IDE cable and power plug. Locate the HDD tray lock screw on the tray with a Philips screw driver. Tray locks 3 4. Place a hard disk drive on the other side of the chassis. 2. Align the HDD and HDD tray screw holes. 5. Secure the HDD with...
... the drive as Master device before connecting the IDE cable and power plug. Locate the HDD tray lock screw on the tray with a Philips screw driver. Tray locks 3 4. Place a hard disk drive on the other side of the chassis. 2. Align the HDD and HDD tray screw holes. 5. Secure the HDD with...

User Guide
Page 47
Chapter 3 This chapter helps you power up MODE ASUS T2-PH1 Starting up the system and install drivers and utilities from the support CD.
Chapter 3 This chapter helps you power up MODE ASUS T2-PH1 Starting up the system and install drivers and utilities from the support CD.
User Guide
Page 48
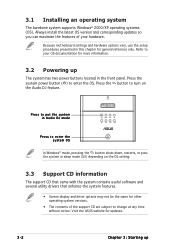
...setting. 3.3 Support CD information The support CD that came with the system contains useful software and several utility drivers that enhance the system features. • Screen display and driver options may not be the same for other operating system versions. • The contents of the support CD... are subject to your hardware. Visit the ASUS website for updates. 3-2 Chapter 3: Starting up The system has two power buttons ...
...setting. 3.3 Support CD information The support CD that came with the system contains useful software and several utility drivers that enhance the system features. • Screen display and driver options may not be the same for other operating system versions. • The contents of the support CD... are subject to your hardware. Visit the ASUS website for updates. 3-2 Chapter 3: Starting up The system has two power buttons ...
User Guide
Page 49
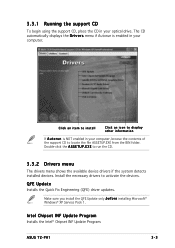
3.3.1 Running the support CD To begin using the support CD, place the CD in your optical drive. ASUS T2-PH1 3-3 QFE Update Installs the Quick Fix Engineering (QFE) driver updates. Make sure you install the QFE Update only b e f o r e installing Microsoft® Windows® XP Service Pack 1. Double-click the A S S E T U P . E X E... item to install Click an icon to locate the file ASSETUP.EXE from the BIN folder. Install the necessary drivers to run the CD. 3.3.2 Drivers menu The drivers menu shows the available device drivers if the system detects installed devices.
3.3.1 Running the support CD To begin using the support CD, place the CD in your optical drive. ASUS T2-PH1 3-3 QFE Update Installs the Quick Fix Engineering (QFE) driver updates. Make sure you install the QFE Update only b e f o r e installing Microsoft® Windows® XP Service Pack 1. Double-click the A S S E T U P . E X E... item to install Click an icon to locate the file ASSETUP.EXE from the BIN folder. Install the necessary drivers to run the CD. 3.3.2 Drivers menu The drivers menu shows the available device drivers if the system detects installed devices.
User Guide
Page 50
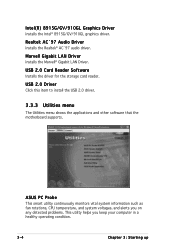
... menu The Utilities menu shows the applications and other software that the motherboard supports. Marvell Gigabit LAN Driver Installs the Marvell® Gigabit LAN Driver. USB 2.0 Card Reader Software Installs the driver for the storage card reader. ASUS PC Probe This smart utility continuously monitors vital system information such as fan rotations, CPU temperature...
... menu The Utilities menu shows the applications and other software that the motherboard supports. Marvell Gigabit LAN Driver Installs the Marvell® Gigabit LAN Driver. USB 2.0 Card Reader Software Installs the driver for the storage card reader. ASUS PC Probe This smart utility continuously monitors vital system information such as fan rotations, CPU temperature...
User Guide
Page 51
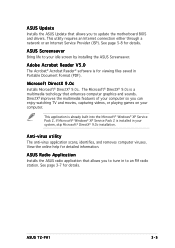
... on your idle screen by installing the ASUS Screensaver. Anti-virus utility The anti-virus application scans, identifies, and removes computer viruses. ASUS Screensaver Bring life to your computer. If...9.0c. See page 3-7 for viewing files saved in Portable Document Format (PDF). ASUS T2-PH1 3-5 Adobe Acrobat Reader V5.0 The Acrobat® Acrobat Reader® software is installed in your ...® 9.0c installation. ASUS Update Installs the ASUS Update that allows you to tune in to an FM radio station. ASUS Radio Application Installs the ASUS radio application that allows you...
... on your idle screen by installing the ASUS Screensaver. Anti-virus utility The anti-virus application scans, identifies, and removes computer viruses. ASUS Screensaver Bring life to your computer. If...9.0c. See page 3-7 for viewing files saved in Portable Document Format (PDF). ASUS T2-PH1 3-5 Adobe Acrobat Reader V5.0 The Acrobat® Acrobat Reader® software is installed in your ...® 9.0c installation. ASUS Update Installs the ASUS Update that allows you to tune in to an FM radio station. ASUS Radio Application Installs the ASUS radio application that allows you...
User Guide
Page 93
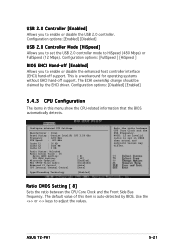
... BIOS. Configuration options: [Disabled] [Enabled] 5.4.3 CPU Configuration The items in CMOS then actual and setpoint values may differ. This is auto-detected by the EHCI driver. ASUS T2-PH1 5-21 NOTE: If an invalid ratio is set the USB 2.0 controller mode to adjust the values. Configuration options: [Enabled] [Disabled] USB 2.0 Controller Mode [HiSpeed] Allows...
... BIOS. Configuration options: [Disabled] [Enabled] 5.4.3 CPU Configuration The items in CMOS then actual and setpoint values may differ. This is auto-detected by the EHCI driver. ASUS T2-PH1 5-21 NOTE: If an invalid ratio is set the USB 2.0 controller mode to adjust the values. Configuration options: [Enabled] [Disabled] USB 2.0 Controller Mode [HiSpeed] Allows...


