T2-PE1 English User Manual E2151
Page 4
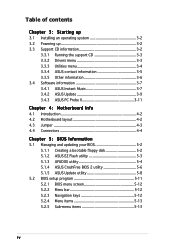
Table of contents Chapter 3: Starting up 3.1 Installing an operating system 3-2 3.2 Powering up 3-2 3.3 Support CD information 3-2 3.3.1 Running the support CD 3-3 3.3.2 Drivers menu 3-3 3.3.3 Utilities menu 3-4 3.3.4 ASUS contact information 3-5 3.3.5 Other information 3-6 3.4 Software information 3-7 3.4.1 ASUS Instant Music 3-7 3.4.2 ASUS Update 3-9 3.4.3 ASUS PC Probe II 3-11 Chapter 4: Motherboard Info 4.1 Introduction 4-2 4.2 Motherboard layout 4-2 4.3 Jumper 4-3 4.4 Connectors 4-4 Chapter 5: BIOS Information 5.1 Managing and updating your BIOS...
Table of contents Chapter 3: Starting up 3.1 Installing an operating system 3-2 3.2 Powering up 3-2 3.3 Support CD information 3-2 3.3.1 Running the support CD 3-3 3.3.2 Drivers menu 3-3 3.3.3 Utilities menu 3-4 3.3.4 ASUS contact information 3-5 3.3.5 Other information 3-6 3.4 Software information 3-7 3.4.1 ASUS Instant Music 3-7 3.4.2 ASUS Update 3-9 3.4.3 ASUS PC Probe II 3-11 Chapter 4: Motherboard Info 4.1 Introduction 4-2 4.2 Motherboard layout 4-2 4.3 Jumper 4-3 4.4 Connectors 4-4 Chapter 5: BIOS Information 5.1 Managing and updating your BIOS...
T2-PE1 English User Manual E2151
Page 8
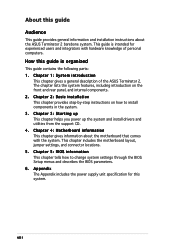
...experienced users and integrators with the system. viii Chapter 3: Starting up This chapter helps you power up the system and install drivers and utilities from the support CD. 4 . Chapter 1: System introduction This chapter gives a general description of personal computers. ...BIOS Setup menus and describes the BIOS parameters. 6. About this system. Chapter 4: Motherboard information This chapter gives information about the ASUS Terminator 2 barebone system. This chapter includes the motherboard layout, jumper settings, and connector locations. 5. Chapter 2: Basic installation ...
...experienced users and integrators with the system. viii Chapter 3: Starting up This chapter helps you power up the system and install drivers and utilities from the support CD. 4 . Chapter 1: System introduction This chapter gives a general description of personal computers. ...BIOS Setup menus and describes the BIOS parameters. 6. About this system. Chapter 4: Motherboard information This chapter gives information about the ASUS Terminator 2 barebone system. This chapter includes the motherboard layout, jumper settings, and connector locations. 5. Chapter 2: Basic installation ...
T2-PE1 English User Manual E2151
Page 20
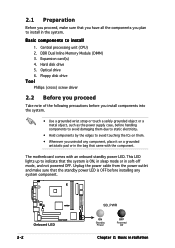
... with an onboard standby power LED. The motherboard comes with the component. DDR Dual Inline Memory Module (DIMM) 3. Floppy disk drive Tool Phillips (cross) screw driver 2.2 Before you proceed Take note of the following precautions before you install components into the system. • Use a grounded wrist strap or touch a safely grounded...
... with an onboard standby power LED. The motherboard comes with the component. DDR Dual Inline Memory Module (DIMM) 3. Floppy disk drive Tool Phillips (cross) screw driver 2.2 Before you proceed Take note of the following precautions before you install components into the system. • Use a grounded wrist strap or touch a safely grounded...
T2-PE1 English User Manual E2151
Page 21
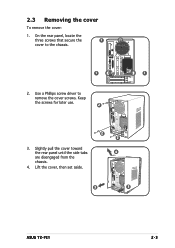
Use a Phillips screw driver to the chassis. 1 1 2. Slightly pull the cover toward the rear panel until the side tabs are disengaged from the chassis. 4. Keep the screws for later use. 2 3. Lift the cover, then set aside. 2 2 4 3 3 ASUS T2-PE1 2-3 On the rear panel, locate the three screws that secure the 1 cover to remove the cover screws. 2.3 Removing the cover To remove the cover: 1.
Use a Phillips screw driver to the chassis. 1 1 2. Slightly pull the cover toward the rear panel until the side tabs are disengaged from the chassis. 4. Keep the screws for later use. 2 3. Lift the cover, then set aside. 2 2 4 3 3 ASUS T2-PE1 2-3 On the rear panel, locate the three screws that secure the 1 cover to remove the cover screws. 2.3 Removing the cover To remove the cover: 1.
T2-PE1 English User Manual E2151
Page 33
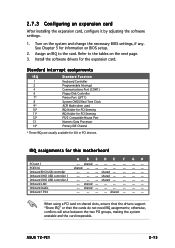
...-- -- When using a PCI card on the next page. 3. Assign an IRQ to the tables on shared slots, ensure that the drivers support "Share IRQ" or that the cards do not need IRQ assignments; IRQ assignments for information on the system and change the necessary ... the expansion card, configure it by adjusting the software settings. 1. Install the software drivers for ISA or PCI devices. Onboard OHCI USB controller 1 -- -- -- Onboard OHCI USB controller 2 -- -- -- Onboard LAN -- shared Onboard Audio -- shared Onboard 1394 -- -- -- -- ASUS T2-PE1 2-15
...-- -- When using a PCI card on the next page. 3. Assign an IRQ to the tables on shared slots, ensure that the drivers support "Share IRQ" or that the cards do not need IRQ assignments; IRQ assignments for information on the system and change the necessary ... the expansion card, configure it by adjusting the software settings. 1. Install the software drivers for ISA or PCI devices. Onboard OHCI USB controller 1 -- -- -- Onboard OHCI USB controller 2 -- -- -- Onboard LAN -- shared Onboard Audio -- shared Onboard 1394 -- -- -- -- ASUS T2-PE1 2-15
T2-PE1 English User Manual E2151
Page 38
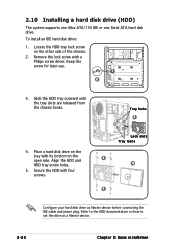
... IDE hard disk drive: 1. Slide the HDD tray outward until the tray slots are released from the chassis hooks. Secure the HDD with a Philips screw driver. Locate the HDD tray lock screw on the open side. Keep the screw for later use. 1 2 3. Align the HDD and HDD tray screw holes. 5. 2.10...
... IDE hard disk drive: 1. Slide the HDD tray outward until the tray slots are released from the chassis hooks. Secure the HDD with a Philips screw driver. Locate the HDD tray lock screw on the open side. Keep the screw for later use. 1 2 3. Align the HDD and HDD tray screw holes. 5. 2.10...

T2-PE1 English User Manual E2151
Page 45
ASUS T2-PE1 Starting up the system and install drivers and utilities from the support CD. Chapter 3 This chapter helps you power up
ASUS T2-PE1 Starting up the system and install drivers and utilities from the support CD. Chapter 3 This chapter helps you power up

T2-PE1 English User Manual E2151
Page 46
... enter the system OS 3.3 Support CD information The support CD that came with the system contains useful software and several utility drivers that enhance the system features. • Screen display and driver options may not be the same for general reference only. 3.1 Installing an operating system Terminator 2 supports Windows® 2000/XP... corresponding updates so you can maximize the features of the support CD are subject to your hardware. and 64-bit) operating systems (OS). Visit the ASUS website for more information. 3.2 Powering up
... enter the system OS 3.3 Support CD information The support CD that came with the system contains useful software and several utility drivers that enhance the system features. • Screen display and driver options may not be the same for general reference only. 3.1 Installing an operating system Terminator 2 supports Windows® 2000/XP... corresponding updates so you can maximize the features of the support CD are subject to your hardware. and 64-bit) operating systems (OS). Visit the ASUS website for more information. 3.2 Powering up
T2-PE1 English User Manual E2151
Page 47
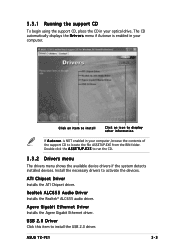
...Agere Gigabit Ethernet Driver Installs the Agere Gigabit Ethernet driver. Click an item to install Click an icon to run the CD. 3.3.2 Drivers menu The drivers menu shows the available device drivers if the ...system detects installed devices. The CD automatically displays the D r i v e r s menu if Autorun is NOT enabled in your computer. Realtek ALC655 Audio Driver Installs the Realtek® ALC655 audio driver. E X E to display other information If A u t o r u n is enabled in your optical drive. ASUS T2-PE1...
...Agere Gigabit Ethernet Driver Installs the Agere Gigabit Ethernet driver. Click an item to install Click an icon to run the CD. 3.3.2 Drivers menu The drivers menu shows the available device drivers if the ...system detects installed devices. The CD automatically displays the D r i v e r s menu if Autorun is NOT enabled in your computer. Realtek ALC655 Audio Driver Installs the Realtek® ALC655 audio driver. E X E to display other information If A u t o r u n is enabled in your optical drive. ASUS T2-PE1...
T2-PE1 English User Manual E2151
Page 48
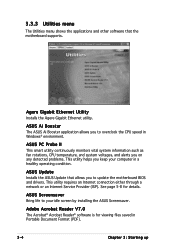
... helps you to overclock the CPU speed in Windows® environment. ASUS Screensaver Bring life to update the motherboard BIOS and drivers. ASUS Ai Booster The ASUS Ai Booster application allows you keep your idle screen by installing the ASUS Screensaver. ASUS Update Installs the ASUS Update that the motherboard supports. See page 5-8 for viewing files saved...
... helps you to overclock the CPU speed in Windows® environment. ASUS Screensaver Bring life to update the motherboard BIOS and drivers. ASUS Ai Booster The ASUS Ai Booster application allows you keep your idle screen by installing the ASUS Screensaver. ASUS Update Installs the ASUS Update that the motherboard supports. See page 5-8 for viewing files saved...
T2-PE1 English User Manual E2151
Page 49
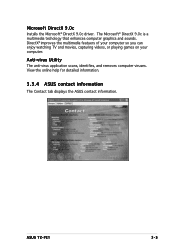
DirectX® improves the multimedia featuers of your computer so you can enjoy watching TV and movies, capturing videos, or playing games on your computer. Anti-virus Utility The anti-virus application scans, identifies, and removes computer viruses. ASUS T2-PE1 3-5 The Microsoft® DirectX 9.0c is a multimedia techology that enhances computer graphics and sounds. View the online help for detailed information. 3.3.4 ASUS contact information The Contact tab displays the ASUS contact information. Microsoft DirectX 9.0c Installs the Microsoft® DirectX 9.0c driver.
DirectX® improves the multimedia featuers of your computer so you can enjoy watching TV and movies, capturing videos, or playing games on your computer. Anti-virus Utility The anti-virus application scans, identifies, and removes computer viruses. ASUS T2-PE1 3-5 The Microsoft® DirectX 9.0c is a multimedia techology that enhances computer graphics and sounds. View the online help for detailed information. 3.3.4 ASUS contact information The Contact tab displays the ASUS contact information. Microsoft DirectX 9.0c Installs the Microsoft® DirectX 9.0c driver.


