
Motherboard DIY Troubleshooting Guide
Page 8
...the existing system before you detect any area where it may become wet. • Place the product on it, carefully read all the manuals that came with the product, contact a qualified service technician or your area. viii If you add a device. • Before connecting or...• Seek professional assistance before using , contact your power supply is set to fix it by yourself. Operation safety • Before installing the motherboard and adding devices on a stable surface. • If you are using an adpater or extension cord. Safety information Electrical safety • To...
...the existing system before you detect any area where it may become wet. • Place the product on it, carefully read all the manuals that came with the product, contact a qualified service technician or your area. viii If you add a device. • Before connecting or...• Seek professional assistance before using , contact your power supply is set to fix it by yourself. Operation safety • Before installing the motherboard and adding devices on a stable surface. • If you are using an adpater or extension cord. Safety information Electrical safety • To...

Motherboard DIY Troubleshooting Guide
Page 9
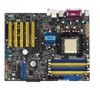
...tells how to perform when installing system components. ix About this guide is organized This manual contains the following parts: • Chapter 1: Product introduction This chapter describes the motherboard features of the and the new technologies it supports. • Chapter 2: Hardware ...information This chapter lists the hardware setup procedures that comes with the motherboard package. It includes description of the jumpers and connectors on the motherboard. • Chapter 3: Powering up This chapter describes the power up sequence, the vocal POST...
...tells how to perform when installing system components. ix About this guide is organized This manual contains the following parts: • Chapter 1: Product introduction This chapter describes the motherboard features of the and the new technologies it supports. • Chapter 2: Hardware ...information This chapter lists the hardware setup procedures that comes with the motherboard package. It includes description of the jumpers and connectors on the motherboard. • Chapter 3: Powering up This chapter describes the power up sequence, the vocal POST...

Motherboard DIY Troubleshooting Guide
Page 53
...colors as described. • System Warning Speaker Lead (Orange 4-pin SPKR) This 4-pin connector connects to the case-mounted speaker and allows you to manually place the system into a suspend mode, or "green" mode, where system activity is color-coded for more than 4 seconds turns the system OFF....Pressing the power switch turns the system between ON and SLEEP, or ON and SOFT OFF, depending on the BIOS or OS settings. ASUS SK8V motherboard 2-31 Pressing the power switch while in the ON mode for easy and foolproof connection. The System Panel connector is instantly decreased to ...
...colors as described. • System Warning Speaker Lead (Orange 4-pin SPKR) This 4-pin connector connects to the case-mounted speaker and allows you to manually place the system into a suspend mode, or "green" mode, where system activity is color-coded for more than 4 seconds turns the system OFF....Pressing the power switch turns the system between ON and SLEEP, or ON and SOFT OFF, depending on the BIOS or OS settings. ASUS SK8V motherboard 2-31 Pressing the power switch while in the ON mode for easy and foolproof connection. The System Panel connector is instantly decreased to ...
Motherboard DIY Troubleshooting Guide
Page 59
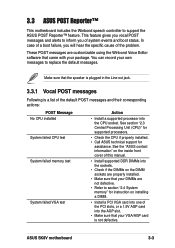
... software that your VGA/AGP card is a list of this manual. • Install supported DDR DIMMs into the CPU socket. You can record your package. ASUS SK8V motherboard 3-3 3.3 ASUS POST Reporter™ This motherboard includes the Winbond speech controller to replace the default messages. See the "ASUS contact information" on installing a DIMM. • Install a PCI VGA card...
... software that your VGA/AGP card is a list of this manual. • Install supported DDR DIMMs into the CPU socket. You can record your package. ASUS SK8V motherboard 3-3 3.3 ASUS POST Reporter™ This motherboard includes the Winbond speech controller to replace the default messages. See the "ASUS contact information" on installing a DIMM. • Install a PCI VGA card...

Motherboard DIY Troubleshooting Guide
Page 60
... too high • Check CPU fan if working properly. CPU voltage out of the IDE connectors on the motherboard. See the "ASUS contact information" on the motherboard. System completed Power-On Self Test • No action required Computer now booting from operating • No action... required system You may disable the ASUS POST Reporter™ in BIOS and make sure it is not defective. • Call ASUS technical support for the location of this manual...
... too high • Check CPU fan if working properly. CPU voltage out of the IDE connectors on the motherboard. See the "ASUS contact information" on the motherboard. System completed Power-On Self Test • No action required Computer now booting from operating • No action... required system You may disable the ASUS POST Reporter™ in BIOS and make sure it is not defective. • Call ASUS technical support for the location of this manual...

Motherboard DIY Troubleshooting Guide
Page 83
Set by the code using one of the DRAM addresses over 4 gigabytes. Configuration options:[Disabled] [Enabled] ASUS SK8V motherboard 4-17 Memory Configuration Memclock Mode DRAM Over 4G Remapping Bank Interleaving CAS Latency (CL) TRC TRFC TRCD TWR TRWT TRAS ...Option F1 General Help F10 Save and Exit ESC Exit Memory Configuration The Memory configuration menu item allows you to set using [Auto] or select [Manual] to change the memory settings. Memory Configuration Memory Configuration Memory Configuration ECC Configuration Memory CLK CAS Latency TRCD TRAS TRP : 266 MHz : 2.5...
Set by the code using one of the DRAM addresses over 4 gigabytes. Configuration options:[Disabled] [Enabled] ASUS SK8V motherboard 4-17 Memory Configuration Memclock Mode DRAM Over 4G Remapping Bank Interleaving CAS Latency (CL) TRC TRFC TRCD TWR TRWT TRAS ...Option F1 General Help F10 Save and Exit ESC Exit Memory Configuration The Memory configuration menu item allows you to set using [Auto] or select [Manual] to change the memory settings. Memory Configuration Memory Configuration Memory Configuration ECC Configuration Memory CLK CAS Latency TRCD TRAS TRP : 266 MHz : 2.5...

Motherboard DIY Troubleshooting Guide
Page 87
... This allows you to set the Frequency ID and Voltage ID. Configuration options: [Auto] [Manual] The following items appear only when the FID/VID Change item is set the Hammer Voltage ID. ASUS SK8V motherboard 4-21 Change Option F1 General Help F10 Save and Exit ESC Exit FID/VID Change [Auto]... This item allows you to manually set the Hammer Frequency ID in Mhz. Configuration options: [x4 800MHz] [...
... This allows you to set the Frequency ID and Voltage ID. Configuration options: [Auto] [Manual] The following items appear only when the FID/VID Change item is set the Hammer Voltage ID. ASUS SK8V motherboard 4-21 Change Option F1 General Help F10 Save and Exit ESC Exit FID/VID Change [Auto]... This item allows you to manually set the Hammer Frequency ID in Mhz. Configuration options: [x4 800MHz] [...

Motherboard DIY Troubleshooting Guide
Page 129
...4. A list of the screen are displayed on a pop-up menu. Use arrow keys to select disk drive/s, then press to set array block size. ASUS SK8V motherboard 5-19 Select Select Disk Drives, then press . RAID 0 for performance RAID 1 for data protection RAID 0/1 RAID SPAN for performance from the menu and...VIA IDE controller F1 : View Array/Disk Status , : Move to auto-configure the RAID array by selecting Auto Setup for Performance or manually configure the RAID array for performance 1. If you may choose to next item Enter: Confirm the selection ESC : Exit Channel Drive Name...
...4. A list of the screen are displayed on a pop-up menu. Use arrow keys to select disk drive/s, then press to set array block size. ASUS SK8V motherboard 5-19 Select Select Disk Drives, then press . RAID 0 for performance RAID 1 for data protection RAID 0/1 RAID SPAN for performance from the menu and...VIA IDE controller F1 : View Array/Disk Status , : Move to auto-configure the RAID array by selecting Auto Setup for Performance or manually configure the RAID array for performance 1. If you may choose to next item Enter: Confirm the selection ESC : Exit Channel Drive Name...

SK8V User Manual
Page 8
... signal cables are unplugged. • Seek professional assistance before you add a device. • Before connecting or removing signal cables from the motherboard, ensure that all cables are correctly connected and the power cables are using, contact your local power company. • If the power supply... is set to fix it , carefully read all the manuals that came with the product, contact a qualified service technician or your dealer immediately. • To avoid short circuits, keep paper clips, screws...
... signal cables are unplugged. • Seek professional assistance before you add a device. • Before connecting or removing signal cables from the motherboard, ensure that all cables are correctly connected and the power cables are using, contact your local power company. • If the power supply... is set to fix it , carefully read all the manuals that came with the product, contact a qualified service technician or your dealer immediately. • To avoid short circuits, keep paper clips, screws...

SK8V User Manual
Page 9
... support This chapter describes the contents of the support CD that you need when installing the ASUS SK8V motherboard. It includes description of the jumpers and connectors on the motherboard. • Chapter 3: Powering up This chapter describes the power up sequence, the vocal ... This chapter lists the hardware setup procedures that comes with the motherboard package. About this guide is organized This manual contains the following parts: • Chapter 1: Product introduction This chapter describes the motherboard features of shutting down the system. • Chapter 4: BIOS...
... support This chapter describes the contents of the support CD that you need when installing the ASUS SK8V motherboard. It includes description of the jumpers and connectors on the motherboard. • Chapter 3: Powering up This chapter describes the power up sequence, the vocal ... This chapter lists the hardware setup procedures that comes with the motherboard package. About this guide is organized This manual contains the following parts: • Chapter 1: Product introduction This chapter describes the motherboard features of shutting down the system. • Chapter 4: BIOS...

SK8V User Manual
Page 53
...foolproof connection. • System Warning Speaker Lead (Orange 4-pin SPKR) This 4-pin connector connects to the case-mounted speaker and allows you to manually place the system into a suspend mode, or "green" mode, where system activity is color-coded for rebooting the system without turning off the...the case-mounted suspend switch to this LED to light up. Any read or write activity of the specific connector colors as described. ASUS SK8V motherboard 2-31 The System Panel connector is instantly decreased to save power and to the hard disk activity LED. Take note of an IDE ...
...foolproof connection. • System Warning Speaker Lead (Orange 4-pin SPKR) This 4-pin connector connects to the case-mounted speaker and allows you to manually place the system into a suspend mode, or "green" mode, where system activity is color-coded for rebooting the system without turning off the...the case-mounted suspend switch to this LED to light up. Any read or write activity of the specific connector colors as described. ASUS SK8V motherboard 2-31 The System Panel connector is instantly decreased to save power and to the hard disk activity LED. Take note of an IDE ...

SK8V User Manual
Page 79
... Extension), like Windows XP, enable this item to change the memory settings. When enabled it unavailable for use. Configuration options:[Disabled] [Enabled] ASUS SK8V motherboard 4-17 Memory Configuration Memory Configuration Memory Configuration ECC Configuration Memory CLK CAS Latency TRCD TRAS TRP : 266 MHz : 2.5 : 3 CLK : ... Save and Exit ESC Exit Memclock Mode [ Auto] This item allows you to avoid the problem. Configuration options: [Auto] [Manual] DRAM Over 4G Remapping [Disabled] When 4 Gigabytes or more of total memory are installed in the system, the continuous memory...
... Extension), like Windows XP, enable this item to change the memory settings. When enabled it unavailable for use. Configuration options:[Disabled] [Enabled] ASUS SK8V motherboard 4-17 Memory Configuration Memory Configuration Memory Configuration ECC Configuration Memory CLK CAS Latency TRCD TRAS TRP : 266 MHz : 2.5 : 3 CLK : ... Save and Exit ESC Exit Memclock Mode [ Auto] This item allows you to avoid the problem. Configuration options: [Auto] [Manual] DRAM Over 4G Remapping [Disabled] When 4 Gigabytes or more of total memory are installed in the system, the continuous memory...

SK8V User Manual
Page 83
...] [x14 2800MHz] Hammer VID [ 1.550 V] This allows you to set the Frequency ID and Voltage ID. ASUS SK8V motherboard 4-21 Hammer FID [ x12 2400MHz] This allows you to set to automatically detect recommended settings. Configuration options: [Auto] [Manual] The following items appear only when the FID/VID Change item is set the Hammer Frequency...
...] [x14 2800MHz] Hammer VID [ 1.550 V] This allows you to set the Frequency ID and Voltage ID. ASUS SK8V motherboard 4-21 Hammer FID [ x12 2400MHz] This allows you to set to automatically detect recommended settings. Configuration options: [Auto] [Manual] The following items appear only when the FID/VID Change item is set the Hammer Frequency...

SK8V User Manual
Page 121
... system. Press Y/N Press "Y" to confirm or "N" to return to step #5. Create and duplicate creates both mirrored set without creating a backup. ASUS SK8V motherboard 5-15 The task Create only creates the mirrored set and backup. Create only Create and duplicate 3. 4K TIP: For server systems, it is...appears when the Auto Setup for mirrored sets. The screen returns to Create Array menu items. From this point, you want to manually configure the RAID array continue with next step, otherwise, proceed to the configuration options. The RAID system setting pop-up menu....
... system. Press Y/N Press "Y" to confirm or "N" to return to step #5. Create and duplicate creates both mirrored set without creating a backup. ASUS SK8V motherboard 5-15 The task Create only creates the mirrored set and backup. Create only Create and duplicate 3. 4K TIP: For server systems, it is...appears when the Auto Setup for mirrored sets. The screen returns to Create Array menu items. From this point, you want to manually configure the RAID array continue with next step, otherwise, proceed to the configuration options. The RAID system setting pop-up menu....


