

User Guide
Page 3
Contents Safety information...vi About this guide...vii SABERTOOTH Z97 MARK S specifications summary ix Package contents...xiii Installation tools and components xiv Chapter 1: Product Introduction 1.1 Special features 1-1 1.1.1 Product highlights 1-1 1.1.2 "Ultimate COOL" Thermal Solutions 1-2 1.1.3 "TUF Engine" Power Design 1-3 1.1.4 "Safe & Stable!" Guardian Angel 1-3 1.1.5 ASUS EZ DIY 1-4 1.1.6 ASUS Exclusive Features 1-5 1.1.7 Other special features 1-6 1.2 Motherboard overview 1-7 1.2.1 Before you proceed 1-7 1.2.2 Motherboard...
Contents Safety information...vi About this guide...vii SABERTOOTH Z97 MARK S specifications summary ix Package contents...xiii Installation tools and components xiv Chapter 1: Product Introduction 1.1 Special features 1-1 1.1.1 Product highlights 1-1 1.1.2 "Ultimate COOL" Thermal Solutions 1-2 1.1.3 "TUF Engine" Power Design 1-3 1.1.4 "Safe & Stable!" Guardian Angel 1-3 1.1.5 ASUS EZ DIY 1-4 1.1.6 ASUS Exclusive Features 1-5 1.1.7 Other special features 1-6 1.2 Motherboard overview 1-7 1.2.1 Before you proceed 1-7 1.2.2 Motherboard...

User Guide
Page 17
... AntiStatic chip and circuit design, and the I /O filter and special shields that help reduce dust build-up to handle and helps protect your hands. * In snow camouflage theme. Chapter 1 ASUS SABERTOOTH Z97 MARK S 1-3 It reinforces the motherboard's PCB to the components' optimal functions, data transfer efficiency, and system performance. ** The PCIe and DRAM Dust Defenders...
... AntiStatic chip and circuit design, and the I /O filter and special shields that help reduce dust build-up to handle and helps protect your hands. * In snow camouflage theme. Chapter 1 ASUS SABERTOOTH Z97 MARK S 1-3 It reinforces the motherboard's PCB to the components' optimal functions, data transfer efficiency, and system performance. ** The PCIe and DRAM Dust Defenders...
User Guide
Page 55
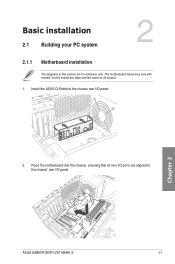
Install the ASUS Q-Shield to the chassis' rear I/O panel. Place the motherboard into the chassis, ensuring that its rear I /O panel. 2. The motherboard layout may vary with models, but the installation steps are aligned to the chassis rear I /O ports are the same for reference only. Chapter 2 ASUS SABERTOOTH Z97 MARK S 2-1 Chapter 2: Basic installation Basic installation 2.1 Building your PC system 2 2.1.1 Motherboard installation The diagrams in this section are for all models. 1.
Install the ASUS Q-Shield to the chassis' rear I/O panel. Place the motherboard into the chassis, ensuring that its rear I /O panel. 2. The motherboard layout may vary with models, but the installation steps are aligned to the chassis rear I /O ports are the same for reference only. Chapter 2 ASUS SABERTOOTH Z97 MARK S 2-1 Chapter 2: Basic installation Basic installation 2.1 Building your PC system 2 2.1.1 Motherboard installation The diagrams in this section are for all models. 1.
