
User Manual
Page 23
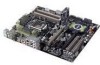
...10-1 pin COM1) 7. Clear RTC RAM (3-pin CLRTC) 14. Front panel audio connector (10-1 pin AAFP) Page 2-37 2-5 2-10 2-25 2-35 2-34 2-24 2-30 2-31 2-38 2-32 2-33 2-22 2-23 2-23 2-34 2-36 2-33 2-36 Chapter 2 ASUS SABERTOOTH 55i 2-3 USB connectors (10-1 pin USB910..., USB1112, USB1314) 13. Digital audio connector (4-1 pin SPDIF_OUT) 18. LGA1156 CPU Socket 3. Optical drive audio connector (4-pin CD) 19. switch 8. ATX power connectors (24-pin EATXPWR, 8-pin EATX12V) 2. ...
...10-1 pin COM1) 7. Clear RTC RAM (3-pin CLRTC) 14. Front panel audio connector (10-1 pin AAFP) Page 2-37 2-5 2-10 2-25 2-35 2-34 2-24 2-30 2-31 2-38 2-32 2-33 2-22 2-23 2-23 2-34 2-36 2-33 2-36 Chapter 2 ASUS SABERTOOTH 55i 2-3 USB connectors (10-1 pin USB910..., USB1112, USB1314) 13. Digital audio connector (4-1 pin SPDIF_OUT) 18. LGA1156 CPU Socket 3. Optical drive audio connector (4-pin CD) 19. switch 8. ATX power connectors (24-pin EATXPWR, 8-pin EATX12V) 2. ...
User Manual
Page 42
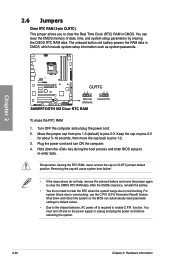
... and reboot the system so the BIOS can clear the CMOS memory of date, time, and system setup parameters by erasing the CMOS RTC RAM data. Except when clearing the RTC RAM, never remove the cap on pins 2-3 for about 5-10 seconds, then move the jumper again to clear the CMOS RTC... system passwords. Move the jumper cap from pins 1-2 (default) to overclocking, use the C.P.R. (CPU Parameter Recall) feature. function. The onboard button cell battery powers the RAM data in CMOS. Keep the cap on CLRTC jumper default position. You must turn ON the computer. 4. Chapter 2 To erase the RTC...
... and reboot the system so the BIOS can clear the CMOS memory of date, time, and system setup parameters by erasing the CMOS RTC RAM data. Except when clearing the RTC RAM, never remove the cap on pins 2-3 for about 5-10 seconds, then move the jumper again to clear the CMOS RTC... system passwords. Move the jumper cap from pins 1-2 (default) to overclocking, use the C.P.R. (CPU Parameter Recall) feature. function. The onboard button cell battery powers the RAM data in CMOS. Keep the cap on CLRTC jumper default position. You must turn ON the computer. 4. Chapter 2 To erase the RTC...
User Manual
Page 89
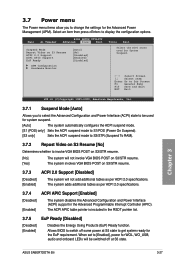
...POS) only] Sets the ACPI suspend mode to S1/POS (Power On Suspend). [S3 only] Sets the ACPI suspend mode to S3/STR (Suspend To RAM). 3.7.2 Repost Video on S3 Resume [No] Determines whether to invoke VGA BIOS POST on S3/STR resume. [No] The system will not invoke VGA BIOS... options. Allows BIOS to switch off at S5 state. The ACPI APIC table pointer is included in the Advanced Programmable Interrupt Controller (APIC). Chapter 3 ASUS SABERTOOTH 55i 3-27 Select an item then press to get system ready for WOL, WO_USB, audio and onboard LEDs will not add additional tables as per ACPI...
...POS) only] Sets the ACPI suspend mode to S1/POS (Power On Suspend). [S3 only] Sets the ACPI suspend mode to S3/STR (Suspend To RAM). 3.7.2 Repost Video on S3 Resume [No] Determines whether to invoke VGA BIOS POST on S3/STR resume. [No] The system will not invoke VGA BIOS... options. Allows BIOS to switch off at S5 state. The ACPI APIC table pointer is included in the Advanced Programmable Interrupt Controller (APIC). Chapter 3 ASUS SABERTOOTH 55i 3-27 Select an item then press to get system ready for WOL, WO_USB, audio and onboard LEDs will not add additional tables as per ACPI...
User Manual
Page 94
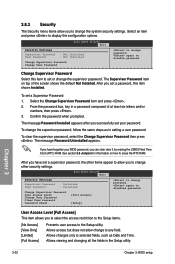
... change password. To set or change the supervisor password. again to display the configuration options. Chapter 3 3-32 Chapter 3: BIOS setup again to erase the RTC RAM. Change Supervisor Password Select this item shows Installed. The Supervisor Password item on how to disable password. Select the Change Supervisor Password item and press... password, you to the Setup utility. 3.8.3 Security The Security menu items allow you can clear clear it by erasing the CMOS Real Time Clock (RTC) RAM.
... change password. To set or change the supervisor password. again to display the configuration options. Chapter 3 3-32 Chapter 3: BIOS setup again to erase the RTC RAM. Change Supervisor Password Select this item shows Installed. The Supervisor Password item on how to disable password. Select the Change Supervisor Password item and press... password, you to the Setup utility. 3.8.3 Security The Security menu items allow you can clear clear it by erasing the CMOS Real Time Clock (RTC) RAM.
User Manual
Page 100
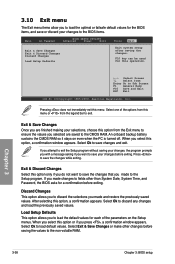
... if you do not want to save the changes that you made changes to fields other changes before saving the values to the non-volatile RAM. Discard Changes This option allows you to discard the selections you press , a confirmation window appears. 3.10 Exit menu The Exit menu items allow you ... saving your changes, the program prompts you with a message asking if you are saved to the Setup program. An onboard backup battery sustains the CMOS RAM so it stays on the Setup menus. Select Ok to load default values. Exit & Save Changes Once you want to exit. Load Setup Defaults This...
... if you do not want to save the changes that you made changes to fields other changes before saving the values to the non-volatile RAM. Discard Changes This option allows you to discard the selections you press , a confirmation window appears. 3.10 Exit menu The Exit menu items allow you ... saving your changes, the program prompts you with a message asking if you are saved to the Setup program. An onboard backup battery sustains the CMOS RAM so it stays on the Setup menus. Select Ok to load default values. Exit & Save Changes Once you want to exit. Load Setup Defaults This...


