
User Guide
Page 10
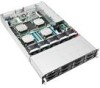
... motherboard layout, jumper settings, and connector locations. 5. Chapter 3: Installation options This chapter describes how to perform when installing or removing system components. 3. Chapter 2: Hardware setup This chapter lists the hardware setup procedures that comes with at least basic knowledge of the server, including sections on front panel and rear panel specifications. 2. Chapter 5: BIOS setup This chapter tells how to change system settings through the BIOS Setup menus. Chapter 6: RAID configuration This chapter tells how to change system settings...
... motherboard layout, jumper settings, and connector locations. 5. Chapter 3: Installation options This chapter describes how to perform when installing or removing system components. 3. Chapter 2: Hardware setup This chapter lists the hardware setup procedures that comes with at least basic knowledge of the server, including sections on front panel and rear panel specifications. 2. Chapter 5: BIOS setup This chapter tells how to change system settings through the BIOS Setup menus. Chapter 6: RAID configuration This chapter tells how to change system settings...
User Guide
Page 19
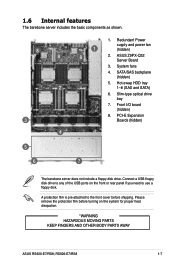
... disk drive. SATA/SAS backplane (hidden) 5. Slim-type optical drive bay 7. Connect a USB floppy disk drive to any of the USB ports on the front or rear panel if you need to the front cover before turning on the system for proper heat dissipation. *WARNING HAZARDOUS MOVING PARTS KEEP FINGERS AND OTHER BODY PARTS AWAY ASUS RS920-E7/RS8; RS926-E7/RS8 1-7 Front I/O board (hidden) 8. Please remove the protection film before shipping. System fans 4. Redundant Power supply and power fan 8 1 (hidden) 8 8 2. Hot-swap HDD tray 2 1-8 (SAS...
... disk drive. SATA/SAS backplane (hidden) 5. Slim-type optical drive bay 7. Connect a USB floppy disk drive to any of the USB ports on the front or rear panel if you need to the front cover before turning on the system for proper heat dissipation. *WARNING HAZARDOUS MOVING PARTS KEEP FINGERS AND OTHER BODY PARTS AWAY ASUS RS920-E7/RS8; RS926-E7/RS8 1-7 Front I/O board (hidden) 8. Please remove the protection film before shipping. System fans 4. Redundant Power supply and power fan 8 1 (hidden) 8 8 2. Hot-swap HDD tray 2 1-8 (SAS...
User Guide
Page 39
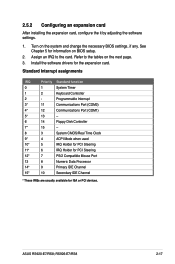
...* 6 IRQ Holder for PCI Steering 12* 7 PS/2 Compatible Mouse Port 13 8 Numeric Data Processor 14* 9 Primary IDE Channel 15* 10 Secondary IDE Channel * These IRQs are usually available for information on BIOS setup. 2. 2.5.2 Configuring an expansion card After installing the expansion card, configure the it by adjusting the software settings. 1. Standard Interrupt assignments IRQ Priority Standard function 0 1 System Timer 1 2 Keyboard Controller 2 - ASUS RS920-E7/RS8; RS926-E7/RS8 2-17 Assign an IRQ...
...* 6 IRQ Holder for PCI Steering 12* 7 PS/2 Compatible Mouse Port 13 8 Numeric Data Processor 14* 9 Primary IDE Channel 15* 10 Secondary IDE Channel * These IRQs are usually available for information on BIOS setup. 2. 2.5.2 Configuring an expansion card After installing the expansion card, configure the it by adjusting the software settings. 1. Standard Interrupt assignments IRQ Priority Standard function 0 1 System Timer 1 2 Keyboard Controller 2 - ASUS RS920-E7/RS8; RS926-E7/RS8 2-17 Assign an IRQ...
User Guide
Page 86
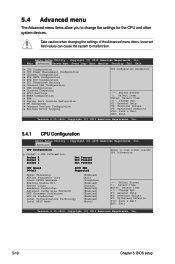
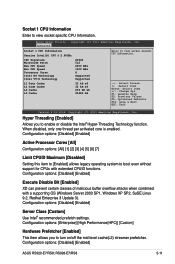
... 5: BIOS setup Main Advanced Server Mgmt Event Logs Boot Monitor Security Tool Exit CPU Configuration CPU Power Management Configuration Chipset Configuration PCH SATA Configuration PCH SCU Configuration PCI Subsystem Setting Onboard LAN Configuration USB Configuration Trusted Computing ACPI Settings WHEA Configuration APM Serial Port Console Redirection ME Subsystem Onboard Devices Configuration Runtime Error Logging CPU Configuration Parameters →←: Select Screen ↑↓: Select Item Enter: Select Item +/-: Change Opt. Advanced CPU Confguration Socket 1 CPU Information...
... 5: BIOS setup Main Advanced Server Mgmt Event Logs Boot Monitor Security Tool Exit CPU Configuration CPU Power Management Configuration Chipset Configuration PCH SATA Configuration PCH SCU Configuration PCI Subsystem Setting Onboard LAN Configuration USB Configuration Trusted Computing ACPI Settings WHEA Configuration APM Serial Port Console Redirection ME Subsystem Onboard Devices Configuration Runtime Error Logging CPU Configuration Parameters →←: Select Screen ↑↓: Select Item Enter: Select Item +/-: Change Opt. Advanced CPU Confguration Socket 1 CPU Information...
User Guide
Page 87
... CPUID Maximum [Disabled] Setting this item to [Enabled] allows legacy operating system to view socket soecific CPU Information. RS926-E7/RS8 5-11 Socket 1 CPU Information Enter to enable or disable the Intel® Hyper-Threading Technology function. Aptio Setup Utility - F1: General Help F2: Previous Values F5: Optimized Defaults F10: Save & Exit ESC: Exit Version 2.15.1219. Configuration options: [Disabled] [Enabled] Server Class [Custom] Use Intel® recommended prefetch settings. Configuration options: [Disabled] [Enabled] ASUS RS920-E7/RS8;
... CPUID Maximum [Disabled] Setting this item to [Enabled] allows legacy operating system to view socket soecific CPU Information. RS926-E7/RS8 5-11 Socket 1 CPU Information Enter to enable or disable the Intel® Hyper-Threading Technology function. Aptio Setup Utility - F1: General Help F2: Previous Values F5: Optimized Defaults F10: Save & Exit ESC: Exit Version 2.15.1219. Configuration options: [Disabled] [Enabled] Server Class [Custom] Use Intel® recommended prefetch settings. Configuration options: [Disabled] [Enabled] ASUS RS920-E7/RS8;
User Guide
Page 92
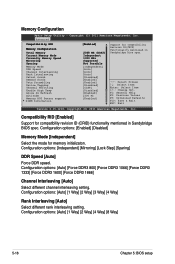
... BIOS spec. Advanced Compatibility RID Memory Configuration Total Memory Current Memory Mode Currently Memory Speed Mirroring Sparing Memory Mode DDR Speed Channel Interleaving Rank Interleaving Patrol Scrub Demand Scrub Data Scrambling Device Tagging Thermal Throtting Enable High Temp Allow 2x Refresh Altitude Memory HOT Sensor support DIMM Information [Enabled] 2048 MB (DDR3) Independent 1333 MHz Supported Not Possible [Independent] [Auto] [Auto] [Auto] [Disabled] [Enabled] [Enabled] [Disabled] [CLTT] [Disabled] [Enabled] [300 M] [Enabled] Support...
... BIOS spec. Advanced Compatibility RID Memory Configuration Total Memory Current Memory Mode Currently Memory Speed Mirroring Sparing Memory Mode DDR Speed Channel Interleaving Rank Interleaving Patrol Scrub Demand Scrub Data Scrambling Device Tagging Thermal Throtting Enable High Temp Allow 2x Refresh Altitude Memory HOT Sensor support DIMM Information [Enabled] 2048 MB (DDR3) Independent 1333 MHz Supported Not Possible [Independent] [Auto] [Auto] [Auto] [Disabled] [Enabled] [Enabled] [Disabled] [CLTT] [Disabled] [Enabled] [300 M] [Enabled] Support...
User Guide
Page 96
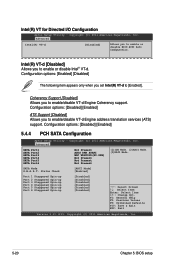
.... Configuration options: [Enabled] [Disabled] The following item appears only when you to enable/disable VT-d Engine address translation services (ATS) support. Configuration options: [Disabled] [Enabled] 5.4.4 PCH SATA Configuration Aptio Setup Utility - F1: General Help F2: Previous Values F5: Optimized Defaults F10: Save & Exit ESC: Exit Version 2.15.1219. Coherency Support [Disabled] Allows you set Intel(R) VT-d to enable or disable BIOS ACPI Auto Configuration. Advanced SATA Port1 SATA Port2 SATA Port3 SATA Port4 SATA Port5 SATA Port6 Not Present ASUS DWR...
.... Configuration options: [Enabled] [Disabled] The following item appears only when you to enable/disable VT-d Engine address translation services (ATS) support. Configuration options: [Disabled] [Enabled] 5.4.4 PCH SATA Configuration Aptio Setup Utility - F1: General Help F2: Previous Values F5: Optimized Defaults F10: Save & Exit ESC: Exit Version 2.15.1219. Coherency Support [Disabled] Allows you set Intel(R) VT-d to enable or disable BIOS ACPI Auto Configuration. Advanced SATA Port1 SATA Port2 SATA Port3 SATA Port4 SATA Port5 SATA Port6 Not Present ASUS DWR...

User Guide
Page 99
... Help F2: Previous Values F5: Optimized Defaults F10: Save & Exit ESC: Exit Version 2.15.1219. PCI Express Link Register Settings ASPM Support [Disabled] Allows you to enable or disable PCI device to generate SERR#. RS926-E7/RS8 5-23 Configuration options: [Disabled] [Enabled] SERR# Generation [Disabled] Allows you to L0s state. [Auto] BIOS auto configure. [Disabled] Disabled ASPM. Copyright (C) 2011 American Megatrends, Inc. Configuration options: [Disabled] [Enabled] PCI Express Settings Aptio Setup Utility - Copyright (C) 2011 American Megatrends, Inc. ASUS RS920-E7/RS8;
... Help F2: Previous Values F5: Optimized Defaults F10: Save & Exit ESC: Exit Version 2.15.1219. PCI Express Link Register Settings ASPM Support [Disabled] Allows you to enable or disable PCI device to generate SERR#. RS926-E7/RS8 5-23 Configuration options: [Disabled] [Enabled] SERR# Generation [Disabled] Allows you to L0s state. [Auto] BIOS auto configure. [Disabled] Disabled ASPM. Copyright (C) 2011 American Megatrends, Inc. Configuration options: [Disabled] [Enabled] PCI Express Settings Aptio Setup Utility - Copyright (C) 2011 American Megatrends, Inc. ASUS RS920-E7/RS8;
User Guide
Page 103
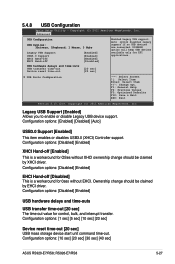
... support if no USB devices are connected. F1: General Help F2: Previous Values F5: Optimized Defaults F10: Save & Exit ESC: Exit Version 2.15.1219. Configuration options: [Disabled] [Enabled] EHCI Hand-off [Disabled] This is a workaround for 0ses without XHCI ownership change should be claimed by XHCI driver. RS926-E7/RS8 5-27 Configuration options: [Disabled] [Enabled] XHCI Hand-off [Enabled] [Enabled] [Enabled] [Disabled] Enabled Legacy USB support. Legacy USB Support [Enabled] Allows you to enable or disable Legacy USB device support. DISABLE option will keep USB...
... support if no USB devices are connected. F1: General Help F2: Previous Values F5: Optimized Defaults F10: Save & Exit ESC: Exit Version 2.15.1219. Configuration options: [Disabled] [Enabled] EHCI Hand-off [Disabled] This is a workaround for 0ses without XHCI ownership change should be claimed by XHCI driver. RS926-E7/RS8 5-27 Configuration options: [Disabled] [Enabled] XHCI Hand-off [Enabled] [Enabled] [Enabled] [Disabled] Enabled Legacy USB support. Legacy USB Support [Enabled] Allows you to enable or disable Legacy USB device support. DISABLE option will keep USB...

User Guide
Page 106
... off or on state, whatever the system state was before the AC power loss. Configuration options: [Power Off] [Power On] [Last State] Power On By PCIE [Disabled] [Disabled] Disables the PCIE devices to generate a wake event. [Enabled] Enables the PCIE devices to enable or disable the Windows Hardware Error Architecture support. Configuration options: [Disabled] [Enabled] 5.4.12 APM setting Aptio Setup Utility - 5.4.11 WHEA Configuration Aptio Setup Utility - Restore AC Power Loss [Last State] When set to when power is re-applied after an AC...
... off or on state, whatever the system state was before the AC power loss. Configuration options: [Power Off] [Power On] [Last State] Power On By PCIE [Disabled] [Disabled] Disables the PCIE devices to generate a wake event. [Enabled] Enables the PCIE devices to enable or disable the Windows Hardware Error Architecture support. Configuration options: [Disabled] [Enabled] 5.4.12 APM setting Aptio Setup Utility - 5.4.11 WHEA Configuration Aptio Setup Utility - Restore AC Power Loss [Last State] When set to when power is re-applied after an AC...

User Guide
Page 111
...[Enabled] [Disabled] Enables Asmedia USB 3.0 fast battery charging support for USB 3.0 devices complying with the BC 1.1 regulation. Configuration options: [Disabled] [Enabled] Device Mode [Standard Serial Port Mode] Allows you to enable or disable PCI Error Logging. Configuration options: [Disabled] [Enabled]. Disables battery charging support. 5.4.16 Runtime Error Logging Aptio Setup Utility - RS926-E7/RS8 5-35 Configuration options: [Standard Serial Port Mode] ASmedia USB 3.0 Controller [Enabled] [Enabled] [Disabled] Enables the USB 3.0 controller. PCI Error Logging...
...[Enabled] [Disabled] Enables Asmedia USB 3.0 fast battery charging support for USB 3.0 devices complying with the BC 1.1 regulation. Configuration options: [Disabled] [Enabled] Device Mode [Standard Serial Port Mode] Allows you to enable or disable PCI Error Logging. Configuration options: [Disabled] [Enabled]. Disables battery charging support. 5.4.16 Runtime Error Logging Aptio Setup Utility - RS926-E7/RS8 5-35 Configuration options: [Standard Serial Port Mode] ASmedia USB 3.0 Controller [Enabled] [Enabled] [Disabled] Enables the USB 3.0 controller. PCI Error Logging...
User Guide
Page 120
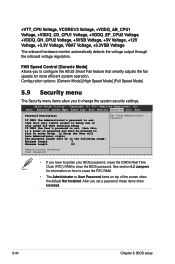
... voltage regulators. FAN Speed Control [Generic Mode] Allows you to change the system security settings. Configuration options: [Generic Mode] [High Speed Mode] [Full Speed Mode] 5.9 Security menu The Security menu items allow you have forgotten your BIOS password, erase the CMOS Real Time Clock (RTC) RAM to boot or enter Setup. In Setup the User will have Administrator rights The password length must be entered to clear the BIOS password. Main Advanced Server Mgmt Event Logs Boot Monitor Security Tool Exit Password...
... voltage regulators. FAN Speed Control [Generic Mode] Allows you to change the system security settings. Configuration options: [Generic Mode] [High Speed Mode] [Full Speed Mode] 5.9 Security menu The Security menu items allow you have forgotten your BIOS password, erase the CMOS Real Time Clock (RTC) RAM to boot or enter Setup. In Setup the User will have Administrator rights The password length must be entered to clear the BIOS password. Main Advanced Server Mgmt Event Logs Boot Monitor Security Tool Exit Password...
User Guide
Page 126
.... RAID 5 stripes both Linux and Windows OS). • Intel Rapid Storage Technology enterprise SCU / SATA Option ROM Utility with each stripe unit having to boot the system from a hard disk drive included in parallel, interleaved stacks. RAID 1 (Data mirroring) copies and maintains an identical image of data from the support DVD to a floppy disk before you want to be of a single disk alone, thus improving data access and storage. Use of RAID 5 configuration include...
.... RAID 5 stripes both Linux and Windows OS). • Intel Rapid Storage Technology enterprise SCU / SATA Option ROM Utility with each stripe unit having to boot the system from a hard disk drive included in parallel, interleaved stacks. RAID 1 (Data mirroring) copies and maintains an identical image of data from the support DVD to a floppy disk before you want to be of a single disk alone, thus improving data access and storage. Use of RAID 5 configuration include...
User Guide
Page 127
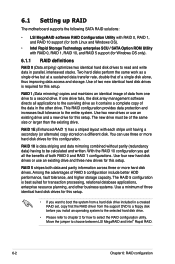
... Storage Technology if you installed Serial ATA hard disk drives on the RAID connectors that you use the RAID configuration utility. RS926-E7/RS8 6-3 Refer to Chapter 5 for details on entering and navigating through the BIOS Setup. 6.1.4 RAID configuration utilities Depending on the Serial ATA connectors supported by Intel® C602-A chipset. Connect a SATA signal cable to the signal connector at the back of the same model and capacity when creating a disk array. For optimal performance, install identical drives of each drive. 6.1.3 Setting the RAID...
... Storage Technology if you installed Serial ATA hard disk drives on the RAID connectors that you use the RAID configuration utility. RS926-E7/RS8 6-3 Refer to Chapter 5 for details on entering and navigating through the BIOS Setup. 6.1.4 RAID configuration utilities Depending on the Serial ATA connectors supported by Intel® C602-A chipset. Connect a SATA signal cable to the signal connector at the back of the same model and capacity when creating a disk array. For optimal performance, install identical drives of each drive. 6.1.3 Setting the RAID...
User Guide
Page 128
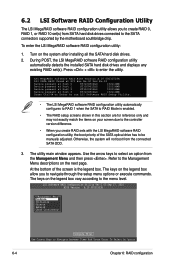
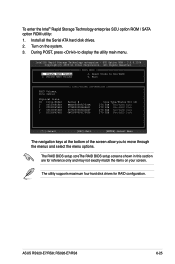
... Configure VD(s) Use Cursor Keys to enter the utility. To enter the LSI MegaRAID software RAID configuration utility: 1. The keys on the next page. During POST, the LSI MegaRAID software RAID configuration utility automatically detects the installed SATA hard disk drives and displays any existing RAID set (s) from SATA hard disk drives connected to the SATA connectors supported by the motherboard southbridge chip. Otherwise, the system will not boot from the Management Menu and then press . LSI MegaRAID Software RAID BIOS Version A.10 09231523R LSI SATA RAID Found at PCI Bus...
... Configure VD(s) Use Cursor Keys to enter the utility. To enter the LSI MegaRAID software RAID configuration utility: 1. The keys on the next page. During POST, the LSI MegaRAID software RAID configuration utility automatically detects the installed SATA hard disk drives and displays any existing RAID set (s) from SATA hard disk drives connected to the SATA connectors supported by the motherboard southbridge chip. Otherwise, the system will not boot from the Management Menu and then press . LSI MegaRAID Software RAID BIOS Version A.10 09231523R LSI SATA RAID Found at PCI Bus...
User Guide
Page 130
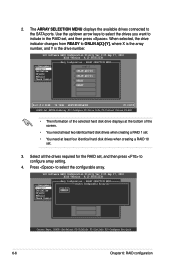
... BIOS Version A.10.09231523R Management Menu Configure Initialize Objects Rebuild Check Consistency Easy Configuration - LSI Software RAID Configuration Utility Ver C.05 Sep 17, 2010 BIOS Version A.10.09231523R Easy Configuration - ARRAY SELECTION MENU Management Menu Configure Initialize Objects Rebuild Check Consistency PORT # 0 ONLIN A00-00 1 ONLIN A00-01 2 READY 3 READY Port # 2 DISK 74.74GB HDS728080PLA380 05.01C05 SPACE-Sel,ENTER-EndArray,F10-Configure,F2-Drive Info,F3-Virtual Drives,F4-HSP • The information of the selected hard disk drive displays...
... BIOS Version A.10.09231523R Management Menu Configure Initialize Objects Rebuild Check Consistency Easy Configuration - LSI Software RAID Configuration Utility Ver C.05 Sep 17, 2010 BIOS Version A.10.09231523R Easy Configuration - ARRAY SELECTION MENU Management Menu Configure Initialize Objects Rebuild Check Consistency PORT # 0 ONLIN A00-00 1 ONLIN A00-01 2 READY 3 READY Port # 2 DISK 74.74GB HDS728080PLA380 05.01C05 SPACE-Sel,ENTER-EndArray,F10-Configure,F2-Drive Info,F3-Virtual Drives,F4-HSP • The information of the selected hard disk drive displays...

User Guide
Page 135
.../Add Configuration Initialize Clear Configuration Objects Select Boot Drive Rebuild Check Consistency View/Add to the SATA ports. ARRAY SELECTION MENU Management Menu Configure Initialize Objects Rebuild Check Consistency PORT # 0 ONLIN A00-00 1 ONLIN A00-01 2 READY 3 READY Port # 2 DISK 77247MB HDS728080PLA380 PF20A60A SPACE-Sel,ENTER-EndArray,F10-Configure,F2-Drive Info,F3-Virtual Drives,F4-HSP The information of the selected hard disk drive displays at the bottom of section 6.2.1 Creating a RAID set , then press . RS926-E7/RS8 6-11 LSI Software RAID Configuration Utility...
.../Add Configuration Initialize Clear Configuration Objects Select Boot Drive Rebuild Check Consistency View/Add to the SATA ports. ARRAY SELECTION MENU Management Menu Configure Initialize Objects Rebuild Check Consistency PORT # 0 ONLIN A00-00 1 ONLIN A00-01 2 READY 3 READY Port # 2 DISK 77247MB HDS728080PLA380 PF20A60A SPACE-Sel,ENTER-EndArray,F10-Configure,F2-Drive Info,F3-Virtual Drives,F4-HSP The information of the selected hard disk drive displays at the bottom of section 6.2.1 Creating a RAID set , then press . RS926-E7/RS8 6-11 LSI Software RAID Configuration Utility...
User Guide
Page 138
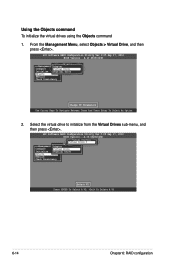
... A VD 6-14 Chapter 6: RAID configuration LSI Software RAID Configuration Utility Ver C.05 Sep 17, 2010 BIOS Version A.10.09231523R Objects Management MAednaupter Configure Virtual Drive Initialize Physical Drive Objects Rebuild Check Consistency Change VD Parameters Use Cursor Keys To Navigate Between Items And Press Enter To Select An Option 2. Select the virtual drive to initialize from the Virtual Drives sub‑menu, and then press . Using the Objects command To initialize the virtual drives using the Objects...
... A VD 6-14 Chapter 6: RAID configuration LSI Software RAID Configuration Utility Ver C.05 Sep 17, 2010 BIOS Version A.10.09231523R Objects Management MAednaupter Configure Virtual Drive Initialize Physical Drive Objects Rebuild Check Consistency Change VD Parameters Use Cursor Keys To Navigate Between Items And Press Enter To Select An Option 2. Select the virtual drive to initialize from the Virtual Drives sub‑menu, and then press . Using the Objects command To initialize the virtual drives using the Objects...
User Guide
Page 149
...: None defined. ASUS RS920-E7/RS8; Create RAID Volume 2. Reset Disks to display the utility main menu. Install all the Serial ATA hard disk drives. 2. SCU Option ROM - 3.0.0.1104 Copyright(C) 2003-11 Intel Corporation. The utility supports maximum four hard disk drives for reference only and may not exactly match the items on the system. 3. RS926-E7/RS8 6-25 During POST, press to Non-RAID 4. Delete RAID Volume [ MAIN MENU ] 3. Turn on your screen. Physical Disks: ID Drive Model 0 ST3300656SS 1 ST3300656SS...
...: None defined. ASUS RS920-E7/RS8; Create RAID Volume 2. Reset Disks to display the utility main menu. Install all the Serial ATA hard disk drives. 2. SCU Option ROM - 3.0.0.1104 Copyright(C) 2003-11 Intel Corporation. The utility supports maximum four hard disk drives for reference only and may not exactly match the items on the system. 3. RS926-E7/RS8 6-25 During POST, press to Non-RAID 4. Delete RAID Volume [ MAIN MENU ] 3. Turn on your screen. Physical Disks: ID Drive Model 0 ST3300656SS 1 ST3300656SS...

User Guide
Page 166
... drive. Use the arrow keys to select the type of the SATA optical disk drive has to boot from the connected SATA ODD. Otherwise, the system will not boot from the support DVD. You have created RAID sets with the RAID driver is required when installing Windows® XP / Server 2003 or Linux operating system on how to the independent hard disk drive or bootable array. 7.1 RAID driver installation After creating the RAID sets for your changes, and then exit the BIOS Setup. 4. This part provides...
... drive. Use the arrow keys to select the type of the SATA optical disk drive has to boot from the connected SATA ODD. Otherwise, the system will not boot from the support DVD. You have created RAID sets with the RAID driver is required when installing Windows® XP / Server 2003 or Linux operating system on how to the independent hard disk drive or bootable array. 7.1 RAID driver installation After creating the RAID sets for your changes, and then exit the BIOS Setup. 4. This part provides...


