Asus RS740-E7-RS24-EG Support and Manuals
Get Help and Manuals for this Asus item
View All Support Options Below
Free Asus RS740-E7-RS24-EG manuals!
Problems with Asus RS740-E7-RS24-EG?
Ask a Question
Free Asus RS740-E7-RS24-EG manuals!
Problems with Asus RS740-E7-RS24-EG?
Ask a Question
Popular Asus RS740-E7-RS24-EG Manual Pages
User Guide - Page 15
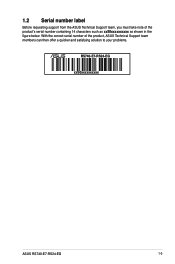
1.2 Serial number label
Before requesting support from the ASUS Technical Support team, you must take note of the product, ASUS Technical Support team members can then offer a quicker and satisfying solution to your problems.
RS740-E7-RS24-EG
xxS0xxxxxxxxxx
ASUS RS740-E7-RS24-EG
1-3 With the correct serial number of the product's serial number containing 14 characters such as xxS0xxxxxxxxxx as...
User Guide - Page 16

...Support software RAID 0, 1, 10, and 5) LSI® MegaRAID driver (Support software RAID 0, 1, and10) (Linux/Windows) ASUS PIKE 2108-32PD 8-port SAS 6G HW RAID card ASUS PIKE 2208 8-port SAS 6G HW RAID card ASUS...to www.asus.com for the complete list of supported memory modules. (continued on the next page)
1-4
Chapter 1: Product introduction 1.3 System specifications
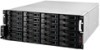
The ASUS RS740-E7-RS24-EG is...
User Guide - Page 19
... 1 SFP+_2 SFP+_2 LEDs SFP+_1
SFP+_1 LEDs
*The LAN 3 port is for ASUS ASMB6-iKVM controller only.
ASUS RS740-E7-RS24-EG
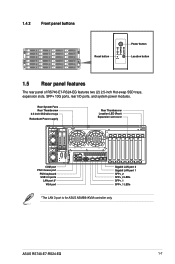
1-7 1.4.2
Front panel buttons
Power button
Reset button
2
1
Location button
2
1
1.5 Rear panel features
The rear panel of RS740-E7-RS24-EG features two (2) 2.5-inch Hot-swap SSD trays, expansion slots, SFP+ 10G ports, rear...
User Guide - Page 21
... installed
ASUS RS740-E7-RS24-EG
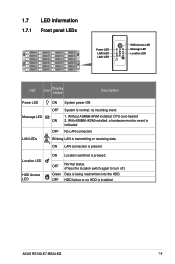
1-9 HDD failure or no incoming event 1. OFF
Green OFF
Normal status. (Press the location switch again to turn off.)
Data is transmitting or receiving data.
With ASMB6-iKVM installed:...No LAN connection
Blinking LAN is being read/written into the HDD. Without ASMB6-iKVM installed: CPU over-heated
ON 2. 1.7 LED information 1.7.1 Front panel LEDs
2
1
HDD...
User Guide - Page 33

... the screws with a Phillips screwdriver just enough to attach the heatsink to avoid damaging the motherboard, CPU, or heatsink.
2 1
ASUS RS740-E7-RS24-EG
2-9 A
C
A C
B
D
B
Fasten the screws to just about the proper tightness to the motherboard.
3. Ensure an even distribution of the
installed CPU, ensuring that the
four screws match the holes on the motherboard.
User Guide - Page 35
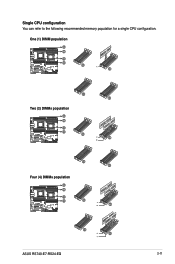
One (1) DIMM population
G-H A-B
F-E D-C
G-H A-B
A-B
A-B
F-E
D-C
Two (2) DIMMs population
G-H
A-B A-B
F-E
D-C
D-C
G-H
A-B
A-B
F-E D-C
D-C
Four (4) DIMMs population
G-H A-B
F-E
D-C
G-H
A-B
F-E D-C
ASUS RS740-E7-RS24-EG
2-11 A-B
Single CPU configuration A-B You can refer to the following recommended memory population for a single CPU configuration.
User Guide - Page 39
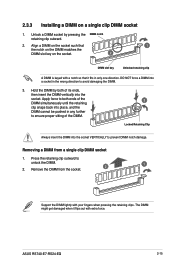
...Removing a DIMM from the socket.
2
1
Support the DIMM lightly with extra force. Remove the DIMM from a single clip DIMM socket
1. ASUS RS740-E7-RS24-EG
2-15
The DIMM might get damaged when...
unlock the DIMM.
2. Press the retaining clip outward to prevent DIMM notch damage.
2.3.3 Installing a DIMM on the socket.
2
DIMM slot key
Unlocked retaining clip
A DIMM is keyed...
User Guide - Page 41

...in anti-static bag before changing drives. 2 Always use the same model and size of HDDs. Do not stack drives.
Align and insert ...replace. 2.
ASUS RS740-E7-RS24-EG
2-17 Ensure to the
backplane, release and pull the drive tray then insert it once again.
After the drive disengages from the
bay. Push the drive tray all the way into the drive bay.
6. Repeat steps 1-6 to install...
User Guide - Page 43
... other hot-swappable 3.5-inch SATA / SAS HDDs. Secure the 3.5-inch SATA / SAS HDD into place.
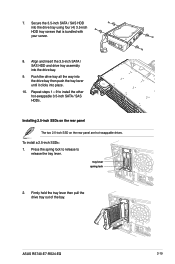
10. Installing 2.5-inch SSDs on the rear panel
The two 2.5-inch SSD on the rear panel are hot-swappable drives.
ASUS RS740-E7-RS24-EG
3 2-19 Push the drive tray all the way into the drive bay then push the...
User Guide - Page 45
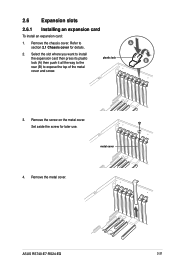
Remove the screw on the metal cover.
ASUS RS740-E7-RS24-EG
2-21 Select the slot where you want to install
the expansion card then press its plastic lock (A) then push it all the way to the
plastic lock
B
rear (B) to
A
section 2.1 Chassis cover for later use. Set aside the screw for details.
2. Refer to expose the...
User Guide - Page 47
.... Assign an IRQ to the following tables.
3.
ASUS RS740-E7-RS24-EG
2-23 Turn on BIOS setup.
2.
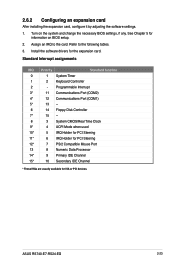
2.6.2 Configuring an expansion card
After installing the expansion card, configure it by adjusting the software settings.
1. See Chapter 5 for ISA or PCI devices... on the system and change the necessary BIOS settings, if any. Install the software drivers for the expansion card.
User Guide - Page 49
... push the bracket until the clip clicks securely in place. ASUS RS740-E7-RS24-EG
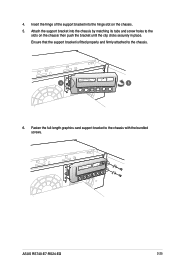
2-25 4. Insert the hinge of the support bracket into the chassis by matching its tabs and screw holes to the chassis with the bundled screws. Fasten the full-length graphics card support bracket to the slots on the chassis.
5. Ensure that...
User Guide - Page 51
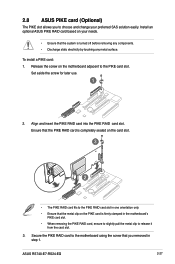
... by touching any metal surface. 2.8 ASUS PIKE card (Optional)
The PIKE slot allows you removed in step 1.
Set aside the screw for later use.
1
2.
Release the screw on your preferred SAS solution easily. Install an optional ASUS PIKE RAID card based on the motherboard...PIKE card slot. Align and insert the PIKE RAID card into the PIKE RAID card slot. ASUS RS740-E7-RS24-EG
2-27
User Guide - Page 53
...ASUS RS740-E7-RS24-EG
2-29
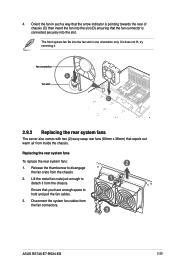
The front system fan fits into the fan slot in such a way that the arrow indicator is pointing towards the rear of chassis (C) then insert the fan into the slot (D) ensuring that the fan connector is connected securely into the slot. Orient the fan in one orientation only. Replacing... the rear system fans
To replace the rear system fans:
1.
User Guide - Page 55
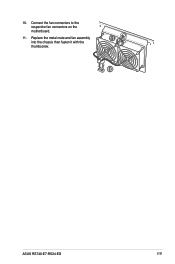
10. Connect the fan connectors to the respective fan connectors on the motherboard.
11. Replace the metal crate and fan assembly
11
into the chassis then fasten it with the
thumbscrew.
10
ASUS RS740-E7-RS24-EG
2-31
Asus RS740-E7-RS24-EG Reviews
We have not received any reviews for Asus yet.