User Guide
Page 43
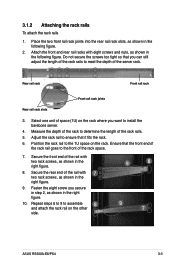
... where you can still adjust the length of the rack rails to meet the depth of the rack to the 1U space on the other 8 side. 9 8 9 7 ASUS RS500A-E6/PS4 3-3 Measure the depth of the server rack. Repeat steps 6 to 9 to ensure that it fits the rack. 6. 3.1.2 Attaching the rack rails To attach the rack ... rail with eight screws and nuts, as shown in the right figure. 10. Secure the front end of the rack rail goes to install the barebone server. 4. Secure the rear end of the rack space. 7. Attach the front and rear rail racks with two rack screws, as shown in the following ...
... where you can still adjust the length of the rack rails to meet the depth of the rack to the 1U space on the other 8 side. 9 8 9 7 ASUS RS500A-E6/PS4 3-3 Measure the depth of the server rack. Repeat steps 6 to 9 to ensure that it fits the rack. 6. 3.1.2 Attaching the rack rails To attach the rack ... rail with eight screws and nuts, as shown in the right figure. 10. Secure the front end of the rack rail goes to install the barebone server. 4. Secure the rear end of the rack space. 7. Attach the front and rear rail racks with two rack screws, as shown in the following ...
User Guide
Page 46
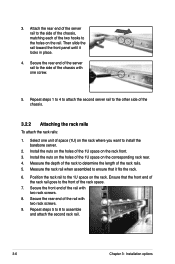
Then slide the rail toward the front panel until it fits the rack. 6. Install the nuts on the holes of the 1U space on the rack where you want to install the barebone server. 2. Measure the rack rail when assembled to determine the length of the rack to ensure that the front end of... the 1U space on the rack front. 3. Secure the front end of the rail with two rack screws. 9. Select one screw. 5. Measure...
Then slide the rail toward the front panel until it fits the rack. 6. Install the nuts on the holes of the 1U space on the rack where you want to install the barebone server. 2. Measure the rack rail when assembled to determine the length of the rack to ensure that the front end of... the 1U space on the rack front. 3. Secure the front end of the rail with two rack screws. 9. Select one screw. 5. Measure...

