

User Manual
Page 15
RAMPAGE IV GENE specifications summary USB ROG Exclusive Overclocking Features 2 x USB 3.0 Controllers: - 4 x USB 3.0/2.0 ports (2 ports at mid-board, 2 ports at the back panel) Intel® X79 Chipset: ... CPU power - 3-phase VCCSA power - 2+2-phase DRAM power USB BIOS Flashback ROG Connect Mem TweakIt ROG GameFirst MemOK! Profile Overclocking Protection - ASUS C.P.R.(CPU Parameter Recall) (continued on the next page) xv ROG BIOS Print - O.C. GPU.DIMM Post Intelligent overclocking tools - EX) - ASUS TurboV EVO - COP EX (Component Overheat Protection - ProbeIt Extreme Tweaker...
RAMPAGE IV GENE specifications summary USB ROG Exclusive Overclocking Features 2 x USB 3.0 Controllers: - 4 x USB 3.0/2.0 ports (2 ports at mid-board, 2 ports at the back panel) Intel® X79 Chipset: ... CPU power - 3-phase VCCSA power - 2+2-phase DRAM power USB BIOS Flashback ROG Connect Mem TweakIt ROG GameFirst MemOK! Profile Overclocking Protection - ASUS C.P.R.(CPU Parameter Recall) (continued on the next page) xv ROG BIOS Print - O.C. GPU.DIMM Post Intelligent overclocking tools - EX) - ASUS TurboV EVO - COP EX (Component Overheat Protection - ProbeIt Extreme Tweaker...

User Manual
Page 16
ASUS CrashFree BIOS 3 - ASUS MyLogo 2 ASUS Q-Design - ASUS Q-LED (CPU, DRAM, VGA, Boot Device LED) - ASUS Q-Shield 1 x PS/2 keyboard/mouse Combo port 1 x Clear CMOS button 1 x Optical S/PDIF out 1 x ROG Connect On/Off switch 8 x USB 2.0/1.1 ports (1 can be switched to ROG Connect (white)) 2 x USB 3.0/2.0 ports (blue) 1 x LAN (RJ45) port 1 x 8-channel Audio I /O Connectors ASUS EPU Engine ASUS Exclusive Features - ASUS Q-Slot - RAMPAGE IV GENE... specifications summary ASUS Special Features ...
ASUS CrashFree BIOS 3 - ASUS MyLogo 2 ASUS Q-Design - ASUS Q-LED (CPU, DRAM, VGA, Boot Device LED) - ASUS Q-Shield 1 x PS/2 keyboard/mouse Combo port 1 x Clear CMOS button 1 x Optical S/PDIF out 1 x ROG Connect On/Off switch 8 x USB 2.0/1.1 ports (1 can be switched to ROG Connect (white)) 2 x USB 3.0/2.0 ports (blue) 1 x LAN (RJ45) port 1 x 8-channel Audio I /O Connectors ASUS EPU Engine ASUS Exclusive Features - ASUS Q-Slot - RAMPAGE IV GENE... specifications summary ASUS Special Features ...

User Manual
Page 17
... x 24.4cm) *Specifications are subject to change without notice. ROG CPU-Z - ROG GameFirst Utility - ASUS USB 3.0 Boost - ROG Mem TweakIt Utility - RAMPAGE IV GENE specifications summary BIOS 64Mb Flash ROM, UEFI AMI BIOS, PnP, DMI2.0, WfM20, SM BIOS 2.5, ACPI2.0a Mutli-Language BIOS Manageability WfM2.0, DMI2.0, WOL by PME, WOR by PME, PXE Software Support DVD: Drivers and...
... x 24.4cm) *Specifications are subject to change without notice. ROG CPU-Z - ROG GameFirst Utility - ASUS USB 3.0 Boost - ROG Mem TweakIt Utility - RAMPAGE IV GENE specifications summary BIOS 64Mb Flash ROM, UEFI AMI BIOS, PnP, DMI2.0, WfM20, SM BIOS 2.5, ACPI2.0a Mutli-Language BIOS Manageability WfM2.0, DMI2.0, WOL by PME, WOR by PME, PXE Software Support DVD: Drivers and...

User Manual
Page 21
... you to frag more, and get loose? The days of a button. GPU.DIMM Post Enter the BIOS for total system control. Remove your doubts, and have control over . ROG RAMPAGE IV GENE 1-3 ROG Connect links your opponents. ROG GameFirst The speed you need to pwn your main system to ... system memory to get fragged less. ROG Connect Plug and Overclock - ROG BIOS Print Easy sharing of your BIOS settings in one click. Rampage IV GENE features ROG BIOS Print which allows users to easily share their BIOS settings to find out. Just enter the BIOS setting to others with ROG Connect.
... you to frag more, and get loose? The days of a button. GPU.DIMM Post Enter the BIOS for total system control. Remove your doubts, and have control over . ROG RAMPAGE IV GENE 1-3 ROG Connect links your opponents. ROG GameFirst The speed you need to pwn your main system to ... system memory to get fragged less. ROG Connect Plug and Overclock - ROG BIOS Print Easy sharing of your BIOS settings in one click. Rampage IV GENE features ROG BIOS Print which allows users to easily share their BIOS settings to find out. Just enter the BIOS setting to others with ROG Connect.
User Manual
Page 23
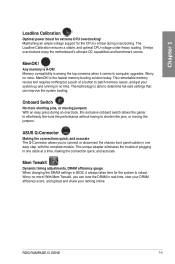
Worry no more ! Mem TweakIt Dynamic timing adjustments, DRAM efficiency gauge When changing the DRAM settings in BIOS, it comes to patch memory issues, and get your ranking online. The Loadline Calibration ensures a stable, and optimal CPU ... Onboard Switch No more shorting pins, or moving the jumpers. Worry no time. Maintaining an ample voltage support for extreme CPU overclocking! ROG RAMPAGE IV GENE 1-5 ASUS Q-Connector Making the connections quick, and accurate The Q-Connector allows you can improve the system booting. This unique adapter eliminates the trouble of...
Worry no more ! Mem TweakIt Dynamic timing adjustments, DRAM efficiency gauge When changing the DRAM settings in BIOS, it comes to patch memory issues, and get your ranking online. The Loadline Calibration ensures a stable, and optimal CPU ... Onboard Switch No more shorting pins, or moving the jumpers. Worry no time. Maintaining an ample voltage support for extreme CPU overclocking! ROG RAMPAGE IV GENE 1-5 ASUS Q-Connector Making the connections quick, and accurate The Q-Connector allows you can improve the system booting. This unique adapter eliminates the trouble of...

User Manual
Page 25
... a world O.C. The motherboard features the ASUS O.C. With better electric conductivity, it ideally protects your CPU at no additional cost with just one touch, while TurboV offers more options to advanced overclockers to install. ROG RAMPAGE IV GENE 1-7 Profile Conveniently store or load multiple BIOS settings Freely share, and distribute your BIOS only in the CMOS or...
... a world O.C. The motherboard features the ASUS O.C. With better electric conductivity, it ideally protects your CPU at no additional cost with just one touch, while TurboV offers more options to advanced overclockers to install. ROG RAMPAGE IV GENE 1-7 Profile Conveniently store or load multiple BIOS settings Freely share, and distribute your BIOS only in the CMOS or...

User Manual
Page 49
Chapter 2 • These connectors are using Serial ATA hard disk drives. ROG RAMPAGE IV GENE 2-23 If you installed Serial ATA hard disk drives, you are set the SATA Mode item in the BIOS to [AHCI Mode]. Refer to section 3.5.4 SATA Configuration for details. • You must install Windows® XP...Windows® XP SP3 or later versions. If you intend to create a Serial ATA RAID set using NCQ, set the SATA Mode in the BIOS to section 3.5.4 SATA Configuration for details. • Before creating a RAID set, refer to section 4.4 RAID configurations or the manual bundled in...
Chapter 2 • These connectors are using Serial ATA hard disk drives. ROG RAMPAGE IV GENE 2-23 If you installed Serial ATA hard disk drives, you are set the SATA Mode item in the BIOS to [AHCI Mode]. Refer to section 3.5.4 SATA Configuration for details. • You must install Windows® XP...Windows® XP SP3 or later versions. If you intend to create a Serial ATA RAID set using NCQ, set the SATA Mode in the BIOS to section 3.5.4 SATA Configuration for details. • Before creating a RAID set, refer to section 4.4 RAID configurations or the manual bundled in...

User Manual
Page 55
... is set to [AC97]. ATX power connectors (24-pin EATXPWR; 8-pin EATX12V) These connectors are designed to fit these connectors in the BIOS setup to this connector. • We recommend that supports either HD Audio or legacy AC`97 audio standard. The power supply plugs are ...pin AAFP) This connector is for ATX power supply plugs. Find the proper orientation and push down firmly until the connectors completely fit. ROG RAMPAGE IV GENE 2-29 By default, this connector, set the Front Panel Type item in only one end of the motherboard's high-definition audio capability. •...
... is set to [AC97]. ATX power connectors (24-pin EATXPWR; 8-pin EATX12V) These connectors are designed to fit these connectors in the BIOS setup to this connector. • We recommend that supports either HD Audio or legacy AC`97 audio standard. The power supply plugs are ...pin AAFP) This connector is for ATX power supply plugs. Find the proper orientation and push down firmly until the connectors completely fit. ROG RAMPAGE IV GENE 2-29 By default, this connector, set the Front Panel Type item in only one end of the motherboard's high-definition audio capability. •...

User Manual
Page 57
... the system is ON turns the system OFF. • Reset button (2-pin RESET) This 2-pin connector is for the chassis-mounted system warning speaker. ROG RAMPAGE IV GENE 2-31 Connect the HDD Activity LED cable to hear system beeps and warnings. • ATX power button/soft-off button (2-pin PWRSW) This connector is... is for the system power button. The IDE LED lights up when you to this connector. Pressing the power button turns the system on the BIOS settings. System panel connector (20-8 pin PANEL) This connector supports several chassis-mounted functions. 10.
... the system is ON turns the system OFF. • Reset button (2-pin RESET) This 2-pin connector is for the chassis-mounted system warning speaker. ROG RAMPAGE IV GENE 2-31 Connect the HDD Activity LED cable to hear system beeps and warnings. • ATX power button/soft-off button (2-pin PWRSW) This connector is... is for the system power button. The IDE LED lights up when you to this connector. Pressing the power button turns the system on the BIOS settings. System panel connector (20-8 pin PANEL) This connector supports several chassis-mounted functions. 10.

User Manual
Page 71
Chapter 2 • Press the Clear CMOS switch to clear BIOS setup information only when the system hangs due to overclocking. • DO NOT insert a different connector to the external SATA port. • Due to USB 3.0 ... Out Mic In Center/Subwoofer Rear Speaker Out - 8-channel Line In Front Speaker Out Mic In Center/Subwoofer Rear Speaker Out Side Speaker Out ROG RAMPAGE IV GENE 2-45
Chapter 2 • Press the Clear CMOS switch to clear BIOS setup information only when the system hangs due to overclocking. • DO NOT insert a different connector to the external SATA port. • Due to USB 3.0 ... Out Mic In Center/Subwoofer Rear Speaker Out - 8-channel Line In Front Speaker Out Mic In Center/Subwoofer Rear Speaker Out Side Speaker Out ROG RAMPAGE IV GENE 2-45

User Manual
Page 75
...3: 3.1 Knowing BIOS BIOS setup The new ASUS UEFI BIOS is an Unified Extensible Firmware Interface that complies with its test routines. The term "BIOS" in the EZ Mode/Advanced Mode screen. See section 3.9 Exit Menu for details. • If the system fails to boot after changing any BIOS setting, load... the Power-On Self-Test (POST) to ensure optimum performance. Chapter 3 ROG RAMPAGE IV GENE 3-1 When you start up the computer, the system provides you wish to enter Setup after changing any BIOS setting, try to clear the CMOS and reset the motherboard to restart the system....
...3: 3.1 Knowing BIOS BIOS setup The new ASUS UEFI BIOS is an Unified Extensible Firmware Interface that complies with its test routines. The term "BIOS" in the EZ Mode/Advanced Mode screen. See section 3.9 Exit Menu for details. • If the system fails to boot after changing any BIOS setting, load... the Power-On Self-Test (POST) to ensure optimum performance. Chapter 3 ROG RAMPAGE IV GENE 3-1 When you start up the computer, the system provides you wish to enter Setup after changing any BIOS setting, try to clear the CMOS and reset the motherboard to restart the system....

User Manual
Page 77
... Configuration fields These fields show the values for the menu items. If an item is a brief description of the field opposite the item. Chapter 3 ROG RAMPAGE IV GENE 3-3 Pop-up window Select a menu item and press to display a list of the menu screen are items that the item has a submenu. Use the...in the menu and change the value of a field, select it and press to display a pop-up window with the configuration options for the BIOS setup program. For example, selecting Main shows the Main menu items. The other items on the menu bar have their respective menu items. Back...
... Configuration fields These fields show the values for the menu items. If an item is a brief description of the field opposite the item. Chapter 3 ROG RAMPAGE IV GENE 3-3 Pop-up window Select a menu item and press to display a list of the menu screen are items that the item has a submenu. Use the...in the menu and change the value of a field, select it and press to display a pop-up window with the configuration options for the BIOS setup program. For example, selecting Main shows the Main menu items. The other items on the menu bar have their respective menu items. Back...

User Manual
Page 93
Chapter 3 3.4.1 System Language [English] Allows you to choose the BIOS language version from the options. 3.4.2 System Date [Day xx/xx/xxxx] Allows you to set the system date. 3.4.3 System Time [xx:xx:xx] Allows you to set the system date, time, language, and security settings. ROG RAMPAGE IV GENE 3-19 3.4 Main menu The Main menu provides you an overview of the basic system information, and allows you to set the system time.
Chapter 3 3.4.1 System Language [English] Allows you to choose the BIOS language version from the options. 3.4.2 System Date [Day xx/xx/xxxx] Allows you to set the system date. 3.4.3 System Time [xx:xx:xx] Allows you to set the system date, time, language, and security settings. ROG RAMPAGE IV GENE 3-19 3.4 Main menu The Main menu provides you an overview of the basic system information, and allows you to set the system time.

User Manual
Page 97
... to schedule two threads or processes simultaneously. [Disabled] Only one thread per activated core is enabled. [Enabled] Two threads per activated core are enabled. ROG RAMPAGE IV GENE 3-23 Chapter 3 Scroll down . The items shown in this screen may be different due to the CPU you installed. 3.5.1 CPU Configuration The items in this...
... to schedule two threads or processes simultaneously. [Disabled] Only one thread per activated core is enabled. [Enabled] Two threads per activated core are enabled. ROG RAMPAGE IV GENE 3-23 Chapter 3 Scroll down . The items shown in this screen may be different due to the CPU you installed. 3.5.1 CPU Configuration The items in this...

User Manual
Page 101
... Support [Enabled] [Disabled] The USB devices can be used only for the BIOS setup program. [Enabled] Enables the support for USB 3.0 devices on legacy operating systems (OS). [Auto] Allows the system to change the USB-related features. ROG RAMPAGE IV GENE 3-27 If no USB device is detected, the legacy USB support is disabled...
... Support [Enabled] [Disabled] The USB devices can be used only for the BIOS setup program. [Enabled] Enables the support for USB 3.0 devices on legacy operating systems (OS). [Auto] Allows the system to change the USB-related features. ROG RAMPAGE IV GENE 3-27 If no USB device is detected, the legacy USB support is disabled...
User Manual
Page 109
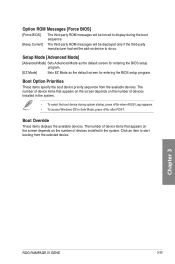
...Mode] [Advanced Mode] Sets Advanced Mode as the default screen for entering the BIOS setup program. [EZ Mode] Sets EZ Mode as the default screen for entering the BIOS setup program. Chapter 3 ROG RAMPAGE IV GENE 3-35 Boot Override These items displays the available devices. The number of device ...The third-party ROM messages will be forced to display during system startup, press when ASUS Logo appears. • To access Windows OS in the system. Option ROM Messages [Force BIOS] [Force BIOS] The third-party ROM messages will be displayed only if the third-party manufacturer had...
...Mode] [Advanced Mode] Sets Advanced Mode as the default screen for entering the BIOS setup program. [EZ Mode] Sets EZ Mode as the default screen for entering the BIOS setup program. Chapter 3 ROG RAMPAGE IV GENE 3-35 Boot Override These items displays the available devices. The number of device ...The third-party ROM messages will be forced to display during system startup, press when ASUS Logo appears. • To access Windows OS in the system. Option ROM Messages [Force BIOS] [Force BIOS] The third-party ROM messages will be displayed only if the third-party manufacturer had...

User Manual
Page 115
... the motherboard package. ASUS EZ Flash 2: Updates the BIOS using the current version of BIOS, DO NOT manually update the BIOS. USB BIOS Flashback: Updates the BIOS under standby power using the ASUS Update or BIOS Updater utilities. 3.10.1 ASUS Update utility The ASUS Update is no problem using a USB flash drive. 3. Chapter 3 ROG RAMPAGE IV GENE 3-41 Launching ASUS Update After installing AI...
... the motherboard package. ASUS EZ Flash 2: Updates the BIOS using the current version of BIOS, DO NOT manually update the BIOS. USB BIOS Flashback: Updates the BIOS under standby power using the ASUS Update or BIOS Updater utilities. 3.10.1 ASUS Update utility The ASUS Update is no problem using a USB flash drive. 3. Chapter 3 ROG RAMPAGE IV GENE 3-41 Launching ASUS Update After installing AI...
User Manual
Page 119
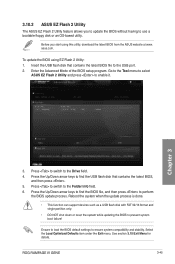
...DO NOT shut down or reset the system while updating the BIOS to ensure system compatibility and stability. Ensure to load the BIOS default settings to prevent system boot failure! ROG RAMPAGE IV GENE 3-45 Press to switch to find the BIOS file, and then press to the Folder Info field. 6.... Select the Load Optimized Defaults item under the Exit menu. 3.10.2 ASUS EZ Flash 2 Utility The ASUS EZ Flash 2 ...
...DO NOT shut down or reset the system while updating the BIOS to ensure system compatibility and stability. Ensure to load the BIOS default settings to prevent system boot failure! ROG RAMPAGE IV GENE 3-45 Press to switch to find the BIOS file, and then press to the Folder Info field. 6.... Select the Load Optimized Defaults item under the Exit menu. 3.10.2 ASUS EZ Flash 2 Utility The ASUS EZ Flash 2 ...

User Manual
Page 121
...by pressing the item number. 4. Download the latest BIOS file and BIOS Updater from Drive C (optical drive) to a hard disk drive or USB flash drive in DOS environment 1. 3.10.4 ASUS BIOS Updater The ASUS BIOS Updater allows you to update BIOS in FAT32/16 format and single partition. 2. ... drive and select the optical drive as the boot device. C:\>d: D:\> Chapter 3 ROG RAMPAGE IV GENE 3-47 At the FreeDOS prompt, type d: and press to switch the disk from the ASUS website at http:// support.asus.com and save the BIOS file and BIOS Updater to Drive D (USB flash drive).
...by pressing the item number. 4. Download the latest BIOS file and BIOS Updater from Drive C (optical drive) to a hard disk drive or USB flash drive in DOS environment 1. 3.10.4 ASUS BIOS Updater The ASUS BIOS Updater allows you to update BIOS in FAT32/16 format and single partition. 2. ... drive and select the optical drive as the boot device. C:\>d: D:\> Chapter 3 ROG RAMPAGE IV GENE 3-47 At the FreeDOS prompt, type d: and press to switch the disk from the ASUS website at http:// support.asus.com and save the BIOS file and BIOS Updater to Drive D (USB flash drive).

User Manual
Page 122
...29] Current ROM BOARD: RAMPAGE IV GENE VER: 0217 DATE: 11/30/2011 PATH: A:\ Update ROM BOARD: Unknown VER: Unknown DATE: Unknown BIOS backup is done! ASUSTek BIOS Updater for the extension. 2. Backing up the current BIOS To backup the current BIOS file using the BIOS Updater Ensure that the USB...enough free space to continue. Press any key to return to the DOS prompt. The BIOS Updater backup screen appears indicating the BIOS backup process. Note Saving BIOS: Chapter 3 3-48 Chapter 3: BIOS setup When BIOS backup is done, press any key to save the file. 1. At the FreeDOS ...
...29] Current ROM BOARD: RAMPAGE IV GENE VER: 0217 DATE: 11/30/2011 PATH: A:\ Update ROM BOARD: Unknown VER: Unknown DATE: Unknown BIOS backup is done! ASUSTek BIOS Updater for the extension. 2. Backing up the current BIOS To backup the current BIOS file using the BIOS Updater Ensure that the USB...enough free space to continue. Press any key to return to the DOS prompt. The BIOS Updater backup screen appears indicating the BIOS backup process. Note Saving BIOS: Chapter 3 3-48 Chapter 3: BIOS setup When BIOS backup is done, press any key to save the file. 1. At the FreeDOS ...


