User Guide for English Edition
Page 4
...® apps 9 Hotspots...10 Working with Windows® apps 12 Launching apps 12 Closing apps...12 Customizing apps on the Start Screen 12 Accessing All Apps 13 Charm bar...15 Inside the Charm bar 16 Snap feature...17 Wi-Fi connection 18 Disabling Airplane mode 18 Enabling ...Wi-Fi 18 Function keys...20 Function keys for ASUS Apps 21 Featured ASUS Apps 22 LifeFrame...22 Power4Gear Hybrid 24 USB Charger 26 Instant On...28 Remove everything and reinstall Windows 29 Shutting down your Notebook...
...® apps 9 Hotspots...10 Working with Windows® apps 12 Launching apps 12 Closing apps...12 Customizing apps on the Start Screen 12 Accessing All Apps 13 Charm bar...15 Inside the Charm bar 16 Snap feature...17 Wi-Fi connection 18 Disabling Airplane mode 18 Enabling ...Wi-Fi 18 Function keys...20 Function keys for ASUS Apps 21 Featured ASUS Apps 22 LifeFrame...22 Power4Gear Hybrid 24 USB Charger 26 Instant On...28 Remove everything and reinstall Windows 29 Shutting down your Notebook...

User Guide for English Edition
Page 6
...) or 2 GB (64-bit) Hard disk space 16 GB (32-bit) or 20 GB (64-bit) Graphics card Microsoft DirectX9 graphics device with WDDM driver Screen resolution 1024 x 768 for Windows® apps 1366 x 768 for Snap feature NOTE: For updates on these system requirements, visit http:// www.windows.microsoft.com...
...) or 2 GB (64-bit) Hard disk space 16 GB (32-bit) or 20 GB (64-bit) Graphics card Microsoft DirectX9 graphics device with WDDM driver Screen resolution 1024 x 768 for Windows® apps 1366 x 768 for Snap feature NOTE: For updates on these system requirements, visit http:// www.windows.microsoft.com...

User Guide for English Edition
Page 8
Press the power button on the keyboard to the following steps: 1. The Start screen appears next, indicating that you have successfully signed in using your Notebook PC . 2. Sign in to Windows® 8. NOTE: Steps 2-4 are also applicable when restarting .../12 2:47:54 PM Click on the touchpad or press any key on your local account or Microsoft account. 4. Starting up . The Windows® 8 lock screen appears after the Notebook PC boots up Windows® 8 To access Windows® 8 from Shut Down, Sleep, or Hibernate mode, refer to proceed. 3.
Press the power button on the keyboard to the following steps: 1. The Start screen appears next, indicating that you have successfully signed in using your Notebook PC . 2. Sign in to Windows® 8. NOTE: Steps 2-4 are also applicable when restarting .../12 2:47:54 PM Click on the touchpad or press any key on your local account or Microsoft account. 4. Starting up . The Windows® 8 lock screen appears after the Notebook PC boots up Windows® 8 To access Windows® 8 from Shut Down, Sleep, or Hibernate mode, refer to proceed. 3.
User Guide for English Edition
Page 9
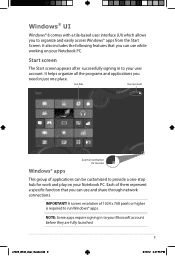
... which allows you can use while working on your Notebook PC. live tiles User account Windows® apps Zoom in to your user account. A screen resolution of them represent a specific function that you to provide a one place. NOTE: Some apps require signing in /out button for work and... play on your Notebook PC. Start screen The Start screen appears after successfully signing in just one -stop hub for live tiles This group of applications can be customized to organize and easily ...
... which allows you can use while working on your Notebook PC. live tiles User account Windows® apps Zoom in to your user account. A screen resolution of them represent a specific function that you to provide a one place. NOTE: Some apps require signing in /out button for work and... play on your Notebook PC. Start screen The Start screen appears after successfully signing in just one -stop hub for live tiles This group of applications can be customized to organize and easily ...

User Guide for English Edition
Page 10
... app's thumbnail to revert back to that app. (2) If you to launch programs and access the settings of your mouse pointer to the Start screen. Hotspots on a launched app Hotspot upper left corner lower left corner top side upper and lower right corner Action (1) Hover your mouse pointer until... it changes to a new location. Hover your mouse pointer then click on the Start screen's thumbnail to revert back to launch the Charm bar. 10 e7495_Win8_User_Guide.indd 10 8/13/12 2:47:56 PM Drag then drop the app to a...
... app's thumbnail to revert back to that app. (2) If you to launch programs and access the settings of your mouse pointer to the Start screen. Hotspots on a launched app Hotspot upper left corner lower left corner top side upper and lower right corner Action (1) Hover your mouse pointer until... it changes to a new location. Hover your mouse pointer then click on the Start screen's thumbnail to revert back to launch the Charm bar. 10 e7495_Win8_User_Guide.indd 10 8/13/12 2:47:56 PM Drag then drop the app to a...

User Guide for English Edition
Page 11
Hotspots on the Start screen Hotspot upper left corner lower left corner upper and lower right corner Action (1) Hover your mouse pointer then click on the recent app's thumbnail to revert back to launch the Charm bar. e7495_Win8_User_Guide.indd 11 11 8/13/12 2:47:56 PM Hover your mouse pointer then click on the recent app's thumbnail to revert back to that app. (2) If you launched more than one app, slide down to show all launched apps. Hover your mouse pointer to that app.
Hotspots on the Start screen Hotspot upper left corner lower left corner upper and lower right corner Action (1) Hover your mouse pointer then click on the recent app's thumbnail to revert back to launch the Charm bar. e7495_Win8_User_Guide.indd 11 11 8/13/12 2:47:56 PM Hover your mouse pointer then click on the recent app's thumbnail to revert back to that app. (2) If you launched more than one app, slide down to show all launched apps. Hover your mouse pointer to that app.
User Guide for English Edition
Page 12
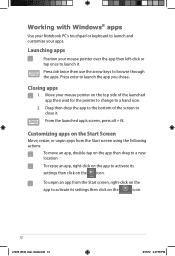
... a new location. Press enter to activate its settings then click on the app to a hand icon. 2. From the launched app's screen, press alt + f4. To unpin an app from the Start screen using the following actions: To move an app, double-tap on the icon. 12 e7495_Win8_User_Guide.indd 12 8/13/12 2:47...:58 PM Move your mouse pointer on the top side of the screen to close it . To resize an app, right-click on the icon. Working with Windows® apps Use your Notebook PC's touchpad or keyboard to...
... a new location. Press enter to activate its settings then click on the app to a hand icon. 2. From the launched app's screen, press alt + f4. To unpin an app from the Start screen using the following actions: To move an app, double-tap on the icon. 12 e7495_Win8_User_Guide.indd 12 8/13/12 2:47...:58 PM Move your mouse pointer on the top side of the screen to close it . To resize an app, right-click on the icon. Working with Windows® apps Use your Notebook PC's touchpad or keyboard to...
User Guide for English Edition
Page 13
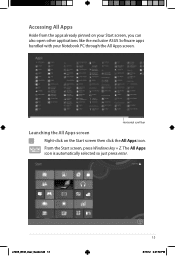
Horizontal scroll bar Launching the All Apps screen Right-click on your Start screen, you can also open other applications like the exclusive ASUS Software apps bundled with your Notebook PC through the All Apps screen. From the Start screen, press Windows key + Z. The All Apps icon is automatically selected so just press enter. e7495_Win8_User_Guide.indd 13 13 8/13/12 2:47:59 PM Accessing All Apps Aside from the apps already pinned on the Start screen then click the All Apps icon.
Horizontal scroll bar Launching the All Apps screen Right-click on your Start screen, you can also open other applications like the exclusive ASUS Software apps bundled with your Notebook PC through the All Apps screen. From the Start screen, press Windows key + Z. The All Apps icon is automatically selected so just press enter. e7495_Win8_User_Guide.indd 13 13 8/13/12 2:47:59 PM Accessing All Apps Aside from the apps already pinned on the Start screen then click the All Apps icon.
User Guide for English Edition
Page 14
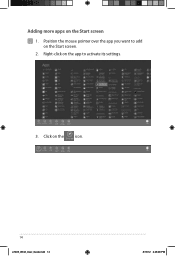
Right-click on the app to add on the Start screen. 2. Position the mouse pointer over the app you want to activate its settings. 3. Click on the Start screen 1. Adding more apps on the icon. 14 e7495_Win8_User_Guide.indd 14 8/13/12 2:48:00 PM
Right-click on the app to add on the Start screen. 2. Position the mouse pointer over the app you want to activate its settings. 3. Click on the Start screen 1. Adding more apps on the icon. 14 e7495_Win8_User_Guide.indd 14 8/13/12 2:48:00 PM
User Guide for English Edition
Page 15
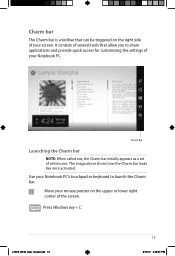
... 15 8/13/12 2:48:01 PM Charm Bar Launching the Charm bar NOTE: When called out, the Charm bar initially appears as a set of your screen. Move your Notebook PC's touchpad or keyboard to share applications and provide quick access for customizing the settings of the... screen. It consists of several tools that can be triggered on the upper or lower right corner of your Notebook PC. Charm bar The Charm bar ...
... 15 8/13/12 2:48:01 PM Charm Bar Launching the Charm bar NOTE: When called out, the Charm bar initially appears as a set of your screen. Move your Notebook PC's touchpad or keyboard to share applications and provide quick access for customizing the settings of the... screen. It consists of several tools that can be triggered on the upper or lower right corner of your Notebook PC. Charm bar The Charm bar ...
User Guide for English Edition
Page 16
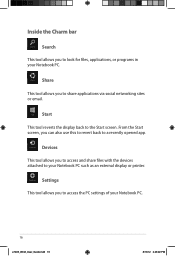
... allows you to look for files, applications, or programs in your Notebook PC. 16 e7495_Win8_User_Guide.indd 16 8/13/12 2:48:02 PM From the Start screen, you to a recently opened app. Share This tool allows you can also use this to revert back to share applications via social networking sites or... PC such as an external display or printer. Settings This tool allows you to access and share files with the devices attached to the Start screen. Devices This tool allows you to access the PC settings of your Notebook PC.
... allows you to look for files, applications, or programs in your Notebook PC. 16 e7495_Win8_User_Guide.indd 16 8/13/12 2:48:02 PM From the Start screen, you to a recently opened app. Share This tool allows you can also use this to revert back to share applications via social networking sites or... PC such as an external display or printer. Settings This tool allows you to access and share files with the devices attached to the Start screen. Devices This tool allows you to access the PC settings of your Notebook PC.
User Guide for English Edition
Page 17
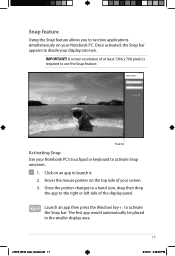
A screen resolution of the display panel. The first app would automatically be placed in the smaller display area. Click on an app to activate the Snap ... launch it. 2. Launch an app then press the Windows key + . Snap feature Using the Snap feature allows you to run two applications simultaneously on your screen. 3. IMPORTANT!
A screen resolution of the display panel. The first app would automatically be placed in the smaller display area. Click on an app to activate the Snap ... launch it. 2. Launch an app then press the Windows key + . Snap feature Using the Snap feature allows you to run two applications simultaneously on your screen. 3. IMPORTANT!
User Guide for English Edition
Page 20
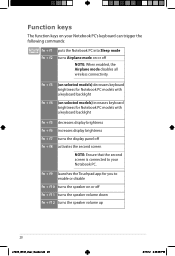
... fn + f5 decreases display brightness fn + f6 increases display brightness fn + f7 turns the display panel off fn + f8 activates the second screen NOTE: Ensure that the second screen is connected to enable or disable fn + f10 turns the speaker on or off NOTE: When enabled, the Airplane mode disables all wireless...
... fn + f5 decreases display brightness fn + f6 increases display brightness fn + f7 turns the display panel off fn + f8 activates the second screen NOTE: Ensure that the second screen is connected to enable or disable fn + f10 turns the speaker on or off NOTE: When enabled, the Airplane mode disables all wireless...
User Guide for English Edition
Page 30
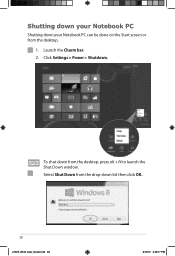
Shutting down your Notebook PC can be done on the Start screen or from the desktop. 1. Click Settings > Power > Shutdown. Launch the Charm bar. 2. To shut down your Notebook PC Shutting down from the drop-down list then click OK. 30 e7495_Win8_User_Guide.indd 30 8/13/12 2:48:17 PM Select Shut Down from the desktop, press alt + f4 to launch the Shut Down window.
Shutting down your Notebook PC can be done on the Start screen or from the desktop. 1. Click Settings > Power > Shutdown. Launch the Charm bar. 2. To shut down your Notebook PC Shutting down from the drop-down list then click OK. 30 e7495_Win8_User_Guide.indd 30 8/13/12 2:48:17 PM Select Shut Down from the desktop, press alt + f4 to launch the Shut Down window.
User's Manual for English Edition
Page 34
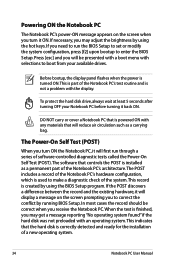
... after turning OFF your available drives. The Power-On Self Test (POST) When you turn ON the Notebook PC, it will display a message on the screen when you turn it back ON. Powering ON the Notebook PC The Notebook PC's power-ON message appears on the... screen prompting you to correct the conflict by running BIOS Setup. If necessary, you need to run through a series of software-controlled diagnostic tests called the ...
... after turning OFF your available drives. The Power-On Self Test (POST) When you turn ON the Notebook PC, it will display a message on the screen when you turn it back ON. Powering ON the Notebook PC The Notebook PC's power-ON message appears on the... screen prompting you to correct the conflict by running BIOS Setup. If necessary, you need to run through a series of software-controlled diagnostic tests called the ...
User's Manual for English Edition
Page 36
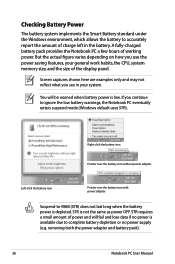
..., the CPU, system memory size, and the size of the display panel. A fully-charged battery pack provides the Notebook PC a few hours of working power. Screen captures shown here are examples only and may not reflect what you continue to ignore the low battery warnings, the Notebook PC eventually enters suspend...
..., the CPU, system memory size, and the size of the display panel. A fully-charged battery pack provides the Notebook PC a few hours of working power. Screen captures shown here are examples only and may not reflect what you continue to ignore the low battery warnings, the Notebook PC eventually enters suspend...
User's Manual for English Edition
Page 43
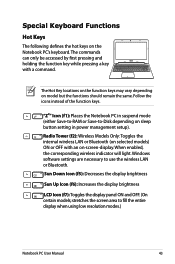
..., the corresponding wireless indicator will light. Follow the icons instead of the function keys. Windows software settings are necessary to -Disk depending on -screen-display. Special Keyboard Functions Hot Keys The following defines the hot keys on model but the functions should remain the same. stretches the... screen area to fill the entire display when using low resolution modes.) Notebook PC User Manual 43 The commands can only be accessed by...
..., the corresponding wireless indicator will light. Follow the icons instead of the function keys. Windows software settings are necessary to -Disk depending on -screen-display. Special Keyboard Functions Hot Keys The following defines the hot keys on model but the functions should remain the same. stretches the... screen area to fill the entire display when using low resolution modes.) Notebook PC User Manual 43 The commands can only be accessed by...

User's Manual for English Edition
Page 45
Power4Gear Hybrid (fn+Space Bar): This key toggles power savings between AC mode and battery mode.You can see the current mode through the on-screen display (OSD). delete/scr lk (on selected models): Toggles Windows "Calculator" application. fn+enter (on selected models): Toggles the "Scroll Lock" ON and OFF. Allows ...
Power4Gear Hybrid (fn+Space Bar): This key toggles power savings between AC mode and battery mode.You can see the current mode through the on-screen display (OSD). delete/scr lk (on selected models): Toggles Windows "Calculator" application. fn+enter (on selected models): Toggles the "Scroll Lock" ON and OFF. Allows ...
User's Manual for English Edition
Page 82
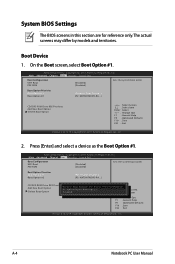
... w s Boot Option #1 Boot Manager (PO: Hitachi P2: MATSHITADVD-RAM UJ8C2 S Disabled HTS727575A9E364) →← : Select ↑↓ : Select Screen Item Enter : Select +/- : Change Opt. Copyright (C) 2011 American Megatrends, Inc. M �a�i�n A�d��v�a��n�...P2: MATSHITADVD-RA...] CD/DVD ROM Drive BBS Priorities Add New Boot Option Delete Boot Option →← : Select Screen ↑↓ : Select Item Enter : Select +/- : Change Opt. Copyright (C) 2011 American Megatrends, Inc. 2. ...
... w s Boot Option #1 Boot Manager (PO: Hitachi P2: MATSHITADVD-RAM UJ8C2 S Disabled HTS727575A9E364) →← : Select ↑↓ : Select Screen Item Enter : Select +/- : Change Opt. Copyright (C) 2011 American Megatrends, Inc. M �a�i�n A�d��v�a��n�...P2: MATSHITADVD-RA...] CD/DVD ROM Drive BBS Priorities Add New Boot Option Delete Boot Option →← : Select Screen ↑↓ : Select Item Enter : Select +/- : Change Opt. Copyright (C) 2011 American Megatrends, Inc. 2. ...
User's Manual for English Edition
Page 83
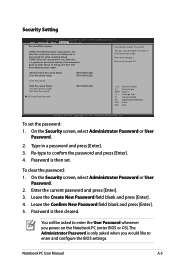
...only asked to enter the User Password whenever you would like to confirm the password and press [Enter]. 4. On the Security screen, select Administrator Password or User Password. 2. If ONLY the user 's password is set . Type in A��d�v&#...Password User Password NOT INSTALLED NOT INSTALLED HDD Password Status : Set Master Password Set User Password I/O Interface Security NOT INSTALLED →← : Select Screen ↑↓ : Select Item Enter : Select +/- : Change Opt. F1 : General Help F9 : Optimized Defaults F10 : Save ESC :...
...only asked to enter the User Password whenever you would like to confirm the password and press [Enter]. 4. On the Security screen, select Administrator Password or User Password. 2. If ONLY the user 's password is set . Type in A��d�v&#...Password User Password NOT INSTALLED NOT INSTALLED HDD Password Status : Set Master Password Set User Password I/O Interface Security NOT INSTALLED →← : Select Screen ↑↓ : Select Item Enter : Select +/- : Change Opt. F1 : General Help F9 : Optimized Defaults F10 : Save ESC :...


