User's Manual for English Edition
Page 3
... Devices 54 Optical Drive (on selected models 54 Flash Memory Card Reader 58 Hard Disk Drive 59 Memory (RAM 62 Connections...63 Network Connection 63 Wireless LAN Connection (on selected models 65 Windows Wireless Network Connection 67 Bluetooth Wireless Connection(on selected models 69 USB Charger+...72 Appendix Optional Accessories A-2 Optional Connections A-2 Operating System and Software A-3 System BIOS Settings A-4 Common Problems and Solutions A-10 Recovering Your Notebook PC A-16 Using Recovery Partition A-16 Using Recovery DVD (on selected models A-17 DVD-ROM Drive...
... Devices 54 Optical Drive (on selected models 54 Flash Memory Card Reader 58 Hard Disk Drive 59 Memory (RAM 62 Connections...63 Network Connection 63 Wireless LAN Connection (on selected models 65 Windows Wireless Network Connection 67 Bluetooth Wireless Connection(on selected models 69 USB Charger+...72 Appendix Optional Accessories A-2 Optional Connections A-2 Operating System and Software A-3 System BIOS Settings A-4 Common Problems and Solutions A-10 Recovering Your Notebook PC A-16 Using Recovery Partition A-16 Using Recovery DVD (on selected models A-17 DVD-ROM Drive...
User's Manual for English Edition
Page 6
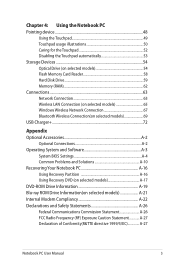
...: Information for This Manual A few notes and warnings are used throughout this guide, allowing you information on getting started with the Notebook PC. 4. The actual bundled operating system and applications differ by models and territories. About This User's Manual You are reading the Notebook PC User's Manual.This User's Manual provides information regarding the various components in this manual. Please accept your Notebook PC and the...
...: Information for This Manual A few notes and warnings are used throughout this guide, allowing you information on getting started with the Notebook PC. 4. The actual bundled operating system and applications differ by models and territories. About This User's Manual You are reading the Notebook PC User's Manual.This User's Manual provides information regarding the various components in this manual. Please accept your Notebook PC and the...
User's Manual for English Edition
Page 7
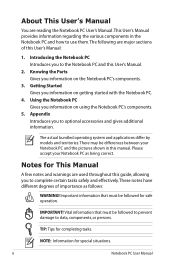
... the battery in this manual, refer all precautions and instructions. Disconnect the AC power and remove the battery pack(s) before cleaning. DO NOT expose to strong magnetic or electrical fields. DO NOT disassemble the battery. DO NOT operate during electrical storms. DO NOT leave the Notebook PC on your lap or any part of the Notebook PC. DO NOT expose to or use...
... the battery in this manual, refer all precautions and instructions. Disconnect the AC power and remove the battery pack(s) before cleaning. DO NOT expose to strong magnetic or electrical fields. DO NOT disassemble the battery. DO NOT operate during electrical storms. DO NOT leave the Notebook PC on your lap or any part of the Notebook PC. DO NOT expose to or use...
User's Manual for English Edition
Page 18
... Notebook PC User Manual Only purchase hard disk drives from authorized retailers of memory in a compartment. There is no hardware or software (including BIOS) setup required after the memory is secured in the system and configures CMOS accordingly during the POST (Power-On-Self-Test) process. Visit an authorized service center or retailer for information on memory upgrades for your Notebook PC. Additional memory will increase application performance by decreasing hard disk access...
... Notebook PC User Manual Only purchase hard disk drives from authorized retailers of memory in a compartment. There is no hardware or software (including BIOS) setup required after the memory is secured in the system and configures CMOS accordingly during the POST (Power-On-Self-Test) process. Visit an authorized service center or retailer for information on memory upgrades for your Notebook PC. Additional memory will increase application performance by decreasing hard disk access...
User's Manual for English Edition
Page 22
... acting as keyboards, pointing devices, cameras, hard disk drives, printers, and scanners connected in sites or hubs. This jack automatically detects the connecting device and switches functions. 22 Notebook PC User Manual USB supports hot-swapping of devices so that most peripherals can be connected or disconnected without restarting the computer. USB allows many devices to run simultaneously on mode. 8 / Headphone Output / Microphone Input Combo Jack This combo jack can be used to connect the Notebook PC' s audio out signal...
... acting as keyboards, pointing devices, cameras, hard disk drives, printers, and scanners connected in sites or hubs. This jack automatically detects the connecting device and switches functions. 22 Notebook PC User Manual USB supports hot-swapping of devices so that most peripherals can be connected or disconnected without restarting the computer. USB allows many devices to run simultaneously on mode. 8 / Headphone Output / Microphone Input Combo Jack This combo jack can be used to connect the Notebook PC' s audio out signal...
User's Manual for English Edition
Page 30
... used to enter the BIOS Setup. Before bootup, the display panel flashes when the power is turned ON.This is part of the system. To protect the hard disk drive, always wait at least 5 seconds after turning OFF your available drives. DO NOT carry or cover a Notebook PC that controls the POST is installed as a permanent part of the Notebook PC's architecture.The POST includes a record of a new operating system. 30 Notebook PC User Manual The Power...
... used to enter the BIOS Setup. Before bootup, the display panel flashes when the power is turned ON.This is part of the system. To protect the hard disk drive, always wait at least 5 seconds after turning OFF your available drives. DO NOT carry or cover a Notebook PC that controls the POST is installed as a permanent part of the Notebook PC's architecture.The POST includes a record of a new operating system. 30 Notebook PC User Manual The Power...
User's Manual for English Edition
Page 37
... your current data and status on the hard disk drive. Because RAM is the same as Suspend-to be OFF in RAM while many components are turned OFF. Recover by pressing the power button. (NOTE: The power indicator will blink in this mode.) Hibernate is greatly reduced but not completely eliminated because certain wake-up components like LAN needs to Sleep. By doing this mode.) Notebook PC User Manual 37
... your current data and status on the hard disk drive. Because RAM is the same as Suspend-to be OFF in RAM while many components are turned OFF. Recover by pressing the power button. (NOTE: The power indicator will blink in this mode.) Hibernate is greatly reduced but not completely eliminated because certain wake-up components like LAN needs to Sleep. By doing this mode.) Notebook PC User Manual 37
User's Manual for English Edition
Page 39
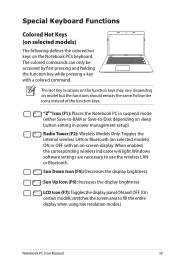
Windows software settings are necessary to fill the entire display when using low resolution modes.) Notebook PC User Manual 39 When enabled, the corresponding wireless indicator will light. The Hot Key locations on the function keys may vary depending on the Notebook PC's keyboard. Sun Down Icon (F5): Decreases the display brightness Sun Up Icon (F6): Increases the display brightness LCD Icon (F7): Toggles the display panel ON and OFF. (On certain models; The colored commands can only be...
Windows software settings are necessary to fill the entire display when using low resolution modes.) Notebook PC User Manual 39 When enabled, the corresponding wireless indicator will light. The Hot Key locations on the function keys may vary depending on the Notebook PC's keyboard. Sun Down Icon (F5): Decreases the display brightness Sun Up Icon (F6): Increases the display brightness LCD Icon (F7): Toggles the display panel ON and OFF. (On certain models; The colored commands can only be...
User's Manual for English Edition
Page 40
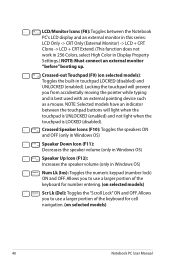
... in touchpad LOCKED (disabled) and UNLOCKED (enabled). Allows you to use a larger portion of the keyboard for cell navigation. (on selected models) 40 Notebook PC User Manual NOTE: Selected models have an indicator between the Notebook PC's LCD display and an external monitor in this series: LCD Only -> CRT Only (External Monitor) -> LCD + CRT Clone -> LCD + CRT Extend. (This function does not work in 256 Colors, select High Color in Display Property Settings.) NOTE: Must connect an external monitor "before" booting up. LCD/Monitor...
... in touchpad LOCKED (disabled) and UNLOCKED (enabled). Allows you to use a larger portion of the keyboard for cell navigation. (on selected models) 40 Notebook PC User Manual NOTE: Selected models have an indicator between the Notebook PC's LCD display and an external monitor in this series: LCD Only -> CRT Only (External Monitor) -> LCD + CRT Clone -> LCD + CRT Extend. (This function does not work in 256 Colors, select High Color in Display Property Settings.) NOTE: Must connect an external monitor "before" booting up. LCD/Monitor...
User's Manual for English Edition
Page 58
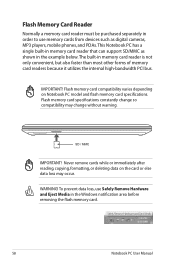
... order to use Safely Remove Hardware and Eject Media in memory card reader that can support SD/MMC as digital cameras, MP3 players, mobile phones, and PDAs. IMPORTANT! SD / MMC IMPORTANT! Flash memory card compatibility varies depending on the card or else data loss may change so compatibility may occur. Flash memory card specifications constantly change without warning. Never remove cards while or immediately after reading, copying, formatting, or deleting data on Notebook PC model and flash memory card specifications...
... order to use Safely Remove Hardware and Eject Media in memory card reader that can support SD/MMC as digital cameras, MP3 players, mobile phones, and PDAs. IMPORTANT! SD / MMC IMPORTANT! Flash memory card compatibility varies depending on the card or else data loss may change so compatibility may occur. Flash memory card specifications constantly change without warning. Never remove cards while or immediately after reading, copying, formatting, or deleting data on Notebook PC model and flash memory card specifications...
User's Manual for English Edition
Page 75
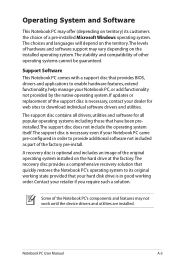
... Software This Notebook PC comes with a support disc that your hard disk drive is optional and includes an image of the original operating system installed on the hard drive at the factory.The recovery disc provides a comprehensive recovery solution that quickly restores the Notebook PC's operating system to its customers the choice of hardware and software support may not work until the device drivers and utilities are installed. A recovery disc is in order to download individual software drivers and utilities. The support disc contains all drivers, utilities and software...
... Software This Notebook PC comes with a support disc that your hard disk drive is optional and includes an image of the original operating system installed on the hard drive at the factory.The recovery disc provides a comprehensive recovery solution that quickly restores the Notebook PC's operating system to its customers the choice of hardware and software support may not work until the device drivers and utilities are installed. A recovery disc is in order to download individual software drivers and utilities. The support disc contains all drivers, utilities and software...
User's Manual for English Edition
Page 76
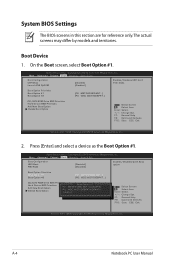
...;���A��d�v�a��n�c�e��d����C��h�i�p�s�e��t Boot Security Save & Exit Boot Configuration UEFI Boot PXE ROM [Disabled] [Disabled] Enables/Disables Quiet Boot option. Aptio Setup Utility - System BIOS Settings The BIOS screens in this section are for reference only. The actual screens may differ by models and territories. Boot Device 1. A-4 Notebook PC User Manual
...;���A��d�v�a��n�c�e��d����C��h�i�p�s�e��t Boot Security Save & Exit Boot Configuration UEFI Boot PXE ROM [Disabled] [Disabled] Enables/Disables Quiet Boot option. Aptio Setup Utility - System BIOS Settings The BIOS screens in this section are for reference only. The actual screens may differ by models and territories. Boot Device 1. A-4 Notebook PC User Manual
User's Manual for English Edition
Page 77
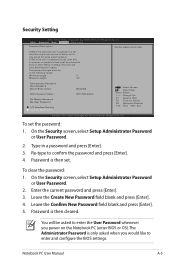
... user's password is set, then this only limits access to enter and configure the BIOS settings. Password is only asked for when entering Setup. Enter the current password and press [Enter]. 3. Leave the Create New Password field blank and press [Enter]. 4. Leave the Confirm New Password field blank and press [Enter]. 5. Password is only asked to enter the User Password whenever you would like to Setup and is then set the password: 1. Notebook PC User Manual A-5 Re-type to boot or enter Setup. Security Setting Aptio Setup Utility...
... user's password is set, then this only limits access to enter and configure the BIOS settings. Password is only asked for when entering Setup. Enter the current password and press [Enter]. 3. Leave the Create New Password field blank and press [Enter]. 4. Leave the Confirm New Password field blank and press [Enter]. 5. Password is only asked to enter the User Password whenever you would like to Setup and is then set the password: 1. Notebook PC User Manual A-5 Re-type to boot or enter Setup. Security Setting Aptio Setup Utility...
User's Manual for English Edition
Page 79
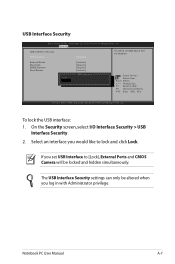
... you log in with Administrator privilege. Copyright (C) 2010 American Megatrends, Inc. � � � Security USB Interface Security USB Interface [UnLock] If Locked, all USB device will be altered when you would like to [Lock], External Ports and CMOS Camera will be disabled. On the Security screen, select I/O Interface Security > USB Interface Security. 2. To lock the USB interface: 1. External Ports BlueTooth CMOS Camera Card Reader LocK UnLock [UnLock] [UnLock] [UnLock] [UnLock] USB Interface : Select Screen : Select Item Enter: Select +/-: Change Opt.
... you log in with Administrator privilege. Copyright (C) 2010 American Megatrends, Inc. � � � Security USB Interface Security USB Interface [UnLock] If Locked, all USB device will be altered when you would like to [Lock], External Ports and CMOS Camera will be disabled. On the Security screen, select I/O Interface Security > USB Interface Security. 2. To lock the USB interface: 1. External Ports BlueTooth CMOS Camera Card Reader LocK UnLock [UnLock] [UnLock] [UnLock] [UnLock] USB Interface : Select Screen : Select Item Enter: Select +/-: Change Opt.
User's Manual for English Edition
Page 80
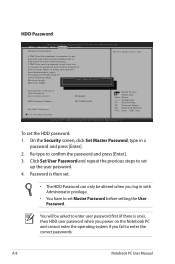
... password and press [Enter]. 3. The password length must be altered when you fail to Setup and is a power on the Notebook PC and cannot enter the operating system if you log in the following range: Minimum length 3Create New Password Maximum length 20 Administrator Password User Password Secure Boot control HDD Password Status : Set Master Password Set User Password I/O Interface Security [Enabled] NOT INSTALLED : Select Screen : Select Item Enter: Select +/-: Change Opt. On the Security screen, click Set Master Password, type...
... password and press [Enter]. 3. The password length must be altered when you fail to Setup and is a power on the Notebook PC and cannot enter the operating system if you log in the following range: Minimum length 3Create New Password Maximum length 20 Administrator Password User Password Secure Boot control HDD Password Status : Set Master Password Set User Password I/O Interface Security [Enabled] NOT INSTALLED : Select Screen : Select Item Enter: Select +/-: Change Opt. On the Security screen, click Set Master Password, type...
User's Manual for English Edition
Page 82
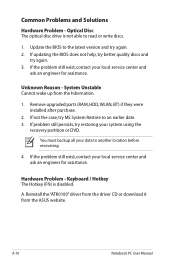
... system using the recovery partition or DVD. Keyboard / Hotkey The Hotkey (FN) is not able to an earlier date. 3. If the problem still exist, contact your data to the latest version and try restoring your local service center and ask an engineer for assistance. Remove upgraded parts (RAM, HDD, WLAN, BT) if they were installed after purchase. 2. A-10 Notebook PC User Manual Optical Disc The optical disc drive is disabled. If updating the BIOS does...
... system using the recovery partition or DVD. Keyboard / Hotkey The Hotkey (FN) is not able to an earlier date. 3. If the problem still exist, contact your data to the latest version and try restoring your local service center and ask an engineer for assistance. Remove upgraded parts (RAM, HDD, WLAN, BT) if they were installed after purchase. 2. A-10 Notebook PC User Manual Optical Disc The optical disc drive is disabled. If updating the BIOS does...

User's Manual for English Edition
Page 84
... system load. 3. visit a local service center for repair. Adapter problem; Battery problem; D. A. Wireless Card How to another location before recovering. You will see taskbar), close them . 4. FAN / Thermal Why is air flow from the main air vent. 2. A-12 Notebook PC User Manual You must backup all your system using the recovery partition or disc. Enter Control Panel -> Device Manager. C. Hardware Problem - check the power cord connections, otherwise visit a local service center for replacement. Mechanical Problem - If you have many applications...
... system load. 3. visit a local service center for repair. Adapter problem; Battery problem; D. A. Wireless Card How to another location before recovering. You will see taskbar), close them . 4. FAN / Thermal Why is air flow from the main air vent. 2. A-12 Notebook PC User Manual You must backup all your system using the recovery partition or disc. Enter Control Panel -> Device Manager. C. Hardware Problem - check the power cord connections, otherwise visit a local service center for replacement. Mechanical Problem - If you have many applications...
User's Manual for English Edition
Page 87
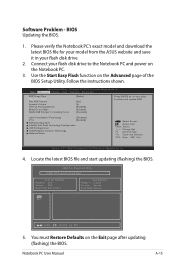
...] [4] [Enabled] [Enabled] [Disabled] Press ENTER to run the utility to the Notebook PC and power on the Exit page after updating (flashing) the BIOS. Connect your flash disk drive. 2. Aptio Setup Utility - Copyright (C) 2010 American Megatrends, Inc. �M���a��i�n� Advanced Chipset Boot Security Save & Exit POST Logo Type Start Easy Flash Play POST Sound Speaker Volume Internal Pointing Device Wake On Lid Open ASUS USB Charger+ in your flash disk drive to select and update BIOS. ASUS...
...] [4] [Enabled] [Enabled] [Disabled] Press ENTER to run the utility to the Notebook PC and power on the Exit page after updating (flashing) the BIOS. Connect your flash disk drive. 2. Aptio Setup Utility - Copyright (C) 2010 American Megatrends, Inc. �M���a��i�n� Advanced Chipset Boot Security Save & Exit POST Logo Type Start Easy Flash Play POST Sound Speaker Volume Internal Pointing Device Wake On Lid Open ASUS USB Charger+ in your flash disk drive to select and update BIOS. ASUS...
User's Manual for English Edition
Page 89
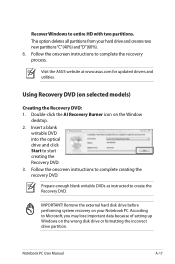
... setting up Windows on the wrong disk drive or formatting the incorrect drive partition. Notebook PC User Manual A-17 Prepare enough blank writable DVDs as instructed to complete the recovery process. Follow the onscreen instructions to create the Recovery DVD. Using Recovery DVD (on the Window desktop. 2. IMPORTANT! This option deletes all partitions from your Notebook PC. Visit the ASUS website at www.asus.com for updated drivers and utilities. Double-click the AI Recovery Burner icon on selected models) Creating the Recovery DVD...
... setting up Windows on the wrong disk drive or formatting the incorrect drive partition. Notebook PC User Manual A-17 Prepare enough blank writable DVDs as instructed to complete the recovery process. Follow the onscreen instructions to create the Recovery DVD. Using Recovery DVD (on the Window desktop. 2. IMPORTANT! This option deletes all partitions from your Notebook PC. Visit the ASUS website at www.asus.com for updated drivers and utilities. Double-click the AI Recovery Burner icon on selected models) Creating the Recovery DVD...
User's Manual for English Edition
Page 90
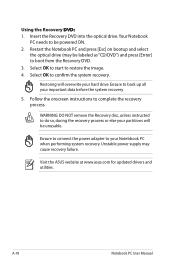
... recovery. 5. Select OK to start to confirm the system recovery. Ensure to connect the power adapter to back up all your hard drive. Unstable power supply may be labeled as "CD/DVD") and press [Enter] to be unusable. Insert the Recovery DVD into the optical drive.Your Notebook PC needs to boot from the Recovery DVD. 3. Visit the ASUS website at www.asus.com for updated drivers and utilities. WARNING: DO NOT remove the Recovery disc, unless instructed...
... recovery. 5. Select OK to start to confirm the system recovery. Ensure to connect the power adapter to back up all your hard drive. Unstable power supply may be labeled as "CD/DVD") and press [Enter] to be unusable. Insert the Recovery DVD into the optical drive.Your Notebook PC needs to boot from the Recovery DVD. 3. Visit the ASUS website at www.asus.com for updated drivers and utilities. WARNING: DO NOT remove the Recovery disc, unless instructed...


