
Pundit Manual
Page 3
Features Table of contents Disclaimer/Copyrights ii FCC/CDC statements iv Safety information vi About this guide vii ASUS contact information ix System package contents x Chapter 1: System Introduction 1-1 1.1 Front Panel Features 1-2 1.2 Rear Panel ...1-4 Chapter 2: Basic Installation 2-1 2.1 Opening the chassis 2-2 2.2 Removing the disk drive assembly 2-4 2.3 Installing the system memory 2-5 2.4 Installing the CPU 2-6 2.5 Installing CPU heatsink and fan 2-8 2.6 Installing a CD/DVD-ROM drive 2-10 2.7 Installing a hard disk drive 2-12 2.8 Replacing chassis cover 2-13 2.9 Connect...
Features Table of contents Disclaimer/Copyrights ii FCC/CDC statements iv Safety information vi About this guide vii ASUS contact information ix System package contents x Chapter 1: System Introduction 1-1 1.1 Front Panel Features 1-2 1.2 Rear Panel ...1-4 Chapter 2: Basic Installation 2-1 2.1 Opening the chassis 2-2 2.2 Removing the disk drive assembly 2-4 2.3 Installing the system memory 2-5 2.4 Installing the CPU 2-6 2.5 Installing CPU heatsink and fan 2-8 2.6 Installing a CD/DVD-ROM drive 2-10 2.7 Installing a hard disk drive 2-12 2.8 Replacing chassis cover 2-13 2.9 Connect...
Pundit Manual
Page 4
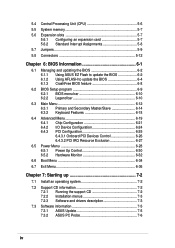
5.4 Central Processing Unit (CPU 5-6 5.5 System memory 5-7 5.6 Expansion slots 5-7 5.6.1 Configuring an expansion card 5-7 5.6.2 Standard Interrupt Assignments 5-8 5.7 Jumpers 5-9 5.8 Connectors 5-12 Chapter 6: BIOS Information 6-1 6.1 Managing and updating the BIOS 6-2 6.1.1 Using ASUS EZ Flash to update the BIOS 6-2 6.1.2 Using AFLASH to update the BIOS 6-4 6.1.3 CrashFree ... CD information 7-2 7.2.1 Running the support CD 7-2 7.2.2 Installation menus 7-3 7.2.3 Software and drivers description 7-3 7.3 Software information 7-5 7.3.1 ASUS Update 7-5 7.3.2 ASUS PC Probe 7-6 iv
5.4 Central Processing Unit (CPU 5-6 5.5 System memory 5-7 5.6 Expansion slots 5-7 5.6.1 Configuring an expansion card 5-7 5.6.2 Standard Interrupt Assignments 5-8 5.7 Jumpers 5-9 5.8 Connectors 5-12 Chapter 6: BIOS Information 6-1 6.1 Managing and updating the BIOS 6-2 6.1.1 Using ASUS EZ Flash to update the BIOS 6-2 6.1.2 Using AFLASH to update the BIOS 6-4 6.1.3 CrashFree ... CD information 7-2 7.2.1 Running the support CD 7-2 7.2.2 Installation menus 7-3 7.2.3 Software and drivers description 7-3 7.3 Software information 7-5 7.3.1 ASUS Update 7-5 7.3.2 ASUS PC Probe 7-6 iv

Pundit Manual
Page 14
1.3 Internal Features The figure below shows the system from above. The standard components are already installed. Power Supply CD / DVD ROM Drive PCI Riser Card ASUS Motherboard CPU Cooler 1-4 Chapter 1: System Introduction
1.3 Internal Features The figure below shows the system from above. The standard components are already installed. Power Supply CD / DVD ROM Drive PCI Riser Card ASUS Motherboard CPU Cooler 1-4 Chapter 1: System Introduction

Pundit Manual
Page 20
Press down and unhook the metal retaining clips on the motherboard. Disconnect the CPU fan power cable if it is too short. 4. Locate the CPU Socket 478 on both sides of the metal heatsink. 3. Lift the heatsink assembly up and out. 5. 2.4 Installing the CPU 1. Pundit P4S8L Motherboard 2-6 Chapter 2: System Assemby To install the CPU, it is necessary to remove the pre-installed heatsink assembly. 2.
Press down and unhook the metal retaining clips on the motherboard. Disconnect the CPU fan power cable if it is too short. 4. Locate the CPU Socket 478 on both sides of the metal heatsink. 3. Lift the heatsink assembly up and out. 5. 2.4 Installing the CPU 1. Pundit P4S8L Motherboard 2-6 Chapter 2: System Assemby To install the CPU, it is necessary to remove the pre-installed heatsink assembly. 2.

Pundit Manual
Page 21
... is lifted up to prevent bending the pins and damaging the CPU! 9. Socket Lever 6. The lever clicks on the socket while you push down the socket lever to secure the CPU. ASUS Book Size Barebone System 2-7 Position the CPU above the socket such that it fits in one correct orientation.... The CPU fits only in place. Carefully insert the CPU Gold Mark into the socket to 90 - 100 a 90°...
... is lifted up to prevent bending the pins and damaging the CPU! 9. Socket Lever 6. The lever clicks on the socket while you push down the socket lever to secure the CPU. ASUS Book Size Barebone System 2-7 Position the CPU above the socket such that it fits in one correct orientation.... The CPU fits only in place. Carefully insert the CPU Gold Mark into the socket to 90 - 100 a 90°...

Pundit Manual
Page 22
...). 2. Position the fan heatsink assembly on top of the installed CPU such that the locking lever is nearest the CPU fan connector on the retention module 2-8 Chapter 2: System Assemby Follow steps 2 and 3 to install the CPU heatsink and fan. 1. Align one retention bracket with the rail on... side of the retention module. 4. Orient the bracket such that the fan cable is on the side of the heatsink. 2.5 Installing the CPU heatsink and fan The Intel® Pentium® 4 478/Northwood Processor requires a specially designed heatsink and fan assembly to ensure optimum thermal...
...). 2. Position the fan heatsink assembly on top of the installed CPU such that the locking lever is nearest the CPU fan connector on the retention module 2-8 Chapter 2: System Assemby Follow steps 2 and 3 to install the CPU heatsink and fan. 1. Align one retention bracket with the rail on... side of the retention module. 4. Orient the bracket such that the fan cable is on the side of the heatsink. 2.5 Installing the CPU heatsink and fan The Intel® Pentium® 4 478/Northwood Processor requires a specially designed heatsink and fan assembly to ensure optimum thermal...

Pundit Manual
Page 23
5. Follow step 5 to the fan connector labeled CPU_FAN1. Connect the CPU fan cable from the assembly to lock the second bracket. CPU fan connector (CPU_FAN1) ASUS Book Size Barebone System 2-9 Carefully press down the locking lever on the other side of the bracket and hook its end into the hole of the retention module to secure the fan heatsink assembly in place. 6. Locking lever 7.
5. Follow step 5 to the fan connector labeled CPU_FAN1. Connect the CPU fan cable from the assembly to lock the second bracket. CPU fan connector (CPU_FAN1) ASUS Book Size Barebone System 2-9 Carefully press down the locking lever on the other side of the bracket and hook its end into the hole of the retention module to secure the fan heatsink assembly in place. 6. Locking lever 7.

Pundit Manual
Page 40
... power connector is AC '97 compliant. 25 Graphic chipset. This interface provides support for the 4-pin 12V plug from an ATX 12V power supply. 18 CPU Sockets. This SIS® SIS651 controller integrates a high performance host interface for the Intel® Pentium® 4 P478 Willamette & Northwood Processor with 400/533 MHz...
... power connector is AC '97 compliant. 25 Graphic chipset. This interface provides support for the 4-pin 12V plug from an ATX 12V power supply. 18 CPU Sockets. This SIS® SIS651 controller integrates a high performance host interface for the Intel® Pentium® 4 P478 Willamette & Northwood Processor with 400/533 MHz...

Pundit Manual
Page 42
... grounded object or to a metal object, such as the power supply case, before handling components to the motherboard, peripherals, and/or components. 5.4 Central Processing Unit (CPU) The motherboard comes with the component. 5. Whenever you uninstall any component, ensure that came with a surface mount 478-pin Zero Insertion Force (ZIF) socket. 5.3 Before...
... grounded object or to a metal object, such as the power supply case, before handling components to the motherboard, peripherals, and/or components. 5.4 Central Processing Unit (CPU) The motherboard comes with the component. 5. Whenever you uninstall any component, ensure that came with a surface mount 478-pin Zero Insertion Force (ZIF) socket. 5.3 Before...

Pundit Manual
Page 45
...; P4S8L USB Device Wake Up USBPWR56 12 23 +5V (Default) +5VSB USBPWR12 2 1 +5V (Default) 3 2 +5VSB USBPWR34 21 32 +5V (Default) +5VSB ASUS Book Size Barebone System 5-9 The total current consumed must NOT exceed the power supply capability (+5VSB) whether under normal condition or in reduced power mode...). Set to +5VSB to wake up from S3 sleep mode (no power to wake up the computer from S1 sleep mode (CPU stopped, DRAM refreshed, system running in low power mode) using the connected USB devices. 5.7 Jumpers 1. Otherwise, the system does not power up...
...; P4S8L USB Device Wake Up USBPWR56 12 23 +5V (Default) +5VSB USBPWR12 2 1 +5V (Default) 3 2 +5VSB USBPWR34 21 32 +5V (Default) +5VSB ASUS Book Size Barebone System 5-9 The total current consumed must NOT exceed the power supply capability (+5VSB) whether under normal condition or in reduced power mode...). Set to +5VSB to wake up from S3 sleep mode (no power to wake up the computer from S1 sleep mode (CPU stopped, DRAM refreshed, system running in low power mode) using the connected USB devices. 5.7 Jumpers 1. Otherwise, the system does not power up...

Pundit Manual
Page 47
... 21 32 OVER Voltage VCORE P4S8L OVER Voltage Setting(OVSEL2) (Default) ASUS Book Size Barebone System 5-11 Keep the default setting (pins 3-2) for +2.5 Dual voltage setting. Set to set the CPU's Vcore voltage setting. It is recommended that you to the CPU. Setting to a high voltage may cause permanent damage to pins 1-2 for...
... 21 32 OVER Voltage VCORE P4S8L OVER Voltage Setting(OVSEL2) (Default) ASUS Book Size Barebone System 5-11 Keep the default setting (pins 3-2) for +2.5 Dual voltage setting. Set to set the CPU's Vcore voltage setting. It is recommended that you to the CPU. Setting to a high voltage may cause permanent damage to pins 1-2 for...

Pundit Manual
Page 50
... Rotation CHA_FAN1 Rotation +12V GND Do not forget to connect the fan cables to go across the onboard heat sinks instead of the expansion slots. CPU and Chassis Fan Connectors (3-pin CHA_FAN1, CPU_FAN1) The two fan connectors support cooling fans of 350mA (4.2 Watts) or a total of sufficient air flow within the...
... Rotation CHA_FAN1 Rotation +12V GND Do not forget to connect the fan cables to go across the onboard heat sinks instead of the expansion slots. CPU and Chassis Fan Connectors (3-pin CHA_FAN1, CPU_FAN1) The two fan connectors support cooling fans of 350mA (4.2 Watts) or a total of sufficient air flow within the...

Pundit Manual
Page 71
...frequency multiple is locked, you have an unlocked processor. CPU External Frequency (MHz) (when CPU Speed is set to [Manual]) This field sets the frequency multiple between the CPU's internal frequency (CPU speed) and external frequency. CPU Frequency Multiple (when CPU Speed is set to [Manual]) This feature tells ...the clock generator what frequency to send to the system bus and PCI bus. ASUS Book Size Barebone System 6-19 6.4 Advanced Menu CPU Speed [Manual] When the motherboard is set to JumperFree™ mode, this field allows you want to make...
...frequency multiple is locked, you have an unlocked processor. CPU External Frequency (MHz) (when CPU Speed is set to [Manual]) This field sets the frequency multiple between the CPU's internal frequency (CPU speed) and external frequency. CPU Frequency Multiple (when CPU Speed is set to [Manual]) This feature tells ...the clock generator what frequency to send to the system bus and PCI bus. ASUS Book Size Barebone System 6-19 6.4 Advanced Menu CPU Speed [Manual] When the motherboard is set to JumperFree™ mode, this field allows you want to make...

Pundit Manual
Page 72
...determines whether the memory clock frequency is set to be used for expansion cards. Configuration options: [Auto] [266MHz] [355MHz] [333MHz] CPU Level 2 Cache [Enabled] These fields allow you are using OS/2 operating systems with the required data. Otherwise, IRQ12 can be in... the popup menu vary according to the CPU Frequency (MHz). Configuration options: [Enabled] [Auto] USB Legacy Support [Auto] This motherboard supports Universal Serial Bus (USB) devices. Configuration options...
...determines whether the memory clock frequency is set to be used for expansion cards. Configuration options: [Auto] [266MHz] [355MHz] [333MHz] CPU Level 2 Cache [Enabled] These fields allow you are using OS/2 operating systems with the required data. Otherwise, IRQ12 can be in... the popup menu vary according to the CPU Frequency (MHz). Configuration options: [Enabled] [Auto] USB Legacy Support [Auto] This motherboard supports Universal Serial Bus (USB) devices. Configuration options...

Pundit Manual
Page 84
... [xxxC/xxxF] The onboard hardware monitor automatically detects and displays the motherboard and CPU temperatures. Select [Ignore] to allow selection of the appropriate fan speeds and the corresponding response time. The POWER temperature item shows the detected value if ... field is set to [Enabled], the Fan Speed Ratio and Speed Up/Down Response Time items appear to allow BIOS to enable or disable the ASUS Q-Fan feature that smartly adjusts the fan speeds for more efficient system operation. When this cable to the TRPWR1 connector on the motherboard to disable...
... [xxxC/xxxF] The onboard hardware monitor automatically detects and displays the motherboard and CPU temperatures. Select [Ignore] to allow selection of the appropriate fan speeds and the corresponding response time. The POWER temperature item shows the detected value if ... field is set to [Enabled], the Fan Speed Ratio and Speed Up/Down Response Time items appear to allow BIOS to enable or disable the ASUS Q-Fan feature that smartly adjusts the fan speeds for more efficient system operation. When this cable to the TRPWR1 connector on the motherboard to disable...

Pundit Manual
Page 85
... setup menu for details". ASUS Book Size Barebone System 6-33 You will then be prompted to "Press F1 to continue or DEL to the motherboard, the specific field shows N/A. CPU Fan Speed [xxxxRPM] or [N/A] Chassis Fan Speed [xxxxRPM] or [N/A] The onboard hardware monitor automatically detects and displays the CPU, chassis, and power fan...
... setup menu for details". ASUS Book Size Barebone System 6-33 You will then be prompted to "Press F1 to continue or DEL to the motherboard, the specific field shows N/A. CPU Fan Speed [xxxxRPM] or [N/A] Chassis Fan Speed [xxxxRPM] or [N/A] The onboard hardware monitor automatically detects and displays the CPU, chassis, and power fan...

Pundit Manual
Page 94
...CD Click this item to exit the P4S8L support CD. ASUS Update This item installs the ASUS Update. PC-CILLIN 2002 This item installs the PC-CILLIN 2002 anti-virus software. ASUS PC Probe This smart utility monitors the fan speed, CPU temperature, and system voltages, and alerts you on any ...item installs the Microsoft V8.1 driver. Readme This item displays the contents of the support CD and a brief description of the BIOS from the ASUS website. CLICK THE LEFT ARROW TO RETURN TO THE MAIN MENU 7-4 Chapter 7: Starting Up Exit Click this item to display the general specifications ...
...CD Click this item to exit the P4S8L support CD. ASUS Update This item installs the ASUS Update. PC-CILLIN 2002 This item installs the PC-CILLIN 2002 anti-virus software. ASUS PC Probe This smart utility monitors the fan speed, CPU temperature, and system voltages, and alerts you on any ...item installs the Microsoft V8.1 driver. Readme This item displays the contents of the support CD and a brief description of the BIOS from the ASUS website. CLICK THE LEFT ARROW TO RETURN TO THE MAIN MENU 7-4 Chapter 7: Starting Up Exit Click this item to display the general specifications ...

Pundit Manual
Page 96
... you review useful information about your computer system's vital components, such as hard disk space, memory usage, and CPU type, CPU speed, and internal/ external frequencies through the DMI Explorer. Starting ASUS PC Probe When ASUS PC Probe starts, a splash screen appears allowing you to select whether to show the screen again when you...
... you review useful information about your computer system's vital components, such as hard disk space, memory usage, and CPU type, CPU speed, and internal/ external frequencies through the DMI Explorer. Starting ASUS PC Probe When ASUS PC Probe starts, a splash screen appears allowing you to select whether to show the screen again when you...

Pundit Manual
Page 98
Smart Fan Control adjusts the fan speed automatically based on the current CPU temperature and predefined threshold. Settings Lets you set threshold levels and polling intervals or refresh times of the PC's hard disk drives and the file ... paging file usage. 7-8 Chapter 7: Starting Up Fan Control Lets you record the monitoring activity of a certain component of your PC for future reference. When When CPU Overheated is selected, the CPU cooling system is enabled whenever the CPU temperature reaches the threshold value. CPU Cooling System Setup Lets you select when to enable software...
Smart Fan Control adjusts the fan speed automatically based on the current CPU temperature and predefined threshold. Settings Lets you set threshold levels and polling intervals or refresh times of the PC's hard disk drives and the file ... paging file usage. 7-8 Chapter 7: Starting Up Fan Control Lets you record the monitoring activity of a certain component of your PC for future reference. When When CPU Overheated is selected, the CPU cooling system is enabled whenever the CPU temperature reaches the threshold value. CPU Cooling System Setup Lets you select when to enable software...

Pundit Manual
Page 99
...information pertinent to red, the PC speaker beeps, and the ASUS PC Probe monitor appears. Device Summary Shows a summary of the ASUS PC Probe icon change to the PC, such as CPU type, CPU speed, and internal/external frequencies, and memory size. ASUS PC Probe Task Bar Icon Right clicking the PC Probe icon... brings up a menu to open or exit ASUS PC Probe and pause or resume all...
...information pertinent to red, the PC speaker beeps, and the ASUS PC Probe monitor appears. Device Summary Shows a summary of the ASUS PC Probe icon change to the PC, such as CPU type, CPU speed, and internal/external frequencies, and memory size. ASUS PC Probe Task Bar Icon Right clicking the PC Probe icon... brings up a menu to open or exit ASUS PC Probe and pause or resume all...


