
PA328 Series User Guide
Page 3
... Services vii Chapter 1: Product introduction 1.1 Welcome 1-1 1.2 Package contents 1-1 1.3 Monitor introduction 1-2 1.3.1 Front view 1-2 1.3.2 Back/Side view 1-3 1.3.3 QuickFit Function 1-4 Chapter 2: Setup 2.1 Detaching the arm/base (for VESA wall mount 2-1 2.2 Adjusting the monitor 2-2 2.3 Connecting the cables 2-3 2.4 Turning on the monitor 2-4 Chapter 3: General instructions 3.1 OSD (On-Screen Display) menu 3-1 3.1.1 How to reconfigure 3-1 3.1.2 OSD function introduction 3-1 3.2 Specifications summary 3-9 3.3 Troubleshooting (FAQ 3-11 3.4 Supported operating...
... Services vii Chapter 1: Product introduction 1.1 Welcome 1-1 1.2 Package contents 1-1 1.3 Monitor introduction 1-2 1.3.1 Front view 1-2 1.3.2 Back/Side view 1-3 1.3.3 QuickFit Function 1-4 Chapter 2: Setup 2.1 Detaching the arm/base (for VESA wall mount 2-1 2.2 Adjusting the monitor 2-2 2.3 Connecting the cables 2-3 2.4 Turning on the monitor 2-4 Chapter 3: General instructions 3.1 OSD (On-Screen Display) menu 3-1 3.1.1 How to reconfigure 3-1 3.1.2 OSD function introduction 3-1 3.2 Specifications summary 3-9 3.3 Troubleshooting (FAQ 3-11 3.4 Supported operating...
PA328 Series User Guide
Page 4
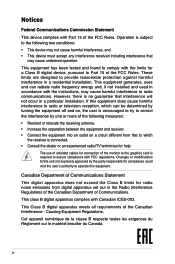
...to correct the interference by the party responsible for radio noise emissions from digital apparatus set out in a residential installation. The use of shielded cables for connection of the monitor to the graphics card is required to the following measures: • Reorient or relocate the receiving...with the limits for help. This equipment generates, uses and can be determined by turning the equipment off and on a circuit different from that to which can radiate radio frequency energy and, if not installed and used in a particular installation. Notices Federal Communications...
...to correct the interference by the party responsible for radio noise emissions from digital apparatus set out in a residential installation. The use of shielded cables for connection of the monitor to the graphics card is required to the following measures: • Reorient or relocate the receiving...with the limits for help. This equipment generates, uses and can be determined by turning the equipment off and on a circuit different from that to which can radiate radio frequency energy and, if not installed and used in a particular installation. Notices Federal Communications...
PA328 Series User Guide
Page 5
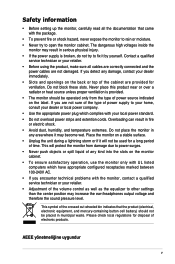
... type of power supply to other settings than the center position may increase the ear-/headphones output voltage and therefore the sound pressure level. This will not be used for ventilation. Never place this product near or over a radiator or heat source unless proper ventilation is broken, do not try to fix it will protect the monitor from the...
... type of power supply to other settings than the center position may increase the ear-/headphones output voltage and therefore the sound pressure level. This will not be used for ventilation. Never place this product near or over a radiator or heat source unless proper ventilation is broken, do not try to fix it will protect the monitor from the...
PA328 Series User Guide
Page 6
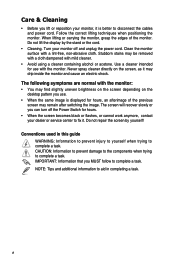
Do not repair the screen by the stand or the cord. • Cleaning. vi Turn your monitor off the Power Switch for hours. • When the screen becomes black or flashes, or cannot work anymore, contact your monitor, it is displayed for use . • When the same image is better to disconnect the cables and power cord. IMPORTANT: Information that you MUST follow to complete a task. Use a cleaner intended for hours, an...
Do not repair the screen by the stand or the cord. • Cleaning. vi Turn your monitor off the Power Switch for hours. • When the screen becomes black or flashes, or cannot work anymore, contact your monitor, it is displayed for use . • When the same image is better to disconnect the cables and power cord. IMPORTANT: Information that you MUST follow to complete a task. Use a cleaner intended for hours, an...
PA328 Series User Guide
Page 8
...the manufacture, use and recycling of product and power supply. Adjustability for 20 years. TCO Development, the organization behind TCO Certified, has been an international driver in the field of Sustainable IT for user comfort (displays, headsets) Acoustic performance protection against sound spikes (... including requirements for mercury-free products, halogenated substances and hazardous flame retardants Design for Recycling Coding of plastics for download at www.tcodevelopment.com, where you can also find a searchable database of spare parts. TCO Development is verified...
...the manufacture, use and recycling of product and power supply. Adjustability for 20 years. TCO Development, the organization behind TCO Certified, has been an international driver in the field of Sustainable IT for user comfort (displays, headsets) Acoustic performance protection against sound spikes (... including requirements for mercury-free products, halogenated substances and hazardous flame retardants Design for Recycling Coding of plastics for download at www.tcodevelopment.com, where you can also find a searchable database of spare parts. TCO Development is verified...
PA328 Series User Guide
Page 9
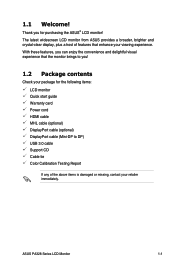
...: LCD monitor Quick start guide Warranty card Power cord HDMI cable MHL cable (optional) DisplayPort cable (optional) DisplayPort cable (Mini-DP to you can enjoy the convenience and delightful visual experience that the monitor brings to DP) USB 3.0 cable Support CD Cable tie Color Calibration Testing Report If any of features that enhance your viewing experience. ASUS PA328 Series LCD Monitor 1-1 With these features, you ! 1.2 Package contents Check your retailer immediately. The latest widescreen LCD monitor from ASUS provides...
...: LCD monitor Quick start guide Warranty card Power cord HDMI cable MHL cable (optional) DisplayPort cable (optional) DisplayPort cable (Mini-DP to you can enjoy the convenience and delightful visual experience that the monitor brings to DP) USB 3.0 cable Support CD Cable tie Color Calibration Testing Report If any of features that enhance your viewing experience. ASUS PA328 Series LCD Monitor 1-1 With these features, you ! 1.2 Package contents Check your retailer immediately. The latest widescreen LCD monitor from ASUS provides...

PA328 Series User Guide
Page 10
... button) to display HDMI-1/MHL, HDMI- 2, HDMI-3, DisplayPort, mini DisplayPort signals after you connect HDMI/ DisplayPort/Mini DisplayPort cable with a long press for alignment. • The QuickFit function contains 8 pages of common grid patterns, paper sizes, and photo sizes. (Please refer to activate the QuickFit function designed for 5 seconds. 3. 1.3 Monitor introduction 1.3.1 Front view Standard Mode DisplayPort 3840x2160@60Hz Menu Close Input Select Quick Fit Brighness Contrast 1 2 3 4 5 6 7 1. Shortcut • Default: Brightness...
... button) to display HDMI-1/MHL, HDMI- 2, HDMI-3, DisplayPort, mini DisplayPort signals after you connect HDMI/ DisplayPort/Mini DisplayPort cable with a long press for alignment. • The QuickFit function contains 8 pages of common grid patterns, paper sizes, and photo sizes. (Please refer to activate the QuickFit function designed for 5 seconds. 3. 1.3 Monitor introduction 1.3.1 Front view Standard Mode DisplayPort 3840x2160@60Hz Menu Close Input Select Quick Fit Brighness Contrast 1 2 3 4 5 6 7 1. Shortcut • Default: Brightness...

PA328 Series User Guide
Page 11
... mode Off 1.3.2 Back/Side view 1 23 4 5 6 7 8 9 10 11 1. AC-IN port. Mini DisplayPort in . This port is for connection with a Mini DisplayPort compatible device. This port is as the below table. Power button/power indicator • Turns the monitor on /off . • The color definition of the power indicator is for connection with an HDMI (MHL) compatible device. 5. Press the switch to the Shortcut > Shortcut 2 menu. 7. ASUS PA328 Series LCD Monitor 1-3 Shortcut • Default: Contrast...
... mode Off 1.3.2 Back/Side view 1 23 4 5 6 7 8 9 10 11 1. AC-IN port. Mini DisplayPort in . This port is for connection with a Mini DisplayPort compatible device. This port is as the below table. Power button/power indicator • Turns the monitor on /off . • The color definition of the power indicator is for connection with an HDMI (MHL) compatible device. 5. Press the switch to the Shortcut > Shortcut 2 menu. 7. ASUS PA328 Series LCD Monitor 1-3 Shortcut • Default: Contrast...

PA328 Series User Guide
Page 12
... cable. Note that all the patterns can move the button up/ down/left /right accroding to change the pattern's position if needed. Use the Menu (5-way) button to organize content and layout on the monitor. 11. You can be moved left /right to your need, but may have limited range for connection with USB devices, such as USB keyboard/mouse, USB flash drive, etc. • HDMI-1/MHL port supports HDMI...
... cable. Note that all the patterns can move the button up/ down/left /right accroding to change the pattern's position if needed. Use the Menu (5-way) button to organize content and layout on the monitor. 11. You can be moved left /right to your need, but may have limited range for connection with USB devices, such as USB keyboard/mouse, USB flash drive, etc. • HDMI-1/MHL port supports HDMI...

PA328 Series User Guide
Page 17
ASUS PA328 Series LCD Monitor 2-3 b. Standard Mode DisplayPort 3840x2160@60Hz Menu Close Input Select Quick Fit Brighness Contrast Standard Mode DisplayPort 3840x2160@60Hz Menu Close Input Select Quick Fit Brighness Contrast 2.3 Connecting the cables Connect the cables as the following instructions: Firmware update only • To connect the power cord: Connect one end of the HDMI/DisplayPort/Mini DisplayPort cable to the monitor's HDMI/DisplayPort/Mini DisplayPort jack. Connect the other end of the power cord securely to the monitor's AC input port, the other end...
ASUS PA328 Series LCD Monitor 2-3 b. Standard Mode DisplayPort 3840x2160@60Hz Menu Close Input Select Quick Fit Brighness Contrast Standard Mode DisplayPort 3840x2160@60Hz Menu Close Input Select Quick Fit Brighness Contrast 2.3 Connecting the cables Connect the cables as the following instructions: Firmware update only • To connect the power cord: Connect one end of the HDMI/DisplayPort/Mini DisplayPort cable to the monitor's HDMI/DisplayPort/Mini DisplayPort jack. Connect the other end of the power cord securely to the monitor's AC input port, the other end...

PA328 Series User Guide
Page 18
... computer is ON. 2-4 Chapter 2: Setup The power indicator lights up in the OSD menu. 2.4 Turning on the monitor to show that the monitor is installed with the lastest Windows 7/Windows 8 operating system. Make sure your computer's USB 3.0 port. • To use the USB 3.0 ports: Take the supplied USB 3.0 cable, and plug the smaller end (type B) of the power button. When these cables are connected, you can choose the desired signal from the Input Select item in white to work.
... computer is ON. 2-4 Chapter 2: Setup The power indicator lights up in the OSD menu. 2.4 Turning on the monitor to show that the monitor is installed with the lastest Windows 7/Windows 8 operating system. Make sure your computer's USB 3.0 port. • To use the USB 3.0 ports: Take the supplied USB 3.0 cable, and plug the smaller end (type B) of the power button. When these cables are connected, you can choose the desired signal from the Input Select item in white to work.
PA328 Series User Guide
Page 19
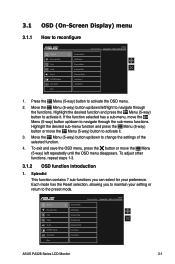
...the Menu (5-way) button to reconfigure Splendid Blue Light Filter Color Image Sound PIP/PBP Setting Input Select More Standard Mode sRGB Mode Scenery Mode Reading Mode Darkroom Mode User Mode 1 User Mode 2 PA328 Standard Mode DisplayPort 3840 x 2160 @ 30Hz 1. Move the Menu (5-way) button up /down to navigate through the sub-menu functions. Splendid Blue Light Filter Color Image Sound PIP/PBP Setting Input Select More Standard Mode sRGB Mode Scenery Mode Reading Mode Darkroom Mode User Mode 1 User Mode 2 PA328 Standard Mode DisplayPort 3840 x 2160 @ 30Hz ASUS PA328 Series LCD Monitor...
...the Menu (5-way) button to reconfigure Splendid Blue Light Filter Color Image Sound PIP/PBP Setting Input Select More Standard Mode sRGB Mode Scenery Mode Reading Mode Darkroom Mode User Mode 1 User Mode 2 PA328 Standard Mode DisplayPort 3840 x 2160 @ 30Hz 1. Move the Menu (5-way) button up /down to navigate through the sub-menu functions. Splendid Blue Light Filter Color Image Sound PIP/PBP Setting Input Select More Standard Mode sRGB Mode Scenery Mode Reading Mode Darkroom Mode User Mode 1 User Mode 2 PA328 Standard Mode DisplayPort 3840 x 2160 @ 30Hz ASUS PA328 Series LCD Monitor...
PA328 Series User Guide
Page 21
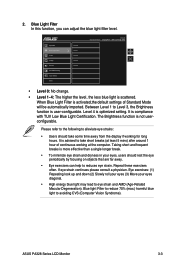
... optimized setting. Blue light Filter to reduce 70% (max.) harmful blue light to reduces eye strain. If eye strain continues please consult a physician. Please refer to the following to take some time away from the display if working at least 5 mins) after around 1 hour of Standard Mode will be automatically imported. It is scattered. ASUS PA328 Series LCD Monitor 3-3 Splendid Blue Light Filter Color Image Sound PIP/PBP Setting Input...
... optimized setting. Blue light Filter to reduce 70% (max.) harmful blue light to reduces eye strain. If eye strain continues please consult a physician. Please refer to the following to take some time away from the display if working at least 5 mins) after around 1 hour of Standard Mode will be automatically imported. It is scattered. ASUS PA328 Series LCD Monitor 3-3 Splendid Blue Light Filter Color Image Sound PIP/PBP Setting Input...

PA328 Series User Guide
Page 22
... Splendid color mode reset: Resets the color settings of current color mode to the factory default value. * All Splendid color mode reset: Resets the color settings of all color modes to 100. • Saturation: The adjusting range is from this menu. 3. Gamma Advanced Setting Color Reset PA328 Standard Mode DisplayPort 3840 x 2160 @ 30Hz • Brightness: The adjusting range is from 0 to 100. • Contrast: The adjusting range is from 0 to the factory default value. 3-4 Chapter 3: OSD (On-Screen Display) menu Splendid Blue Light Filter Color Image Sound PIP/PBP Setting Input Select...
... Splendid color mode reset: Resets the color settings of current color mode to the factory default value. * All Splendid color mode reset: Resets the color settings of all color modes to 100. • Saturation: The adjusting range is from this menu. 3. Gamma Advanced Setting Color Reset PA328 Standard Mode DisplayPort 3840 x 2160 @ 30Hz • Brightness: The adjusting range is from 0 to 100. • Contrast: The adjusting range is from 0 to the factory default value. 3-4 Chapter 3: OSD (On-Screen Display) menu Splendid Blue Light Filter Color Image Sound PIP/PBP Setting Input Select...

PA328 Series User Guide
Page 23
... 100. • Trace Free: Adjusts the response time of the displayed picture and generates high-quality images on screen. • ASCR: Turns on and off the ASCR (ASUS Smart Contrast Ratio) function. 5. 4. Splendid Blue Light Filter Color Image Sound PIP/PBP Setting Input Select More Volume Mute Source PA328 Standard Mode DisplayPort 3840 x 2160 @ 30Hz • Volume: the adjusting range is from this menu. OverScan is only available for the HDMI input source. • Uniformity Compensation...
... 100. • Trace Free: Adjusts the response time of the displayed picture and generates high-quality images on screen. • ASCR: Turns on and off the ASCR (ASUS Smart Contrast Ratio) function. 5. 4. Splendid Blue Light Filter Color Image Sound PIP/PBP Setting Input Select More Volume Mute Source PA328 Standard Mode DisplayPort 3840 x 2160 @ 30Hz • Volume: the adjusting range is from this menu. OverScan is only available for the HDMI input source. • Uniformity Compensation...

PA328 Series User Guide
Page 24
... 3: OSD (On-Screen Display) menu 6. By activating this function, you to Right-Top, LeftTop, Right-Bottom, or Left-Bottom. (Only available for the PIP mode) • PIP Position: Adjusts the position of the main and sub-windows. PIP/PBP Setting The PIP/PBP Setting allows you can have two pictures from your original video source. Splendid Blue Light Filter Color Image Sound PIP/PBP Setting Input Select More PIP/PBP Mode PIP...
... 3: OSD (On-Screen Display) menu 6. By activating this function, you to Right-Top, LeftTop, Right-Bottom, or Left-Bottom. (Only available for the PIP mode) • PIP Position: Adjusts the position of the main and sub-windows. PIP/PBP Setting The PIP/PBP Setting allows you can have two pictures from your original video source. Splendid Blue Light Filter Color Image Sound PIP/PBP Setting Input Select More PIP/PBP Mode PIP...
PA328 Series User Guide
Page 25
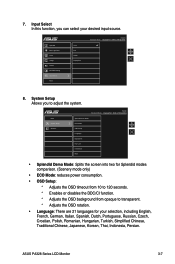
... your desired input source. 7. Splendid Blue Light Filter Color Image Sound PIP/PBP Setting Input Select More VGA DVI HDMI DisplayPort PA328 Standard Mode DisplayPort 3840 x 2160 @ 30Hz 8. System Setup Allows you can select your selection, including English, French, German, Italian, Spanish, Dutch, Portuguese, Russian, Czech, Croatian, Polish, Romanian, Hungarian, Turkish, Simplified Chinese, Traditional Chinese, Japanese, Korean, Thai, Indonesia, Persian. ASUS PA328 Series LCD Monitor 3-7 Back System Setup Shortcut PA328...
... your desired input source. 7. Splendid Blue Light Filter Color Image Sound PIP/PBP Setting Input Select More VGA DVI HDMI DisplayPort PA328 Standard Mode DisplayPort 3840 x 2160 @ 30Hz 8. System Setup Allows you can select your selection, including English, French, German, Italian, Spanish, Dutch, Portuguese, Russian, Czech, Croatian, Polish, Romanian, Hungarian, Turkish, Simplified Chinese, Traditional Chinese, Japanese, Korean, Thai, Indonesia, Persian. ASUS PA328 Series LCD Monitor 3-7 Back System Setup Shortcut PA328...
PA328 Series User Guide
Page 26
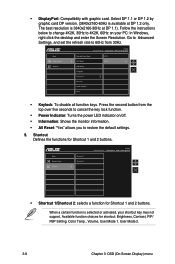
... the functions for shortcut: Brightness, Contrast, PIP/ PBP Setting, Color Temp., Volume, User Mode 1, User Mode 2. 3-8 Chapter 3: OSD (On-Screen Display) menu Follow the instructions below to change 4K2K, 30Hz to 4K2K, 60Hz on /off. • Information: Shows the monitor information. • All Reset: "Yes" allows you to 60Hz from the top over five seconds to cancel the key lock function. • Power Indicator: Turns the power LED indicator on your shortcut...
... the functions for shortcut: Brightness, Contrast, PIP/ PBP Setting, Color Temp., Volume, User Mode 1, User Mode 2. 3-8 Chapter 3: OSD (On-Screen Display) menu Follow the instructions below to change 4K2K, 30Hz to 4K2K, 60Hz on /off. • Information: Shows the monitor information. • All Reset: "Yes" allows you to 60Hz from the top over five seconds to cancel the key lock function. • Power Indicator: Turns the power LED indicator on your shortcut...
PA328 Series User Guide
Page 27
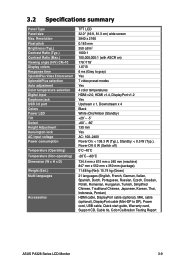
Resolution Pixel pitch Brightness (Typ.) Contrast Ratio (Typ.) Contrast Ratio (Max.) Viewing angle (H/V) CR>10 Display colors Response time SplendidPlus Video Enhancement SplendidPlus selection Auto adjustment Color temperature selection Digital input Earphone jack USB 3.0 port Colors Power LED Tilt Swivel Height Adjustment Kensington lock AC input voltage Power consumption Temperature (Operating) Temperature (Non-operating) Dimension (W x H x D) Weight (Esti.) Multi-languages Accessories TFT LCD 32.0" (16:9, 81.3 cm) wide screen 3840 x 2160 0.185 mm 350 cd/m2 1000:1 100,000,000:1 (with ASCR...
Resolution Pixel pitch Brightness (Typ.) Contrast Ratio (Typ.) Contrast Ratio (Max.) Viewing angle (H/V) CR>10 Display colors Response time SplendidPlus Video Enhancement SplendidPlus selection Auto adjustment Color temperature selection Digital input Earphone jack USB 3.0 port Colors Power LED Tilt Swivel Height Adjustment Kensington lock AC input voltage Power consumption Temperature (Operating) Temperature (Non-operating) Dimension (W x H x D) Weight (Esti.) Multi-languages Accessories TFT LCD 32.0" (16:9, 81.3 cm) wide screen 3840 x 2160 0.185 mm 350 cd/m2 1000:1 100,000,000:1 (with ASCR...
PA328 Series User Guide
Page 29
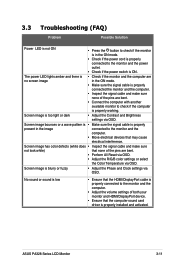
... signal cable and make sure none of the pins are bent. • Perform All Reset via OSD. • Adjust the R/G/B color settings or select the Color Temperature via OSD. 3.3 Troubleshooting (FAQ) Problem Possible Solution Power LED is not ON • Press the button to check if the monitor is in the ON mode. • Check if the power cord is properly connected to the monitor and the computer. • Adjust the volume settings of both your monitor...
... signal cable and make sure none of the pins are bent. • Perform All Reset via OSD. • Adjust the R/G/B color settings or select the Color Temperature via OSD. 3.3 Troubleshooting (FAQ) Problem Possible Solution Power LED is not ON • Press the button to check if the monitor is in the ON mode. • Check if the power cord is properly connected to the monitor and the computer. • Adjust the volume settings of both your monitor...


