PRIME Z270-AR USER S MANUAL ENGLISH
Page 9
...Technology /I nsider™ Maximum shared memory of 1024MB Supports NVIDIA® 2-Way/Quad-GPU SLI® Technology (with max. PRIME Z270-AR specifications summary LGA1151 socket for details. 2 x PCI Express 3.0/2.0 x16 slots (single at x16 or dual at x4 mode, compatible with PCIe...back panel (Type-C) (continued on the CPU types. Dual interconnect between the integrated Media Access Controller (MAC) and physical layer (PHY) ASUS LAN Guard ASUS Turbo LAN Utility Intel® Z270 Express Chipset - 6 x USB 3.0/2.0 ports (2 ports @mid-board, 4 ports @back panel, blue) - 6 x USB 2.0/1.1 ...
...Technology /I nsider™ Maximum shared memory of 1024MB Supports NVIDIA® 2-Way/Quad-GPU SLI® Technology (with max. PRIME Z270-AR specifications summary LGA1151 socket for details. 2 x PCI Express 3.0/2.0 x16 slots (single at x16 or dual at x4 mode, compatible with PCIe...back panel (Type-C) (continued on the CPU types. Dual interconnect between the integrated Media Access Controller (MAC) and physical layer (PHY) ASUS LAN Guard ASUS Turbo LAN Utility Intel® Z270 Express Chipset - 6 x USB 3.0/2.0 ports (2 ports @mid-board, 4 ports @back panel, blue) - 6 x USB 2.0/1.1 ...
PRIME Z270-AR USER S MANUAL ENGLISH
Page 16
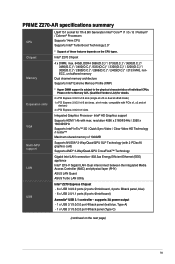
Installation tools and components Intel® LGA1151 compatible CPU Fan Intel® LGA1151 CPU PC chassis SATA hard disk drive Phillips (cross) screwdriver Power supply unit 1 bag of screws DIMM SATA optical disc drive (optional) Graphics card The tools and components in the table above are not included in the motherboard package. xvi
Installation tools and components Intel® LGA1151 compatible CPU Fan Intel® LGA1151 CPU PC chassis SATA hard disk drive Phillips (cross) screwdriver Power supply unit 1 bag of screws DIMM SATA optical disc drive (optional) Graphics card The tools and components in the table above are not included in the motherboard package. xvi
PRIME Z270-AR USER S MANUAL ENGLISH
Page 19
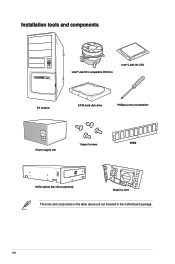
... 1-5 1-9 1-10 1-22 1-14 1-11 1-20 1-17 1-16 1-21 1-23 1-24 1-15 1-21 1-24 1-12 ASUS PRIME Z270-AR Series 1-3 Power-on button 6. M.2 sockets (M.2_1(Socket 3); Clear RTC RAM jumper (2-pin CLRTC) 10. System panel connector (20-3 pin PANEL) 11. LGA1151 CPU socket 3. DDR4 DIMM slots 5. SATA 6G_56) 9. Serial port connector (10-1 pin COM) 16. USB910...
... 1-5 1-9 1-10 1-22 1-14 1-11 1-20 1-17 1-16 1-21 1-23 1-24 1-15 1-21 1-24 1-12 ASUS PRIME Z270-AR Series 1-3 Power-on button 6. M.2 sockets (M.2_1(Socket 3); Clear RTC RAM jumper (2-pin CLRTC) 10. System panel connector (20-3 pin PANEL) 11. LGA1151 CPU socket 3. DDR4 DIMM slots 5. SATA 6G_56) 9. Serial port connector (10-1 pin COM) 16. USB910...
PRIME Z270-AR USER S MANUAL ENGLISH
Page 20
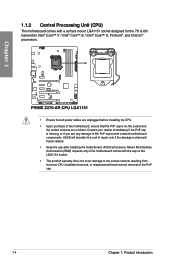
ASUS will process Return Merchandise Authorization (RMA) requests only if the motherboard comes with a surface mount LGA1151 socket designed for the 7th & 6th Generation Intel® Core™ i7 / Intel® Core™ i5 / Intel® Core™ i3, Pentium®, ...and Celeron® processors. • Ensure that all power cables are not bent. ASUS will shoulder the cost of repair ...
ASUS will process Return Merchandise Authorization (RMA) requests only if the motherboard comes with a surface mount LGA1151 socket designed for the 7th & 6th Generation Intel® Core™ i7 / Intel® Core™ i5 / Intel® Core™ i3, Pentium®, ...and Celeron® processors. • Ensure that all power cables are not bent. ASUS will shoulder the cost of repair ...
PRIME Z270-AR USER S MANUAL ENGLISH
Page 43
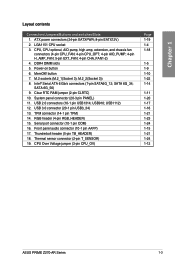
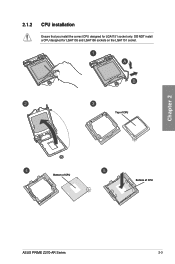
2.1.2 CPU installation Ensure that you install the correct CPU designed for LGA1155 and LGA1156 sockets on the LGA1151 socket. DO NOT install a CPU designed for LGA1151 socket only. Chapter 2 Top of CPU Bottom of CPU Bottom of CPU ASUS PRIME Z270-AR Series 2-3
2.1.2 CPU installation Ensure that you install the correct CPU designed for LGA1155 and LGA1156 sockets on the LGA1151 socket. DO NOT install a CPU designed for LGA1151 socket only. Chapter 2 Top of CPU Bottom of CPU Bottom of CPU ASUS PRIME Z270-AR Series 2-3

PRIME Z270-AR USER S MANUAL ENGLISH
Page 44
.... • Ensure to use a soft stable surface when installing the CPU to the CPU Installation Tool to prevent CPU damage. • ASUS will not cover damages resulting from incorrect CPU installation/removal, incorrect CPU orientation/placement, or other damages resulting from negligence by the user. 2-4... Tool. • Always firmly hold both sides of CPU Chapter 2 • The CPU Installation Tool is only compatible on ASUS motherboards with a Intel® LGA1151 socket. • Ensure that the CPU is firmly clicked into place before installing it onto the CPU socket on the motherboard....
.... • Ensure to use a soft stable surface when installing the CPU to the CPU Installation Tool to prevent CPU damage. • ASUS will not cover damages resulting from incorrect CPU installation/removal, incorrect CPU orientation/placement, or other damages resulting from negligence by the user. 2-4... Tool. • Always firmly hold both sides of CPU Chapter 2 • The CPU Installation Tool is only compatible on ASUS motherboards with a Intel® LGA1151 socket. • Ensure that the CPU is firmly clicked into place before installing it onto the CPU socket on the motherboard....