
User Manual
Page 2
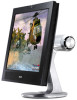
Monitor introduction Front view Webcam Stereo speakers (5Wx2) Base Touch sensors 1 2 3 4 5 6 Rear view ASUS Power Bass System (15W) Connectors 7 8 9 10 1112 13 1. Increase sensor/Brightness hotkey 4. English Safety information • Before setting up the monitor, carefully read all the ... (Upstream) * Hotkey for 5 sound preset mode selection. ** Hotkey for 5 video preset mode selection. *** Adjusts the image automatically by touching the sensor for 2-3 seconds. 2 Quick Start Guide
Monitor introduction Front view Webcam Stereo speakers (5Wx2) Base Touch sensors 1 2 3 4 5 6 Rear view ASUS Power Bass System (15W) Connectors 7 8 9 10 1112 13 1. Increase sensor/Brightness hotkey 4. English Safety information • Before setting up the monitor, carefully read all the ... (Upstream) * Hotkey for 5 sound preset mode selection. ** Hotkey for 5 video preset mode selection. *** Adjusts the image automatically by touching the sensor for 2-3 seconds. 2 Quick Start Guide
User Manual
Page 3
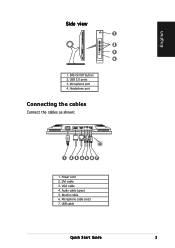
USB 2.0 ports 3. Microphone cable (red) 7. USB cable Quick Start Guide 3 Woofer cable 6. Power cord 2. SRS On/Off button 2. Audio cable (gray) 5. Microphone port 4. VGA cable 4. Headphone port Connecting the cables Connect the cables as shown: 1 2 3 4567 1. DVI cable 3. English Side view 1 2 3 4 1.
USB 2.0 ports 3. Microphone cable (red) 7. USB cable Quick Start Guide 3 Woofer cable 6. Power cord 2. SRS On/Off button 2. Audio cable (gray) 5. Microphone port 4. VGA cable 4. Headphone port Connecting the cables Connect the cables as shown: 1 2 3 4567 1. DVI cable 3. English Side view 1 2 3 4 1.

User Manual
Page 4
... securely to the monitor's AC input port, the other end to a power outlet. • T o c o n n e c t t h e w o o f e r c a b l e : connect the woofer cable to 120º. 120º 4 Quick Start Guide b.
... securely to the monitor's AC input port, the other end to a power outlet. • T o c o n n e c t t h e w o o f e r c a b l e : connect the woofer cable to 120º. 120º 4 Quick Start Guide b.
User Manual
Page 5
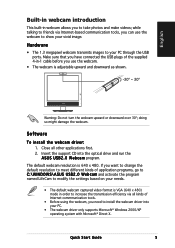
... X. Software To install the webcam driver: 1. Insert the support CD into your needs. • The default webcam captured video format is 640 x 480. Quick Start Guide 5 while talking to friends via all other applications first. 2. Hardware • The 1.3 megapixel webcam transmits images to increase the transmission efficiency via Internet-based communication...
... X. Software To install the webcam driver: 1. Insert the support CD into your needs. • The default webcam captured video format is 640 x 480. Quick Start Guide 5 while talking to friends via all other applications first. 2. Hardware • The 1.3 megapixel webcam transmits images to increase the transmission efficiency via Internet-based communication...

User Manual
Page 6
... -1 cable to run the LifeFrame program. 3. Insert the support CD into your PC. • The LifeFrame software is bundled in the PG191 support CD. A display card supporting 16-bit high color mode Installation instructions: 1. A personal computer with the built-in webcam, allowing users...plug of the supplied 4-in webcam and LifeFrame will not be activated. 6 Quick Start Guide English LifeFrame software Introduction and installation instructions To capture snapshots or video clips, ASUS PG191provides an easy-to-use this software, install LifeFrame into the optical drive and run the...
... -1 cable to run the LifeFrame program. 3. Insert the support CD into your PC. • The LifeFrame software is bundled in the PG191 support CD. A display card supporting 16-bit high color mode Installation instructions: 1. A personal computer with the built-in webcam, allowing users...plug of the supplied 4-in webcam and LifeFrame will not be activated. 6 Quick Start Guide English LifeFrame software Introduction and installation instructions To capture snapshots or video clips, ASUS PG191provides an easy-to-use this software, install LifeFrame into the optical drive and run the...