

User Manual
Page 2
... NOTICE, AND SHOULD NOT BE CONSTRUED AS A COMMITMENT BY ASUS. ASUS ASSUMES NO RESPONSIBILITY OR LIABILITY FOR ANY ERRORS OR INACCURACIES THAT MAY APPEAR IN THIS MANUAL, INCLUDING THE PRODUCTS AND SOFTWARE DESCRIBED IN IT. No part of this manual may or may be extended if: (1) the product is ...repaired, modified or altered, unless such repair, modification of ASUSTeK COMPUTER INC. ("ASUS"). ASUS PROVIDES THIS MANUAL "AS IS" WITHOUT WARRANTY OF ANY KIND, EITHER EXPRESS OR IMPLIED, INCLUDING BUT NOT LIMITED TO THE IMPLIED WARRANTIES OR CONDITIONS OF...
... NOTICE, AND SHOULD NOT BE CONSTRUED AS A COMMITMENT BY ASUS. ASUS ASSUMES NO RESPONSIBILITY OR LIABILITY FOR ANY ERRORS OR INACCURACIES THAT MAY APPEAR IN THIS MANUAL, INCLUDING THE PRODUCTS AND SOFTWARE DESCRIBED IN IT. No part of this manual may or may be extended if: (1) the product is ...repaired, modified or altered, unless such repair, modification of ASUSTeK COMPUTER INC. ("ASUS"). ASUS PROVIDES THIS MANUAL "AS IS" WITHOUT WARRANTY OF ANY KIND, EITHER EXPRESS OR IMPLIED, INCLUDING BUT NOT LIMITED TO THE IMPLIED WARRANTIES OR CONDITIONS OF...
User Manual
Page 6
... devices could interrupt the grounding circuit. • Make sure that your power supply is broken, do not try to fix it , carefully read all the manuals that came with the product, contact a qualified service technician or your area. If possible, disconnect all power cables from the existing system before you encounter...
... devices could interrupt the grounding circuit. • Make sure that your power supply is broken, do not try to fix it , carefully read all the manuals that came with the product, contact a qualified service technician or your area. If possible, disconnect all power cables from the existing system before you encounter...
User Manual
Page 7
How this guide This user guide contains the information you have to when confiiguring the motherboard. vii About this guide is organized This manual contains the following parts: • Chapter 1: Product introduction This chapter describes the features of the switches, jumpers, and connectors on the motherboard. • Chapter 3: Powering ... also provided. • Appendix: Reference information This appendix includes additional information that you need when installing and configuring the motherboard. It includes description of the PCH-DL motherboard.
How this guide This user guide contains the information you have to when confiiguring the motherboard. vii About this guide is organized This manual contains the following parts: • Chapter 1: Product introduction This chapter describes the features of the switches, jumpers, and connectors on the motherboard. • Chapter 3: Powering ... also provided. • Appendix: Reference information This appendix includes additional information that you need when installing and configuring the motherboard. It includes description of the PCH-DL motherboard.
User Manual
Page 8
... worldwide provide updated information on ASUS hardware and software products. Where to find more information Refer to the following symbols used in completing a task. Refer to aid in this manual. These documents are not part of the following sources for additional information and for... product and software updates. 1. viii IMPORTANT: Information that may have been added by your dealer. NOTE: Tips and additional information to the ASUS contact information. 2. ...
... worldwide provide updated information on ASUS hardware and software products. Where to find more information Refer to the following symbols used in completing a task. Refer to aid in this manual. These documents are not part of the following sources for additional information and for... product and software updates. 1. viii IMPORTANT: Information that may have been added by your dealer. NOTE: Tips and additional information to the ASUS contact information. 2. ...
User Manual
Page 26
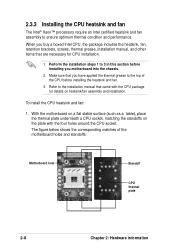
... in this section before installing the heatsink and fan. 3. Motherboard hole Standoff CPU thermal plate 2-8 Chapter 2: Hardware information Perform the installation steps 1 to the installation manual that came with the four holes around the CPU socket. With the motherboard on a flat stable surface (such as a table), place the thermal plate underneath...of the motherboard holes and standoffs. When you buy a boxed Intel CPU, the package includes the heatsink, fan, retention brackets, screws, thermal grease, installation manual, and other items that you motherboard into the chassis. 2.
... in this section before installing the heatsink and fan. 3. Motherboard hole Standoff CPU thermal plate 2-8 Chapter 2: Hardware information Perform the installation steps 1 to the installation manual that came with the four holes around the CPU socket. With the motherboard on a flat stable surface (such as a table), place the thermal plate underneath...of the motherboard holes and standoffs. When you buy a boxed Intel CPU, the package includes the heatsink, fan, retention brackets, screws, thermal grease, installation manual, and other items that you motherboard into the chassis. 2.
User Manual
Page 65
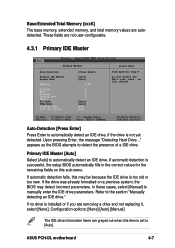
... Auto-Detection [Press Enter] Press Enter to [Auto]. Primary IDE Master [Auto] Select [Auto] to the section "Manually detecting an IDE drive." Configuration options: [None] [Auto] [Manual] The IDE drive information items are grayed out when this item is installed or if you are removing a drive and not... replacing it, select [None]. If no drive is set to automatically detect an IDE drive, if the drive is too old or too new. ASUS PCH-DL motherboard 4-7 ...
... Auto-Detection [Press Enter] Press Enter to [Auto]. Primary IDE Master [Auto] Select [Auto] to the section "Manually detecting an IDE drive." Configuration options: [None] [Auto] [Manual] The IDE drive information items are grayed out when this item is installed or if you are removing a drive and not... replacing it, select [None]. If no drive is set to automatically detect an IDE drive, if the drive is too old or too new. ASUS PCH-DL motherboard 4-7 ...
User Manual
Page 66
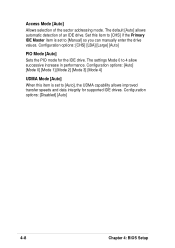
... Mode [Auto] When this item to [CHS] if the Primary IDE Master item is set to 4 allow successive increase in performance. The settings Mode 0 to [Manual] so you can manually enter the drive values.
... Mode [Auto] When this item to [CHS] if the Primary IDE Master item is set to 4 allow successive increase in performance. The settings Mode 0 to [Manual] so you can manually enter the drive values.
User Manual
Page 67
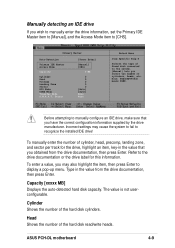
... the drive documentation, then press Enter. Capacity [xxxxx MB] Displays the auto-detected hard disk capacity. ASUS PCH-DL motherboard 4-9 To enter a value, you wish to manually enter the drive information, set the Primary IDE Master item to [Manual], and the Access Mode item to [CHS]. Type in the value that you select the number...
... the drive documentation, then press Enter. Capacity [xxxxx MB] Displays the auto-detected hard disk capacity. ASUS PCH-DL motherboard 4-9 To enter a value, you wish to manually enter the drive information, set the Primary IDE Master item to [Manual], and the Access Mode item to [CHS]. Type in the value that you select the number...

User Manual
Page 72
... [3] Active to display a pop-up menu with the configuration options. Configuration options: [8] [7] [6] [5] 4-14 Chapter 4: BIOS Setup Configuration options: [Manual] [By SPD] The items CAS Latency Time, Active to Precharge Delay, DRAM RAS# to CAS# Delay, and DRAM RAS# Precharge are set to...] Memory Timing Selectable [By SPD] The DRAM clock are configurable only when the Memory Timing Selectable item is set according to [Manual]. 4.4.3 Memory Configuration This menu shows the memory configuration settings. Select an item then press Enter to Precharge Delay [7] This item...
... [3] Active to display a pop-up menu with the configuration options. Configuration options: [8] [7] [6] [5] 4-14 Chapter 4: BIOS Setup Configuration options: [Manual] [By SPD] The items CAS Latency Time, Active to Precharge Delay, DRAM RAS# to CAS# Delay, and DRAM RAS# Precharge are set to...] Memory Timing Selectable [By SPD] The DRAM clock are configurable only when the Memory Timing Selectable item is set according to [Manual]. 4.4.3 Memory Configuration This menu shows the memory configuration settings. Select an item then press Enter to Precharge Delay [7] This item...
User Manual
Page 81
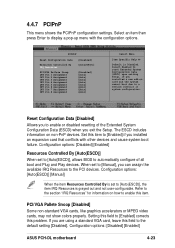
Set this field to the default setting [Disabled]. Setting this field to [Manual], you exit the Setup. Configuration options: [Disabled] [Enabled] ASUS PCH-DL motherboard 4-23 PCI/VGA Pallete Snoop [Disabled] Some non-standard VGA cards, like graphics accelerators or MPEG video cards, may ... available IRQ Resources to enable this problem. The ESCD includes information on how to the PCI devices. Configuration options: [Auto(ESCD)] [Manual] When the item Resources Controlled By is set to enable or disabled resetting of all boot and Plug and Play devices. If you ...
Set this field to the default setting [Disabled]. Setting this field to [Manual], you exit the Setup. Configuration options: [Disabled] [Enabled] ASUS PCH-DL motherboard 4-23 PCI/VGA Pallete Snoop [Disabled] Some non-standard VGA cards, like graphics accelerators or MPEG video cards, may ... available IRQ Resources to enable this problem. The ESCD includes information on how to the PCI devices. Configuration options: [Auto(ESCD)] [Manual] When the item Resources Controlled By is set to enable or disabled resetting of all boot and Plug and Play devices. If you ...
User Manual
Page 82
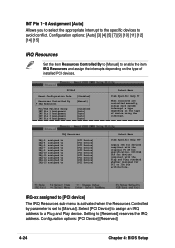
... [PCI Device] [PCI Device] [PCI Device] [PCI Device] [PCI Device] [PCI Device] Select Menu Item Specific Help When resources are controlled manually, assign each system interrupt a type depending on the type of device using the interrupt. Configuration options: [PCI Device] [Reserved] 4-24 Chapter 4: BIOS...is set to avoid conflict. INT Pin 1~8 Assignment [Auto] Allows you to select the appropriate interrupt to the specific devices to [Manual]. Setting to a Plug and Play device. PCIPnP Reset Configuration Data Resources Controlled By IRQ Resources PCI/VGA Pallete Snoop INT Pin 1...
... [PCI Device] [PCI Device] [PCI Device] [PCI Device] [PCI Device] [PCI Device] Select Menu Item Specific Help When resources are controlled manually, assign each system interrupt a type depending on the type of device using the interrupt. Configuration options: [PCI Device] [Reserved] 4-24 Chapter 4: BIOS...is set to avoid conflict. INT Pin 1~8 Assignment [Auto] Allows you to select the appropriate interrupt to the specific devices to [Manual]. Setting to a Plug and Play device. PCIPnP Reset Configuration Data Resources Controlled By IRQ Resources PCI/VGA Pallete Snoop INT Pin 1...


