User Manual
Page 19
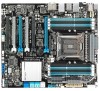
...in the long line of the above items is damaged or missing, contact your retailer. ASUS P9X79 WS 1-1 Before you for the following items. Motherboard I/O modules Cables Accessories Application DVD Documentation ASUS P9X79 WS 1 x 2-port USB 2.0 + 1-port eSATA3.0 module 4 x Serial ATA 6.0 Gb...2 x Serial ATA 3.0 Gb/s cables 1 x COM port cable 1 x ASUS Q-Shield (I/O shield) 1 x ASUS 2-in your package with the list below. 1.2 Package contents Check your motherboard package for buying an ASUS P9X79 WS motherboard! 1.1 Welcome! The motherboard delivers a host of new features and latest ...
...in the long line of the above items is damaged or missing, contact your retailer. ASUS P9X79 WS 1-1 Before you for the following items. Motherboard I/O modules Cables Accessories Application DVD Documentation ASUS P9X79 WS 1 x 2-port USB 2.0 + 1-port eSATA3.0 module 4 x Serial ATA 6.0 Gb...2 x Serial ATA 3.0 Gb/s cables 1 x COM port cable 1 x ASUS Q-Shield (I/O shield) 1 x ASUS 2-in your package with the list below. 1.2 Package contents Check your motherboard package for buying an ASUS P9X79 WS motherboard! 1.1 Welcome! The motherboard delivers a host of new features and latest ...
User Manual
Page 21
...latest plug & play connectivity at speeds up to 6.0 Gb/s data transfer. The P9X79 WS affords greater convenience to optimize PCIe allocation in Dual Intel Server-Class Gigabit LAN To enhance network reliability, the P9X79 WS is an essential and convenient tool to let users know more efficiently. Red means overclocked... Expect a brand-new gaming style you the multi-GPU choice of Intel lan can easily run even the most demanding PC games in total. ASUS P9X79 WS 1-3 It's ideal for both the front and rear panel - 4USB 3.0 ports in full detail for 4-Way NVIDIA® GeForce® SLI...
...latest plug & play connectivity at speeds up to 6.0 Gb/s data transfer. The P9X79 WS affords greater convenience to optimize PCIe allocation in Dual Intel Server-Class Gigabit LAN To enhance network reliability, the P9X79 WS is an essential and convenient tool to let users know more efficiently. Red means overclocked... Expect a brand-new gaming style you the multi-GPU choice of Intel lan can easily run even the most demanding PC games in total. ASUS P9X79 WS 1-3 It's ideal for both the front and rear panel - 4USB 3.0 ports in full detail for 4-Way NVIDIA® GeForce® SLI...
User Manual
Page 23
... dramatically improves your performance with no rebooting needed and instant activation for optimized performance in diverse situations. This all exclusive ASUS features into the world's first real-time PC power saving chip through Auto Tuning and TurboVfunctions. This also reduces fan...design. MemOK! It delivers high power efficiency and supreme overclocking ability. ASUS P9X79 WS 1-5 EPU Tap into one click, no capacity limitations as a cache for frequently accessed data. ASUS SSD Caching SSD caching from ASUS is easier than ever. TPU Unleash your system boot success. Get...
... dramatically improves your performance with no rebooting needed and instant activation for optimized performance in diverse situations. This all exclusive ASUS features into the world's first real-time PC power saving chip through Auto Tuning and TurboVfunctions. This also reduces fan...design. MemOK! It delivers high power efficiency and supreme overclocking ability. ASUS P9X79 WS 1-5 EPU Tap into one click, no capacity limitations as a cache for frequently accessed data. ASUS SSD Caching SSD caching from ASUS is easier than ever. TPU Unleash your system boot success. Get...

User Manual
Page 25
... motherboard against Electronic Magnetic Interference (EMI). ASUS P9X79 WS 1-7 It also natively supports fully-utilized hard drives larger than 2.2TB in 64-bit operating systems. ASUS exclusive interface EZ Mode displays frequently-accessed info. ASUS EZ DIY ASUS EZ DIY feature collection provides you to ...floppy disk or an OS-based utility. making it against static electricity and shields it convenient and easy to install. ASUS EZ-Flash 2 ASUS EZ Flash 2 is a user-friendly utility that goes beyond traditional keyboard-only controls. Users can choose system performance...
... motherboard against Electronic Magnetic Interference (EMI). ASUS P9X79 WS 1-7 It also natively supports fully-utilized hard drives larger than 2.2TB in 64-bit operating systems. ASUS exclusive interface EZ Mode displays frequently-accessed info. ASUS EZ DIY ASUS EZ DIY feature collection provides you to ...floppy disk or an OS-based utility. making it against static electricity and shields it convenient and easy to install. ASUS EZ-Flash 2 ASUS EZ Flash 2 is a user-friendly utility that goes beyond traditional keyboard-only controls. Users can choose system performance...
User Manual
Page 28
Chapter summary 2 2.1 Before you proceed 2-1 2.2 Motherboard overview 2-2 2.3 Building your computer system 2-30 2.4 Starting up for the first time 2-46 2.5 Turning off the computer 2-47 ASUS P9X79 WS
Chapter summary 2 2.1 Before you proceed 2-1 2.2 Motherboard overview 2-2 2.3 Building your computer system 2-30 2.4 Starting up for the first time 2-46 2.5 Turning off the computer 2-47 ASUS P9X79 WS
User Manual
Page 29
... as the power supply case, to avoid damaging them due to static electricity. • Hold components by the edges to the motherboard, peripherals, or components. ASUS P9X79 WS 2-1 2.1 Before you proceed Take note of the following precautions before you install motherboard components or change any motherboard settings. • Unplug the power cord from...
... as the power supply case, to avoid damaging them due to static electricity. • Hold components by the edges to the motherboard, peripherals, or components. ASUS P9X79 WS 2-1 2.1 Before you proceed Take note of the following precautions before you install motherboard components or change any motherboard settings. • Unplug the power cord from...
User Manual
Page 31
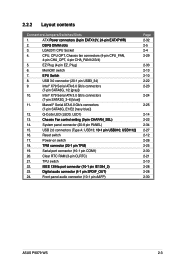
...-1 pin AAFP) Page 2-32 2-5 2-4 2-29 2-33 2-13 2-10 2-22 2-23 2-24 2-25 2-14 2-22 2-34 2-27 2-12 2-26 2-25 2-30 2-21 2-10 2-28 2-28 2-30 ASUS P9X79 WS 2-3
...-1 pin AAFP) Page 2-32 2-5 2-4 2-29 2-33 2-13 2-10 2-22 2-23 2-24 2-25 2-14 2-22 2-34 2-27 2-12 2-26 2-25 2-30 2-21 2-10 2-28 2-28 2-30 ASUS P9X79 WS 2-3
User Manual
Page 33
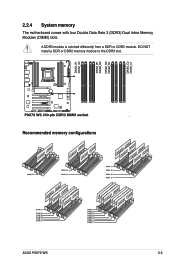
A DDR3 module is notched differently from a DDR or DDR2 module. DO NOT install a DDR or DDR2 memory module to the DDR3 slot. ® ® Recommended memory configurations ASUS P9X79 WS 2-5 2.2.4 System memory The motherboard comes with four Double Data Rate 3 (DDR3) Dual Inline Memory Modules (DIMM) slots.
A DDR3 module is notched differently from a DDR or DDR2 module. DO NOT install a DDR or DDR2 memory module to the DDR3 slot. ® ® Recommended memory configurations ASUS P9X79 WS 2-5 2.2.4 System memory The motherboard comes with four Double Data Rate 3 (DDR3) Dual Inline Memory Modules (DIMM) slots.
User Manual
Page 35
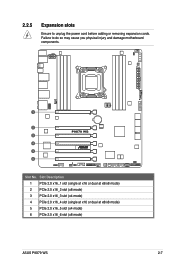
Slot Description 1 PCIe 2.0 x16_1 slot (single at x16 or dual at x8/x8 mode) 2 PCIe 2.0 x16_2 slot (x8 mode) 3 PCIe 2.0 x16_3 slot (x4 mode) 4 PCIe 2.0 x16_4 slot (single at x16 or dual at x8/x8 mode) 5 PCIe 2.0 x16_5 slot (x4 mode) 6 PCIe 2.0 x16_6 slot (x8 mode) ASUS P9X79 WS 2-7 2.2.5 Expansion slots Ensure to do so may cause you physical injury and damage motherboard components. Slot No. Failure to unplug the power cord before adding or removing expansion cards.
Slot Description 1 PCIe 2.0 x16_1 slot (single at x16 or dual at x8/x8 mode) 2 PCIe 2.0 x16_2 slot (x8 mode) 3 PCIe 2.0 x16_3 slot (x4 mode) 4 PCIe 2.0 x16_4 slot (single at x16 or dual at x8/x8 mode) 5 PCIe 2.0 x16_5 slot (x4 mode) 6 PCIe 2.0 x16_6 slot (x8 mode) ASUS P9X79 WS 2-7 2.2.5 Expansion slots Ensure to do so may cause you physical injury and damage motherboard components. Slot No. Failure to unplug the power cord before adding or removing expansion cards.
User Manual
Page 37
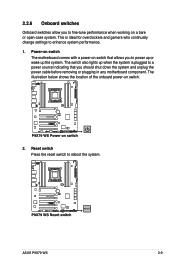
... onboard power-on a bare or open-case system. Power-on switch The motherboard comes with a power-on switch that you to reboot the system. ® ASUS P9X79 WS 2-9 The switch also lights up the system. Reset switch Press the reset switch to fine-tune performance when working on switch. ® 2. This is plugged...
... onboard power-on a bare or open-case system. Power-on switch The motherboard comes with a power-on switch that you to reboot the system. ® ASUS P9X79 WS 2-9 The switch also lights up the system. Reset switch Press the reset switch to fine-tune performance when working on switch. ® 2. This is plugged...
User Manual
Page 39
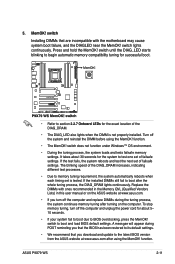
...the system loads and tests failsafe memory settings. The blinking speed of the DIAG_DRAM. • The DIAG_LED also lights when the DIMM is tested. ASUS P9X79 WS 2-11 Press and hold the MemOK! Replace the DIMMs with the motherboard may cause system boot failure, and the DIAGLED near the MemOK! 5....8226; We recommend that are incompatible with ones recommended in the Memory QVL (Qualified Vendors Lists) in this user manual or on the ASUS website at www.asus.com. • If you that the BIOS has been restored to test one set of failsafe settings. It takes about 5- 10 seconds...
...the system loads and tests failsafe memory settings. The blinking speed of the DIAG_DRAM. • The DIAG_LED also lights when the DIMM is tested. ASUS P9X79 WS 2-11 Press and hold the MemOK! Replace the DIMMs with the motherboard may cause system boot failure, and the DIAGLED near the MemOK! 5....8226; We recommend that are incompatible with ones recommended in the Memory QVL (Qualified Vendors Lists) in this user manual or on the ASUS website at www.asus.com. • If you that the BIOS has been restored to test one set of failsafe settings. It takes about 5- 10 seconds...
User Manual
Page 41
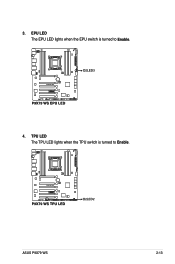
3. TPU LED The TPU LED lights when the TPU switch is turned to Enable. ® ASUS P9X79 WS 2-13 EPU LED The EPU LED lights when the EPU switch is turned to Enable. ® 4.
3. TPU LED The TPU LED lights when the TPU switch is turned to Enable. ® ASUS P9X79 WS 2-13 EPU LED The EPU LED lights when the EPU switch is turned to Enable. ® 4.
User Manual
Page 43
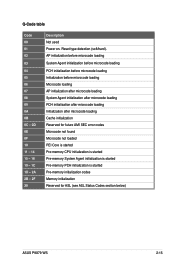
... Agent initialization is started Pre-memory PCH initialization is started Pre-memory initialization codes Memory initialization Reserved for ASL (see ASL Status Codes section below) ASUS P9X79 WS 2-15 Reset type detection (soft/hard). Q-Code table Code 00 01 02 03 04 05 06 07 08 09 0A 0B 0C - 0D 0E 0F...
... Agent initialization is started Pre-memory PCH initialization is started Pre-memory initialization codes Memory initialization Reserved for ASL (see ASL Status Codes section below) ASUS P9X79 WS 2-15 Reset type detection (soft/hard). Q-Code table Code 00 01 02 03 04 05 06 07 08 09 0A 0B 0C - 0D 0E 0F...
User Manual
Page 45
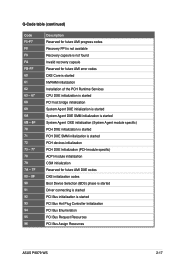
... connecting is started PCI Bus initialization is started PCI Bus Hot Plug Controller Initialization PCI Bus Enumeration PCI Bus Request Resources PCI Bus Assign Resources ASUS P9X79 WS 2-17
... connecting is started PCI Bus initialization is started PCI Bus Hot Plug Controller Initialization PCI Bus Enumeration PCI Bus Request Resources PCI Bus Assign Resources ASUS P9X79 WS 2-17
User Manual
Page 47
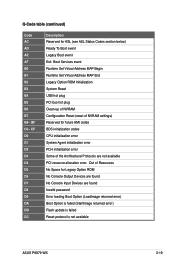
... Invalid password Error loading Boot Option (LoadImage returned error) Boot Option is failed (StartImage returned error) Flash update is failed Reset protocol is not available ASUS P9X79 WS 2-19 CF D0 D1 D2 D3 D4 D5 D6 D7 D8 D9 DA DB DC Description Reserved for ASL (see ASL Status Codes section below...
... Invalid password Error loading Boot Option (LoadImage returned error) Boot Option is failed (StartImage returned error) Flash update is failed Reset protocol is not available ASUS P9X79 WS 2-19 CF D0 D1 D2 D3 D4 D5 D6 D7 D8 D9 DA DB DC Description Reserved for ASL (see ASL Status Codes section below...
User Manual
Page 49
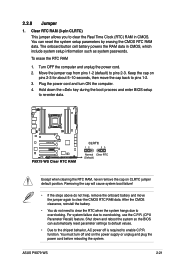
...! • If the steps above do not need to clear the RTC when the system hangs due to pins 1-2. 3. You must turn ON the computer. 4. ASUS P9X79 WS 2-21 The onboard button cell battery powers the RAM data in CMOS. Clear RTC RAM (3-pin CLRTC) This jumper allows you to enable C.P.R. Move the...
...! • If the steps above do not need to clear the RTC when the system hangs due to pins 1-2. 3. You must turn ON the computer. 4. ASUS P9X79 WS 2-21 The onboard button cell battery powers the RAM data in CMOS. Clear RTC RAM (3-pin CLRTC) This jumper allows you to enable C.P.R. Move the...

User Manual
Page 51
...® XP SP3 or later versions. • You must install Windows® XP Service Pack 3 or later versions before using Serial ATA hard disk drives. ASUS P9X79 WS 2-23 Intel® X79 Serial ATA 6.0 Gb/s connectors (7-pin SATA6G_1/2 [gray]) These connectors connect to the SATA_3G port), or else the ODD will not run...
...® XP SP3 or later versions. • You must install Windows® XP Service Pack 3 or later versions before using Serial ATA hard disk drives. ASUS P9X79 WS 2-23 Intel® X79 Serial ATA 6.0 Gb/s connectors (7-pin SATA6G_1/2 [gray]) These connectors connect to the SATA_3G port), or else the ODD will not run...
User Manual
Page 53
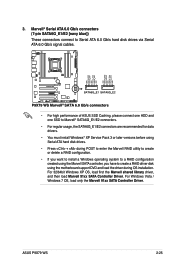
.../E2 [navy blue]) These connectors connect to Serial ATA 6.0 Gb/s hard disk drives via Serial ATA 6.0 Gb/s signal cables. ® • For high performance of ASUS SSD Caching, please connect one HDD and one SSD to Marvell® SATA6G_E1/E2 connectors. • For regular usage, the SATA6G_E1/E2 connectors are recommended... created using the Marvell SATA controller, you have to create a RAID driver disk using the motherboard support DVD and load the driver during OS installation. ASUS P9X79 WS 2-25 For Windows Vista / Windows 7 OS, load only the Marvell 91xx SATA Controller Driver.
.../E2 [navy blue]) These connectors connect to Serial ATA 6.0 Gb/s hard disk drives via Serial ATA 6.0 Gb/s signal cables. ® • For high performance of ASUS SSD Caching, please connect one HDD and one SSD to Marvell® SATA6G_E1/E2 connectors. • For regular usage, the SATA6G_E1/E2 connectors are recommended... created using the Marvell SATA controller, you have to create a RAID driver disk using the motherboard support DVD and load the driver during OS installation. ASUS P9X79 WS 2-25 For Windows Vista / Windows 7 OS, load only the Marvell 91xx SATA Controller Driver.
User Manual
Page 55
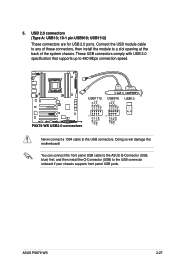
... USB module cable to any of the system chassis. Doing so will damage the motherboard! You can connect the front panel USB cable to the ASUS Q-Connector (USB, blue) first, and then install the Q-Connector (USB) to a slot opening at the back of these connectors, then install the module to the... 2.0 specification that supports up to 480 Mbps connection speed. ® Never connect a 1394 cable to the USB connectors. USB 2.0 connectors (Type A: USB13; 10-1 pin USB910; 5. ASUS P9X79 WS 2-27
... USB module cable to any of the system chassis. Doing so will damage the motherboard! You can connect the front panel USB cable to the ASUS Q-Connector (USB, blue) first, and then install the Q-Connector (USB) to a slot opening at the back of these connectors, then install the module to the... 2.0 specification that supports up to 480 Mbps connection speed. ® Never connect a 1394 cable to the USB connectors. USB 2.0 connectors (Type A: USB13; 10-1 pin USB910; 5. ASUS P9X79 WS 2-27
User Manual
Page 57
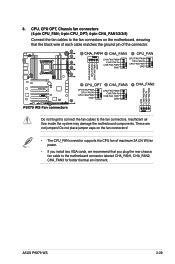
These are not jumpers! Do not forget to connect the fan cables to the motherboard connector labeled CHA_FAN1, CHA_FAN2, CHA_FAN3 for better thermal environment. ASUS P9X79 WS 2-29 8. CPU, CPU OPT, Chassis fan connectors (4-pin CPU_FAN; 4-pin CPU_OPT; 4-pin CHA_FAN1/2/3/4) Connect the fan cables to the fan connectors on the fan connectors! &#...
These are not jumpers! Do not forget to connect the fan cables to the motherboard connector labeled CHA_FAN1, CHA_FAN2, CHA_FAN3 for better thermal environment. ASUS P9X79 WS 2-29 8. CPU, CPU OPT, Chassis fan connectors (4-pin CPU_FAN; 4-pin CPU_OPT; 4-pin CHA_FAN1/2/3/4) Connect the fan cables to the fan connectors on the fan connectors! &#...


