
User Manual
Page 3
...vi Safety information...vii About this guide...viii P9X79 DELUXE specifications summary x Chapter 1: Product introduction 1.1 Welcome!...1-1 1.2 Package contents 1-1 1.3 Special features 1-2 1.3.1 Product highlights 1-2 1.3.2 Dual Intelligent Processors 3 with New DIGI+ Power Control..... 1-3 1.3.3 ASUS Exclusive Features 1-4 1.3.4 ASUS Quiet Thermal Solution 1-5 1.3.5 ASUS EZ DIY 1-5 1.3.6 Other special features ... Expansion Card installation 2-46 2.3.10 Bluetooth v3.0 + HS Module Installation 2-47 2.3.11 USB BIOS Flashback 2-49 2.3.12 Rear panel connection 2-50 iii
...vi Safety information...vii About this guide...viii P9X79 DELUXE specifications summary x Chapter 1: Product introduction 1.1 Welcome!...1-1 1.2 Package contents 1-1 1.3 Special features 1-2 1.3.1 Product highlights 1-2 1.3.2 Dual Intelligent Processors 3 with New DIGI+ Power Control..... 1-3 1.3.3 ASUS Exclusive Features 1-4 1.3.4 ASUS Quiet Thermal Solution 1-5 1.3.5 ASUS EZ DIY 1-5 1.3.6 Other special features ... Expansion Card installation 2-46 2.3.10 Bluetooth v3.0 + HS Module Installation 2-47 2.3.11 USB BIOS Flashback 2-49 2.3.12 Rear panel connection 2-50 iii

User Manual
Page 4
... Xpert 3-45 3.9 Exit menu 3-46 3.10 Updating BIOS 3-47 3.10.1 ASUS Update utility 3-47 3.10.2 ASUS EZ Flash 2 utility 3-50 3.10.3 ASUS CrashFree BIOS 3 utility 3-51 3.10.4 ASUS BIOS Updater 3-52 Chapter 4: Software support 4.1 Installing an operating system 4-1 4.2 Support DVD information 4-1... Configuration 3-27 3.5.2 CPU Power Management Configuration 3-28 3.5.3 PCH Configuration 3-29 3.5.4 SATA Configuration 3-29 3.5.5 USB Configuration 3-32 3.5.6 Onboard Devices Configuraton 3-33 3.5.7 APM 3-36 3.6 Monitor menu 3-37 3.7 Boot menu 3-40 3.8 Tools menu 3-42...
... Xpert 3-45 3.9 Exit menu 3-46 3.10 Updating BIOS 3-47 3.10.1 ASUS Update utility 3-47 3.10.2 ASUS EZ Flash 2 utility 3-50 3.10.3 ASUS CrashFree BIOS 3 utility 3-51 3.10.4 ASUS BIOS Updater 3-52 Chapter 4: Software support 4.1 Installing an operating system 4-1 4.2 Support DVD information 4-1... Configuration 3-27 3.5.2 CPU Power Management Configuration 3-28 3.5.3 PCH Configuration 3-29 3.5.4 SATA Configuration 3-29 3.5.5 USB Configuration 3-32 3.5.6 Onboard Devices Configuraton 3-33 3.5.7 APM 3-36 3.6 Monitor menu 3-37 3.7 Boot menu 3-40 3.8 Tools menu 3-42...
User Manual
Page 5
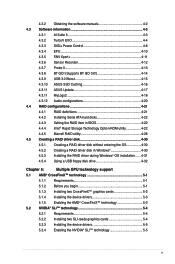
... 4-11 4.3.6 Sensor Recorder 4-12 4.3.7 Probe II 4-13 4.3.8 BT GO! (Supports BT GO 3.0 4-14 4.3.9 USB 3.0 Boost 4-15 4.3.10 ASUS SSD Caching 4-16 4.3.11 ASUS Update 4-17 4.3.11 MyLogo2 4-18 4.3.12 Audio configurations 4-20 4.4 RAID configurations 4-21 4.4.1 RAID definitions 4-21 4.4.2...Creating a RAID driver disk in Windows 4-30 4.5.3 Installing the RAID driver during Windows® OS installation....... 4-31 4.5.4 Using a USB floppy disk drive 4-32 Chapter 5: Multiple GPU technology support 5.1 AMD® CrossFireX™ technology 5-1 5.1.1 Requirements 5-1 5.1.2 Before...
... 4-11 4.3.6 Sensor Recorder 4-12 4.3.7 Probe II 4-13 4.3.8 BT GO! (Supports BT GO 3.0 4-14 4.3.9 USB 3.0 Boost 4-15 4.3.10 ASUS SSD Caching 4-16 4.3.11 ASUS Update 4-17 4.3.11 MyLogo2 4-18 4.3.12 Audio configurations 4-20 4.4 RAID configurations 4-21 4.4.1 RAID definitions 4-21 4.4.2...Creating a RAID driver disk in Windows 4-30 4.5.3 Installing the RAID driver during Windows® OS installation....... 4-31 4.5.4 Using a USB floppy disk drive 4-32 Chapter 5: Multiple GPU technology support 5.1 AMD® CrossFireX™ technology 5-1 5.1.1 Requirements 5-1 5.1.2 Before...

User Manual
Page 11
AI Suite II - ASUS MyLogo 2 - Multi-language BIOS ASUS Q-Design: - ASUS Q-Shield - Front Panel USB 3.0 Support - USB BIOS Flashback - Percision Tweaker 2 - ASUS Q-Code - ASUS Q-Connector (continues on next page) xi P9X79 DELUXE specifications summary USB ASUS unique features 3 x ASMedia® USB 3.0 controllers - 2 x USB 3.0/2.0 ports at mid-board for front panel support - 6 x USB 3.0/2.0 ports at back panel with 1 additional VIA SuperSpeed USB hub controller Intel® X79...
AI Suite II - ASUS MyLogo 2 - Multi-language BIOS ASUS Q-Design: - ASUS Q-Shield - Front Panel USB 3.0 Support - USB BIOS Flashback - Percision Tweaker 2 - ASUS Q-Code - ASUS Q-Connector (continues on next page) xi P9X79 DELUXE specifications summary USB ASUS unique features 3 x ASMedia® USB 3.0 controllers - 2 x USB 3.0/2.0 ports at mid-board for front panel support - 6 x USB 3.0/2.0 ports at back panel with 1 additional VIA SuperSpeed USB hub controller Intel® X79...

User Manual
Page 12
... Precision Tweaker 2: - vCCSA: 255-step system agent voltage control - vCore: Adjustable CPU voltage at 0.005V increment - P9X79 DELUXE specifications summary ASUS exclusive overclocking features Back panel I/O ports Internal I /O 1 x USB 3.0/2.0 connector supports additional 2 USB ports (19-pin) 4 x USB 2.0/1.1 connectors support additional 8 USB ports 4 x SATA 6Gb/s connectors 4 x SATA 3Gb/s connectors 1 x CPU Fan connector (4-pin) 1 x CPU Optional Fan connector (4-pin...
... Precision Tweaker 2: - vCCSA: 255-step system agent voltage control - vCore: Adjustable CPU voltage at 0.005V increment - P9X79 DELUXE specifications summary ASUS exclusive overclocking features Back panel I/O ports Internal I /O 1 x USB 3.0/2.0 connector supports additional 2 USB ports (19-pin) 4 x USB 2.0/1.1 connectors support additional 8 USB ports 4 x SATA 6Gb/s connectors 4 x SATA 3Gb/s connectors 1 x CPU Fan connector (4-pin) 1 x CPU Optional Fan connector (4-pin...

User Manual
Page 16
The P9X79 DELUXE affords greater convenience to meet the higher bandwidth requirements of 2400(O. ASUS provides extra SATA 6.0 Gb/s ports with memory and PCI Express controllers integrated to -reach rear I/O. Intel® X79 Express Chipset The Intel® X79...systems. 3-Way SLI™ and Quad-GPU CrossFireX™ Support Both SLI and CrossfireX architectures work , heavy duty multimedia or dedicated gaming, more than USB 2.0. Experience the latest plug & play connectivity at DDR3 2133/1866/1600 MHz frequency as default. Enjoy faster throughput of the most powerful and energy ...
The P9X79 DELUXE affords greater convenience to meet the higher bandwidth requirements of 2400(O. ASUS provides extra SATA 6.0 Gb/s ports with memory and PCI Express controllers integrated to -reach rear I/O. Intel® X79 Express Chipset The Intel® X79...systems. 3-Way SLI™ and Quad-GPU CrossFireX™ Support Both SLI and CrossfireX architectures work , heavy duty multimedia or dedicated gaming, more than USB 2.0. Experience the latest plug & play connectivity at DDR3 2133/1866/1600 MHz frequency as default. Enjoy faster throughput of the most powerful and energy ...

User Manual
Page 18
...easily, without even entering their existing BIOS or operating system. USB 3.0 Boost New ASUS USB 3.0 Boost technology supports UASP (USB Attached SCSI Protocol), the latest USB 3.0 standard. AI Suite II With its user-friendly interface, ASUS AI Suite II consolidates all -inone software offers diverse and easy... wireless devices with no central access points. This all exclusive ASUS features into the world's first real-time PC power saving chip through the exclusive user friendly ASUS interface. ASUS BT GO 3.0! Just plug in USB storage and push the dedicated button for 3 seconds, and...
...easily, without even entering their existing BIOS or operating system. USB 3.0 Boost New ASUS USB 3.0 Boost technology supports UASP (USB Attached SCSI Protocol), the latest USB 3.0 standard. AI Suite II With its user-friendly interface, ASUS AI Suite II consolidates all -inone software offers diverse and easy... wireless devices with no central access points. This all exclusive ASUS features into the world's first real-time PC power saving chip through the exclusive user friendly ASUS interface. ASUS BT GO 3.0! Just plug in USB storage and push the dedicated button for 3 seconds, and...

User Manual
Page 23
...AAFP) 18. DDR3 DIMM slots 2. USB 3.0 connector (20-1 pin USB3_78) 7. EPU switch 12. Q-Code LED (LED1, LED2) Page 2-5 2-33 2-4 2-32 2-17 2-29 2-26 2-27 2-28 2-35 2-19 2-18 2-30 2-18 2-16 2-16 2-33 2-31 2-22 ASUS P9X79 DELUXE 2-3 Chapter 2 Layout contents Connectors/...Jumpers/Slots 1. ATX power connectors (24-pin EATXPWR, 8-pin EATX12V) 3. USB 2.0 connectors (10-1 pin USB78, USB910, USB1112, USB1314) 14 Clear CMOS switch 15. Power-on ...
...AAFP) 18. DDR3 DIMM slots 2. USB 3.0 connector (20-1 pin USB3_78) 7. EPU switch 12. Q-Code LED (LED1, LED2) Page 2-5 2-33 2-4 2-32 2-17 2-29 2-26 2-27 2-28 2-35 2-19 2-18 2-30 2-18 2-16 2-16 2-33 2-31 2-22 ASUS P9X79 DELUXE 2-3 Chapter 2 Layout contents Connectors/...Jumpers/Slots 1. ATX power connectors (24-pin EATXPWR, 8-pin EATX12V) 3. USB 2.0 connectors (10-1 pin USB78, USB910, USB1112, USB1314) 14 Clear CMOS switch 15. Power-on ...

User Manual
Page 35
... shared - - - - - - - shared - - - - - ASM 1042 USB 3.0 #1 shared - - - - - - - shared - - - - - - PCIEX1_2 shared - - - - - - - ASM 1061 E-SATA shared - - - - - - - shared - - - - - Marvell 9128 - - - On Chip USB1 On Chip USB2 On Chip SATA HD Audio - - - - - - shared - Configuration Auto Mode PCI Express sharing mode PCIe x1_1 PCIe x1_2 x1 x1 BT3 Mode BT3 N/A eSATA Mode N/A eSATA ASUS P9X79 DELUXE 2-15 PCIEX1_1 - - - shared - - - - - shared...
... shared - - - - - - - shared - - - - - ASM 1042 USB 3.0 #1 shared - - - - - - - shared - - - - - - PCIEX1_2 shared - - - - - - - ASM 1061 E-SATA shared - - - - - - - shared - - - - - Marvell 9128 - - - On Chip USB1 On Chip USB2 On Chip SATA HD Audio - - - - - - shared - Configuration Auto Mode PCI Express sharing mode PCIe x1_1 PCIe x1_2 x1 x1 BT3 Mode BT3 N/A eSATA Mode N/A eSATA ASUS P9X79 DELUXE 2-15 PCIEX1_1 - - - shared - - - - - shared...

User Manual
Page 44
... Initialization PCI Bus Enumeration PCI Bus Request Resources PCI Bus Assign Resources Console Output devices connect Console input devices connect Super IO Initialization USB initialization is started USB Reset USB Detect USB Enable Reserved for future AMI codes IDE initialization is started IDE Reset IDE Detect IDE Enable SCSI initialization is started SCSI Reset...
... Initialization PCI Bus Enumeration PCI Bus Request Resources PCI Bus Assign Resources Console Output devices connect Console input devices connect Super IO Initialization USB initialization is started USB Reset USB Detect USB Enable Reserved for future AMI codes IDE initialization is started IDE Reset IDE Detect IDE Enable SCSI initialization is started SCSI Reset...

User Manual
Page 45
ASUS P9X79 DELUXE 2-25 Interrupt controller is in APIC mode. System has transitioned into ACPI mode. Q-Code table (continued) Code AC AD AE AF B0 B1 B2 B3 ... Legacy Boot event Exit Boot Services event Runtime Set Virtual Address MAP Begin Runtime Set Virtual Address MAP End Legacy Option ROM Initialization System Reset USB hot plug PCI bus hot plug Clean-up of NVRAM Configuration Reset (reset of the Architectural Protocols are found Invalid password Error loading Boot Option...
ASUS P9X79 DELUXE 2-25 Interrupt controller is in APIC mode. System has transitioned into ACPI mode. Q-Code table (continued) Code AC AD AE AF B0 B1 B2 B3 ... Legacy Boot event Exit Boot Services event Runtime Set Virtual Address MAP Begin Runtime Set Virtual Address MAP End Legacy Option ROM Initialization System Reset USB hot plug PCI bus hot plug Clean-up of NVRAM Configuration Reset (reset of the Architectural Protocols are found Invalid password Error loading Boot Option...

User Manual
Page 46
... installation • Windows XP: 32 bit: Intel IRST driver for the system to detect the Optical Disk Drive (the ODD should be connected to the USB Flash Drive before using NCQ, set to [AHCI Mode][RAID Mode], it is necessary to load IRST Driver from SCD to the Intel SATA ports...
... installation • Windows XP: 32 bit: Intel IRST driver for the system to detect the Optical Disk Drive (the ODD should be connected to the USB Flash Drive before using NCQ, set to [AHCI Mode][RAID Mode], it is necessary to load IRST Driver from SCD to the Intel SATA ports...

User Manual
Page 47
... to [IDE Mode] for the system to the Intel SATA ports), or else the ODD will NOT support Windows XP 32 bit. Refer to the USB Flash Drive before using Windows® XP SP3 or later versions. For details, please refer to the section "4.5 Create a RAID driver disk". • Windows 7 & Vista... run. We strongly recommend you can create a RAID 0, 1, 5, and 10 configuration with the Intel® Rapid Storage Technology through the onboard Intel® X79 chipset. ASUS P9X79 DELUXE 2-27
... to [IDE Mode] for the system to the Intel SATA ports), or else the ODD will NOT support Windows XP 32 bit. Refer to the USB Flash Drive before using Windows® XP SP3 or later versions. For details, please refer to the section "4.5 Create a RAID driver disk". • Windows 7 & Vista... run. We strongly recommend you can create a RAID 0, 1, 5, and 10 configuration with the Intel® Rapid Storage Technology through the onboard Intel® X79 chipset. ASUS P9X79 DELUXE 2-27
User Manual
Page 49
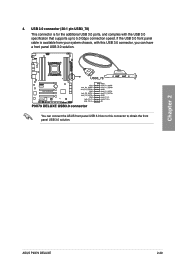
Chapter 2 ASUS P9X79 DELUXE 2-29 USB 3.0 connector (20-1 pin USB3_78) This connector is available from your system chassis, with the USB 3.0 specificaton that supports up to obtain the front panel USB 3.0 solution. You can have a front panel USB 3.0 solution. 4. If the USB 3.0 front panel cable is for the additional USB 3.0 ports, and complies with this USB 3.0 connector, you can connect the ASUS front panel USB 3.0 box to this connector to 5.0 Gbps connection speed.
Chapter 2 ASUS P9X79 DELUXE 2-29 USB 3.0 connector (20-1 pin USB3_78) This connector is available from your system chassis, with the USB 3.0 specificaton that supports up to obtain the front panel USB 3.0 solution. You can have a front panel USB 3.0 solution. 4. If the USB 3.0 front panel cable is for the additional USB 3.0 ports, and complies with this USB 3.0 connector, you can connect the ASUS front panel USB 3.0 box to this connector to 5.0 Gbps connection speed.

User Manual
Page 50
...-1 pin USB1112; USB1314) These connectors are for USB 2.0 ports. You can connect the front panel USB cable to the ASUS Q-Connector (USB, blue) first, and then install the Q-Connector (USB) to the USB connectors. Never connect a 1394 cable to the USB connector onboard if your chassis supports front panel USB ports. The USB 2.0 module is purchased separately. 2-30 Chapter...
...-1 pin USB1112; USB1314) These connectors are for USB 2.0 ports. You can connect the front panel USB cable to the ASUS Q-Connector (USB, blue) first, and then install the Q-Connector (USB) to the USB connectors. Never connect a 1394 cable to the USB connector onboard if your chassis supports front panel USB ports. The USB 2.0 module is purchased separately. 2-30 Chapter...

User Manual
Page 65
IDE_LED PWR Ground Reset Ground POWER SW RESET SW To install USB 2.0 Connector To install front panel audio connector Chapter 2 USB 2.0 To install USB 3.0 Connector USB 3.0 ASUS P9X79 DELUXE AAFP 2-45 2.3.8 Front I/O Connector To install ASUS Q-Connector 1 2 IDE_LED+ IDE_LED-
IDE_LED PWR Ground Reset Ground POWER SW RESET SW To install USB 2.0 Connector To install front panel audio connector Chapter 2 USB 2.0 To install USB 3.0 Connector USB 3.0 ASUS P9X79 DELUXE AAFP 2-45 2.3.8 Front I/O Connector To install ASUS Q-Connector 1 2 IDE_LED+ IDE_LED-

User Manual
Page 68
... refer to install the BT3 driver before installing the BT GO! software. For BT GO! FRONT REAR SPK MIC IN POWER eSATA 6G USB3.0 S/PDIF USB BIOS Flashback USB3.0 Chapter 2 2-48 Chapter 2: Hardware information Attach the IO shield onto the chassis and then place the motherboard flat into the chassis. 5. Be...
... refer to install the BT3 driver before installing the BT GO! software. For BT GO! FRONT REAR SPK MIC IN POWER eSATA 6G USB3.0 S/PDIF USB BIOS Flashback USB3.0 Chapter 2 2-48 Chapter 2: Hardware information Attach the IO shield onto the chassis and then place the motherboard flat into the chassis. 5. Be...

User Manual
Page 69
... operating properly. Improper installation of the light signal accelerates along with the updating speed. 6. ASUS P9X79 DELUXE 2-49 Just plug in the root directory. 2 On the rear I/O port, plug the USB disk to the USB port with the WHITE interior. 3 Press the BIOS Flashback button for five seconds and turns... to flash the BIOS. If the light flashes for 3 seconds, and the light will be caused by:1. Chapter 2 2.3.11 USB BIOS Flashback USB BIOS Flashback offers the most convenient way to enter their existing BIOS or operating system. In case of interruption, please follow the ...
... operating properly. Improper installation of the light signal accelerates along with the updating speed. 6. ASUS P9X79 DELUXE 2-49 Just plug in the root directory. 2 On the rear I/O port, plug the USB disk to the USB port with the WHITE interior. 3 Press the BIOS Flashback button for five seconds and turns... to flash the BIOS. If the light flashes for 3 seconds, and the light will be caused by:1. Chapter 2 2.3.11 USB BIOS Flashback USB BIOS Flashback offers the most convenient way to enter their existing BIOS or operating system. In case of interruption, please follow the ...

User Manual
Page 70
... LED, Wi-Fi LED, LAN port LED, and audio port definitions. 2-50 Chapter 2: Hardware information USB 3.0 ports 3 and 4 11. 2.3.12 Rear panel connection 1 2 3 4 Chapter 2 5 6 7 8 9 10 11 12 Rear panel connectors 1. USB BIOS Flashback button 7. Power eSATA 6G port 4. USB 3.0 ports 5 and 6 12. Optical S/PDIF Out port 10. Wi-Fi Antenna Jack* 2. Realtek®...
... LED, Wi-Fi LED, LAN port LED, and audio port definitions. 2-50 Chapter 2: Hardware information USB 3.0 ports 3 and 4 11. 2.3.12 Rear panel connection 1 2 3 4 Chapter 2 5 6 7 8 9 10 11 12 Rear panel connectors 1. USB BIOS Flashback button 7. Power eSATA 6G port 4. USB 3.0 ports 5 and 6 12. Optical S/PDIF Out port 10. Wi-Fi Antenna Jack* 2. Realtek®...

User Manual
Page 71
... as data storage only. • We strongly recommend that you have to set the ASMedia® 1061 SATA controllers item in the BIOS setting to USB 3.0 ports for faster and better performance for details. * Bluetooth module LED indications Status Off Blue Blinking Description No link Linked Data activity * Wi-Fi LED... Speaker Out Mic In Center/Subwoofer Rear Speaker Out - 8-channel Line In Front Speaker Out Mic In Center/Subwoofer Rear Speaker Out Side Speaker Out ASUS P9X79 DELUXE 2-51
... as data storage only. • We strongly recommend that you have to set the ASMedia® 1061 SATA controllers item in the BIOS setting to USB 3.0 ports for faster and better performance for details. * Bluetooth module LED indications Status Off Blue Blinking Description No link Linked Data activity * Wi-Fi LED... Speaker Out Mic In Center/Subwoofer Rear Speaker Out - 8-channel Line In Front Speaker Out Mic In Center/Subwoofer Rear Speaker Out Side Speaker Out ASUS P9X79 DELUXE 2-51


