
User Manual
Page 3
Contents Contents...iii Notices vi Safety information...vii About this guide...viii P9X79 DELUXE specifications summary x Chapter 1: Product introduction 1.1 Welcome!...1-1 1.2 Package contents 1-1 1.3 Special features 1-2 1.3.1 Product highlights 1-2 1.3.2 Dual Intelligent Processors 3 with New DIGI+ Power Control..... 1-3 1.3.3 ASUS Exclusive Features 1-4 1.3.4 ASUS Quiet Thermal Solution 1-5 1.3.5 ASUS EZ DIY 1-5 1.3.6 Other special features 1-6 Chapter 2: Hardware information 2.1 Before you proceed 2-1 2.2 Motherboard overview 2-2 2.2.1 Motherboard...
Contents Contents...iii Notices vi Safety information...vii About this guide...viii P9X79 DELUXE specifications summary x Chapter 1: Product introduction 1.1 Welcome!...1-1 1.2 Package contents 1-1 1.3 Special features 1-2 1.3.1 Product highlights 1-2 1.3.2 Dual Intelligent Processors 3 with New DIGI+ Power Control..... 1-3 1.3.3 ASUS Exclusive Features 1-4 1.3.4 ASUS Quiet Thermal Solution 1-5 1.3.5 ASUS EZ DIY 1-5 1.3.6 Other special features 1-6 Chapter 2: Hardware information 2.1 Before you proceed 2-1 2.2 Motherboard overview 2-2 2.2.1 Motherboard...

User Manual
Page 4
... 3-40 3.8 Tools menu 3-42 3.8.1 ASUS EZ Flash 2 Utility 3-42 3.8.2 ASUS DRAM SPD Information 3-43 3.8.4 ASUS O.C. Profile 3-44 3.8.5 ASUS Drive Xpert 3-45 3.9 Exit menu 3-46 3.10 Updating BIOS 3-47 3.10.1 ASUS Update utility 3-47 3.10.2 ASUS EZ Flash 2 utility 3-50 3.10.3 ASUS CrashFree BIOS 3 utility 3-51 3.10.4 ASUS BIOS Updater 3-52 Chapter 4: Software support 4.1 Installing an operating system 4-1 4.2 Support DVD...
... 3-40 3.8 Tools menu 3-42 3.8.1 ASUS EZ Flash 2 Utility 3-42 3.8.2 ASUS DRAM SPD Information 3-43 3.8.4 ASUS O.C. Profile 3-44 3.8.5 ASUS Drive Xpert 3-45 3.9 Exit menu 3-46 3.10 Updating BIOS 3-47 3.10.1 ASUS Update utility 3-47 3.10.2 ASUS EZ Flash 2 utility 3-50 3.10.3 ASUS CrashFree BIOS 3 utility 3-51 3.10.4 ASUS BIOS Updater 3-52 Chapter 4: Software support 4.1 Installing an operating system 4-1 4.2 Support DVD...
User Manual
Page 5
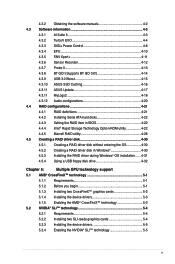
... BT GO 3.0 4-14 4.3.9 USB 3.0 Boost 4-15 4.3.10 ASUS SSD Caching 4-16 4.3.11 ASUS Update 4-17 4.3.11 MyLogo2 4-18 4.3.12 Audio configurations 4-20 4.4 RAID configurations 4-21 4.4.1 RAID definitions 4-21 4.4.2 Installing Serial ATA hard disks 4-22 4.4.3 Setting the RAID item in ... Creating a RAID driver disk without entering the OS 4-30 4.5.2 Creating a RAID driver disk in Windows 4-30 4.5.3 Installing the RAID driver during Windows® OS installation....... 4-31 4.5.4 Using a USB floppy disk drive 4-32 Chapter 5: Multiple GPU technology support 5.1 AMD® CrossFireX™...
... BT GO 3.0 4-14 4.3.9 USB 3.0 Boost 4-15 4.3.10 ASUS SSD Caching 4-16 4.3.11 ASUS Update 4-17 4.3.11 MyLogo2 4-18 4.3.12 Audio configurations 4-20 4.4 RAID configurations 4-21 4.4.1 RAID definitions 4-21 4.4.2 Installing Serial ATA hard disks 4-22 4.4.3 Setting the RAID item in ... Creating a RAID driver disk without entering the OS 4-30 4.5.2 Creating a RAID driver disk in Windows 4-30 4.5.3 Installing the RAID driver during Windows® OS installation....... 4-31 4.5.4 Using a USB floppy disk drive 4-32 Chapter 5: Multiple GPU technology support 5.1 AMD® CrossFireX™...

User Manual
Page 6
... circuit different from digital apparatus set out in accordance with the limits for help. DO NOT throw the motherboard in a particular installation. Canadian Department of Communications Statement This digital apparatus does not exceed the Class B limits for disposal of electronic products. This product...http://csr.asus.com/english/REACH.htm. This equipment has been tested and found to comply with manufacturer's instructions, may cause harmful interference to Part 15 of the FCC Rules. DO NOT throw the mercury-containing button cell battery in a residential installation. These ...
... circuit different from digital apparatus set out in accordance with the limits for help. DO NOT throw the motherboard in a particular installation. Canadian Department of Communications Statement This digital apparatus does not exceed the Class B limits for disposal of electronic products. This product...http://csr.asus.com/english/REACH.htm. This equipment has been tested and found to comply with manufacturer's instructions, may cause harmful interference to Part 15 of the FCC Rules. DO NOT throw the mercury-containing button cell battery in a residential installation. These ...

User Manual
Page 7
... circuits, keep paper clips, screws, and staples away from connectors, slots, sockets and circuitry. • Avoid dust, humidity, and temperature extremes. Operation safety • Before installing the motherboard and adding devices on it may become wet. • Place the product on a stable surface. • If you are using, contact your local...
... circuits, keep paper clips, screws, and staples away from connectors, slots, sockets and circuitry. • Avoid dust, humidity, and temperature extremes. Operation safety • Before installing the motherboard and adding devices on it may become wet. • Place the product on a stable surface. • If you are using, contact your local...

User Manual
Page 8
... package and the software. • Chapter 5: Multiple GPU technology support This chapter describes how to perform when installing system components. ASUS websites The ASUS website provides updated information on the motherboard. • Chapter 3: BIOS setup This chapter tells how to the... the new technology it supports. • Chapter 2: Hardware information This chapter lists the hardware setup procedures that you need when installing and configuring the motherboard. About this guide is organized This guide contains the following sources for additional information and for product and ...
... package and the software. • Chapter 5: Multiple GPU technology support This chapter describes how to perform when installing system components. ASUS websites The ASUS website provides updated information on the motherboard. • Chapter 3: BIOS setup This chapter tells how to the... the new technology it supports. • Chapter 2: Hardware information This chapter lists the hardware setup procedures that you need when installing and configuring the motherboard. About this guide is organized This guide contains the following sources for additional information and for product and ...

User Manual
Page 15
... connector 1 x 2-in the long line of the above are for buying an ASUS® P9X79 DELUXE motherboard! Before you for reference only. Chapter 1 Chapter 1: Chapter 1 Product introduction 1.1 Welcome! ASUS P9X79 DELUXE 1-1 Thank you start installing the motherboard, and hardware devices on it another standout in -1 ASUS Q-Connector kit 1 x Wi-Fi Ring Moving Antenna 1 x Bluetooth v3.0 + HS Module •...
... connector 1 x 2-in the long line of the above are for buying an ASUS® P9X79 DELUXE motherboard! Before you for reference only. Chapter 1 Chapter 1: Chapter 1 Product introduction 1.1 Welcome! ASUS P9X79 DELUXE 1-1 Thank you start installing the motherboard, and hardware devices on it another standout in -1 ASUS Q-Connector kit 1 x Wi-Fi Ring Moving Antenna 1 x Bluetooth v3.0 + HS Module •...

User Manual
Page 18
...with just one simple-to-use . With USB 3.0 Boost, USB device transmission speed is automatically flashed using an installed SSD with exclusive ASUS device auto-detect settings. It allows users to try new BIOS versions easily, without even entering their existing BIOS or...for frequently accessed data. It allows overclockers to supervise overclocking, energy management, fan speeds, voltage, and sensor readings. USB 3.0 Boost New ASUS USB 3.0 Boost technology supports UASP (USB Attached SCSI Protocol), the latest USB 3.0 standard. USB 3.0 Boost provides a user-friendly graphical ...
...with just one simple-to-use . With USB 3.0 Boost, USB device transmission speed is automatically flashed using an installed SSD with exclusive ASUS device auto-detect settings. It allows users to try new BIOS versions easily, without even entering their existing BIOS or...for frequently accessed data. It allows overclockers to supervise overclocking, energy management, fan speeds, voltage, and sensor readings. USB 3.0 Boost New ASUS USB 3.0 Boost technology supports UASP (USB Attached SCSI Protocol), the latest USB 3.0 standard. USB 3.0 Boost provides a user-friendly graphical ...

User Manual
Page 20
... eSATA 6Gb/s Ready Powered eSATA 6Gb/s combines data and power connectivity. ASUS Q-Connector ASUS Q-Connector allows you to reduce carbon footprint of current bus systems for the external SATA device. ASUS provides two extra ports with Audio Restoration, recreating the dynamic range of ...upmixes stereo sources (CDs, MP3s, WMAs, internet radio) into as many as S/PDIF or HDMI) designed to deliver audio to install. With better electric conductivity, it ideally protects your motherboard against Electronic Magnetic Interference (EMI). With these technologies, users experience better ...
... eSATA 6Gb/s Ready Powered eSATA 6Gb/s combines data and power connectivity. ASUS Q-Connector ASUS Q-Connector allows you to reduce carbon footprint of current bus systems for the external SATA device. ASUS provides two extra ports with Audio Restoration, recreating the dynamic range of ...upmixes stereo sources (CDs, MP3s, WMAs, internet radio) into as many as S/PDIF or HDMI) designed to deliver audio to install. With better electric conductivity, it ideally protects your motherboard against Electronic Magnetic Interference (EMI). With these technologies, users experience better ...
User Manual
Page 21
Chapter 2: Chapter 2 Hardware information 2.1 Before you proceed Take note of the following precautions before you install motherboard components or change any motherboard settings. • Unplug the power cord from the wall socket before touching any component. • Before ... to avoid touching the ICs on a grounded antistatic pad or in the bag that came with the component. • Before you install or remove any component, place it on them due to static electricity. • Hold components by the edges to the motherboard, peripherals, or components. ASUS P9X79 DELUXE 2-1
Chapter 2: Chapter 2 Hardware information 2.1 Before you proceed Take note of the following precautions before you install motherboard components or change any motherboard settings. • Unplug the power cord from the wall socket before touching any component. • Before ... to avoid touching the ICs on a grounded antistatic pad or in the bag that came with the component. • Before you install or remove any component, place it on them due to static electricity. • Hold components by the edges to the motherboard, peripherals, or components. ASUS P9X79 DELUXE 2-1

User Manual
Page 24
...CPU. • Upon purchase of repair only if the damage is shipment/ transit-related. • Keep the cap after installing the motherboard. ASUS will process Return Merchandise Authorization (RMA) requests only if the motherboard comes with a surface mount LGA2011 socket designed for the ... of the motherboard, ensure that the PnP cap is missing, or if you see any damage to the socket contacts resulting from incorrect CPU installation/removal, or misplacement/loss/incorrect removal of the PnP cap. 2-4 Chapter 2: Hardware information Chapter 2 2.2.2 Central Processing Unit (CPU) The ...
...CPU. • Upon purchase of repair only if the damage is shipment/ transit-related. • Keep the cap after installing the motherboard. ASUS will process Return Merchandise Authorization (RMA) requests only if the motherboard comes with a surface mount LGA2011 socket designed for the ... of the motherboard, ensure that the PnP cap is missing, or if you see any damage to the socket contacts resulting from incorrect CPU installation/removal, or misplacement/loss/incorrect removal of the PnP cap. 2-4 Chapter 2: Hardware information Chapter 2 2.2.2 Central Processing Unit (CPU) The ...

User Manual
Page 25
Recommended memory configurations Chapter 2 ASUS P9X79 DELUXE 2-5 A DDR3 module is notched differently from a DDR or DDR2 module. DO NOT install a DDR or DDR2 memory module to the DDR3 slot. 2.2.3 System memory The motherboard comes with eight Double Data Rate 3 (DDR3) Dual Inline Memory Modules (DIMM) slots.
Recommended memory configurations Chapter 2 ASUS P9X79 DELUXE 2-5 A DDR3 module is notched differently from a DDR or DDR2 module. DO NOT install a DDR or DDR2 memory module to the DDR3 slot. 2.2.3 System memory The motherboard comes with eight Double Data Rate 3 (DDR3) Dual Inline Memory Modules (DIMM) slots.

User Manual
Page 26
...® spec, the max. 64GB memory capacity can be supported with the same CAS latency. Under the default state, some memory modules for overclocking may install varying memory sizes in Channel A, B, C, and D. To operate at the vendor-marked or at a lower frequency than the vendor-marked value. Use a maximum ...8226; Due to CPU behavior, DDR3 2200/2000/1800 MHz memory module will update QVL once the DIMMs are available on 64-bit Windows OS. ASUS will run at http://support.microsoft.com/kb/929605/en-us. • This motherboard does not support DIMMs made up of the lower-sized ...
...® spec, the max. 64GB memory capacity can be supported with the same CAS latency. Under the default state, some memory modules for overclocking may install varying memory sizes in Channel A, B, C, and D. To operate at the vendor-marked or at a lower frequency than the vendor-marked value. Use a maximum ...8226; Due to CPU behavior, DDR3 2200/2000/1800 MHz memory module will update QVL once the DIMMs are available on 64-bit Windows OS. ASUS will run at http://support.microsoft.com/kb/929605/en-us. • This motherboard does not support DIMMs made up of the lower-sized ...

User Manual
Page 33
... TXD32048M1333C7-D(XMP) 2GB DS Team T3D1288LT-13 7-7-7-21 1.5-1.6 • • • Side(s): SS - Load the X.M.P. We suggest that you install the modules into slots A1/B1/B2/C1/D1/D2 for Quad-channel memory configuration. We suggest that you... is subject to the physical characteristics of individual CPUs. Size S S / Chip Brand Chip NO. Chapter 2 P9X79 DELUXE Motherboard Qualified Vendors Lists (QVL) DDR3 1333 MHz capability (continued) Vendors Part No. or D.O.C.P. Under the default state, some memory modules for the latest QVL. ASUS P9X79 DELUXE 2-13
... TXD32048M1333C7-D(XMP) 2GB DS Team T3D1288LT-13 7-7-7-21 1.5-1.6 • • • Side(s): SS - Load the X.M.P. We suggest that you install the modules into slots A1/B1/B2/C1/D1/D2 for Quad-channel memory configuration. We suggest that you... is subject to the physical characteristics of individual CPUs. Size S S / Chip Brand Chip NO. Chapter 2 P9X79 DELUXE Motherboard Qualified Vendors Lists (QVL) DDR3 1333 MHz capability (continued) Vendors Part No. or D.O.C.P. Under the default state, some memory modules for the latest QVL. ASUS P9X79 DELUXE 2-13

User Manual
Page 37
...of failsafe settings. function. Press and hold the MemOK! switch to boot after the whole tuning process, the DRAM_LED lights continuously. switch Installing DIMMs that you turn off the computer and unplug the power cord for about 30 seconds for the system to the latest BIOS version...failsafe memory settings. Turn off the computer and replace DIMMs during the tuning process, the system continues memory tuning after using the MemOK! ASUS P9X79 DELUXE 2-17 Replace the DIMMs with the motherboard may cause system boot failure, and the DRAM_LED near the MemOK! To stop memory tuning, ...
...of failsafe settings. function. Press and hold the MemOK! switch to boot after the whole tuning process, the DRAM_LED lights continuously. switch Installing DIMMs that you turn off the computer and unplug the power cord for about 30 seconds for the system to the latest BIOS version...failsafe memory settings. Turn off the computer and replace DIMMs during the tuning process, the system continues memory tuning after using the MemOK! ASUS P9X79 DELUXE 2-17 Replace the DIMMs with the motherboard may cause system boot failure, and the DRAM_LED near the MemOK! To stop memory tuning, ...
User Manual
Page 43
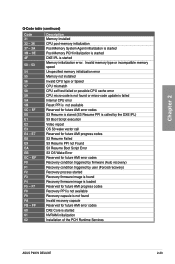
... is started DXE IPL is started Memory initialization error. Invalid memory type or incompatible memory speed Unspecified memory initialization error Memory not installed Invalid CPU type or Speed CPU mismatch CPU self test failed or possible CPU cache error CPU micro-code is not found or... is not available Recovery capsule is not found Invalid recovery capsule Reserved for future AMI error codes DXE Core is started NVRAM initialization Installation of the PCH Runtime Services ASUS P9X79 DELUXE 2-23 F7 F8 F9 FA FB - Chapter 2 Q-Code table (continued) Code 31 32 - 36 37 - 3A 3B - 3E ...
... is started DXE IPL is started Memory initialization error. Invalid memory type or incompatible memory speed Unspecified memory initialization error Memory not installed Invalid CPU type or Speed CPU mismatch CPU self test failed or possible CPU cache error CPU micro-code is not found or... is not available Recovery capsule is not found Invalid recovery capsule Reserved for future AMI error codes DXE Core is started NVRAM initialization Installation of the PCH Runtime Services ASUS P9X79 DELUXE 2-23 F7 F8 F9 FA FB - Chapter 2 Q-Code table (continued) Code 31 32 - 36 37 - 3A 3B - 3E ...

User Manual
Page 46
... 0, 1, 5, and 10 configuration with the Intel® Rapid Storage Technology through the onboard Intel® X79 chipset. IRST driver note for OS installation • Windows XP: 32 bit: Intel IRST driver for the system to detect the Optical Disk Drive (the ODD should be connected to Serial.... 2.2.7 Internal connectors 1. Refer to section 3.5.4 SATA Configuration for details. • You must load IRST Driver during OS Windows XP 64 bit installation for OS installation. 64 bit: When [SATA Mode] is set to [AHCI Mode][RAID Mode], it is set the SATA Mode item in the motherboard support ...
... 0, 1, 5, and 10 configuration with the Intel® Rapid Storage Technology through the onboard Intel® X79 chipset. IRST driver note for OS installation • Windows XP: 32 bit: Intel IRST driver for the system to detect the Optical Disk Drive (the ODD should be connected to Serial.... 2.2.7 Internal connectors 1. Refer to section 3.5.4 SATA Configuration for details. • You must load IRST Driver during OS Windows XP 64 bit installation for OS installation. 64 bit: When [SATA Mode] is set to [AHCI Mode][RAID Mode], it is set the SATA Mode item in the motherboard support ...

User Manual
Page 47
...or later versions. ASUS P9X79 DELUXE 2-27 Intel® X79 Serial ATA 3.0 Gb/s connectors (7-pin SATA3G_3-6 [blue]) These connectors connect to detect the storage devices. Refer to section 3.5.4 SATA Configuration for details. • You must load IRST Driver during OS Windows XP 64 bit installation for X79 platform will... not run. Chapter 2 • These connectors are using Serial ATA hard disk drives. IRST driver note for OS installation • Windows XP: 32 bit: Intel IRST driver for the system to Serial ATA 3.0 Gb/s hard disk drives and optical ...
...or later versions. ASUS P9X79 DELUXE 2-27 Intel® X79 Serial ATA 3.0 Gb/s connectors (7-pin SATA3G_3-6 [blue]) These connectors connect to detect the storage devices. Refer to section 3.5.4 SATA Configuration for details. • You must load IRST Driver during OS Windows XP 64 bit installation for X79 platform will... not run. Chapter 2 • These connectors are using Serial ATA hard disk drives. IRST driver note for OS installation • Windows XP: 32 bit: Intel IRST driver for the system to Serial ATA 3.0 Gb/s hard disk drives and optical ...
User Manual
Page 48
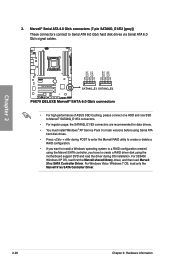
...gray]) These connectors connect to Serial ATA 6.0 Gb/s hard disk drives via Serial ATA 6.0 Gb/s signal cables. • For high performance of ASUS SSD Caching, please connect one HDD and one SSD to Marvell® SATA6G_E1/E2 connectors. • For regular usage, the SATA6G_E1/E2 connectors ...drives. • Press + during POST to enter the Marvell RAID utility to create or delete a RAID configuration. • If you want to install a Windows operating system to a RAID configuration created using the Marvell SATA controller, you have to create a RAID driver disk using the motherboard support...
...gray]) These connectors connect to Serial ATA 6.0 Gb/s hard disk drives via Serial ATA 6.0 Gb/s signal cables. • For high performance of ASUS SSD Caching, please connect one HDD and one SSD to Marvell® SATA6G_E1/E2 connectors. • For regular usage, the SATA6G_E1/E2 connectors ...drives. • Press + during POST to enter the Marvell RAID utility to create or delete a RAID configuration. • If you want to install a Windows operating system to a RAID configuration created using the Marvell SATA controller, you have to create a RAID driver disk using the motherboard support...

User Manual
Page 50
Chapter 2 5. Connect the USB module cable to any of these connectors, then install the module to 480 Mbps connection speed. These USB connectors comply with USB 2.0 specification that supports up to a slot opening at the back of the ... the USB connector onboard if your chassis supports front panel USB ports. You can connect the front panel USB cable to the ASUS Q-Connector (USB, blue) first, and then install the Q-Connector (USB) to the USB connectors. The USB 2.0 module is purchased separately. 2-30 Chapter 2: Hardware information USB1314) These connectors are for...
Chapter 2 5. Connect the USB module cable to any of these connectors, then install the module to 480 Mbps connection speed. These USB connectors comply with USB 2.0 specification that supports up to a slot opening at the back of the ... the USB connector onboard if your chassis supports front panel USB ports. You can connect the front panel USB cable to the ASUS Q-Connector (USB, blue) first, and then install the Q-Connector (USB) to the USB connectors. The USB 2.0 module is purchased separately. 2-30 Chapter 2: Hardware information USB1314) These connectors are for...


