
User Manual
Page 11
... Package contents Check your motherboard package for the following items. Motherboard Cables Accessories Application DVD Documentation ASUS P8Q77-M motherboard 2 x Serial ATA 6.0Gb/s cables 1 x I/O shield ASUS motherboard support DVD User Manual If any of new features and latest technologies, making it , ...check the items in your retailer. 1.3 1.3.1 Special features Product highlights LGA1155 socket for buying an ASUS® P8Q77-M motherboard! Chapter 1: Product introduction 1-1 The motherboard delivers a host of the above items is damaged or missing, contact...
... Package contents Check your motherboard package for the following items. Motherboard Cables Accessories Application DVD Documentation ASUS P8Q77-M motherboard 2 x Serial ATA 6.0Gb/s cables 1 x I/O shield ASUS motherboard support DVD User Manual If any of new features and latest technologies, making it , ...check the items in your retailer. 1.3 1.3.1 Special features Product highlights LGA1155 socket for buying an ASUS® P8Q77-M motherboard! Chapter 1: Product introduction 1-1 The motherboard delivers a host of the above items is damaged or missing, contact...

User Manual
Page 12
...174; Smart Response Technology. The dual-channel DDR3 architecture enlarges the bandwidth of current bus systems. Complete USB 3.0 Integration ASUS facilitates strategic USB 3.0 accessibility for selected applications, even when setting the system to start, update and sync with hard ... 4 USB 3.0 ports for applications to sleep. This technology combines SSD performance with the cloud, providing a more efficient way. 1-2 ASUS P8Q77-M Intel® Q77 Express Chipset The Intel® Q77 Express Chipset is a single-chipset designed to high speed connectivity. Additionally, get...
...174; Smart Response Technology. The dual-channel DDR3 architecture enlarges the bandwidth of current bus systems. Complete USB 3.0 Integration ASUS facilitates strategic USB 3.0 accessibility for selected applications, even when setting the system to start, update and sync with hard ... 4 USB 3.0 ports for applications to sleep. This technology combines SSD performance with the cloud, providing a more efficient way. 1-2 ASUS P8Q77-M Intel® Q77 Express Chipset The Intel® Q77 Express Chipset is a single-chipset designed to high speed connectivity. Additionally, get...

User Manual
Page 14
...-time PC power saving chip through the AI Suite II utility. It allows you to switch back and forth between different utilities. ASUS Anti-Surge Protection This special design prevents expensive devices and the motherboard from switching power supply (PSU). Get total system-wide energy ... to restore a corrupted BIOS file using the bundled support DVD or USB flash disk that contains the latest BIOS file. 1-4 ASUS P8Q77-M This all the exclusive ASUS features into one software offers diverse and ease to use . This remarkable memory rescue tool requires a mere push of the button...
...-time PC power saving chip through the AI Suite II utility. It allows you to switch back and forth between different utilities. ASUS Anti-Surge Protection This special design prevents expensive devices and the motherboard from switching power supply (PSU). Get total system-wide energy ... to restore a corrupted BIOS file using the bundled support DVD or USB flash disk that contains the latest BIOS file. 1-4 ASUS P8Q77-M This all the exclusive ASUS features into one software offers diverse and ease to use . This remarkable memory rescue tool requires a mere push of the button...

User Manual
Page 16
... holes Place six screws into the holes indicated by circles to secure the motherboard to the chassis. Failure to the rear part of the chassis P8Q77-M 1-6 ASUS P8Q77-M Do not overtighten the screws! The edge with external ports goes to do so can damage the motherboard. Ensure that you place it into it...
... holes Place six screws into the holes indicated by circles to secure the motherboard to the chassis. Failure to the rear part of the chassis P8Q77-M 1-6 ASUS P8Q77-M Do not overtighten the screws! The edge with external ports goes to do so can damage the motherboard. Ensure that you place it into it...

User Manual
Page 18
CPU_FAN P8Q77-M P8Q77-M CPU fan connector Unplug all power cables before installing the CPU. • Upon purchase of the motherboard, ensure that the PnP cap is shipment/transit-related. • Keep the cap after installing the motherboard. ASUS will process Return Merchandise Authorization (RMA) requests only ... socket. • The product warranty does not cover damage to the PnP cap/socket contacts/motherboard components. ASUS will shoulder the cost of the PnP cap. 1-8 ASUS P8Q77-M CPU FAN PWM CPU FAN IN CPU FAN PWR GND 1.6 Central Processing Unit (CPU) The motherboard comes...
CPU_FAN P8Q77-M P8Q77-M CPU fan connector Unplug all power cables before installing the CPU. • Upon purchase of the motherboard, ensure that the PnP cap is shipment/transit-related. • Keep the cap after installing the motherboard. ASUS will process Return Merchandise Authorization (RMA) requests only ... socket. • The product warranty does not cover damage to the PnP cap/socket contacts/motherboard components. ASUS will shoulder the cost of the PnP cap. 1-8 ASUS P8Q77-M CPU FAN PWM CPU FAN IN CPU FAN PWR GND 1.6 Central Processing Unit (CPU) The motherboard comes...

User Manual
Page 22
To uninstall the CPU heatsink and fan assembly 1 2 B A B A 1-12 ASUS P8Q77-M
To uninstall the CPU heatsink and fan assembly 1 2 B A B A 1-12 ASUS P8Q77-M

User Manual
Page 28
... the DIMM slot key on the socket such that it fits in the wrong direction to unlock a DIMM socket. 2. Locked Retaining Clip 2 1 DIMM notch 1-18 ASUS P8Q77-M Align a DIMM on the socket. 2 DIMM notch 1 Unlocked retaining clip DIMM slot key A DIMM is properly seated. 1.7.4 Removing a DIMM To remove a DIMM: 1. Simultaneously press the...
... the DIMM slot key on the socket such that it fits in the wrong direction to unlock a DIMM socket. 2. Locked Retaining Clip 2 1 DIMM notch 1-18 ASUS P8Q77-M Align a DIMM on the socket. 2 DIMM notch 1 Unlocked retaining clip DIMM slot key A DIMM is properly seated. 1.7.4 Removing a DIMM To remove a DIMM: 1. Simultaneously press the...

User Manual
Page 30
... hangs due to clear the CMOS RTC RAM data. Shut down the key during the boot process and enter BIOS setup to default values. 1-20 ASUS P8Q77-M IRQ assignments for about 5-10 seconds, then move the jumper again to overclocking. shared - - - - Realtek 8111F controller - Move the jumper...onboard button cell battery powers the RAM data in CMOS. Clear RTC RAM (3-pin CLRTC) This jumper allows you to pins 1-2. 3. P8Q77-M CLRTC 12 23 Normal (Default) P8Q77-M Clear RTC RAM Clear RTC To erase the RTC RAM: 1. shared - - - - You can clear the CMOS memory of ...
... hangs due to clear the CMOS RTC RAM data. Shut down the key during the boot process and enter BIOS setup to default values. 1-20 ASUS P8Q77-M IRQ assignments for about 5-10 seconds, then move the jumper again to overclocking. shared - - - - Realtek 8111F controller - Move the jumper...onboard button cell battery powers the RAM data in CMOS. Clear RTC RAM (3-pin CLRTC) This jumper allows you to pins 1-2. 3. P8Q77-M CLRTC 12 23 Normal (Default) P8Q77-M Clear RTC RAM Clear RTC To erase the RTC RAM: 1. shared - - - - You can clear the CMOS memory of ...

User Manual
Page 32
... to output RGB Signal to CRT and isn't compatible with HD audio module in the 2, 4, 6, or 8-channel configuration. This port is for a PS/2 keyboard. 1-22 ASUS P8Q77-M Microphone port (pink). DVI-D port. These two 4-pin Universal Serial Bus (USB) ports are available for connecting USB 2.0/1.1 devices. 8. USB 2.0 ports 3 and 4.
... to output RGB Signal to CRT and isn't compatible with HD audio module in the 2, 4, 6, or 8-channel configuration. This port is for a PS/2 keyboard. 1-22 ASUS P8Q77-M Microphone port (pink). DVI-D port. These two 4-pin Universal Serial Bus (USB) ports are available for connecting USB 2.0/1.1 devices. 8. USB 2.0 ports 3 and 4.

User Manual
Page 34
... connector when a chassis component is removed or replaced. CHASSIS +5VSB_MB Chassis Signal GND P8Q77-M P8Q77-M Chassis intrusion connector 1-24 ASUS P8Q77-M CHA_FAN2 CPU_FAN CPU FAN PWM CPU FAN IN CPU FAN PWR GND GND +12V Rotation P8Q77-M CHA_FAN1 GND +12V Rotation P8Q77-M Fan connectors Do not forget to connect the fan cables to the fan connectors...
... connector when a chassis component is removed or replaced. CHASSIS +5VSB_MB Chassis Signal GND P8Q77-M P8Q77-M Chassis intrusion connector 1-24 ASUS P8Q77-M CHA_FAN2 CPU_FAN CPU FAN PWM CPU FAN IN CPU FAN PWR GND GND +12V Rotation P8Q77-M CHA_FAN1 GND +12V Rotation P8Q77-M Fan connectors Do not forget to connect the fan cables to the fan connectors...

User Manual
Page 36
See section 2.5.5 SATA Configuration for details. 1-26 ASUS P8Q77-M The Serial ATA RAID feature (RAID 0, 1, 5, and 10) is available only if you intend to create a Serial ATA RAID set using hot-plug and NCQ,... 6.0Gb/s connectors (7-pin SATA6G_1/2 [gray]) These connectors connect to [RAID]. GND RSATA_RXP2 RSATA_RXN2 GND RSATA_TXN2 RSATA_TXP2 GND GND RSATA_RXP1 RSATA_RXN1 GND RSATA_TXN1 RSATA_TXP1 GND P8Q77-M SATA6G_2 SATA6G_1 P8Q77-M Intel® SATA 6.0Gb/s connectors • These connectors are using Windows® XP SP3 or later version. • When using these connectors, set...
See section 2.5.5 SATA Configuration for details. 1-26 ASUS P8Q77-M The Serial ATA RAID feature (RAID 0, 1, 5, and 10) is available only if you intend to create a Serial ATA RAID set using hot-plug and NCQ,... 6.0Gb/s connectors (7-pin SATA6G_1/2 [gray]) These connectors connect to [RAID]. GND RSATA_RXP2 RSATA_RXN2 GND RSATA_TXN2 RSATA_TXP2 GND GND RSATA_RXP1 RSATA_RXN1 GND RSATA_TXN1 RSATA_TXP1 GND P8Q77-M SATA6G_2 SATA6G_1 P8Q77-M Intel® SATA 6.0Gb/s connectors • These connectors are using Windows® XP SP3 or later version. • When using these connectors, set...

User Manual
Page 38
... GND GND GND GND GND SLIN# INIT# ERR# AFD SLCT PE BUSY ACK# PD7 PD6 PD5 PD4 PD3 PD2 PD1 PD0 STB# LPT PIN 1 1-28 ASUS P8Q77-M The system power LED lights up or flashes when data is read from or written to the HDD. • Power/Soft-off button (2-pin PWRBTN... system is in sleep mode. • Hard disk drive activity LED (2-pin +HDLED) This 2-pin connector is for the HDD Activity LED. Ground Reset P8Q77-M PIN 1 +HDLED RESET P8Q77-M System panel connector • System power LED (2-pin PLED) This 2-pin connector is for the system power LED. 10. System panel connector (10...
... GND GND GND GND GND SLIN# INIT# ERR# AFD SLCT PE BUSY ACK# PD7 PD6 PD5 PD4 PD3 PD2 PD1 PD0 STB# LPT PIN 1 1-28 ASUS P8Q77-M The system power LED lights up or flashes when data is read from or written to the HDD. • Power/Soft-off button (2-pin PWRBTN... system is in sleep mode. • Hard disk drive activity LED (2-pin +HDLED) This 2-pin connector is for the HDD Activity LED. Ground Reset P8Q77-M PIN 1 +HDLED RESET P8Q77-M System panel connector • System power LED (2-pin PLED) This 2-pin connector is for the system power LED. 10. System panel connector (10...

User Manual
Page 40
... memory tuning requirement, the system automatically reboots when each timing set is tested. The blinking speed of failsafe settings. function. 1-30 ASUS P8Q77-M switch lights continuously. If the test fails, the system reboots and test the next set of the DRAM_LED increases, indicating different test ...that are incompatible with ones recommended in the Memory QVL (Qualified Vendors Lists) in this user manual or on the ASUS website at www.asus.com after the whole tuning process, the DRAM_LED lights continuously. This is not properly installed. switch Installing DIMMs that...
... memory tuning requirement, the system automatically reboots when each timing set is tested. The blinking speed of failsafe settings. function. 1-30 ASUS P8Q77-M switch lights continuously. If the test fails, the system reboots and test the next set of the DRAM_LED increases, indicating different test ...that are incompatible with ones recommended in the Memory QVL (Qualified Vendors Lists) in this user manual or on the ASUS website at www.asus.com after the whole tuning process, the DRAM_LED lights continuously. This is not properly installed. switch Installing DIMMs that...

User Manual
Page 42
... If Autorun is enabled in your computer, browse the contents of your hardware. • Motherboard settings and hardware options vary. To run the DVD. 1-32 ASUS P8Q77-M The following screen is NOT enabled in your OS documentation for detailed information. • Ensure that you install Windows® XP Service Pack 3 or later... to maximize the features of the Support DVD to the optical drive. Click Drivers, Utilities, Manual, Contact, and Specials tabs to change at www.asus.com for updates. The contents of the Support DVD are subject to display their respective menus.
... If Autorun is enabled in your computer, browse the contents of your hardware. • Motherboard settings and hardware options vary. To run the DVD. 1-32 ASUS P8Q77-M The following screen is NOT enabled in your OS documentation for detailed information. • Ensure that you install Windows® XP Service Pack 3 or later... to maximize the features of the Support DVD to the optical drive. Click Drivers, Utilities, Manual, Contact, and Specials tabs to change at www.asus.com for updates. The contents of the Support DVD are subject to display their respective menus.

User Manual
Page 46
... itself through the Internet. Follow the onscreen instructions to avail all its features. Locate the BIOS file from a BIOS file a. ASUS EZ Flash 2 Utility V01.04 Flash Info MODEL: P8Q77-M File Path: fs0:\ Drive Info fs0:\ VER: 0205 Folder Info 11/07/2011 10:23p 8388608 Exit DATE: 11/07/...2011 P8Q77.CAP File Info MODEL: Help Info VER: DATE [Enter] Select or Load [Tab] Switch [Up/Down/PageUp/PageDown/Home/End] Move [Esc] Exit 2-2 ASUS P8Q77-M Select Update ...
... itself through the Internet. Follow the onscreen instructions to avail all its features. Locate the BIOS file from a BIOS file a. ASUS EZ Flash 2 Utility V01.04 Flash Info MODEL: P8Q77-M File Path: fs0:\ Drive Info fs0:\ VER: 0205 Folder Info 11/07/2011 10:23p 8388608 Exit DATE: 11/07/...2011 P8Q77.CAP File Info MODEL: Help Info VER: DATE [Enter] Select or Load [Tab] Switch [Up/Down/PageUp/PageDown/Home/End] Move [Esc] Exit 2-2 ASUS P8Q77-M Select Update ...

User Manual
Page 48
...actual utility screen displays may not be same as the boot device. Do not save them on the USB flash drive. C:\>d: D:\> 2-4 ASUS P8Q77-M Turn off the computer and disconnect all SATA hard disk drives (optional). NTFS is not supported under DOS environment. Insert the USB flash...command prompt item by pressing the item number. 4. At the FreeDOS prompt, type d: and press to update BIOS in NTFS format. 3. When the ASUS Logo appears, press to boot using defaults 3. Booting the system in FAT32/16 format and single partition. 2. Before updating BIOS 1. Please select boot ...
...actual utility screen displays may not be same as the boot device. Do not save them on the USB flash drive. C:\>d: D:\> 2-4 ASUS P8Q77-M Turn off the computer and disconnect all SATA hard disk drives (optional). NTFS is not supported under DOS environment. Insert the USB flash...command prompt item by pressing the item number. 4. At the FreeDOS prompt, type d: and press to update BIOS in NTFS format. 3. When the ASUS Logo appears, press to boot using defaults 3. Booting the system in FAT32/16 format and single partition. 2. Before updating BIOS 1. Please select boot ...

User Manual
Page 50
... its parameters. The BIOS screens include navigation keys and brief online help to your screen. • Visit the ASUS website at startup: • Press during the Power-On Self Test (POST). Entering BIOS Setup at startup To enter BIOS... Setup at www.asus.com to download the latest BIOS file for details. • If the system fails to boot after changing any...see on your data or system. If you in the EZ Mode/Advanced Mode screen. 2-6 ASUS P8Q77-M Do this section are for information on .
... its parameters. The BIOS screens include navigation keys and brief online help to your screen. • Visit the ASUS website at startup: • Press during the Power-On Self Test (POST). Entering BIOS Setup at startup To enter BIOS... Setup at www.asus.com to download the latest BIOS file for details. • If the system fails to boot after changing any...see on your data or system. If you in the EZ Mode/Advanced Mode screen. 2-6 ASUS P8Q77-M Do this section are for information on .
User Manual
Page 52
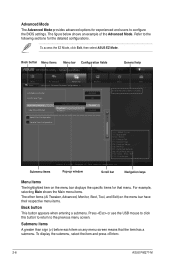
... Boost F10: Save ESC: Exit F12: Print Screen Submenu items Version 2.10.1208. To access the EZ Mode, click Exit, then select ASUS EZ Mode. For example, selecting Main shows the Main menu items. The other items (Ai Tweaker, Advanced, Monitor, Boot, Tool, and Exit... the specific items for the detailed configurations. Copyright (C) 2012 American Megatrends, Inc. To display the submenu, select the item and press . 2-8 ASUS P8Q77-M Pop-up window Scroll bar Navigation keys Menu items The highlighted item on the menu bar have their respective menu items. Back button This button...
... Boost F10: Save ESC: Exit F12: Print Screen Submenu items Version 2.10.1208. To access the EZ Mode, click Exit, then select ASUS EZ Mode. For example, selecting Main shows the Main menu items. The other items (Ai Tweaker, Advanced, Monitor, Boot, Tool, and Exit... the specific items for the detailed configurations. Copyright (C) 2012 American Megatrends, Inc. To display the submenu, select the item and press . 2-8 ASUS P8Q77-M Pop-up window Scroll bar Navigation keys Menu items The highlighted item on the menu bar have their respective menu items. Back button This button...

User Manual
Page 54
.... To change the system security settings. • If you might be able to clear the BIOS password. Select the User Password item and press . 2-10 ASUS P8Q77-M To set a password, this item shows Installed. Select the Administrator Password item and press . 2. From the Create New Password box, key in a password, then press...
.... To change the system security settings. • If you might be able to clear the BIOS password. Select the User Password item and press . 2-10 ASUS P8Q77-M To set a password, this item shows Installed. Select the Administrator Password item and press . 2. From the Create New Password box, key in a password, then press...

User Manual
Page 56
...: [Auto] [Light Power Saving Mode] [Medium Power Saving Mode] [Max Power Saving Mode] 2.4.4 [OK] [Cancel] GPU Boost [OK] Select [OK] to your CPU model. 2-12 ASUS P8Q77-M Changing the values in this menu may cause the system to become unstable! Configuration options: [DDR3-800MHz] [DDR3-1066MHz] [DDR3-1333MHz] [DDR3-1600MHz] [DDR3-1866MHz...
...: [Auto] [Light Power Saving Mode] [Medium Power Saving Mode] [Max Power Saving Mode] 2.4.4 [OK] [Cancel] GPU Boost [OK] Select [OK] to your CPU model. 2-12 ASUS P8Q77-M Changing the values in this menu may cause the system to become unstable! Configuration options: [DDR3-800MHz] [DDR3-1066MHz] [DDR3-1333MHz] [DDR3-1600MHz] [DDR3-1866MHz...


