
User Manual
Page 10
...ASUS Q-Fan 2 ASUS CrashFree BIOS 3 ASUS EZ Flash 2 ASUS MyLogo 2™ ASUS Anti-Surge Protection ASUS GPU Boost ASUS EPU 1 x PS/2 Mouse port (green) 1 x PS/2 Keyboard port (purple) 1 x Display Port 1 x DVI-D port 1 x VGA port 1 x LAN (RJ-45) port 6 x USB 2.0/1.1 ports (P8Q67-M DO/TPM only) 4 x USB 2.0/1.1 ports; 2 x USB 3.0 ports (P8Q67-M DO/ USB3/TPM... EATX 12V power connector 1 x System panel connector 1 x TPM IC onboard 64 Mb Flash ROM, EFI AMI BIOS, PnP, DMI 2.0, WfM 2.0, ACPI 2.0a, SM BIOS 2.6, Multi-language BIOS, ASUS CrashFree BIOS 3, ASUS EZ Flash 2 WfM 2.0, DMI 2.0, WOL by PME, WOR...
...ASUS Q-Fan 2 ASUS CrashFree BIOS 3 ASUS EZ Flash 2 ASUS MyLogo 2™ ASUS Anti-Surge Protection ASUS GPU Boost ASUS EPU 1 x PS/2 Mouse port (green) 1 x PS/2 Keyboard port (purple) 1 x Display Port 1 x DVI-D port 1 x VGA port 1 x LAN (RJ-45) port 6 x USB 2.0/1.1 ports (P8Q67-M DO/TPM only) 4 x USB 2.0/1.1 ports; 2 x USB 3.0 ports (P8Q67-M DO/ USB3/TPM... EATX 12V power connector 1 x System panel connector 1 x TPM IC onboard 64 Mb Flash ROM, EFI AMI BIOS, PnP, DMI 2.0, WfM 2.0, ACPI 2.0a, SM BIOS 2.6, Multi-language BIOS, ASUS CrashFree BIOS 3, ASUS EZ Flash 2 WfM 2.0, DMI 2.0, WOL by PME, WOR...

User Manual
Page 12
Doing so can damage the motherboard. 1-2 ASUS P8Q67-M DO Series DO NOT overtighten the screws! The edge with external ports goes to the chassis. 1.2 1.2.1 Motherboard overview Motherboard layout Ensure that you...6in) USB34 EATXPWR LAN1_USB12 AUDIO Intel® 82579 CHA_FAN Lithium Cell CMOS Power TPM IC 1 PCIEX16 ASM P8Q67-M DO/USB3/TPM 1042 PCI1 Super I/O Intel® Q67 SATA3G_2 SATA3G_1 PCI2 SATA3G_4 SATA3G3 6 SB_PWR SATA6G_1 SATA6G_2 VIA VT1708S PCIEX4_1 64Mb BIOS 7 SPDIF_OUT USB1314 USB1112 USB910 USB78 SPEAKER COM1 CLRTC AAFP DIS_ME CHASSIS F_PANEL ...
Doing so can damage the motherboard. 1-2 ASUS P8Q67-M DO Series DO NOT overtighten the screws! The edge with external ports goes to the chassis. 1.2 1.2.1 Motherboard overview Motherboard layout Ensure that you...6in) USB34 EATXPWR LAN1_USB12 AUDIO Intel® 82579 CHA_FAN Lithium Cell CMOS Power TPM IC 1 PCIEX16 ASM P8Q67-M DO/USB3/TPM 1042 PCI1 Super I/O Intel® Q67 SATA3G_2 SATA3G_1 PCI2 SATA3G_4 SATA3G3 6 SB_PWR SATA6G_1 SATA6G_2 VIA VT1708S PCIEX4_1 64Mb BIOS 7 SPDIF_OUT USB1314 USB1112 USB910 USB78 SPEAKER COM1 CLRTC AAFP DIS_ME CHASSIS F_PANEL ...

User Manual
Page 19
... 12 23 Normal (Default) Clear RTC P8Q67-M DO/USB3/TPM Clear RTC RAM To erase the RTC RAM: 1. Plug the power cord and turn ON the computer. 4. Hold down and reboot the system, then the BIOS automatically resets parameter settings to re-enter data. For system failure due to pins 2-3. Shut down the...
... 12 23 Normal (Default) Clear RTC P8Q67-M DO/USB3/TPM Clear RTC RAM To erase the RTC RAM: 1. Plug the power cord and turn ON the computer. 4. Hold down and reboot the system, then the BIOS automatically resets parameter settings to re-enter data. For system failure due to pins 2-3. Shut down the...
User Manual
Page 22
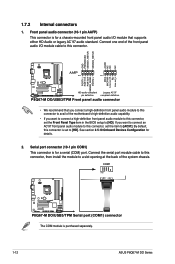
...This connector is set the item to [HD]. By default, this connector, set the Front Panel Type item in the BIOS setup to [AC97]. COM1 PIN 1 P8Q67-M DO/USB3/TPM P8Q67-M DO/USB3/TPM Serial port (COM1) connector The COM module is for details. 2. If you want to connect a high-definition front... section 2.5.10 Onboard Devices Configuration for a serial (COM) port. Serial port connector (10-1 pin COM1) This connector is purchased separately. 1-12 ASUS P8Q67-M DO Series Connect one end of the front panel audio I /O module that you want to connect an AC'97 front panel audio module to this...
...This connector is set the item to [HD]. By default, this connector, set the Front Panel Type item in the BIOS setup to [AC97]. COM1 PIN 1 P8Q67-M DO/USB3/TPM P8Q67-M DO/USB3/TPM Serial port (COM1) connector The COM module is for details. 2. If you want to connect a high-definition front... section 2.5.10 Onboard Devices Configuration for a serial (COM) port. Serial port connector (10-1 pin COM1) This connector is purchased separately. 1-12 ASUS P8Q67-M DO Series Connect one end of the front panel audio I /O module that you want to connect an AC'97 front panel audio module to this...
User Manual
Page 25
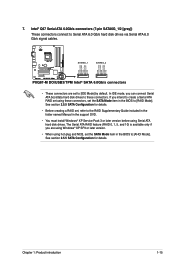
... These connectors connect to [RAID Mode]. GND RSATA_RXN1 RSATA_RXP1 GND RSATA_TXN1 RSATA_TXP1 GND GND RSATA_RXN2 RSATA_RXP2 GND RSATA_TXN2 RSATA_TXP2 GND P8Q67-M DO/USB3/TPM SATA6G_1 SATA6G_2 P8Q67-M DO/USB3/TPM Intel® SATA 6.0Gb/s connectors • These connectors are using Windows® XP SP3 or later version. &#...8226; When using hot-plug and NCQ, set the SATA Mode item in the BIOS to create a Serial ATA RAID set ...
... These connectors connect to [RAID Mode]. GND RSATA_RXN1 RSATA_RXP1 GND RSATA_TXN1 RSATA_TXP1 GND GND RSATA_RXN2 RSATA_RXP2 GND RSATA_TXN2 RSATA_TXP2 GND P8Q67-M DO/USB3/TPM SATA6G_1 SATA6G_2 P8Q67-M DO/USB3/TPM Intel® SATA 6.0Gb/s connectors • These connectors are using Windows® XP SP3 or later version. &#...8226; When using hot-plug and NCQ, set the SATA Mode item in the BIOS to create a Serial ATA RAID set ...
User Manual
Page 26
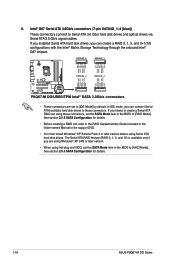
...GND RSATA_TXP2 RSATA_TXN2 GND RSATA_RXP2 RSATA_RXN2 GND GND RSATA_RXN3 RSATA_RXP3 GND RSATA_TXN3 RSATA_TXP3 GND GND RSATA_RXN4 RSATA_RXP4 GND RSATA_TXN4 RSATA_TXP4 GND P8Q67-M DO/USB3/TPM SATA3G_4 SATA3G_3 P8Q67-M DO/USB3/TPM Intel® SATA 3.0Gb/s connectors • These connectors are using Windows® XP SP3 or later version. &#.../s connectors (7-pin SATA3G_1~4 [blue]) These connectors connect to the RAID Supplementary Guide included in the folder named Manual in the BIOS to [AHCI Mode]. See section 2.5.5 SATA Configuration for details. 1-16 ASUS P8Q67-M DO Series 8.
...GND RSATA_TXP2 RSATA_TXN2 GND RSATA_RXP2 RSATA_RXN2 GND GND RSATA_RXN3 RSATA_RXP3 GND RSATA_TXN3 RSATA_TXP3 GND GND RSATA_RXN4 RSATA_RXP4 GND RSATA_TXN4 RSATA_TXP4 GND P8Q67-M DO/USB3/TPM SATA3G_4 SATA3G_3 P8Q67-M DO/USB3/TPM Intel® SATA 3.0Gb/s connectors • These connectors are using Windows® XP SP3 or later version. &#.../s connectors (7-pin SATA3G_1~4 [blue]) These connectors connect to the RAID Supplementary Guide included in the folder named Manual in the BIOS to [AHCI Mode]. See section 2.5.5 SATA Configuration for details. 1-16 ASUS P8Q67-M DO Series 8.
User Manual
Page 31
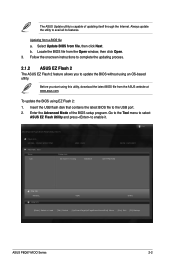
... Updating from the ASUS website at www.asus.com. Go to the Tool menu to select ASUS EZ Flash Utility and press to the USB port. 2. To update the BIOS using an OS‑based utility. ASUSTek EZ Flash BIOS ROM Utility V00.75 Flash Info MODEL: P8Q67-M DO/TPM File Path: fs0:\... [Up/Down/PageUp/PageDown/Home/End] Move [Esc] Exit [F2] Backup ASUS P8Q67-M DO Series 2-2 Before you to avail all its features. Enter the Advanced Mode of updating itself through the Internet. The ASUS Update utility is capable of the BIOS setup program. Always update the utility to update the...
... Updating from the ASUS website at www.asus.com. Go to the Tool menu to select ASUS EZ Flash Utility and press to the USB port. 2. To update the BIOS using an OS‑based utility. ASUSTek EZ Flash BIOS ROM Utility V00.75 Flash Info MODEL: P8Q67-M DO/TPM File Path: fs0:\... [Up/Down/PageUp/PageDown/Home/End] Move [Esc] Exit [F2] Backup ASUS P8Q67-M DO Series 2-2 Before you to avail all its features. Enter the Advanced Mode of updating itself through the Internet. The ASUS Update utility is capable of the BIOS setup program. Always update the utility to update the...
User Manual
Page 32
... device into Q67TPM.ROM (for P8Q67-M DO/TPM) or QU3TPM.ROM (for the BIOS file. Press to switch to perform the BIOS update process. When found, the utility reads the BIOS file and enters ASUS EZ Flash 2 utility automatically. 4. The utility automatically checks the devices for P8Q67-M DO/USB3/ TPM). • The BIOS file in the support DVD may...
... device into Q67TPM.ROM (for P8Q67-M DO/TPM) or QU3TPM.ROM (for the BIOS file. Press to switch to perform the BIOS update process. When found, the utility reads the BIOS file and enters ASUS EZ Flash 2 utility automatically. 4. The utility automatically checks the devices for P8Q67-M DO/USB3/ TPM). • The BIOS file in the support DVD may...

User Manual
Page 34
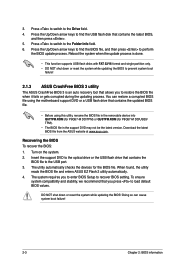
...least 8MB free space to save the file. 1. The BIOS Updater backup screen appears indicating the BIOS backup process. Note Saving BIOS: 2-5 Chapter 2: BIOS information ASUSTek BIOS Updater for the extension. 2. Backing up the current BIOS To backup the current BIOS file using the BIOS Updater Ensure that the USB flash drive is done, press...filename with no more than eight alphanumeric characters for the filename and three alphanumeric characters for DOS V1.18 Current ROM BOARD: P8Q67-M DO/TPM VER: 0302 DATE: 03/10/2011 Update ROM BOARD: Unknown VER: Unknown DATE: Unknown PATH...
...least 8MB free space to save the file. 1. The BIOS Updater backup screen appears indicating the BIOS backup process. Note Saving BIOS: 2-5 Chapter 2: BIOS information ASUSTek BIOS Updater for the extension. 2. Backing up the current BIOS To backup the current BIOS file using the BIOS Updater Ensure that the USB flash drive is done, press...filename with no more than eight alphanumeric characters for the filename and three alphanumeric characters for DOS V1.18 Current ROM BOARD: P8Q67-M DO/TPM VER: 0302 DATE: 03/10/2011 Update ROM BOARD: Unknown VER: Unknown DATE: Unknown PATH...
User Manual
Page 35
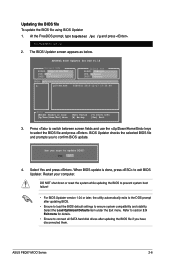
...all SATA hard disk drives after updating BIOS. • Ensure to load the BIOS default settings to update BIOS? When BIOS update is done, press to select the BIOS file and press . Refer to section 2.9 Exit menu for DOS V1.18 Current ROM BOARD: P8Q67-M DO/TPM VER: 0302 DATE: 03/10/2011...screen fields and use the keys to exit BIOS Updater. Are you sure to ensure system compatibility and stability. ASUS P8Q67-M DO Series 2-6 Yes No 4. DO NOT shut down or reset the system while updating the BIOS to prevent system boot failure! • For BIOS Updater version 1.04 or later, the ...
...all SATA hard disk drives after updating BIOS. • Ensure to load the BIOS default settings to update BIOS? When BIOS update is done, press to select the BIOS file and press . Refer to section 2.9 Exit menu for DOS V1.18 Current ROM BOARD: P8Q67-M DO/TPM VER: 0302 DATE: 03/10/2011...screen fields and use the keys to exit BIOS Updater. Are you sure to ensure system compatibility and stability. ASUS P8Q67-M DO Series 2-6 Yes No 4. DO NOT shut down or reset the system while updating the BIOS to prevent system boot failure! • For BIOS Updater version 1.04 or later, the ...

User Manual
Page 37
... Advanced Mode. The default screen for details. The EZ Mode provides you an overview of the selected mode on the right hand side Normal mode ASUS Optimal mode Selects the boot device priority • The boot device options vary depending on the devices you installed to the system. • The Boot... program can be used under two modes: EZ Mode and Advanced Mode. EZ Mode Friday [10/08/2010] P8Q67-M DO/TPM BIOS Version : 0302 Build Date : 03/10/2011 CPU Type : Intel(R) Core(TM) i5-2400 CPU 0 @ 3.10GHz Speed : 3100 MHz Total Memory : 1024 MB (DDR3 1333MHz) ...
... Advanced Mode. The default screen for details. The EZ Mode provides you an overview of the selected mode on the right hand side Normal mode ASUS Optimal mode Selects the boot device priority • The boot device options vary depending on the devices you installed to the system. • The Boot... program can be used under two modes: EZ Mode and Advanced Mode. EZ Mode Friday [10/08/2010] P8Q67-M DO/TPM BIOS Version : 0302 Build Date : 03/10/2011 CPU Type : Intel(R) Core(TM) i5-2400 CPU 0 @ 3.10GHz Speed : 3100 MHz Total Memory : 1024 MB (DDR3 1333MHz) ...
User Manual
Page 45
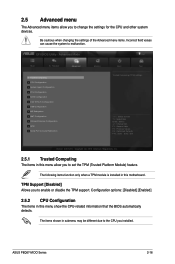
...the system to change the settings for the CPU and other system devices. EFI BIOS Utility - 2.5 Advanced menu The Advanced menu items allow you to enable or disable the TPM support. ASUS P8Q67-M DO Series 2-16 The items shown in this menu show the CPU-related ...information that the BIOS automatically detects. Advanced Mode Exit Main Ai Tweaker > Trusted Computing > CPU Configuration > System Agent ...
...the system to change the settings for the CPU and other system devices. EFI BIOS Utility - 2.5 Advanced menu The Advanced menu items allow you to enable or disable the TPM support. ASUS P8Q67-M DO Series 2-16 The items shown in this menu show the CPU-related ...information that the BIOS automatically detects. Advanced Mode Exit Main Ai Tweaker > Trusted Computing > CPU Configuration > System Agent ...

User Manual
Page 49
...Enabled] This item appears only on P8Q67-M DO/USB3/TPM. [Enabled] Enables the support for USB 3.0 devices on legacy operating systems (OS). [Disabled] The USB devices can be used only for the BIOS setup program. [Auto] Allows the...BIOS Extension (MEBx) feature. EHCI Hand-off [Disabled] [Enabled] Enables the support for USB devices on legacy operating systems (OS). [Disabled] Disables the function. AMT [Enabled] Allow you set the ME Subsystem item to [Enabled]. The USB Devices item shows the auto-detected values. Configuration options: [Enabled] [Disabled] ASUS P8Q67...
...Enabled] This item appears only on P8Q67-M DO/USB3/TPM. [Enabled] Enables the support for USB 3.0 devices on legacy operating systems (OS). [Disabled] The USB devices can be used only for the BIOS setup program. [Auto] Allows the...BIOS Extension (MEBx) feature. EHCI Hand-off [Disabled] [Enabled] Enables the support for USB devices on legacy operating systems (OS). [Disabled] Disables the function. AMT [Enabled] Allow you set the ME Subsystem item to [Enabled]. The USB Devices item shows the auto-detected values. Configuration options: [Enabled] [Disabled] ASUS P8Q67...

User Manual
Page 50
...ME without using a password or set the HD Audio Controller item to [Enabled]. Asmedia USB 3.0 Battery Charging Support [Disabled] (P8Q67-M DO/USB3/ TPM only) This item appears only when the ASMedia USB 3.0 Controller item is set the front panel audio connector (AAFP) mode to... performed by a software or hardware. Configuration options: [Enabled] [Disabled] WatchDog Timer [Disabled] When set the WatchDog Timer item to [Enabled]. BIOS WatchDog Timer [0] Use the and keys to adjust the value or key in a number directly. 2.5.10 Onboard Devices Configuration HD Audio Controller [Enabled...
...ME without using a password or set the HD Audio Controller item to [Enabled]. Asmedia USB 3.0 Battery Charging Support [Disabled] (P8Q67-M DO/USB3/ TPM only) This item appears only when the ASMedia USB 3.0 Controller item is set the front panel audio connector (AAFP) mode to... performed by a software or hardware. Configuration options: [Enabled] [Disabled] WatchDog Timer [Disabled] When set the WatchDog Timer item to [Enabled]. BIOS WatchDog Timer [0] Use the and keys to adjust the value or key in a number directly. 2.5.10 Onboard Devices Configuration HD Audio Controller [Enabled...


