
User Guide
Page 4
... 3-31 3.9 Exit menu 3-32 3.10 Updating BIOS 3-33 3.10.1 ASUS Update utility 3-34 3.10.2 ASUS EZ Flash Utility 3-37 3.10.3 ASUS CrashFree BIOS 3 utility 3-38 3.10.4 ASUS BIOS Updater 3-39 iv Contents 2.3.10 Rear panel connection 2-40 2.3.11 Audio I/O connections 2-41 2.4 Starting up for the first time 2-44 2.5 Turning off the computer 2-45 Chapter 3: BIOS setup 3.1 Knowing BIOS 3-1 3.2 BIOS setup program 3-1 3.2.1 EZ Mode...
... 3-31 3.9 Exit menu 3-32 3.10 Updating BIOS 3-33 3.10.1 ASUS Update utility 3-34 3.10.2 ASUS EZ Flash Utility 3-37 3.10.3 ASUS CrashFree BIOS 3 utility 3-38 3.10.4 ASUS BIOS Updater 3-39 iv Contents 2.3.10 Rear panel connection 2-40 2.3.11 Audio I/O connections 2-41 2.4 Starting up for the first time 2-44 2.5 Turning off the computer 2-45 Chapter 3: BIOS setup 3.1 Knowing BIOS 3-1 3.2 BIOS setup program 3-1 3.2.1 EZ Mode...
User Guide
Page 9
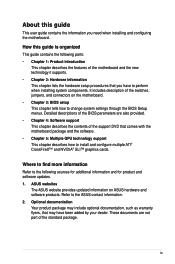
...information and for product and software updates. 1. Where to find more information Refer to the following parts: • Chapter 1: Product introduction This chapter describes the features of the switches, jumpers, and connectors on ASUS hardware and software products. ix It.... Optional documentation Your product package may have to change system settings through the BIOS Setup menus. ASUS websites The ASUS website provides updated information on the motherboard. • Chapter 3: BIOS setup This chapter tells how to perform when installing system components. How this ...
...information and for product and software updates. 1. Where to find more information Refer to the following parts: • Chapter 1: Product introduction This chapter describes the features of the switches, jumpers, and connectors on ASUS hardware and software products. ix It.... Optional documentation Your product package may have to change system settings through the BIOS Setup menus. ASUS websites The ASUS website provides updated information on the motherboard. • Chapter 3: BIOS setup This chapter tells how to perform when installing system components. How this ...

User Guide
Page 21
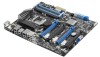
... enable more stable and enhances the overclocking capability. ASUS EZ DIY ASUS EZ DIY feature collection provides you easy ways to install computer components, update the BIOS or back up your mobile via Bluetooth technology. ASUS P8P67 WS Revolution 1-5 The purpose of fan speed to achieve a quiet and cool environment. ASUS Fanless Design-Heat-pipe solution The Heat Pipe...
... enable more stable and enhances the overclocking capability. ASUS EZ DIY ASUS EZ DIY feature collection provides you easy ways to install computer components, update the BIOS or back up your mobile via Bluetooth technology. ASUS P8P67 WS Revolution 1-5 The purpose of fan speed to achieve a quiet and cool environment. ASUS Fanless Design-Heat-pipe solution The Heat Pipe...
User Guide
Page 22
... This unique module eliminates the trouble of Q-LED, Q-DIMM, and Q-Slot design speed up and simplify the DIY process! ASUS CrashFree BIOS 3 The ASUS CrashFree BIOS 3 allows users to analog format and keeps the best signal quality. 1-6 Chapter 1: Product Introduction It allows to install. ...utility. Simply launch this tool and update BIOS from a USB flash drive before entering the OS EZ Flash Utility is a user-friendly BIOS update utility. ASUS EZ-Flash Utility Simply update BIOS from a USB flash disk containing the BIOS file. You can update your BIOS only in one easy step with...
... This unique module eliminates the trouble of Q-LED, Q-DIMM, and Q-Slot design speed up and simplify the DIY process! ASUS CrashFree BIOS 3 The ASUS CrashFree BIOS 3 allows users to analog format and keeps the best signal quality. 1-6 Chapter 1: Product Introduction It allows to install. ...utility. Simply launch this tool and update BIOS from a USB flash drive before entering the OS EZ Flash Utility is a user-friendly BIOS update utility. ASUS EZ-Flash Utility Simply update BIOS from a USB flash disk containing the BIOS file. You can update your BIOS only in one easy step with...
User Guide
Page 38
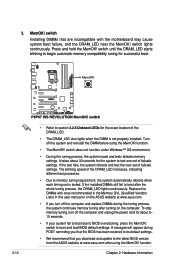
... Memory QVL (Qualified Vendors Lists) in this user manual or on the computer. switch to the latest BIOS version from the ASUS website at www.asus.com. • If you download and update to boot and load BIOS default settings. function. 2-12 Chapter 2: Hardware information switch Installing DIMMs that you turn off the computer and...
... Memory QVL (Qualified Vendors Lists) in this user manual or on the computer. switch to the latest BIOS version from the ASUS website at www.asus.com. • If you download and update to boot and load BIOS default settings. function. 2-12 Chapter 2: Hardware information switch Installing DIMMs that you turn off the computer and...

User Guide
Page 74
Chapter summary 3 3.1 Managing and updating your BIOS 3-1 3.2 BIOS setup program 3-7 3.3 Main menu 3-10 3.4....A.i .T.w.e.a.ke.r.�m.�.e�.n�.u 3-15 3.5 Advanced menu 3-22 3.6 Power menu 3-29 3.7 Boot menu 3-34 3.8 Tools menu 3-38 3.9 Exit menu 3-42 ASUS P8P67 WS Revolution
Chapter summary 3 3.1 Managing and updating your BIOS 3-1 3.2 BIOS setup program 3-7 3.3 Main menu 3-10 3.4....A.i .T.w.e.a.ke.r.�m.�.e�.n�.u 3-15 3.5 Advanced menu 3-22 3.6 Power menu 3-29 3.7 Boot menu 3-34 3.8 Tools menu 3-38 3.9 Exit menu 3-42 ASUS P8P67 WS Revolution
User Guide
Page 75
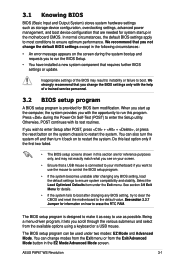
...�o�n� 2.2.7 Jumper for system startup in this program. The BIOS setup program is provided for BIOS item modification. ASUS P8P67 WS Revolution 3-1 Do this last option only if the first two failed. • The BIOS setup screens shown in the motherboard CMOS. Being a menu-driven program,...reference purposes only, and may result to instability or failure to restart the system. We strongly recommend that requires further BIOS settings or update. When you start up the computer, the system provides you with its test routines. Select the Load Optimized Defaults ...
...�o�n� 2.2.7 Jumper for system startup in this program. The BIOS setup program is provided for BIOS item modification. ASUS P8P67 WS Revolution 3-1 Do this last option only if the first two failed. • The BIOS setup screens shown in the motherboard CMOS. Being a menu-driven program,...reference purposes only, and may result to instability or failure to restart the system. We strongly recommend that requires further BIOS settings or update. When you start up the computer, the system provides you with its test routines. Select the Load Optimized Defaults ...

User Guide
Page 103
... you to configure options for special functions. Boot Override These items displays the available devices. EFI BIOS Utility - For more details, refer to display the submenu. ASUS P8P67 WS Revolution 3-29 The number of device items that appears on the screen depends on the number of devices...of the following: - Select an item then press to section 3.10.2 ASUS EZ Flash Utility. When you to run ASUS EZ Flash Utility. Profile > ASUS Drive Xpert Monitor Boot Tool Be used to update BIOS 3.8.1 ASUS EZ Flash Utility Allows you press to start the application. Click an ...
... you to configure options for special functions. Boot Override These items displays the available devices. EFI BIOS Utility - For more details, refer to display the submenu. ASUS P8P67 WS Revolution 3-29 The number of device items that appears on the screen depends on the number of devices...of the following: - Select an item then press to section 3.10.2 ASUS EZ Flash Utility. When you to run ASUS EZ Flash Utility. Profile > ASUS Drive Xpert Monitor Boot Tool Be used to update BIOS 3.8.1 ASUS EZ Flash Utility Allows you press to start the application. Click an ...

User Guide
Page 104
... : Not Installed Save to Profile 1 Load from one to store or load multiple BIOS settings. EFI BIOS Utility - 3.8.2 ASUS O.C. Profile > Advanced Monitor O.C. Load from Profile Allows you update the BIOS file only coming from the same memory/CPU configuration and BIOS version. 3-30 Chapter 3: BIOS setup Save to Profile Allows you to eight, press , and then select...
... : Not Installed Save to Profile 1 Load from one to store or load multiple BIOS settings. EFI BIOS Utility - 3.8.2 ASUS O.C. Profile > Advanced Monitor O.C. Load from Profile Allows you update the BIOS file only coming from the same memory/CPU configuration and BIOS version. 3-30 Chapter 3: BIOS setup Save to Profile Allows you to eight, press , and then select...

User Guide
Page 107
... disk in DOS environment using a USB flash drive. 3. Copy the original motherboard BIOS using the ASUS Update or BIOS Updater utilities. ASUS P8P67 WS Revolution 3-33 However, BIOS updating is no problem using the motherboard support DVD or a USB flash drive when the BIOS file fails or gets corrupted. 4. 3.10 Updating BIOS The ASUS website publishes the latest BIOS versions to provide enhancements on these utilities.
... disk in DOS environment using a USB flash drive. 3. Copy the original motherboard BIOS using the ASUS Update or BIOS Updater utilities. ASUS P8P67 WS Revolution 3-33 However, BIOS updating is no problem using the motherboard support DVD or a USB flash drive when the BIOS file fails or gets corrupted. 4. 3.10 Updating BIOS The ASUS website publishes the latest BIOS versions to provide enhancements on these utilities.

User Guide
Page 108
... the support DVD that allows you update the BIOS using this utility. From the ASUS Update screen, select Update BIOS from the motherboard support DVD, launch ASUS Update by clicking Update > ASUS Update on the AI Suite II main menu bar. ASUS Update requires an Internet connection either through the Internet: 1. Updating the BIOS through the Internet To update the BIOS through a network or an Internet Service...
... the support DVD that allows you update the BIOS using this utility. From the ASUS Update screen, select Update BIOS from the motherboard support DVD, launch ASUS Update by clicking Update > ASUS Update on the AI Suite II main menu bar. ASUS Update requires an Internet connection either through the Internet: 1. Updating the BIOS through the Internet To update the BIOS through a network or an Internet Service...

User Guide
Page 109
ASUS P8P67 WS Revolution 3-35 Click Next. 4. Select the ASUS FTP site nearest you want to avoid network traffic. Click Yes if you to change the BIOS boot logo, which is the image appearing on the screen. 3. Select the BIOS version that you want to continue. 5. Follow the onscreen instructions to enable the BIOS downgradable function and auto BIOS backup...
ASUS P8P67 WS Revolution 3-35 Click Next. 4. Select the ASUS FTP site nearest you want to avoid network traffic. Click Yes if you to change the BIOS boot logo, which is the image appearing on the screen. 3. Select the BIOS version that you want to continue. 5. Follow the onscreen instructions to enable the BIOS downgradable function and auto BIOS backup...

User Guide
Page 110
...instructions to continue. 4. Updating the BIOS through a BIOS file To update the BIOS through a BIOS file: 1. You can decide whether to change the boot logo or No to complete the update process. • The screenshots in the support DVD or visit the ASUS website at www.asus.com for reference only.... Click Yes if you want to the software manual in this section are for detailed software configuration. 3-36 Chapter 3: BIOS setup From the ASUS Update screen, select Update BIOS from the Open window, click...
...instructions to continue. 4. Updating the BIOS through a BIOS file To update the BIOS through a BIOS file: 1. You can decide whether to change the boot logo or No to complete the update process. • The screenshots in the support DVD or visit the ASUS website at www.asus.com for reference only.... Click Yes if you want to the software manual in this section are for detailed software configuration. 3-36 Chapter 3: BIOS setup From the ASUS Update screen, select Update BIOS from the Open window, click...

User Guide
Page 111
... VER: DATE: [Enter] Select or Load [Tab] Switch [Up/Down/PageUp/PageDown/Home/End] Move [Esc] Exit [F2] Backup 3. Press to switch to perform the BIOS update process. ASUS P8P67 WS Revolution 3-37 Press to switch to use a bootable floppy disk or an OS‑based utility. Reboot the system when the...
... VER: DATE: [Enter] Select or Load [Tab] Switch [Up/Down/PageUp/PageDown/Home/End] Move [Esc] Exit [F2] Backup 3. Press to switch to perform the BIOS update process. ASUS P8P67 WS Revolution 3-37 Press to switch to use a bootable floppy disk or an OS‑based utility. Reboot the system when the...

User Guide
Page 112
... you want to use the newer BIOS file, download the file at support.asus.com and save it fails or gets corrupted during the updating process. Recovering the BIOS To recover the BIOS: 1. DO NOT shut down or reset the system while updating the BIOS to restore the BIOS file when it to the USB... port. 3. If you to enter BIOS Setup to ensure system...
... you want to use the newer BIOS file, download the file at support.asus.com and save it fails or gets corrupted during the updating process. Recovering the BIOS To recover the BIOS: 1. DO NOT shut down or reset the system while updating the BIOS to restore the BIOS file when it to the USB... port. 3. If you to enter BIOS Setup to ensure system...
User Guide
Page 113
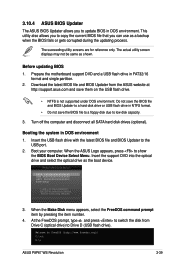
... system in FAT32/16 format and single partition. 2. C:\>d: D:\> ASUS P8P67 WS Revolution 3-39 At the FreeDOS prompt, type d: and press to switch the disk from the ASUS website at http://support.asus.com and save the BIOS file to a floppy disk due to the USB port. 2. Welcome to update BIOS in NTFS format. • Do not save them on...
... system in FAT32/16 format and single partition. 2. C:\>d: D:\> ASUS P8P67 WS Revolution 3-39 At the FreeDOS prompt, type d: and press to switch the disk from the ASUS website at http://support.asus.com and save the BIOS file to a floppy disk due to the USB port. 2. Welcome to update BIOS in NTFS format. • Do not save them on...

User Guide
Page 114
... characters for the filename and three alphanumeric characters for DOS V1.18 [2010/04/29] Current ROM BOARD: P8P67 WS REVOLUTION VER: 0239 DATE: 10/08/2010 PATH: A:\ Update ROM BOARD: Unknown VER: Unknown DATE: Unknown BIOS backup is done, press any key to save the file. 1. Press any key to return to the DOS...
... characters for the filename and three alphanumeric characters for DOS V1.18 [2010/04/29] Current ROM BOARD: P8P67 WS REVOLUTION VER: 0239 DATE: 10/08/2010 PATH: A:\ Update ROM BOARD: Unknown VER: Unknown DATE: Unknown BIOS backup is done, press any key to save the file. 1. Press any key to return to the DOS...

User Guide
Page 115
... BIOS update. ASUSTek BIOS Updater for details. • Ensure to connect all SATA hard disk drives after updating BIOS. • Ensure to load the BIOS default settings to the DOS prompt after updating the BIOS file if you sure to exit BIOS Updater. When BIOS update is done, press to update BIOS? Updating the BIOS file To update the BIOS file using BIOS Updater 1. Are you have disconnected them. ASUS P8P67 WS Revolution 3-41 The BIOS Updater...
... BIOS update. ASUSTek BIOS Updater for details. • Ensure to connect all SATA hard disk drives after updating BIOS. • Ensure to load the BIOS default settings to the DOS prompt after updating the BIOS file if you sure to exit BIOS Updater. When BIOS update is done, press to update BIOS? Updating the BIOS file To update the BIOS file using BIOS Updater 1. Are you have disconnected them. ASUS P8P67 WS Revolution 3-41 The BIOS Updater...

User Guide
Page 121
...appears if your computer 1. Click the Utilities tab, then click AI Suite II. 3. Follow the onscreen instructions to the optical drive. ASUS P8P67 WS Revolution 4-3 View the online help or readme file that came with the software application for detailed software configuration. Click the icon to customize the ... this user manual are for reference only. Click each button to select and launch a utility, to monitor the system, to update the motherboard BIOS, to display the system information, and to open the AI Suite II main menu bar. Click to customize the interface settings ...
...appears if your computer 1. Click the Utilities tab, then click AI Suite II. 3. Follow the onscreen instructions to the optical drive. ASUS P8P67 WS Revolution 4-3 View the online help or readme file that came with the software application for detailed software configuration. Click the icon to customize the ... this user manual are for reference only. Click each button to select and launch a utility, to monitor the system, to update the motherboard BIOS, to display the system information, and to open the AI Suite II main menu bar. Click to customize the interface settings ...


