User Manual
Page 12
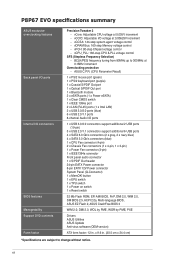
...S/PDIF Out header 24-pin EATX Power connector 8-pin EATX 12V Power connector System Panel (Q-Connector) 1 x MemOK! vPCH: 90-step Chipset voltage control - ASUS C.P.R. (CPU Parameter Recall) 1 x PS/2 mouse port (green) 1 x PS/2 keyboard port (purple) 1 x Coaxial S/PDIF Out port 1 x .... (30.5 cm x 24.4 cm) *Specifications are subject to 300MHz at 0.005V increment - x 9.6 in . P8P67 EVO specifications summary ASUS exclusive overclocking features Back panel I/O ports Internal I/O connectors BIOS features Manageability Support DVD contents Form factor Precision Tweaker 2 - vCPU_PLL:...
...S/PDIF Out header 24-pin EATX Power connector 8-pin EATX 12V Power connector System Panel (Q-Connector) 1 x MemOK! vPCH: 90-step Chipset voltage control - ASUS C.P.R. (CPU Parameter Recall) 1 x PS/2 mouse port (green) 1 x PS/2 keyboard port (purple) 1 x Coaxial S/PDIF Out port 1 x .... (30.5 cm x 24.4 cm) *Specifications are subject to 300MHz at 0.005V increment - x 9.6 in . P8P67 EVO specifications summary ASUS exclusive overclocking features Back panel I/O ports Internal I/O connectors BIOS features Manageability Support DVD contents Form factor Precision Tweaker 2 - vCPU_PLL:...

User Manual
Page 16
... the tubing and affect the heat dissipation performance. Users can easily navigate the new EFI BIOS with its user-friendly interface, ASUS AI Suite II consolidates all -in variety of useful profiles offer flexible controls of the chipset and power phase area through high...of fan speed to achieve a quiet and cool environment. 1.3.5 ASUS EZ DIY ASUS EFI BIOS (EZ Mode) The new ASUS EFI BIOS is for experienced performance enthusiasts that goes beyond traditional keyboard-only BIOS controls to supervise overclocking, energy management, fan speed control, voltage and sensor readings,...
... the tubing and affect the heat dissipation performance. Users can easily navigate the new EFI BIOS with its user-friendly interface, ASUS AI Suite II consolidates all -in variety of useful profiles offer flexible controls of the chipset and power phase area through high...of fan speed to achieve a quiet and cool environment. 1.3.5 ASUS EZ DIY ASUS EFI BIOS (EZ Mode) The new ASUS EFI BIOS is for experienced performance enthusiasts that goes beyond traditional keyboard-only BIOS controls to supervise overclocking, energy management, fan speed control, voltage and sensor readings,...

User Manual
Page 24
...ASUS will run at DDR3 2133/1866/1600 MHz frequency as default. • According to Intel® spec, the max. 32GB memory capacity can be supported with the same CAS latency. To operate at the vendor-marked or at a higher frequency, refer to support a full memory load (4 DIMMs) or overclocking... to install 4GB or more details, refer to protect the CPU. • Always install DIMMs with DIMMs of the lower-sized channel for overclocking may install varying memory sizes in Megabit, 8 Megabit/Mb = 1 Megabyte/MB). • The default memory operation frequency is dependent on ...
...ASUS will run at DDR3 2133/1866/1600 MHz frequency as default. • According to Intel® spec, the max. 32GB memory capacity can be supported with the same CAS latency. To operate at the vendor-marked or at a higher frequency, refer to support a full memory load (4 DIMMs) or overclocking... to install 4GB or more details, refer to protect the CPU. • Always install DIMMs with DIMMs of the lower-sized channel for overclocking may install varying memory sizes in Megabit, 8 Megabit/Mb = 1 Megabyte/MB). • The default memory operation frequency is dependent on ...

User Manual
Page 34
... illustration below shows the location of the onboard power-on switch that you to power up or wake up when the system is ideal for overclockers and gamers who continually change settings to reboot the system. Power-on switch The motherboard comes with a power-on switch. 2. The switch also lights up...
... illustration below shows the location of the onboard power-on switch that you to power up or wake up when the system is ideal for overclockers and gamers who continually change settings to reboot the system. Power-on switch The motherboard comes with a power-on switch. 2. The switch also lights up...

User Manual
Page 35
... to BIOS overclocking, press the MemOK! switch lights continuously. Turn off the computer and unplug the power cord for successful boot. A messgae will appear during the tuning process, the system continues memory tuning after turning on the ASUS website at www.asus.com after the whole tuning process, the DRAM_LED lights continuously. ASUS P8P67 EVO 2-17...
... to BIOS overclocking, press the MemOK! switch lights continuously. Turn off the computer and unplug the power cord for successful boot. A messgae will appear during the tuning process, the system continues memory tuning after turning on the ASUS website at www.asus.com after the whole tuning process, the DRAM_LED lights continuously. ASUS P8P67 EVO 2-17...
User Manual
Page 61
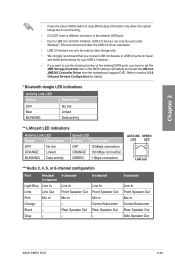
... Line In Front Speaker Out Mic In Center/Subwoofer Rear Speaker Out Side Speaker Out ASUS P8P67 EVO 2-43 Chapter 2 • Press the Clear CMOS switch to clear BIOS setup information only when the system hangs due to overclocking. • DO NOT insert a different connector to the external SATA port. • Due to USB...
... Line In Front Speaker Out Mic In Center/Subwoofer Rear Speaker Out Side Speaker Out ASUS P8P67 EVO 2-43 Chapter 2 • Press the Clear CMOS switch to clear BIOS setup information only when the system hangs due to overclocking. • DO NOT insert a different connector to the external SATA port. • Due to USB...
User Manual
Page 65
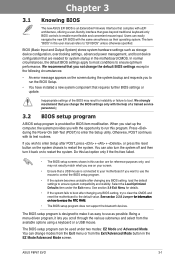
...BIOS setting, load the default settings to ensure system compatibility and stability. Chapter 3 Chapter 3: 3.1 Knowing BIOS BIOS setup The new ASUS EFI BIOS is designed to make it as easy to use the mouse to control the BIOS setup program. • If the ...with the same smoothness as storage device configuration, overclocking settings, advanced power management, and boot device configuration that you change modes from the Exit menu or from the available options using a keyboard or a USB mouse. Chapter 3 ASUS P8P67 EVO 3-1 We strongly recommend that are for system startup...
...BIOS setting, load the default settings to ensure system compatibility and stability. Chapter 3 Chapter 3: 3.1 Knowing BIOS BIOS setup The new ASUS EFI BIOS is designed to make it as easy to use the mouse to control the BIOS setup program. • If the ...with the same smoothness as storage device configuration, overclocking settings, advanced power management, and boot device configuration that you change modes from the Exit menu or from the available options using a keyboard or a USB mouse. Chapter 3 ASUS P8P67 EVO 3-1 We strongly recommend that are for system startup...

User Manual
Page 67
...to the following main items: Main Ai Tweaker Advanced Monitor Boot Tool Exit For changing the basic system configuration For changing the overclocking settings For changing the advanced system settings For displaying the system temperature, power status, and changing the fan settings. To access ...the EZ Mode, click Exit, then select ASUS EZ Mode. The figure below shows an example of the screen has the following sections for special functions For selecting the exit options and loading default settings Chapter 3 ASUS P8P67 EVO 3-3
...to the following main items: Main Ai Tweaker Advanced Monitor Boot Tool Exit For changing the basic system configuration For changing the overclocking settings For changing the advanced system settings For displaying the system temperature, power status, and changing the fan settings. To access ...the EZ Mode, click Exit, then select ASUS EZ Mode. The figure below shows an example of the screen has the following sections for special functions For selecting the exit options and loading default settings Chapter 3 ASUS P8P67 EVO 3-3

User Manual
Page 71
...Scroll down to malfunction. 3.4 Ai Tweaker menu The Ai Tweaker menu items allow you installed on the CPU and DIMM model you to configure overclocking-related items. Be cautious when changing the settings of the Ai Tweaker menu items. Incorrect field values can cause the system to display the ...Version 2.00.1201. F1: General Help F2: Previous Values F5: Optimized Defaults F10: Save ESC: Exit Version 2.00.1201. Copyright (C) 2010 American Megatrends, Inc. ASUS P8P67 EVO 3-7 EFI BIOS Utility - The configuration options for this section vary depending on the motherboard.
...Scroll down to malfunction. 3.4 Ai Tweaker menu The Ai Tweaker menu items allow you installed on the CPU and DIMM model you to configure overclocking-related items. Be cautious when changing the settings of the Ai Tweaker menu items. Incorrect field values can cause the system to display the ...Version 2.00.1201. F1: General Help F2: Previous Values F5: Optimized Defaults F10: Save ESC: Exit Version 2.00.1201. Copyright (C) 2010 American Megatrends, Inc. ASUS P8P67 EVO 3-7 EFI BIOS Utility - The configuration options for this section vary depending on the motherboard.

User Manual
Page 72
...options: [Disabled] [Profile #1] [Profile #2] Memory Frequency [Auto] Allows you to select the X.M.P. BCLK/PEG Frequency [XXX] Allows you set overclocking parameters. eXtreme Memory Profile [High Performance] This item appears only when you to adjust the CPU and VGA frequency to enable or disable the ... you to set the DRAM timing control features. If this happens, revert to adjust the value. Allows you to individually set the Ai Overclock Tuner item to [X.M.P.] and allows you to enhance the system performance. To restore the default setting, type [auto] using the numeric keypad...
...options: [Disabled] [Profile #1] [Profile #2] Memory Frequency [Auto] Allows you to select the X.M.P. BCLK/PEG Frequency [XXX] Allows you set overclocking parameters. eXtreme Memory Profile [High Performance] This item appears only when you to adjust the CPU and VGA frequency to enable or disable the ... you to set the DRAM timing control features. If this happens, revert to adjust the value. Allows you to individually set the Ai Overclock Tuner item to [X.M.P.] and allows you to enhance the system performance. To restore the default setting, type [auto] using the numeric keypad...

User Manual
Page 74
...[Auto] Maximum instaneous current allowed at 0.125A increment. Increasing phase number under light system loading to get higher voltage and better overclocking performance, but increase the CPU and VRM thermal. Chapter 3 3-10 Chapter 3: BIOS setup DIGI+ VRM Load-Line Calibration [Auto...] [Medium] [High] [Ultra High] [Extreme] The actual performance boost may vary depending on the CPU loading. [Optimized] Loads the ASUS optimized phase tuning profile. [Extreme] Proceeds the full phase mode. [Manual Adjustment] Allows manual adjustment. Higher load-line calibration would get more...
...[Auto] Maximum instaneous current allowed at 0.125A increment. Increasing phase number under light system loading to get higher voltage and better overclocking performance, but increase the CPU and VRM thermal. Chapter 3 3-10 Chapter 3: BIOS setup DIGI+ VRM Load-Line Calibration [Auto...] [Medium] [High] [Ultra High] [Extreme] The actual performance boost may vary depending on the CPU loading. [Optimized] Loads the ASUS optimized phase tuning profile. [Extreme] Proceeds the full phase mode. [Manual Adjustment] Allows manual adjustment. Higher load-line calibration would get more...

User Manual
Page 75
...keys to the CPU documentation before setting the CPU voltage. The values range from 0.005V to set the VCCSA voltage. Chapter 3 ASUS P8P67 EVO 3-11 CPU Offset Voltage [Auto] This item appears only when you set the CPU Voltage item to [Offset Mode] and ...values range from 0.800V to 1.70V with the voltage requirement below 1.65V. A higher value brings a wider total power range and extends the overclocking frequency range simultaneously. DRAM Voltage [Auto] Allows you install the DIMMs with a 0.00625V interval. Setting a high voltage may damage the CPU ...
...keys to the CPU documentation before setting the CPU voltage. The values range from 0.005V to set the VCCSA voltage. Chapter 3 ASUS P8P67 EVO 3-11 CPU Offset Voltage [Auto] This item appears only when you set the CPU Voltage item to [Offset Mode] and ...values range from 0.800V to 1.70V with the voltage requirement below 1.65V. A higher value brings a wider total power range and extends the overclocking frequency range simultaneously. DRAM Voltage [Auto] Allows you install the DIMMs with a 0.00625V interval. Setting a high voltage may damage the CPU ...

User Manual
Page 76
... 1.11000V- 1.15000V 0.125V-0.175V 1.65625V- 1.72500V 1.01875V- 1.06250V 1.15625V- 1.20625V 1.98125V- 2.06875V 1.16000V- 1.20000V CPU Spread Spectrum [Auto] [Auto] Automatic configuration. [Disabled] Enhances the BCLK overclocking ability. [Enabled] Sets to set the CPU and PCH PLL voltage. Red 1.340V-1.990V 0.180V-0.635V 1.73125V- 2.20000V 1.06875V- 1.70000V 1.21250V- 1.70000V 2.07500V- 2.20000V 1.21000V...
... 1.11000V- 1.15000V 0.125V-0.175V 1.65625V- 1.72500V 1.01875V- 1.06250V 1.15625V- 1.20625V 1.98125V- 2.06875V 1.16000V- 1.20000V CPU Spread Spectrum [Auto] [Auto] Automatic configuration. [Disabled] Enhances the BCLK overclocking ability. [Enabled] Sets to set the CPU and PCH PLL voltage. Red 1.340V-1.990V 0.180V-0.635V 1.73125V- 2.20000V 1.06875V- 1.70000V 1.21250V- 1.70000V 2.07500V- 2.20000V 1.21000V...

User Manual
Page 106
... transient response. The thermal conditions should be monitored. Refer to the software manual in the support DVD or visit the ASUS website at www.asus.com for overclocking. It also provides the highest power efficiency, generating less heat to enhance reliability and stability. 4.3.2 DIGI+ VRM... ASUS DIGI+ VRM allows you to adjust VRM voltage and frequency modulation to longer component lifespan and minimize power loss. Reduce...
... transient response. The thermal conditions should be monitored. Refer to the software manual in the support DVD or visit the ASUS website at www.asus.com for overclocking. It also provides the highest power efficiency, generating less heat to enhance reliability and stability. 4.3.2 DIGI+ VRM... ASUS DIGI+ VRM allows you to adjust VRM voltage and frequency modulation to longer component lifespan and minimize power loss. Reduce...

User Manual
Page 108
... clicking Tool > TurboV EVO on the next system boot. Auto Tuning Mode TurboV Load profile Target values Current values Click to show / hide more settings Click to restore all changes immediately For advanced overclock ability, adjust first the BIOS items, and then proceed more detailed ...a high voltage may damage the CPU permanently, and setting a low voltage may make the system unstable. 4.3.4 TurboV EVO ASUS TurboV EVO introduces TurboV that allows you to overclock the BCLK frequency, CPU voltage, IMC voltage, and DRAM Bus voltage in WIndows® environment and takes effect in ...
... clicking Tool > TurboV EVO on the next system boot. Auto Tuning Mode TurboV Load profile Target values Current values Click to show / hide more settings Click to restore all changes immediately For advanced overclock ability, adjust first the BIOS items, and then proceed more detailed ...a high voltage may damage the CPU permanently, and setting a low voltage may make the system unstable. 4.3.4 TurboV EVO ASUS TurboV EVO introduces TurboV that allows you to overclock the BCLK frequency, CPU voltage, IMC voltage, and DRAM Bus voltage in WIndows® environment and takes effect in ...

User Manual
Page 110
Read through the warning messages and click OK to the desired value. Auto Tuning ASUS TurboV EVO includes two auto tuning modes, providing the most flexible auto-tuning options. • The overclocking result varies with your motherboard user manual for details. • The CPU Ratio bars show the status of your CPU model. Drag...
Read through the warning messages and click OK to the desired value. Auto Tuning ASUS TurboV EVO includes two auto tuning modes, providing the most flexible auto-tuning options. • The overclocking result varies with your motherboard user manual for details. • The CPU Ratio bars show the status of your CPU model. Drag...

User Manual
Page 111
... you did not click Stop in the previous step, TurboV automatically starts further system overclocking and stability test. TurboV automatically overclocks the CPU, saves BIOS settings and restarts the system. Using Extreme Tuning 1. If you want to exit. ASUS P8P67 EVO 4-9 Chapter 4 Click the Auto Tuning tab and then click Extreme. 2. After re-entering Windows...
... you did not click Stop in the previous step, TurboV automatically starts further system overclocking and stability test. TurboV automatically overclocks the CPU, saves BIOS settings and restarts the system. Using Extreme Tuning 1. If you want to exit. ASUS P8P67 EVO 4-9 Chapter 4 Click the Auto Tuning tab and then click Extreme. 2. After re-entering Windows...


