
User Manual
Page 33
Chapter 2 ASUS P8P67 Deluxe 2-15 This is plugged to a power source indicating that allows you to power up or wake up the system. Reset switch Press the reset switch ... or plugging in any motherboard component. The switch also lights up when the system is ideal for overclockers and gamers who continually change settings to reboot the system. The illustration below shows the location of the onboard power-on a bare or opencase system.
Chapter 2 ASUS P8P67 Deluxe 2-15 This is plugged to a power source indicating that allows you to power up or wake up the system. Reset switch Press the reset switch ... or plugging in any motherboard component. The switch also lights up when the system is ideal for overclockers and gamers who continually change settings to reboot the system. The illustration below shows the location of the onboard power-on a bare or opencase system.
User Manual
Page 34
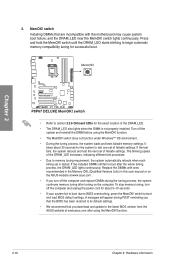
... 5-10 seconds. • If your system fail to boot due to section 2.2.6 Onboard LEDs for successful boot. If the test fails, the system reboots and test the next set is not properly installed. To stop memory tuning, turn off the system and reinstall the DIMM before using the MemOK...During the tuning process, the system loads and tests failsafe memory settings. If the installed DIMMs still fail to boot after turning on the ASUS website at www.asus.com. • If you download and update to its default settings. • We recommend that are incompatible with ones recommended in the...
... 5-10 seconds. • If your system fail to boot due to section 2.2.6 Onboard LEDs for successful boot. If the test fails, the system reboots and test the next set is not properly installed. To stop memory tuning, turn off the system and reinstall the DIMM before using the MemOK...During the tuning process, the system loads and tests failsafe memory settings. If the installed DIMMs still fail to boot after turning on the ASUS website at www.asus.com. • If you download and update to its default settings. • We recommend that are incompatible with ones recommended in the...

User Manual
Page 51
... the system is ON turns the system OFF. • Reset button (2-pin RESET) This 2-pin connector is for the chassis-mounted reset button for system reboot without turning off mode depending on the system power, and blinks when the system is for the HDD Activity LED. Chapter 2 • System power LED...; ATX power button/soft-off button (2-pin PWRSW) This connector is for the system power button. The speaker allows you turn on the BIOS settings. ASUS P8P67 Deluxe 2-33 The IDE LED lights up when you to this connector. 11.
... the system is ON turns the system OFF. • Reset button (2-pin RESET) This 2-pin connector is for the chassis-mounted reset button for system reboot without turning off mode depending on the system power, and blinks when the system is for the HDD Activity LED. Chapter 2 • System power LED...; ATX power button/soft-off button (2-pin PWRSW) This connector is for the system power button. The speaker allows you turn on the BIOS settings. ASUS P8P67 Deluxe 2-33 The IDE LED lights up when you to this connector. 11.
User Manual
Page 102
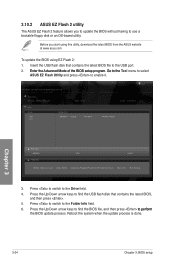
...65533;p�r�o�g�r�a�m��.�G��o�t�o��th�e� Tool menu to select ASUS EZ Flash Utility and press to enable it. Press the Up/Down arrow keys to find the BIOS file, and then press ...;to the Drive field. 4. Reboot the system when the update process is done. Before you to update the BIOS without having to the Folder Info field. 6. Chapter 3 3-34 Chapter 3: BIOS setup ASUSTek EZ Flash 2 BIOS ROM Utility V00.75 Flash Info MODEL: P8P67 DELUXE fs0:\ Drive fs0:\ fs1:\ ...
...65533;p�r�o�g�r�a�m��.�G��o�t�o��th�e� Tool menu to select ASUS EZ Flash Utility and press to enable it. Press the Up/Down arrow keys to find the BIOS file, and then press ...;to the Drive field. 4. Reboot the system when the update process is done. Before you to update the BIOS without having to the Folder Info field. 6. Chapter 3 3-34 Chapter 3: BIOS setup ASUSTek EZ Flash 2 BIOS ROM Utility V00.75 Flash Info MODEL: P8P67 DELUXE fs0:\ Drive fs0:\ fs1:\ ...
User Manual
Page 112
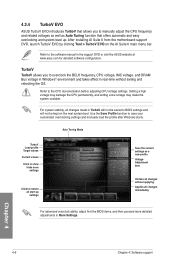
... to the CPU documentation before adjusting CPU voltage settings. Refer to the software manual in the support DVD or visit the ASUS website at www.asus.com for detailed software configuration. Use the Save Profile function to BIOS settings and will not be kept on the AI Suite...and easy overlocking and system level up settings Save the current settings as a new profile Voltage Adjustment bars Undoes all changes without exiting and rebooting the OS. Setting a high voltage may damage the CPU permanently, and setting a low voltage may make the system unstable. After installing AI...
... to the CPU documentation before adjusting CPU voltage settings. Refer to the software manual in the support DVD or visit the ASUS website at www.asus.com for detailed software configuration. Use the Save Profile function to BIOS settings and will not be kept on the AI Suite...and easy overlocking and system level up settings Save the current settings as a new profile Voltage Adjustment bars Undoes all changes without exiting and rebooting the OS. Setting a high voltage may damage the CPU permanently, and setting a low voltage may make the system unstable. After installing AI...
