User Manual
Page 45
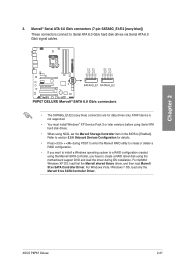
Refer to section 3.5.6 Onboard Devices Configuration for data drives only. ASUS P8P67 Deluxe 2-27 Chapter 2 3. For Windows Vista / Windows 7 OS, load only the Marvell 91xx SATA Controller Driver. ATAPI device is not supported. • You must install Windows® XP Service Pack 3 or later versions before using Serial ATA hard disk drives. •... Marvell RAID utility to create or delete a RAID configuration. • If you want to install a Windows operating system to a RAID configuration created using the motherboard support DVD and load the driver during OS installation.
Refer to section 3.5.6 Onboard Devices Configuration for data drives only. ASUS P8P67 Deluxe 2-27 Chapter 2 3. For Windows Vista / Windows 7 OS, load only the Marvell 91xx SATA Controller Driver. ATAPI device is not supported. • You must install Windows® XP Service Pack 3 or later versions before using Serial ATA hard disk drives. •... Marvell RAID utility to create or delete a RAID configuration. • If you want to install a Windows operating system to a RAID configuration created using the motherboard support DVD and load the driver during OS installation.
User Manual
Page 65
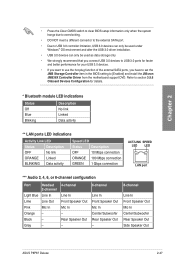
... - 8-channel Line In Front Speaker Out Mic In Center/Subwoofer Rear Speaker Out Side Speaker Out ASUS P8P67 Deluxe 2-47 Refer to [Enabled] and install the JMicron JMB36X Controller Driver from the motherboard support DVD. Black - Chapter 2 • Press the Clear CMOS switch to clear BIOS setup ...port. • Due to USB 3.0 controller limitation, USB 3.0 devices can only be used under Windows® OS environment and after the USB 3.0 driver installation. • USB 3.0 devices can only be used as data storage only. • We strongly recommend that you connect USB 3.0 devices to...
... - 8-channel Line In Front Speaker Out Mic In Center/Subwoofer Rear Speaker Out Side Speaker Out ASUS P8P67 Deluxe 2-47 Refer to [Enabled] and install the JMicron JMB36X Controller Driver from the motherboard support DVD. Black - Chapter 2 • Press the Clear CMOS switch to clear BIOS setup ...port. • Due to USB 3.0 controller limitation, USB 3.0 devices can only be used under Windows® OS environment and after the USB 3.0 driver installation. • USB 3.0 devices can only be used as data storage only. • We strongly recommend that you connect USB 3.0 devices to...

User Manual
Page 88
... BIOS setup Configuration options: [Enabled] [Disabled] JMB Storage Controller [Enabled] Allows you to [Enabled] and install the JMicron JMB36X Controller Driver from the motherboard support DVD. Marvell Storage OPROM [Enabled] This item appears only when you to use the full functin of the JMB storage controller. Configuration... Mode] when you to internally optimize the order of the JMB storage controller during POST. The AHCI allows the onboard storage driver to enable advanced Serial ATA features that you set the previous item to [Enabled] and allows you set this item to ...
... BIOS setup Configuration options: [Enabled] [Disabled] JMB Storage Controller [Enabled] Allows you to [Enabled] and install the JMicron JMB36X Controller Driver from the motherboard support DVD. Marvell Storage OPROM [Enabled] This item appears only when you to use the full functin of the JMB storage controller. Configuration... Mode] when you to internally optimize the order of the JMB storage controller during POST. The AHCI allows the onboard storage driver to enable advanced Serial ATA features that you set the previous item to [Enabled] and allows you set this item to ...
User Manual
Page 107
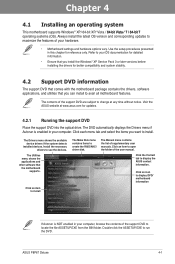
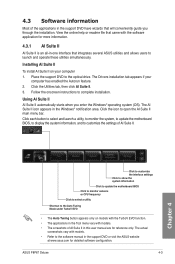
... The support DVD that comes with the motherboard package contains the drivers, software applications, and utilities that the motherboard supports. Refer to locate the file ASSETUP.EXE from the BIN folder. The Manual menu contains the list of the support DVD are subject to use the devices. ASUS P8P67 Deluxe 4-1 Click each menu tab and select...
... The support DVD that comes with the motherboard package contains the drivers, software applications, and utilities that the motherboard supports. Refer to locate the file ASSETUP.EXE from the BIN folder. The Manual menu contains the list of the support DVD are subject to use the devices. ASUS P8P67 Deluxe 4-1 Click each menu tab and select...
User Manual
Page 109
...ASUS website at www.asus.com for detailed software configuration. The Drivers installation tab appears if your computer 1. Click each button to select and launch a utility, to monitor the system, to update the motherboard BIOS, to display the system information, and to open the AI Suite II main menu bar. ASUS P8P67 Deluxe... 4-3 Chapter 4 Click to customize the interface settings Click to show the system information Click to update the motherboard BIOS Click to monitor sensors or CPU frequency Click to select ...
...ASUS website at www.asus.com for detailed software configuration. The Drivers installation tab appears if your computer 1. Click each button to select and launch a utility, to monitor the system, to update the motherboard BIOS, to display the system information, and to open the AI Suite II main menu bar. ASUS P8P67 Deluxe... 4-3 Chapter 4 Click to customize the interface settings Click to show the system information Click to update the motherboard BIOS Click to monitor sensors or CPU frequency Click to select ...
User Manual
Page 119
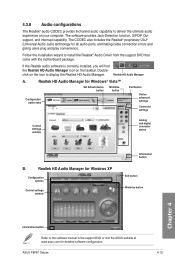
...audio experience on your computer. Double- click on the taskbar. ASUS P8P67 Deluxe 4-13 Follow the installation wizard to the software manual in the support DVD or visit the ASUS website at www.asus.com for detailed software configuration. The CODEC also includes the Realtek&#... Information button Exit button Minimize button Chapter 4 Information button Refer to install the Realtek® Audio Driver from the support DVD that came with the motherboard package. 4.3.8 Audio configurations The Realtek® audio CODEC provides 8-channel audio capability to display the ...
...audio experience on your computer. Double- click on the taskbar. ASUS P8P67 Deluxe 4-13 Follow the installation wizard to the software manual in the support DVD or visit the ASUS website at www.asus.com for detailed software configuration. The CODEC also includes the Realtek&#... Information button Exit button Minimize button Chapter 4 Information button Refer to install the Realtek® Audio Driver from the support DVD that came with the motherboard package. 4.3.8 Audio configurations The Realtek® audio CODEC provides 8-channel audio capability to display the ...

User Manual
Page 120
4.4 RAID configurations The motherboard supports the following SATA RAID solutions: • Intel® Rapid Storage Technology...stacks. This RAID configuration provides data protection and increases fault tolerance to create a RAID driver disk and load the RAID driver during OS installation. Use two new drives or use an existing drive and three new... configurations. Use of the same size or larger than the existing drive. Refer to section 4.5 Creating a RAID driver disk for this setup. The new drive must install Windows® XP Service Pack 3 or later versions before using...
4.4 RAID configurations The motherboard supports the following SATA RAID solutions: • Intel® Rapid Storage Technology...stacks. This RAID configuration provides data protection and increases fault tolerance to create a RAID driver disk and load the RAID driver during OS installation. Use two new drives or use an existing drive and three new... configurations. Use of the same size or larger than the existing drive. Refer to section 4.5 Creating a RAID driver disk for this setup. The new drive must install Windows® XP Service Pack 3 or later versions before using...
User Manual
Page 129
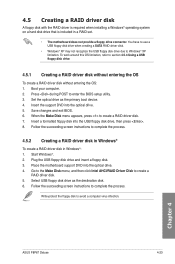
... 5. Chapter 4 ASUS P8P67 Deluxe 4-23 Start Windows®. 2. Select USB floppy disk drive as the primary boot device. 4. Write-protect the floppy disk to create a RAID driver disk. 7. Plug the USB floppy disk drive and insert a floppy disk. 3. Place the motherboard support DVD into the... optical drive. 4. Follow the succeeding screen instructions to section 4.5.4 Using a USB floppy disk drive. 4.5.1 Creating a RAID driver disk without entering the OS To create a RAID driver disk without entering the OS: 1. ...
... 5. Chapter 4 ASUS P8P67 Deluxe 4-23 Start Windows®. 2. Select USB floppy disk drive as the primary boot device. 4. Write-protect the floppy disk to create a RAID driver disk. 7. Plug the USB floppy disk drive and insert a floppy disk. 3. Place the motherboard support DVD into the... optical drive. 4. Follow the succeeding screen instructions to section 4.5.4 Using a USB floppy disk drive. 4.5.1 Creating a RAID driver disk without entering the OS To create a RAID driver disk without entering the OS: 1. ...

User Manual
Page 133
...motherboard supports the ATI® CrossFireX™ technology that your graphics card driver supports the ATI CrossFireX technology. For Windows XP, go to Control Panel > Add/Remove Programs. For Windows Vista, go to install multi-graphics processing units (GPU) graphics cards. For Windows XP, select Add/Remove. ASUS P8P67 Deluxe 5-1 To uninstall existing graphics card drivers...: 1. For Windows Vista, select Uninstall. 5. Turn off your current graphics card driver/s. 4. Follow the installation ...
...motherboard supports the ATI® CrossFireX™ technology that your graphics card driver supports the ATI CrossFireX technology. For Windows XP, go to Control Panel > Add/Remove Programs. For Windows Vista, go to install multi-graphics processing units (GPU) graphics cards. For Windows XP, select Add/Remove. ASUS P8P67 Deluxe 5-1 To uninstall existing graphics card drivers...: 1. For Windows Vista, select Uninstall. 5. Turn off your current graphics card driver/s. 4. Follow the installation ...

User Manual
Page 136
.... See Chapter 2 for multi-graphics card installation. 3. The graphics cards and the motherboard layout may vary with models, but the installation steps remain the same. 1. If your graphics card driver supports the NVIDIA SLI technology. Insert the two graphics card into the PCIEX16 slots.... Ensure that your motherboard has more than two PCIEX16 slots, refer to install multi-graphics processing units (GPU)...
.... See Chapter 2 for multi-graphics card installation. 3. The graphics cards and the motherboard layout may vary with models, but the installation steps remain the same. 1. If your graphics card driver supports the NVIDIA SLI technology. Insert the two graphics card into the PCIEX16 slots.... Ensure that your motherboard has more than two PCIEX16 slots, refer to install multi-graphics processing units (GPU)...


