User Manual
Page 5
... Storage Technology Option ROM utility 4-15 4.4.5 Marvell RAID utility 4-19 4.5 Creating a RAID driver disk 4-23 4.5.1 Creating a RAID driver disk without entering the OS 4-23 4.5.2 Creating a RAID driver disk in Windows 4-23 4.5.3 Installing the RAID driver during Windows® OS installation....... 4-24 4.5.4 Using a USB floppy disk drive 4-25 Chapter 5: Multiple GPU technology support 5.1 ATI® CrossFireX...
... Storage Technology Option ROM utility 4-15 4.4.5 Marvell RAID utility 4-19 4.5 Creating a RAID driver disk 4-23 4.5.1 Creating a RAID driver disk without entering the OS 4-23 4.5.2 Creating a RAID driver disk in Windows 4-23 4.5.3 Installing the RAID driver during Windows® OS installation....... 4-24 4.5.4 Using a USB floppy disk drive 4-25 Chapter 5: Multiple GPU technology support 5.1 ATI® CrossFireX...
User Manual
Page 12
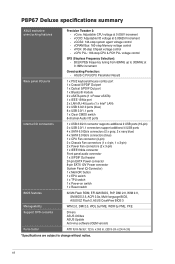
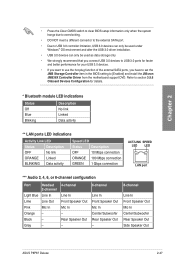
...2.0, SM BIOS 2.5, ACPI 2.0a, Multi-language BIOS, ASUS EZ Flash 2, ASUS CrashFree BIOS 3 Manageability WfM 2.0, DMI 2.0, WOL by PME, WOR by PME, PXE Support DVD contents Drivers ASUS Utilities ASUS Update Anti-virus software (OEM version) Form factor ATX ...ports (1 x Power eSATA) 1 x IEEE 1394a port 2 x LAN (RJ-45) ports (1 x Intel® LAN) 2 x USB 3.0/2.0 ports (blue) 8 x USB 2.0/1.1 ports 1 x Clear CMOS switch 8-channel Audio I/O ports Internal I /O voltage at 0.005V increment - P8P67 Deluxe specifications summary ASUS exclusive overclocking features Precision Tweaker 2: -
...2.0, SM BIOS 2.5, ACPI 2.0a, Multi-language BIOS, ASUS EZ Flash 2, ASUS CrashFree BIOS 3 Manageability WfM 2.0, DMI 2.0, WOL by PME, WOR by PME, PXE Support DVD contents Drivers ASUS Utilities ASUS Update Anti-virus software (OEM version) Form factor ATX ...ports (1 x Power eSATA) 1 x IEEE 1394a port 2 x LAN (RJ-45) ports (1 x Intel® LAN) 2 x USB 3.0/2.0 ports (blue) 8 x USB 2.0/1.1 ports 1 x Clear CMOS switch 8-channel Audio I/O ports Internal I /O voltage at 0.005V increment - P8P67 Deluxe specifications summary ASUS exclusive overclocking features Precision Tweaker 2: -
User Manual
Page 41
... Reserved for future AMI DXE codes OEM DXE initialization codes Boot Device Selection (BDS) phase is started Driver connecting is started PCI Bus initialization is started PCI Bus Hot Plug Controller Initialization PCI Bus Enumeration PCI ...USB initialization is started USB Reset USB Detect USB Enable Reserved for future AMI codes IDE initialization is started IDE Reset IDE Detect IDE Enable SCSI initialization is started SCSI Reset SCSI Detect SCSI Enable Setup Verifying Password Start of Setup Reserved for ASL (see ASL Status Codes section below) Setup Input Wait ASUS P8P67 Deluxe...
... Reserved for future AMI DXE codes OEM DXE initialization codes Boot Device Selection (BDS) phase is started Driver connecting is started PCI Bus initialization is started PCI Bus Hot Plug Controller Initialization PCI Bus Enumeration PCI ...USB initialization is started USB Reset USB Detect USB Enable Reserved for future AMI codes IDE initialization is started IDE Reset IDE Detect IDE Enable SCSI initialization is started SCSI Reset SCSI Detect SCSI Enable Setup Verifying Password Start of Setup Reserved for ASL (see ASL Status Codes section below) Setup Input Wait ASUS P8P67 Deluxe...
User Manual
Page 65
...ASUS P8P67 Deluxe 2-47 Chapter 2 • Press the Clear CMOS switch to clear BIOS setup information only when the system hangs due to overclocking. • DO NOT insert a different connector to the external SATA port. • Due to USB 3.0 controller limitation, USB 3.0 devices can only be used under Windows® OS environment and after the USB 3.0 driver... installation. • USB 3.0 devices can only be used as data ...
...ASUS P8P67 Deluxe 2-47 Chapter 2 • Press the Clear CMOS switch to clear BIOS setup information only when the system hangs due to overclocking. • DO NOT insert a different connector to the external SATA port. • Due to USB 3.0 controller limitation, USB 3.0 devices can only be used under Windows® OS environment and after the USB 3.0 driver... installation. • USB 3.0 devices can only be used as data ...

User Manual
Page 88
... Configuration options: [Enabled] [Disabled] JMB Storage Controller [Enabled] Allows you to [Enabled] and install the JMicron JMB36X Controller Driver from the motherboard support DVD. Configuration options: [Enabled] [Disabled] Display OptionRom in POST [Enabled] This item appears only when... [Enabled] and allows you want to display or hide the OptionRom of the JMB storage contorller (ex. Renesas Electronics USB 3.0 [Enabled] [Enabled] Enables the USB 3.0 controller. [Disabled] Disables the controller. Configuration options: [Disabled] [Enabled] If you to use the AHCI (...
... Configuration options: [Enabled] [Disabled] JMB Storage Controller [Enabled] Allows you to [Enabled] and install the JMicron JMB36X Controller Driver from the motherboard support DVD. Configuration options: [Enabled] [Disabled] Display OptionRom in POST [Enabled] This item appears only when... [Enabled] and allows you want to display or hide the OptionRom of the JMB storage contorller (ex. Renesas Electronics USB 3.0 [Enabled] [Enabled] Enables the USB 3.0 controller. [Disabled] Disables the controller. Configuration options: [Disabled] [Enabled] If you to use the AHCI (...
User Manual
Page 129
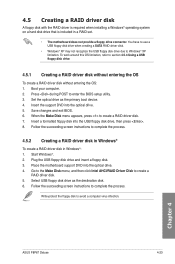
... motherboard support DVD into the optical drive. 5. Follow the succeeding screen instructions to create a RAID driver disk. 5. Press during POST to avoid a computer virus infection. Save changes and exit BIOS. 6. Chapter 4 ASUS P8P67 Deluxe 4-23 Start Windows®. 2. Select USB floppy disk drive as the primary boot device. 4. Write-protect the floppy disk to enter...
... motherboard support DVD into the optical drive. 5. Follow the succeeding screen instructions to create a RAID driver disk. 5. Press during POST to avoid a computer virus infection. Save changes and exit BIOS. 6. Chapter 4 ASUS P8P67 Deluxe 4-23 Start Windows®. 2. Select USB floppy disk drive as the primary boot device. 4. Write-protect the floppy disk to enter...
User Manual
Page 130
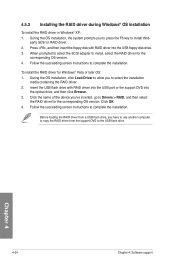
... insert the floppy disk with RAID driver into the USB port or the support DVD into the USB floppy disk drive. 3. To install the RAID driver for the corresponding OS version. Follow the succeeding screen instructions to install, select the RAID driver for the corresponding OS version. 4....OK. 4. Before loading the RAID driver from a USB flash drive, you to press the F6 key to Drivers > RAID, and then select the RAID driver for Windows® Vista or later OS: 1. party SCSI or RAID driver. 2. Follow the succeeding screen instructions to the USB flash drive. Chapter 4 4-24 ...
... insert the floppy disk with RAID driver into the USB port or the support DVD into the USB floppy disk drive. 3. To install the RAID driver for the corresponding OS version. Follow the succeeding screen instructions to install, select the RAID driver for the corresponding OS version. 4....OK. 4. Before loading the RAID driver from a USB flash drive, you to press the F6 key to Drivers > RAID, and then select the RAID driver for Windows® Vista or later OS: 1. party SCSI or RAID driver. 2. Follow the succeeding screen instructions to the USB flash drive. Chapter 4 4-24 ...

User Manual
Page 131
...) and Product ID (PID) are displayed. 5. Double-click the file. Chapter 4 ASUS P8P67 Deluxe 4-25 To solve this issue, add the USB floppy disk drive's Vendor ID (VID) and Product ID (PID) to the steps below: 1. Refer to the floppy disk containing the RAID driver. Select Device Manager. A window appears, allowing you install the RAID...
...) and Product ID (PID) are displayed. 5. Double-click the file. Chapter 4 ASUS P8P67 Deluxe 4-25 To solve this issue, add the USB floppy disk drive's Vendor ID (VID) and Product ID (PID) to the steps below: 1. Refer to the floppy disk containing the RAID driver. Select Device Manager. A window appears, allowing you install the RAID...


