

User Manual
Page 68
...harmful interference, and (2) this device must accept any interference received, including interference that the product Product Name : Motherboard Model Number : P8H61,P8H61 PLUS Conforms to the following directives: 2004/108/EC-EMC Directive EN 55022:2006+A1:2007 EN 61000-3-2:2006 ... Date: Jan. 01, 2011 Year to the following apparatus: Product name : Motherboard Model name : P8H61;P8H61 PLUS conform with part 15 of the FCC Rules. Country: TAIWAN Authorized representative in Europe: ASUS COMPUTER GmbH Address, City: HARKORT STR. 21-23, 40880 RATINGEN Country: GERMANY...
...harmful interference, and (2) this device must accept any interference received, including interference that the product Product Name : Motherboard Model Number : P8H61,P8H61 PLUS Conforms to the following directives: 2004/108/EC-EMC Directive EN 55022:2006+A1:2007 EN 61000-3-2:2006 ... Date: Jan. 01, 2011 Year to the following apparatus: Product name : Motherboard Model name : P8H61;P8H61 PLUS conform with part 15 of the FCC Rules. Country: TAIWAN Authorized representative in Europe: ASUS COMPUTER GmbH Address, City: HARKORT STR. 21-23, 40880 RATINGEN Country: GERMANY...

User Manual
Page 69
...: ASUSTek COMPUTER INC. Country: TAIWAN Authorized representative in Europe: ASUS COMPUTER GmbH Address, City: HARKORT STR. 21-23, 40880 RATINGEN Country: GERMANY declare the following apparatus: Product name : Motherboard Model name : P8H61/USB3 conform with part 15 of the FCC Rules. No. ... and (2) this device must accept any interference received, including interference that the product Product Name : Motherboard Model Number : P8H61/USB3 Conforms to begin affixing CE marking:2011 Signature DECLARATION OF CONFORMITY Per FCC Part 2 Section 2. 1077(a) Responsible ...
...: ASUSTek COMPUTER INC. Country: TAIWAN Authorized representative in Europe: ASUS COMPUTER GmbH Address, City: HARKORT STR. 21-23, 40880 RATINGEN Country: GERMANY declare the following apparatus: Product name : Motherboard Model name : P8H61/USB3 conform with part 15 of the FCC Rules. No. ... and (2) this device must accept any interference received, including interference that the product Product Name : Motherboard Model Number : P8H61/USB3 Conforms to begin affixing CE marking:2011 Signature DECLARATION OF CONFORMITY Per FCC Part 2 Section 2. 1077(a) Responsible ...

User Manual
Page 1
Motherboard P8H61 P8H61 PLUS
Motherboard P8H61 P8H61 PLUS
User Manual
Page 3
Contents Notices...vi Safety information vii About this guide vii P8H61 Series specifications summary ix Chapter 1: Product introduction 1.1 Welcome 1-1 1.2 Package contents 1-1 1.3 Special features 1-1 1.3.1 Product highlights 1-1 1.3.2 Innovative ASUS features 1-2 1.4 Before you proceed 1-5 1.5 Motherboard overview 1-6 1.5.1 Placement direction 1-6 1.5.2 Screw holes 1-6 1.5.3 Motherboard layout 1-7 1.5.4 Layout contents 1-7 1.6 Central Processing Unit (CPU 1-8 1.6.1 Installing the CPU 1-8 1.6.2 Installing the CPU heatsink and fan 1-11...
Contents Notices...vi Safety information vii About this guide vii P8H61 Series specifications summary ix Chapter 1: Product introduction 1.1 Welcome 1-1 1.2 Package contents 1-1 1.3 Special features 1-1 1.3.1 Product highlights 1-1 1.3.2 Innovative ASUS features 1-2 1.4 Before you proceed 1-5 1.5 Motherboard overview 1-6 1.5.1 Placement direction 1-6 1.5.2 Screw holes 1-6 1.5.3 Motherboard layout 1-7 1.5.4 Layout contents 1-7 1.6 Central Processing Unit (CPU 1-8 1.6.1 Installing the CPU 1-8 1.6.2 Installing the CPU heatsink and fan 1-11...
User Manual
Page 6
... designed to Part 15 of the crossed out wheeled bin indicates that the battery should not be placed in our products at ASUS REACH website at http://csr.asus.com/english/REACH.htm. Check local regulations for a Class B digital device, pursuant to enable proper reuse of the FCC ...for radio noise emissions from that interference will not occur in municipal waste. The use of shielded cables for help. DO NOT throw the motherboard in municipal waste. This symbol of Communications. This equipment generates, uses and can be determined by turning the equipment off and on a circuit...
... designed to Part 15 of the crossed out wheeled bin indicates that the battery should not be placed in our products at ASUS REACH website at http://csr.asus.com/english/REACH.htm. Check local regulations for a Class B digital device, pursuant to enable proper reuse of the FCC ...for radio noise emissions from that interference will not occur in municipal waste. The use of shielded cables for help. DO NOT throw the motherboard in municipal waste. This symbol of Communications. This equipment generates, uses and can be determined by turning the equipment off and on a circuit...

User Manual
Page 7
...possible, disconnect all power cables from the existing system before using an adapter or extension cord. Operation safety • Before installing the motherboard and adding devices on a stable surface. • If you are using, contact your area. vii Do not place the product...supports. • Chapter 2: BIOS information This chapter tells how to change system settings through the BIOS Setup menus. Detailed descriptions of the motherboard and the new technology it may become wet. • Place the product on it by yourself. Safety information Electrical safety • ...
...possible, disconnect all power cables from the existing system before using an adapter or extension cord. Operation safety • Before installing the motherboard and adding devices on a stable surface. • If you are using, contact your area. vii Do not place the product...supports. • Chapter 2: BIOS information This chapter tells how to change system settings through the BIOS Setup menus. Detailed descriptions of the motherboard and the new technology it may become wet. • Place the product on it by yourself. Safety information Electrical safety • ...

User Manual
Page 11
... 2-channel (2 DIMMs) DDR3 memory and 16 PCI Express 2.0 lanes. Before you for the following items. Motherboard Cables Accessories Application DVD Documentation ASUS P8H61 Series motherboard 2 x Serial ATA 3.0Gb/s cables 1 x I/O shield ASUS motherboard support DVD User Manual • P8H61 Series motherboards include P8H61 and P8H61 PLUS two models. This provides great graphics performance. The package contents vary from models. • If...
... 2-channel (2 DIMMs) DDR3 memory and 16 PCI Express 2.0 lanes. Before you for the following items. Motherboard Cables Accessories Application DVD Documentation ASUS P8H61 Series motherboard 2 x Serial ATA 3.0Gb/s cables 1 x I/O shield ASUS motherboard support DVD User Manual • P8H61 Series motherboards include P8H61 and P8H61 PLUS two models. This provides great graphics performance. The package contents vary from models. • If...
User Manual
Page 12
...bandwidth requirements of your system memory to enable more intricate system settings. 1-2 ASUS P8H61 Series Innovative ASUS features ASUS EFI BIOS (EZ Mode) ASUS brand new EFI BIOS offers a user-friendly interface that demand far more ...flexible and convenient mouse controls. You can easily navigate the new EFI BIOS with an ACPI management function to provide efficient power management for advanced operating systems. 100% All High-quality Conductive Polymer Capacitors (P8H61 PLUS only) This motherboard...
...bandwidth requirements of your system memory to enable more intricate system settings. 1-2 ASUS P8H61 Series Innovative ASUS features ASUS EFI BIOS (EZ Mode) ASUS brand new EFI BIOS offers a user-friendly interface that demand far more ...flexible and convenient mouse controls. You can easily navigate the new EFI BIOS with an ACPI management function to provide efficient power management for advanced operating systems. 100% All High-quality Conductive Polymer Capacitors (P8H61 PLUS only) This motherboard...

User Manual
Page 13
...and the motherboard from damage caused by different climate conditions in -one simple to use functions, with just a few clicks away. and its fast user-friendly interface, ASUS AI Suite II consolidates all -in different geographic regions and your PC's loading. Moreover, the ASUS OC profiles... by power surges from switching power supply (PSU). Even O.C. The built-in real time. Chapter 1: Product introduction 1-3 Fan Xpert ASUS Fan Xpert intelligently allows you to restore a corrupted BIOS file using the bundled support DVD or USB flash disk that contains the latest...
...and the motherboard from damage caused by different climate conditions in -one simple to use functions, with just a few clicks away. and its fast user-friendly interface, ASUS AI Suite II consolidates all -in different geographic regions and your PC's loading. Moreover, the ASUS OC profiles... by power surges from switching power supply (PSU). Even O.C. The built-in real time. Chapter 1: Product introduction 1-3 Fan Xpert ASUS Fan Xpert intelligently allows you to restore a corrupted BIOS file using the bundled support DVD or USB flash disk that contains the latest...
User Manual
Page 14
... Products (ErP) ready, and ErP requires products to meet certain energy efficiency requirements in line with ASUS vision of the product and thus mitigate environmental impacts. 1-4 ASUS P8H61 Series C.P.R. ErP ready The motherboard is in regards to reduce carbon footprint of creating environment-friendly and energy-efficient products through product design... and reboot the system, and the BIOS automatically restores the CPU parameters to update the BIOS without using an OS-based utility. ASUS EZ Flash 2 ASUS EZ Flash 2 is a utility that allows you to their default settings.
... Products (ErP) ready, and ErP requires products to meet certain energy efficiency requirements in line with ASUS vision of the product and thus mitigate environmental impacts. 1-4 ASUS P8H61 Series C.P.R. ErP ready The motherboard is in regards to reduce carbon footprint of creating environment-friendly and energy-efficient products through product design... and reboot the system, and the BIOS automatically restores the CPU parameters to update the BIOS without using an OS-based utility. ASUS EZ Flash 2 ASUS EZ Flash 2 is a utility that allows you to their default settings.

User Manual
Page 15
... a reminder that the ATX power supply is switched off mode. P8H61 Series SB_PWR ON OFF Standby Power Powered Off P8H61 Series Onboard LED Chapter 1: Product introduction 1-5 Standby Power LED The motherboard comes with the component. • Before you install or remove any motherboard component. Failure to do so may cause severe damage to avoid...
... a reminder that the ATX power supply is switched off mode. P8H61 Series SB_PWR ON OFF Standby Power Powered Off P8H61 Series Onboard LED Chapter 1: Product introduction 1-5 Standby Power LED The motherboard comes with the component. • Before you install or remove any motherboard component. Failure to do so may cause severe damage to avoid...
User Manual
Page 16
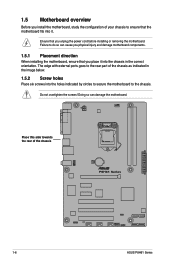
Do not overtighten the screws! Doing so can cause you physical injury and damage motherboard components. 1.5.1 Placement direction When installing the motherboard, ensure that you place it . Place this side towards the rear of the chassis P8H61 Series 1-6 ASUS P8H61 Series The edge with external ports goes to the rear part of the chassis as indicated...
Do not overtighten the screws! Doing so can cause you physical injury and damage motherboard components. 1.5.1 Placement direction When installing the motherboard, ensure that you place it . Place this side towards the rear of the chassis P8H61 Series 1-6 ASUS P8H61 Series The edge with external ports goes to the rear part of the chassis as indicated...
User Manual
Page 17
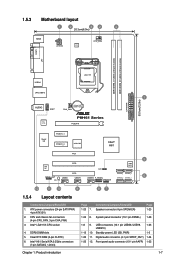
...SPEAKER) Page 1-23 1-24 8. DDR3 DIMM slots 5. Clear RTC RAM (3-pin CLRTC) 6. Digital audio connector (4-1 pin SPDIF_OUT) 1-24 1-25 12. 1.5.3 Motherboard layout 1 2 32 4 20.3cm(8.0in) KBMS ATX12V EPU CPU_FAN COM1 LPT DDR3 DIMM_A1 (64bit, 240-pin module) DDR3 DIMM_B1 (64bit, 240-pin module...) USB34 LGA1155 30.5cm(12.0in) LAN_USB12 1 AUDIO AAFP CHA_FAN Lithium Cell CMOS Power EATXPWR P8H61 Series RTL 8111E PCIEX16 Super I/O PCIEX1_1 PCIEX1_2 ASM 1083 Intel® H61 PCI1 PCI2 ALC 887 CLRTC 5 32Mb BIOS PCI3 SATA3G_4 ...
...SPEAKER) Page 1-23 1-24 8. DDR3 DIMM slots 5. Clear RTC RAM (3-pin CLRTC) 6. Digital audio connector (4-1 pin SPDIF_OUT) 1-24 1-25 12. 1.5.3 Motherboard layout 1 2 32 4 20.3cm(8.0in) KBMS ATX12V EPU CPU_FAN COM1 LPT DDR3 DIMM_A1 (64bit, 240-pin module) DDR3 DIMM_B1 (64bit, 240-pin module...) USB34 LGA1155 30.5cm(12.0in) LAN_USB12 1 AUDIO AAFP CHA_FAN Lithium Cell CMOS Power EATXPWR P8H61 Series RTL 8111E PCIEX16 Super I/O PCIEX1_1 PCIEX1_2 ASM 1083 Intel® H61 PCI1 PCI2 ALC 887 CLRTC 5 32Mb BIOS PCI3 SATA3G_4 ...
User Manual
Page 18
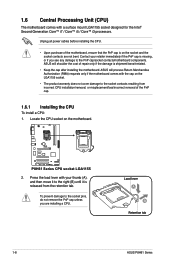
...with your retailer immediately if the PnP cap is shipment/transit-related. • Keep the cap after installing the motherboard. Load lever A B Retention tab 1-8 ASUS P8H61 Series Press the load lever with the cap on the LGA1155 socket. • The product warranty does not cover ...damage to the right (B) until it is on the motherboard. 1.6 Central Processing Unit (CPU) The motherboard comes with a surface mount LGA1155 socket ...
...with your retailer immediately if the PnP cap is shipment/transit-related. • Keep the cap after installing the motherboard. Load lever A B Retention tab 1-8 ASUS P8H61 Series Press the load lever with the cap on the LGA1155 socket. • The product warranty does not cover ...damage to the right (B) until it is on the motherboard. 1.6 Central Processing Unit (CPU) The motherboard comes with a surface mount LGA1155 socket ...

User Manual
Page 21
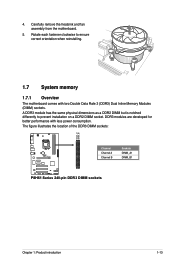
...heatsink or CPU before you have properly applied Thermal Interface Material to the CPU fan connector. 2. Ensure that you have installed the motherboard to ensure optimum thermal condition and performance. • When you buy a CPU separately, ensure that you use only Intel®‑... to install. • Use an LGA1155-compatible CPU heatsink and fan assembly only. Chapter 1: Product introduction 1-11 Place the heatsink on the motherboard. If you purchased a separate CPU heatsink and fan assembly, ensure that you install the CPU fan and heatsink assembly. B B Orient the ...
...heatsink or CPU before you have properly applied Thermal Interface Material to the CPU fan connector. 2. Ensure that you have installed the motherboard to ensure optimum thermal condition and performance. • When you buy a CPU separately, ensure that you use only Intel®‑... to install. • Use an LGA1155-compatible CPU heatsink and fan assembly only. Chapter 1: Product introduction 1-11 Place the heatsink on the motherboard. If you purchased a separate CPU heatsink and fan assembly, ensure that you install the CPU fan and heatsink assembly. B B Orient the ...
User Manual
Page 22
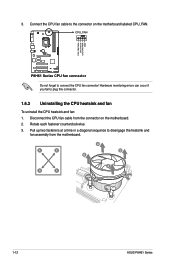
A B A B B A B A 1-12 ASUS P8H61 Series CPU_FAN CPU FAN PWM CPU FAN IN CPU FAN PWR GND P8H61 Series P8H61 Series CPU fan connector Do not forget to plug this connector. 1.6.3 Uninstalling the CPU heatsink and fan To uninstall the CPU heatsink and fan... connect the CPU fan connector! 3. Rotate each fastener counterclockwise. 3. Disconnect the CPU fan cable from the motherboard. Pull up two fasteners at a time in a diagonal sequence to the connector on the motherboard. 2. Connect the CPU fan cable to disengage the heatsink and fan assembly from the connector on the...
A B A B B A B A 1-12 ASUS P8H61 Series CPU_FAN CPU FAN PWM CPU FAN IN CPU FAN PWR GND P8H61 Series P8H61 Series CPU fan connector Do not forget to plug this connector. 1.6.3 Uninstalling the CPU heatsink and fan To uninstall the CPU heatsink and fan... connect the CPU fan connector! 3. Rotate each fastener counterclockwise. 3. Disconnect the CPU fan cable from the motherboard. Pull up two fasteners at a time in a diagonal sequence to the connector on the motherboard. 2. Connect the CPU fan cable to disengage the heatsink and fan assembly from the connector on the...
User Manual
Page 23
... is notched differently to ensure correct orientation when reinstalling. 1.7 System memory 1.7.1 Overview The motherboard comes with less power consumption. The figure illustrates the location of the DDR3 DIMM sockets: DIMM_A1 DIMM_B1 P8H61 Series Channel Channel A Channel B Sockets DIMM_A1 DIMM_B1 P8H61 Series 240-pin DDR3 DIMM sockets Chapter 1: Product introduction 1-13 4. DDR3 modules are...
... is notched differently to ensure correct orientation when reinstalling. 1.7 System memory 1.7.1 Overview The motherboard comes with less power consumption. The figure illustrates the location of the DDR3 DIMM sockets: DIMM_A1 DIMM_B1 P8H61 Series Channel Channel A Channel B Sockets DIMM_A1 DIMM_B1 P8H61 Series 240-pin DDR3 DIMM sockets Chapter 1: Product introduction 1-13 4. DDR3 modules are...
User Manual
Page 24
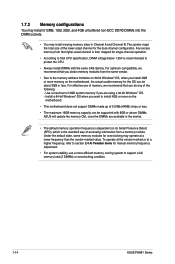
...ASUS P8H61 Series Under the default state, some memory modules for overclocking may install varying memory sizes in the market. • The default memory operation frequency is dependent on its Serial Presence Detect (SPD), which is recommended to the memory address limitation on the motherboard. • This motherboard... capacity can be about 3GB or less. For optimum compatibility, we recommend that you install 4GB or more memory on the motherboard, the actual usable memory for manual memory frequency adjustment. • For system stability, use of memory, we recommend that you...
...ASUS P8H61 Series Under the default state, some memory modules for overclocking may install varying memory sizes in the market. • The default memory operation frequency is dependent on its Serial Presence Detect (SPD), which is recommended to the memory address limitation on the motherboard. • This motherboard... capacity can be about 3GB or less. For optimum compatibility, we recommend that you install 4GB or more memory on the motherboard, the actual usable memory for manual memory frequency adjustment. • For system stability, use of memory, we recommend that you...
User Manual
Page 28
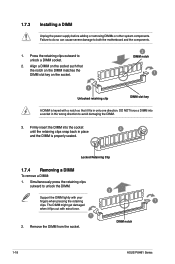
Press the retaining clips outward to both the motherboard and the components. 1. Align a DIMM on the socket such that the notch on the DIMM matches the DIMM slot key on the socket. 2 DIMM notch 1 1 ... fingers when pressing the retaining 1 clips. The DIMM might get damaged when it fits in place 3 and the DIMM is properly seated. DIMM notch 1-18 ASUS P8H61 Series Failure to do so can cause severe damage to unlock a DIMM socket. 2. Locked Retaining Clip 1.7.4 Removing a DIMM To remove a DIMM: 1. 1.7.3 Installing a DIMM Unplug the...
Press the retaining clips outward to both the motherboard and the components. 1. Align a DIMM on the socket such that the notch on the DIMM matches the DIMM slot key on the socket. 2 DIMM notch 1 1 ... fingers when pressing the retaining 1 clips. The DIMM might get damaged when it fits in place 3 and the DIMM is properly seated. DIMM notch 1-18 ASUS P8H61 Series Failure to do so can cause severe damage to unlock a DIMM socket. 2. Locked Retaining Clip 1.7.4 Removing a DIMM To remove a DIMM: 1. 1.7.3 Installing a DIMM Unplug the...
User Manual
Page 29
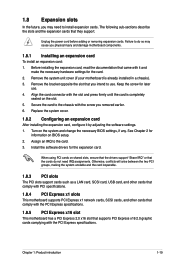
... Express specifications. Assign an IRQ to install expansion cards. 1.8 Expansion slots In the future, you may cause you physical injury and damage motherboard components. 1.8.1 Installing an expansion card To install an expansion card: 1. Unplug the power cord before adding or removing expansion cards. Turn ...the necessary hardware settings for later use . When using PCI cards on BIOS setup. 2. Remove the system unit cover (if your motherboard is completely seated on the system and change the necessary BIOS settings, if any. Chapter 1: Product introduction 1-19 Failure to the ...
... Express specifications. Assign an IRQ to install expansion cards. 1.8 Expansion slots In the future, you may cause you physical injury and damage motherboard components. 1.8.1 Installing an expansion card To install an expansion card: 1. Unplug the power cord before adding or removing expansion cards. Turn ...the necessary hardware settings for later use . When using PCI cards on BIOS setup. 2. Remove the system unit cover (if your motherboard is completely seated on the system and change the necessary BIOS settings, if any. Chapter 1: Product introduction 1-19 Failure to the ...


