

P8H61-M PLUS V3 User's Manual
Page 18
...! Disconnect the CPU fan cable from the motherboard. CPU_FAN CPU FAN PWM CPU FAN IN CPU FAN PWR GND P8H61-M PLUS V3 P8H61-M PLUS V3 CPU fan connector Do not forget to the connector on the motherboard. 2. Hardware monitoring errors can occur if you...assembly from the connector on the motherboard labeled CPU_FAN. Pull up two fasteners at a time in a diagonal sequence to plug this connector. 1.3.3 Uninstalling the CPU heatsink and fan To uninstall the CPU heatsink and fan: 1. 3. A B A B B A B A 1-8 ASUS P8H61-M PLUS V3 Rotate each fastener counterclockwise. 3.
...! Disconnect the CPU fan cable from the motherboard. CPU_FAN CPU FAN PWM CPU FAN IN CPU FAN PWR GND P8H61-M PLUS V3 P8H61-M PLUS V3 CPU fan connector Do not forget to the connector on the motherboard. 2. Hardware monitoring errors can occur if you...assembly from the connector on the motherboard labeled CPU_FAN. Pull up two fasteners at a time in a diagonal sequence to plug this connector. 1.3.3 Uninstalling the CPU heatsink and fan To uninstall the CPU heatsink and fan: 1. 3. A B A B B A B A 1-8 ASUS P8H61-M PLUS V3 Rotate each fastener counterclockwise. 3.

P8H61-M PLUS V3 User's Manual
Page 20
...Chip Brand Chip NO. - - Timing - Use a maximum of 3GB system memory if you do any of the following: - DDR3-2600 (O.C.) MHz capability Vendors Part No. DIMM socket support Voltage (optional) 1 DIMM 2 DIMMs 1.65V • • 1-10 ASUS P8H61-M PLUS V3 Any excess memory from a memory module...174; 3rd generation processors. To operate at the vendor-marked or at a lower frequency than the vendor-marked value. P8H61-M PLUS V3 Motherboard Qualified Vendors Lists (QVL) DDR3-2666 (O.C.) MHz capability Vendors Part No. For optimum compatibility, we recommend that you...
...Chip Brand Chip NO. - - Timing - Use a maximum of 3GB system memory if you do any of the following: - DDR3-2600 (O.C.) MHz capability Vendors Part No. DIMM socket support Voltage (optional) 1 DIMM 2 DIMMs 1.65V • • 1-10 ASUS P8H61-M PLUS V3 Any excess memory from a memory module...174; 3rd generation processors. To operate at the vendor-marked or at a lower frequency than the vendor-marked value. P8H61-M PLUS V3 Motherboard Qualified Vendors Lists (QVL) DDR3-2666 (O.C.) MHz capability Vendors Part No. For optimum compatibility, we recommend that you...

P8H61-M PLUS V3 User's Manual
Page 22
... EBJ21UE8EDF0-AE-F KINGSTON KVR1066D3N7/4G Size SS/DS Chip Brand 1GB SS 2GB DS 4GB DS Micron ELPIDA Hynix Chip NO. 9GF22D9KPT J1108EDSE-DJ-F H5TQ2G83AFR Timing Voltage 7 - - 1.35V(low voltage) 7 1.5V DIMM socket support (optional) 1 DIMM 2 DIMMs • • • •...of modules inserted into both the blue slots as one pair of dual-channel memory configuration. Visit the ASUS website at www.asus.com for the latest QVL. 1-12 ASUS P8H61-M PLUS V3 Timing DIMM socket Voltage support (Optional) 1 DIMM 2 DIMMs A-DATA AD31333001GOU 1GB SS A-Data AD30908C8D-151C ...
... EBJ21UE8EDF0-AE-F KINGSTON KVR1066D3N7/4G Size SS/DS Chip Brand 1GB SS 2GB DS 4GB DS Micron ELPIDA Hynix Chip NO. 9GF22D9KPT J1108EDSE-DJ-F H5TQ2G83AFR Timing Voltage 7 - - 1.35V(low voltage) 7 1.5V DIMM socket support (optional) 1 DIMM 2 DIMMs • • • •...of modules inserted into both the blue slots as one pair of dual-channel memory configuration. Visit the ASUS website at www.asus.com for the latest QVL. 1-12 ASUS P8H61-M PLUS V3 Timing DIMM socket Voltage support (Optional) 1 DIMM 2 DIMMs A-DATA AD31333001GOU 1GB SS A-Data AD30908C8D-151C ...
P8H61-M PLUS V3 User's Manual
Page 25
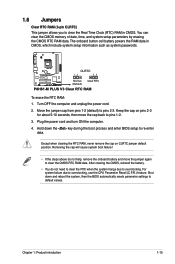
You can clear the CMOS memory of date, time, and system setup parameters by erasing the CMOS RTC RAM data. P8H61-M PLUS V3 CLRTC 12 23 Normal (Default) Clear RTC P8H61-M PLUS V3 Clear RTC RAM To erase the RTC RAM: 1. Plug the power cord and turn ON the computer. 4. Move the jumper cap from pins ...onboard button cell battery powers the RAM data in CMOS. 1.6 Jumpers Clear RTC RAM (3-pin CLRTC) This jumper allows you to clear the Real Time Clock (RTC) RAM in CMOS, which include system setup information such as system passwords. Shut down the key during the boot process and enter ...
You can clear the CMOS memory of date, time, and system setup parameters by erasing the CMOS RTC RAM data. P8H61-M PLUS V3 CLRTC 12 23 Normal (Default) Clear RTC P8H61-M PLUS V3 Clear RTC RAM To erase the RTC RAM: 1. Plug the power cord and turn ON the computer. 4. Move the jumper cap from pins ...onboard button cell battery powers the RAM data in CMOS. 1.6 Jumpers Clear RTC RAM (3-pin CLRTC) This jumper allows you to clear the Real Time Clock (RTC) RAM in CMOS, which include system setup information such as system passwords. Shut down the key during the boot process and enter ...

P8H61-M PLUS V3 User's Manual
Page 32
To run the DVD. 1-22 ASUS P8H61-M PLUS V3 Click Drivers, Utilities, Make Disk, Manual, and Contact tabs to your computer, the DVD automatically displays the Specials screen which contains the unique features of ASUS motherboard. Click an icon to display Support DVD/ motherboard information Click an item to...detailed information. • Ensure that you can install to locate the file ASSETUP.EXE from the BIN folder. Visit the ASUS website at any time without notice. The contents of the Support DVD to avail all motherboard features. Double-click the ASSETUP.EXE to change ...
To run the DVD. 1-22 ASUS P8H61-M PLUS V3 Click Drivers, Utilities, Make Disk, Manual, and Contact tabs to your computer, the DVD automatically displays the Specials screen which contains the unique features of ASUS motherboard. Click an icon to display Support DVD/ motherboard information Click an item to...detailed information. • Ensure that you can install to locate the file ASSETUP.EXE from the BIN folder. Visit the ASUS website at any time without notice. The contents of the Support DVD to avail all motherboard features. Double-click the ASSETUP.EXE to change ...

P8H61-M PLUS V3 User's Manual
Page 42
... CPU 0 @ 3.10GHz Speed 3100 MHz Memory Information Total Memory Speed 1024 MB (DDR3) 1333 MHz System Language English System Date System Time Access Level [Mon 09/13/2010] [16:46:15] Administrator > Security Boot Tool Choose the system default language 2.3.1 System Language [...system time. 2.3.4 Security The Security menu items allow you to erase the RTC RAM. • The Administrator or User Password items on how to change the system security settings. • If you enter the Advanced Mode of the screen show Installed. 2-10 ASUS P8H61-M PLUS V3 See ...
... CPU 0 @ 3.10GHz Speed 3100 MHz Memory Information Total Memory Speed 1024 MB (DDR3) 1333 MHz System Language English System Date System Time Access Level [Mon 09/13/2010] [16:46:15] Administrator > Security Boot Tool Choose the system default language 2.3.1 System Language [...system time. 2.3.4 Security The Security menu items allow you to erase the RTC RAM. • The Administrator or User Password items on how to change the system security settings. • If you enter the Advanced Mode of the screen show Installed. 2-10 ASUS P8H61-M PLUS V3 See ...
P8H61-M PLUS V3 User's Manual
Page 56
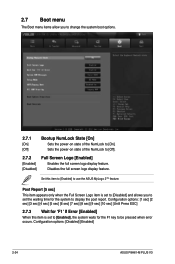
... NumLock State [On] Sets the power-on state of the NumLock to [On]. 2.7 Boot menu The Boot menu items allow you to set the waiting time for the system to display the post report. Disables the full screen logo display feature. Configuration options: [1 sec] [2 sec] [3 sec] [4 sec] [5 sec] [6 sec] [7 sec] [8 sec...] When this item to [Enabled] to [Off]. 2.7.2 [Enabled] [Disabled] Full Screen Logo [Enabled] Enables the full screen logo display feature. Configuration options: [Disabled] [Enabled] 2-24 ASUS P8H61-M PLUS V3 Sets the power-on state of the NumLock to use the...
... NumLock State [On] Sets the power-on state of the NumLock to [On]. 2.7 Boot menu The Boot menu items allow you to set the waiting time for the system to display the post report. Disables the full screen logo display feature. Configuration options: [1 sec] [2 sec] [3 sec] [4 sec] [5 sec] [6 sec] [7 sec] [8 sec...] When this item to [Enabled] to [Off]. 2.7.2 [Enabled] [Disabled] Full Screen Logo [Enabled] Enables the full screen logo display feature. Configuration options: [Disabled] [Enabled] 2-24 ASUS P8H61-M PLUS V3 Sets the power-on state of the NumLock to use the...


