
User Manual
Page 11
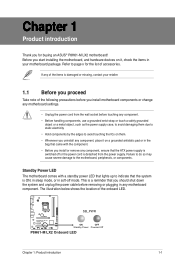
Failure to do so may cause severe damage to page x for buying an ASUS® P8H61-M LX2 motherboard! SB_PWR P8H61-M LX2 ON OFF Standby Power Powered Off P8H61-M LX2 Onboard LED Chapter 1: Product introduction 1-1 Chapter 1 Product introduction Thank you start installing the motherboard, and hardware devices on a grounded antistatic pad or in the bag ...
Failure to do so may cause severe damage to page x for buying an ASUS® P8H61-M LX2 motherboard! SB_PWR P8H61-M LX2 ON OFF Standby Power Powered Off P8H61-M LX2 Onboard LED Chapter 1: Product introduction 1-1 Chapter 1 Product introduction Thank you start installing the motherboard, and hardware devices on a grounded antistatic pad or in the bag ...
User Manual
Page 12
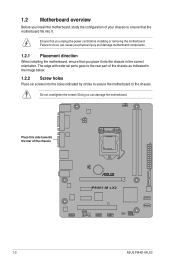
1.2 Motherboard overview Before you install the motherboard, study the configuration of the chassis P8H61-M LX2 1-2 ASUS P8H61-M LX2 Ensure that you place it into the chassis in the image below. 1.2.2 Screw holes Place six screws into it. Do not overtighten the screws! Doing ...
1.2 Motherboard overview Before you install the motherboard, study the configuration of the chassis P8H61-M LX2 1-2 ASUS P8H61-M LX2 Ensure that you place it into the chassis in the image below. 1.2.2 Screw holes Place six screws into it. Do not overtighten the screws! Doing ...
User Manual
Page 14
...on the LGA1155 socket. • The product warranty does not cover damage to the socket contacts resulting from the retention tab. ASUS will process Return Merchandise Authorization (RMA) requests only if the motherboard comes with a surface mount LGA1155 socket designed for the Intel&#... PnP cap is on the motherboard. Load lever A B Retention tab 1-4 ASUS P8H61-M LX2 Contact your thumb (A), and then move it is shipment/transit-related. • Keep the cap after installing the motherboard. P8H61-M LX2 P8H61-M LX2 CPU socket LGA1155 2. To prevent damage to the socket pins, do not ...
...on the LGA1155 socket. • The product warranty does not cover damage to the socket contacts resulting from the retention tab. ASUS will process Return Merchandise Authorization (RMA) requests only if the motherboard comes with a surface mount LGA1155 socket designed for the Intel&#... PnP cap is on the motherboard. Load lever A B Retention tab 1-4 ASUS P8H61-M LX2 Contact your thumb (A), and then move it is shipment/transit-related. • Keep the cap after installing the motherboard. P8H61-M LX2 P8H61-M LX2 CPU socket LGA1155 2. To prevent damage to the socket pins, do not ...
User Manual
Page 16
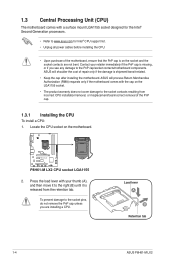
... (B), ensuring that it is toxic and inedible. Some heatsinks come with , ensuring that the front edge of the load plate slides under the retention tab. 1-6 ASUS P8H61-M LX2 Apply some Thermal Interface Material to the exposed area of the CPU that the heatsink will be in an even thin layer. 6. B A C 8. The Thermal Interface...
... (B), ensuring that it is toxic and inedible. Some heatsinks come with , ensuring that the front edge of the load plate slides under the retention tab. 1-6 ASUS P8H61-M LX2 Apply some Thermal Interface Material to the exposed area of the CPU that the heatsink will be in an even thin layer. 6. B A C 8. The Thermal Interface...
User Manual
Page 18
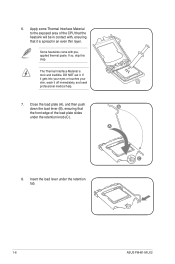
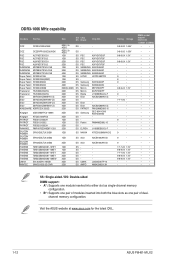
Disconnect the CPU fan cable from the motherboard. A B A B B A B A 1-8 ASUS P8H61-M LX2 Hardware monitoring errors can occur if you fail to disengage the heatsink and fan assembly from the connector on the motherboard labeled CPU_FAN. Pull up ... each fastener counterclockwise. 3. Connect the CPU fan cable to connect the CPU fan connector! CPU_FAN CPU FAN PWM CPU FAN IN CPU FAN PWR GND P8H61-M LX2 P8H61-M LX2 CPU fan connector Do not forget to the connector on the motherboard. 2.
Disconnect the CPU fan cable from the motherboard. A B A B B A B A 1-8 ASUS P8H61-M LX2 Hardware monitoring errors can occur if you fail to disengage the heatsink and fan assembly from the connector on the motherboard labeled CPU_FAN. Pull up ... each fastener counterclockwise. 3. Connect the CPU fan cable to connect the CPU fan connector! CPU_FAN CPU FAN PWM CPU FAN IN CPU FAN PWR GND P8H61-M LX2 P8H61-M LX2 CPU fan connector Do not forget to the connector on the motherboard. 2.

User Manual
Page 20
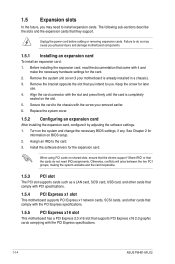
...; • • • • • • • • • • • • • • • • 1-10 ASUS P8H61-M LX2 To operate at the vendor-marked or at a lower frequency than the vendor-marked value. P8H61-M LX2 Motherboard Qualified Vendors Lists (QVL) DDR3-1066 MHz capability Vendors Part No. Size SS/ DS Crucial CT12864BA1067.8FF...
...; • • • • • • • • • • • • • • • • 1-10 ASUS P8H61-M LX2 To operate at the vendor-marked or at a lower frequency than the vendor-marked value. P8H61-M LX2 Motherboard Qualified Vendors Lists (QVL) DDR3-1066 MHz capability Vendors Part No. Size SS/ DS Crucial CT12864BA1067.8FF...
User Manual
Page 22
channel memory configuration. DDR3-1066 MHz capability Vendors Part No. Visit the ASUS website at www.asus.com for the latest QVL. 1-12 ASUS P8H61-M LX2 DS Elixir N2CB2G808N-CG DS PATRIOT PM128M8D385-15 DS Samsung SEC 904 HCH9 K4B1G0846D DS - - DS Patriot PM64M8D38U-15 DS - - DS ELPIDA J1108BDBG-DJ-F 1GB ...
channel memory configuration. DDR3-1066 MHz capability Vendors Part No. Visit the ASUS website at www.asus.com for the latest QVL. 1-12 ASUS P8H61-M LX2 DS Elixir N2CB2G808N-CG DS PATRIOT PM128M8D385-15 DS Samsung SEC 904 HCH9 K4B1G0846D DS - - DS Patriot PM64M8D38U-15 DS - - DS ELPIDA J1108BDBG-DJ-F 1GB ...
User Manual
Page 24
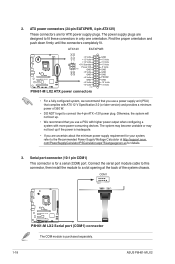
... the system unit cover (if your motherboard is completely seated on BIOS setup. 2. Secure the card to the chassis with the PCI Express specifications. 1-14 ASUS P8H61-M LX2 Failure to install expansion cards. Remove the bracket opposite the slot that came with the slot and press firmly until the card is already installed...
... the system unit cover (if your motherboard is completely seated on BIOS setup. 2. Secure the card to the chassis with the PCI Express specifications. 1-14 ASUS P8H61-M LX2 Failure to install expansion cards. Remove the bracket opposite the slot that came with the slot and press firmly until the card is already installed...

User Manual
Page 26
... allows Gigabit connection to a headphone or a speaker. This port connects to a Local Area Network (LAN) through a network hub. Refer to support 8-channel audio output. 1-16 ASUS P8H61-M LX2 Line In port (light blue). In the 4, 6, and 8-channel configurations, the function of the audio ports in the front panel to the audio configuration table...
... allows Gigabit connection to a headphone or a speaker. This port connects to a Local Area Network (LAN) through a network hub. Refer to support 8-channel audio output. 1-16 ASUS P8H61-M LX2 Line In port (light blue). In the 4, 6, and 8-channel configurations, the function of the audio ports in the front panel to the audio configuration table...
User Manual
Page 28
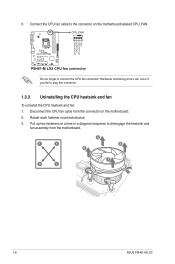
... supply requirement for ATX power supply plugs. The power supply plugs are for your system, refer to a slot opening at http://support.asus. ATX12V EATXPWR +12V DC +12V DC P8H61-M LX2 GND GND +3 Volts +12 Volts +12 Volts +5V Standby Power OK PIN 1 GND +5 Volts GND +5 Volts GND +3 Volts... designed to connect the 4-pin ATX +12V power plug. Serial port connector (10-1 pin COM1) This connector is purchased separately. 1-18 ASUS P8H61-M LX2 The system may become unstable or may not boot up . • We recommend that complies with more power-consuming devices. 2.
... supply requirement for ATX power supply plugs. The power supply plugs are for your system, refer to a slot opening at http://support.asus. ATX12V EATXPWR +12V DC +12V DC P8H61-M LX2 GND GND +3 Volts +12 Volts +12 Volts +5V Standby Power OK PIN 1 GND +5 Volts GND +5 Volts GND +3 Volts... designed to connect the 4-pin ATX +12V power plug. Serial port connector (10-1 pin COM1) This connector is purchased separately. 1-18 ASUS P8H61-M LX2 The system may become unstable or may not boot up . • We recommend that complies with more power-consuming devices. 2.
User Manual
Page 30
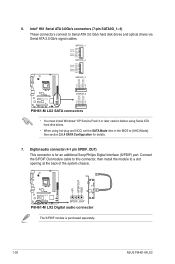
... RSATA_RXP2 RSATA_RXN2 GND SATA3G_3 GND RSATA_RXN3 RSATA_RXP3 GND RSATA_TXN3 RSATA_TXP3 GND GND RSATA_RXN4 RSATA_RXP4 GND RSATA_TXN4 RSATA_TXP4 GND P8H61-M LX2 SATA3G_4 P8H61-M LX2 SATA connectors • You must install Windows® XP Service Pack 3 or later version before using... of the system chassis. +5V SPDIFOUT GND P8H61-M LX2 SPDIF_OUT P8H61-M LX2 Digital audio connector The S/PDIF module is for details. 7. Digital audio connector (4-1 pin SPDIF_OUT) This connector is purchased separately. 1-20 ASUS P8H61-M LX2 See section 2.5.4 SATA Configuration for an additional Sony...
... RSATA_RXP2 RSATA_RXN2 GND SATA3G_3 GND RSATA_RXN3 RSATA_RXP3 GND RSATA_TXN3 RSATA_TXP3 GND GND RSATA_RXN4 RSATA_RXP4 GND RSATA_TXN4 RSATA_TXP4 GND P8H61-M LX2 SATA3G_4 P8H61-M LX2 SATA connectors • You must install Windows® XP Service Pack 3 or later version before using... of the system chassis. +5V SPDIFOUT GND P8H61-M LX2 SPDIF_OUT P8H61-M LX2 Digital audio connector The S/PDIF module is for details. 7. Digital audio connector (4-1 pin SPDIF_OUT) This connector is purchased separately. 1-20 ASUS P8H61-M LX2 See section 2.5.4 SATA Configuration for an additional Sony...
User Manual
Page 32
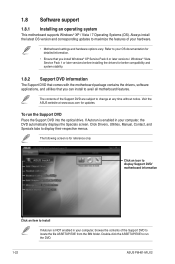
...optical drive. Double-click the ASSETUP.EXE to display their respective menus. Visit the ASUS website at any time without notice. Refer to avail all motherboard features. To run the DVD. 1-22 ASUS P8H61-M LX2 The following screen is NOT enabled in your computer, browse the contents of the Support...information Click an item to install If Autorun is for updates. The contents of the Support DVD to change at www.asus.com for reference only. 1.8 Software support 1.8.1 Installing an operating system This motherboard supports Windows® XP / Vista / 7 Operating Systems (OS...
...optical drive. Double-click the ASSETUP.EXE to display their respective menus. Visit the ASUS website at any time without notice. Refer to avail all motherboard features. To run the DVD. 1-22 ASUS P8H61-M LX2 The following screen is NOT enabled in your computer, browse the contents of the Support...information Click an item to install If Autorun is for updates. The contents of the Support DVD to change at www.asus.com for reference only. 1.8 Software support 1.8.1 Installing an operating system This motherboard supports Windows® XP / Vista / 7 Operating Systems (OS...
User Manual
Page 34
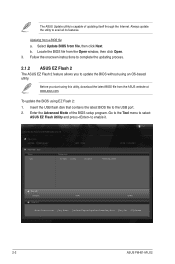
...a. Go to the Tool menu to select ASUS EZ Flash Utility and press to the USB port. 2. ASUSTek EZ Flash BIOS ROM Utility V00.75 Flash Info MODEL: P8H61-M LX2 File Path: fs0:\ Drive fs0:\ VER: ...Tab] Switch [Up/Down/PageUp/PageDown/Home/End] Move [Esc] Exit [F2] Backup 2-2 ASUS P8H61-M LX2 Locate the BIOS file from file, then click Next. Enter the Advanced Mode of updating itself through the Internet...Insert the USB flash disk that contains the latest BIOS file to enable it. b. The ASUS Update utility is capable of the BIOS setup program. Always update the utility to update the...
...a. Go to the Tool menu to select ASUS EZ Flash Utility and press to the USB port. 2. ASUSTek EZ Flash BIOS ROM Utility V00.75 Flash Info MODEL: P8H61-M LX2 File Path: fs0:\ Drive fs0:\ VER: ...Tab] Switch [Up/Down/PageUp/PageDown/Home/End] Move [Esc] Exit [F2] Backup 2-2 ASUS P8H61-M LX2 Locate the BIOS file from file, then click Next. Enter the Advanced Mode of updating itself through the Internet...Insert the USB flash disk that contains the latest BIOS file to enable it. b. The ASUS Update utility is capable of the BIOS setup program. Always update the utility to update the...

User Manual
Page 36
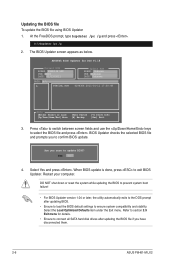
... DOS environment 1. Insert the USB flash drive with the latest BIOS file and BIOS Updater to show the BIOS Boot Device Select Menu. When the ASUS Logo appears, press to the USB port. 2. Boot your computer. Insert the support DVD into the optical drive and select the optical drive as shown... Updater allows you can use as a backup when the BIOS fails or gets corrupted during the updating process. C:\>d: D:\> 2-4 ASUS P8H61-M LX2 This utility also allows you to copy the current BIOS file that you to update BIOS in NTFS format. 3. At the FreeDOS prompt, type d: and ...
... DOS environment 1. Insert the USB flash drive with the latest BIOS file and BIOS Updater to show the BIOS Boot Device Select Menu. When the ASUS Logo appears, press to the USB port. 2. Boot your computer. Insert the support DVD into the optical drive and select the optical drive as shown... Updater allows you can use as a backup when the BIOS fails or gets corrupted during the updating process. C:\>d: D:\> 2-4 ASUS P8H61-M LX2 This utility also allows you to copy the current BIOS file that you to update BIOS in NTFS format. 3. At the FreeDOS prompt, type d: and ...
User Manual
Page 38
The BIOS Updater screen appears as below. Are you have disconnected them. 2-6 ASUS P8H61-M LX2 When BIOS update is done, press to select the BIOS file and press . Restart your computer. Refer to section 2.9 Exit menu for DOS V1.18 Current ROM BOARD: P8H61-M LX2 VER: 0206 DATE: 01/13/2011 Update ROM BOARD: Unknown VER...
The BIOS Updater screen appears as below. Are you have disconnected them. 2-6 ASUS P8H61-M LX2 When BIOS update is done, press to select the BIOS file and press . Restart your computer. Refer to section 2.9 Exit menu for DOS V1.18 Current ROM BOARD: P8H61-M LX2 VER: 0206 DATE: 01/13/2011 Update ROM BOARD: Unknown VER...
User Manual
Page 40
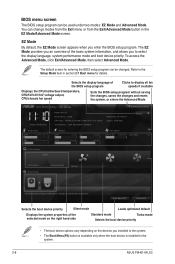
... to decide the boot priority. To access the Advanced Mode, click Exit/Advanced Mode, then select Advanced Mode. Refer to the system. 2-8 ASUS P8H61-M LX2 EZ Mode Friday [10/08/2010] P8H61-M LX2 BIOS Version : 0206 CPU Type : Intel(R) Core(TM) i5-2400 CPU @ 3.10GHz Total Memory : 1024 MB (DDR3 1333MHz) Build Date : 01/13...
... to decide the boot priority. To access the Advanced Mode, click Exit/Advanced Mode, then select Advanced Mode. Refer to the system. 2-8 ASUS P8H61-M LX2 EZ Mode Friday [10/08/2010] P8H61-M LX2 BIOS Version : 0206 CPU Type : Intel(R) Core(TM) i5-2400 CPU @ 3.10GHz Total Memory : 1024 MB (DDR3 1333MHz) Build Date : 01/13...
User Manual
Page 42
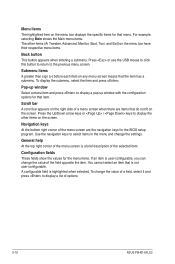
... the specific items for that item. To display the submenu, select the item and press . General help At the top right corner of options. 2-10 ASUS P8H61-M LX2 Press or use the USB mouse to click this button to return to display a list of the menu screen is highlighted when selected. Scroll bar...
... the specific items for that item. To display the submenu, select the item and press . General help At the top right corner of options. 2-10 ASUS P8H61-M LX2 Press or use the USB mouse to click this button to return to display a list of the menu screen is highlighted when selected. Scroll bar...
User Manual
Page 44
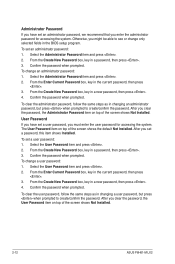
... when prompted to create/confirm the password. After you clear the password, the User Password item on top of the screen shows Not Installed. 2-12 ASUS P8H61-M LX2
... when prompted to create/confirm the password. After you clear the password, the User Password item on top of the screen shows Not Installed. 2-12 ASUS P8H61-M LX2
User Manual
Page 46
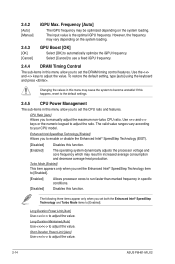
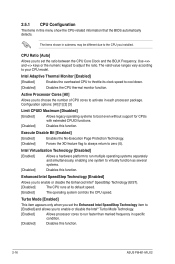
... optimize the iGPU frequency. The following three items appear only when you to [Enabled]. Long Duration Power Limit [Auto] Use / to adjust the value. 2-14 ASUS P8H61-M LX2 Short Duration Power Limit [Auto] Use / to adjust the value. Turbo Mode [Enabled] This item appears only when you to run faster than marked frequency...
... optimize the iGPU frequency. The following three items appear only when you to [Enabled]. Long Duration Power Limit [Auto] Use / to adjust the value. 2-14 ASUS P8H61-M LX2 Short Duration Power Limit [Auto] Use / to adjust the value. Turbo Mode [Enabled] This item appears only when you to run faster than marked frequency...
User Manual
Page 48
...] Allows processor cores to run multiple operating systems separately and simultaneously, enabling one system to virtually function as several systems. [Disabled] Disables this function. 2-16 ASUS P8H61-M LX2 Use and keys or the numeric keypad to zero (0). Execute Disable Bit [Enabled] [Enabled] Enables the No-Execution Page Protection Technology. [Disabled] Forces the XD...
...] Allows processor cores to run multiple operating systems separately and simultaneously, enabling one system to virtually function as several systems. [Disabled] Disables this function. 2-16 ASUS P8H61-M LX2 Use and keys or the numeric keypad to zero (0). Execute Disable Bit [Enabled] [Enabled] Enables the No-Execution Page Protection Technology. [Disabled] Forces the XD...


