User Manual
Page 11
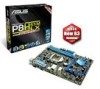
... the following items. Motherboard Cables Accessories Application DVD Documentation ASUS P8H61-M LX Series motherboard 2 x Serial ATA 3.0Gb/s cables 1 x I/O shield ASUS motherboard support DVD User Manual • P8H61-M LX Series motherboards include P8H61-M LX PLUS and P8H61-M LX two models. The motherboard delivers a host of new features... the long line of the items is damaged or missing, contact your motherboard package for P8H61-M LX only. • If any of ASUS quality motherboards! The package contents vary from models. This provides great graphics performance. Thank you...
... the following items. Motherboard Cables Accessories Application DVD Documentation ASUS P8H61-M LX Series motherboard 2 x Serial ATA 3.0Gb/s cables 1 x I/O shield ASUS motherboard support DVD User Manual • P8H61-M LX Series motherboards include P8H61-M LX PLUS and P8H61-M LX two models. The motherboard delivers a host of new features... the long line of the items is damaged or missing, contact your motherboard package for P8H61-M LX only. • If any of ASUS quality motherboards! The package contents vary from models. This provides great graphics performance. Thank you...
User Manual
Page 12
... LAN controller is for experienced performance enthusiasts that demand far more intricate system control, including detailed DRAM information. 1-2 ASUS P8H61-M LX Series Quick and simple overclocking and setup sharing is facilitate by utilizing serial point-to-point links, which means there...ACPI management function to provide efficient power management for advanced operating systems. 100% All High-quality Conductive Polymer Capacitors (P8H61-M LX PLUS only) This motherboard uses all high-quality conductive polymer capacitors for double speed and bandwidth which enhances system performance...
... LAN controller is for experienced performance enthusiasts that demand far more intricate system control, including detailed DRAM information. 1-2 ASUS P8H61-M LX Series Quick and simple overclocking and setup sharing is facilitate by utilizing serial point-to-point links, which means there...ACPI management function to provide efficient power management for advanced operating systems. 100% All High-quality Conductive Polymer Capacitors (P8H61-M LX PLUS only) This motherboard uses all high-quality conductive polymer capacitors for double speed and bandwidth which enhances system performance...
User Manual
Page 14
... environment-friendly and energy-efficient products through product design and innovation to reduce carbon footprint of the product and thus mitigate environmental impacts. 1-4 ASUS P8H61-M LX Series Simply shut down and reboot the system, and the BIOS automatically restores the CPU parameters to overclocking failure. C.P.R. (CPU Parameter Recall)... more colorful and vivid image on your screen. This is an auto-recovery tool that contains the latest BIOS file. ASUS CrashFree BIOS 3 ASUS CrashFree BIOS 3 is in regards to restore a corrupted BIOS file using an OS-based utility...
... environment-friendly and energy-efficient products through product design and innovation to reduce carbon footprint of the product and thus mitigate environmental impacts. 1-4 ASUS P8H61-M LX Series Simply shut down and reboot the system, and the BIOS automatically restores the CPU parameters to overclocking failure. C.P.R. (CPU Parameter Recall)... more colorful and vivid image on your screen. This is an auto-recovery tool that contains the latest BIOS file. ASUS CrashFree BIOS 3 ASUS CrashFree BIOS 3 is in regards to restore a corrupted BIOS file using an OS-based utility...
User Manual
Page 16
... ports goes to the rear part of your chassis to do so can damage the motherboard. Place this side towards the rear of the chassis P8H61-M LX 1-6 ASUS P8H61-M LX Series Failure to ensure that you place it into it. Doing so can cause you physical injury and damage motherboard components. 1.5.1 Placement direction When installing...
... ports goes to the rear part of your chassis to do so can damage the motherboard. Place this side towards the rear of the chassis P8H61-M LX 1-6 ASUS P8H61-M LX Series Failure to ensure that you place it into it. Doing so can cause you physical injury and damage motherboard components. 1.5.1 Placement direction When installing...
User Manual
Page 18
...it to the socket pins, do not remove the PnP cap unless you see any damage to the socket contacts resulting from the retention tab. P8H61-M LX P8H61-M LX CPU socket LGA1155 2. Unplug all power cables before installing the CPU. • Upon purchase of repair only if the damage is released from ...lever with your retailer immediately if the PnP cap is on the socket and the socket contacts are installing a CPU. Load lever A B Retention tab 1-8 ASUS P8H61-M LX Series ASUS will shoulder the cost of the motherboard, ensure that the PnP cap is missing, or if you are not bent...
...it to the socket pins, do not remove the PnP cap unless you see any damage to the socket contacts resulting from the retention tab. P8H61-M LX P8H61-M LX CPU socket LGA1155 2. Unplug all power cables before installing the CPU. • Upon purchase of repair only if the damage is released from ...lever with your retailer immediately if the PnP cap is on the socket and the socket contacts are installing a CPU. Load lever A B Retention tab 1-8 ASUS P8H61-M LX Series ASUS will shoulder the cost of the motherboard, ensure that the PnP cap is missing, or if you are not bent...
User Manual
Page 20
... some Thermal Interface Material to the exposed area of the CPU that the front edge of the load plate slides under the retention tab. 1-10 ASUS P8H61-M LX Series
... some Thermal Interface Material to the exposed area of the CPU that the front edge of the load plate slides under the retention tab. 1-10 ASUS P8H61-M LX Series
User Manual
Page 22
.... 3. CPU_FAN CPU FAN PWM CPU FAN IN CPU FAN PWR GND P8H61-M LX P8H61-M LX CPU fan connector Do not forget to plug this connector. 1.6.3 Uninstalling the CPU heatsink and fan To uninstall the CPU heatsink and fan: 1. Hardware monitoring errors can occur if you fail to connect the CPU fan connector! A B A B B A B A 1-12 ASUS P8H61-M LX Series
.... 3. CPU_FAN CPU FAN PWM CPU FAN IN CPU FAN PWR GND P8H61-M LX P8H61-M LX CPU fan connector Do not forget to plug this connector. 1.6.3 Uninstalling the CPU heatsink and fan To uninstall the CPU heatsink and fan: 1. Hardware monitoring errors can occur if you fail to connect the CPU fan connector! A B A B B A B A 1-12 ASUS P8H61-M LX Series
User Manual
Page 24
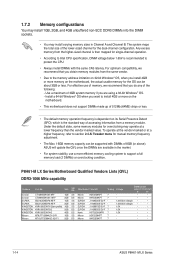
... memory operation frequency is dependent on the motherboard, the actual usable memory for the OS can be about 3GB or less. P8H61-M LX Series Motherboard Qualified Vendors Lists (QVL) DDR3-1066 MHz capability Vendors Part No. Timing Voltage DIMM socket support (Optional) A*...-1G1F1 1GB SS Micron 9GF22D9KPT 7 - • • Micron MT16JTF25664AZ-1G1F1 2GB DS Micron 9HF22D9KPT 7 - • • 1-14 ASUS P8H61-M LX Series To operate at the vendor-marked or at a lower frequency than the vendor-marked value. Under the default state, some memory modules for...
... memory operation frequency is dependent on the motherboard, the actual usable memory for the OS can be about 3GB or less. P8H61-M LX Series Motherboard Qualified Vendors Lists (QVL) DDR3-1066 MHz capability Vendors Part No. Timing Voltage DIMM socket support (Optional) A*...-1G1F1 1GB SS Micron 9GF22D9KPT 7 - • • Micron MT16JTF25664AZ-1G1F1 2GB DS Micron 9HF22D9KPT 7 - • • 1-14 ASUS P8H61-M LX Series To operate at the vendor-marked or at a lower frequency than the vendor-marked value. Under the default state, some memory modules for...
User Manual
Page 26
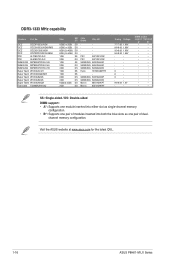
... 1.65V - - - - - - - - - - 9 - 8 - 9 - - - 9-9-9-24 1.5V - - channel memory configuration. PSC A3P1GF3FGF PSC A3P1GF3FGF SAMSUNG K4B1G0846F SAMSUNG K4B1G0846F SAMSUNG K4B2G0846C Hynix H5TQ1G83TFR - - Visit the ASUS website at www.asus.com for the latest QVL. 1-16 ASUS P8H61-M LX Series OCZ OCZ3P1333LV6GK OCZ OCZ3X1333LV6GK(XMP) OCZ OCZ3G1333LV8GK OCZ OCZ3RPR1333C9LV8GK PSC AL7F8G73F-DJ2 PSC AL8F8G73F-DJ2 SAMSUNG M378B2873FHS-CH9 SAMSUNG M378B5673FH0...
... 1.65V - - - - - - - - - - 9 - 8 - 9 - - - 9-9-9-24 1.5V - - channel memory configuration. PSC A3P1GF3FGF PSC A3P1GF3FGF SAMSUNG K4B1G0846F SAMSUNG K4B1G0846F SAMSUNG K4B2G0846C Hynix H5TQ1G83TFR - - Visit the ASUS website at www.asus.com for the latest QVL. 1-16 ASUS P8H61-M LX Series OCZ OCZ3P1333LV6GK OCZ OCZ3X1333LV6GK(XMP) OCZ OCZ3G1333LV8GK OCZ OCZ3RPR1333C9LV8GK PSC AL7F8G73F-DJ2 PSC AL8F8G73F-DJ2 SAMSUNG M378B2873FHS-CH9 SAMSUNG M378B5673FH0...
User Manual
Page 28
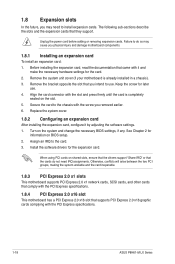
... the slot and press firmly until the card is already installed in a chassis). 3. Secure the card to the chassis with the PCI Express specifications. 1-18 ASUS P8H61-M LX Series Unplug the power cord before adding or removing expansion cards. Failure to install expansion cards. Keep the screw for the card. 2. Replace the system...
... the slot and press firmly until the card is already installed in a chassis). 3. Secure the card to the chassis with the PCI Express specifications. 1-18 ASUS P8H61-M LX Series Unplug the power cord before adding or removing expansion cards. Failure to install expansion cards. Keep the screw for the card. 2. Replace the system...
User Manual
Page 30
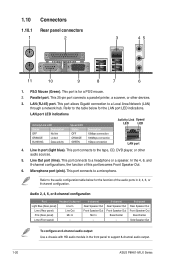
... 9 8 7 6 1. This port is for the LAN port LED indications. LAN (RJ-45) port. Microphone port (pink). This port connects to support 8-channel audio output. 1-20 ASUS P8H61-M LX Series Refer to the tape, CD, DVD player, or other devices. 3.
... 9 8 7 6 1. This port is for the LAN port LED indications. LAN (RJ-45) port. Microphone port (pink). This port connects to support 8-channel audio output. 1-20 ASUS P8H61-M LX Series Refer to the tape, CD, DVD player, or other devices. 3.
User Manual
Page 32
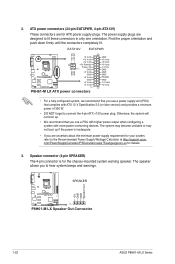
...) The 4-pin connector is inadequate. • If you to connect the 4-pin ATX +12V power plug. SPEAKER +5V GND GND Speaker Out P8H61-M LX PIN 1 P8H61-M LX Speaker Out Connector 1-22 ASUS P8H61-M LX Series 2. The speaker allows you are uncertain about the minimum power supply requirement for the chassis-mounted system warning speaker. ATX power connectors...
...) The 4-pin connector is inadequate. • If you to connect the 4-pin ATX +12V power plug. SPEAKER +5V GND GND Speaker Out P8H61-M LX PIN 1 P8H61-M LX Speaker Out Connector 1-22 ASUS P8H61-M LX Series 2. The speaker allows you are uncertain about the minimum power supply requirement for the chassis-mounted system warning speaker. ATX power connectors...
User Manual
Page 34
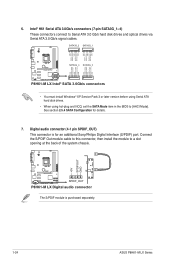
Digital audio connector (4-1 pin SPDIF_OUT) This connector is purchased separately. 1-24 ASUS P8H61-M LX Series Intel® H61 Serial ATA 3.0Gb/s connectors (7-pin SATA3G_1~4) These connectors connect to [AHCI Mode]. SATA3G_2 SATA3G_1 GND ...RSATA_RXN2 GND GND RSATA_TXP1 RSATA_TXN1 GND RSATA_RXP1 RSATA_RXN1 GND GND RSATA_RXN4 RSATA_RXP4 GND RSATA_TXN4 RSATA_TXP4 GND GND RSATA_RXN3 RSATA_RXP3 GND RSATA_TXN3 RSATA_TXP3 GND P8H61-M LX SATA3G_4 SATA3G_3 P8H61-M LX Intel® SATA 3.0Gb/s connectors • You must install Windows® XP Service Pack 3 or later version before using...
Digital audio connector (4-1 pin SPDIF_OUT) This connector is purchased separately. 1-24 ASUS P8H61-M LX Series Intel® H61 Serial ATA 3.0Gb/s connectors (7-pin SATA3G_1~4) These connectors connect to [AHCI Mode]. SATA3G_2 SATA3G_1 GND ...RSATA_RXN2 GND GND RSATA_TXP1 RSATA_TXN1 GND RSATA_RXP1 RSATA_RXN1 GND GND RSATA_RXN4 RSATA_RXP4 GND RSATA_TXN4 RSATA_TXP4 GND GND RSATA_RXN3 RSATA_RXP3 GND RSATA_TXN3 RSATA_TXP3 GND P8H61-M LX SATA3G_4 SATA3G_3 P8H61-M LX Intel® SATA 3.0Gb/s connectors • You must install Windows® XP Service Pack 3 or later version before using...
User Manual
Page 36
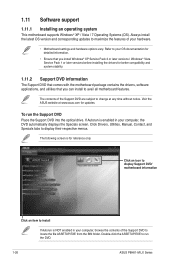
The contents of the Support DVD are subject to locate the file ASSETUP.EXE from the BIN folder. To run the DVD. 1-26 ASUS P8H61-M LX Series Click an icon to display Support DVD/ motherboard information Click an item to install If Autorun is NOT enabled in your computer, the DVD ... DVD into the optical drive. Click Drivers, Utilities, Manual, Contact, and Specials tabs to maximize the features of the Support DVD to change at www.asus.com for reference only. Always install the latest OS version and corresponding updates to display their respective menus. Visit the...
The contents of the Support DVD are subject to locate the file ASSETUP.EXE from the BIN folder. To run the DVD. 1-26 ASUS P8H61-M LX Series Click an icon to display Support DVD/ motherboard information Click an item to install If Autorun is NOT enabled in your computer, the DVD ... DVD into the optical drive. Click Drivers, Utilities, Manual, Contact, and Specials tabs to maximize the features of the Support DVD to change at www.asus.com for reference only. Always install the latest OS version and corresponding updates to display their respective menus. Visit the...
User Manual
Page 38
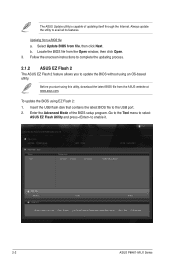
...utility to enable it. Locate the BIOS file from a BIOS file a. Select Update BIOS from the ASUS website at www.asus.com. ASUSTek EZ Flash BIOS ROM Utility V00.75 Flash Info MODEL: P8H61-M LX File Path: fs0:\ Drive fs0:\ VER: 0206 Folder Info 05/16/11 10:23p 4194304 Exit ... MODEL: Help Info VER: DATE [Enter] Select or Load [Tab] Switch [Up/Down/PageUp/PageDown/Home/End] Move [Esc] Exit [F2] Backup 2-2 ASUS P8H61-M LX Series Insert the USB flash disk that contains the latest BIOS file to update the BIOS without using this utility, download the latest BIOS file...
...utility to enable it. Locate the BIOS file from a BIOS file a. Select Update BIOS from the ASUS website at www.asus.com. ASUSTek EZ Flash BIOS ROM Utility V00.75 Flash Info MODEL: P8H61-M LX File Path: fs0:\ Drive fs0:\ VER: 0206 Folder Info 05/16/11 10:23p 4194304 Exit ... MODEL: Help Info VER: DATE [Enter] Select or Load [Tab] Switch [Up/Down/PageUp/PageDown/Home/End] Move [Esc] Exit [F2] Backup 2-2 ASUS P8H61-M LX Series Insert the USB flash disk that contains the latest BIOS file to update the BIOS without using this utility, download the latest BIOS file...
User Manual
Page 40
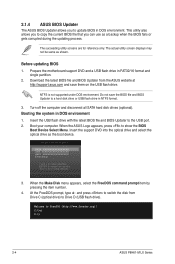
...may not be same as the boot device. Prepare the motherboard support DVD and a USB flash drive in DOS environment 1. C:\>d: D:\> 2-4 ASUS P8H61-M LX Series Before updating BIOS 1. NTFS is not supported under DOS environment. Booting the system in FAT32/16 format and single partition. 2. Welcome ... Select Menu. When the Make Disk menu appears, select the FreeDOS command prompt item by pressing the item number. 4. When the ASUS Logo appears, press to the USB port. 2. Please select boot device: SATA: XXXXXXXXXXXXXXXX USB XXXXXXXXXXXXXXXXX UEFI: XXXXXXXXXXXXXXXX Enter Setup ↑...
...may not be same as the boot device. Prepare the motherboard support DVD and a USB flash drive in DOS environment 1. C:\>d: D:\> 2-4 ASUS P8H61-M LX Series Before updating BIOS 1. NTFS is not supported under DOS environment. Booting the system in FAT32/16 format and single partition. 2. Welcome ... Select Menu. When the Make Disk menu appears, select the FreeDOS command prompt item by pressing the item number. 4. When the ASUS Logo appears, press to the USB port. 2. Please select boot device: SATA: XXXXXXXXXXXXXXXX USB XXXXXXXXXXXXXXXXX UEFI: XXXXXXXXXXXXXXXX Enter Setup ↑...

User Manual
Page 42
... and press . Select the Load Optimized Defaults item under the Exit menu. Refer to section 2.9 Exit menu for DOS V1.18 Current ROM BOARD: P8H61-M LX VER: 0206 DATE: 05/16/2011 Update ROM BOARD: Unknown VER: Unknown DATE: Unknown PATH: A:\ A: P8H61MLX.ROM 4194304 2011-05-16 17:...pc /g and press . The BIOS Updater screen appears as below. BIOS Updater checks the selected BIOS file and prompts you have disconnected them. 2-6 ASUS P8H61-M LX Series DO NOT shut down or reset the system while updating the BIOS to prevent system boot failure! • For BIOS Updater version 1.04 or...
... and press . Select the Load Optimized Defaults item under the Exit menu. Refer to section 2.9 Exit menu for DOS V1.18 Current ROM BOARD: P8H61-M LX VER: 0206 DATE: 05/16/2011 Update ROM BOARD: Unknown VER: Unknown DATE: Unknown PATH: A:\ A: P8H61MLX.ROM 4194304 2011-05-16 17:...pc /g and press . The BIOS Updater screen appears as below. BIOS Updater checks the selected BIOS file and prompts you have disconnected them. 2-6 ASUS P8H61-M LX Series DO NOT shut down or reset the system while updating the BIOS to prevent system boot failure! • For BIOS Updater version 1.04 or...
User Manual
Page 44
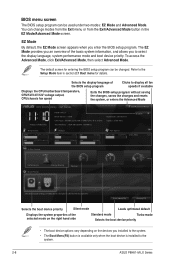
The EZ Mode provides you an overview of the basic system information, and allows you to the system. 2-8 ASUS P8H61-M LX Series Boot Menu(F8) Default(F5) Selects the boot device priority Silent mode Loads optimized default Displays the system properties of the BIOS setup ...program Clicks to decide the boot priority. EZ Mode Friday [10/08/2010] P8H61-M LX BIOS Version : 0206 CPU Type : Intel(R) Core(TM) i5-2400 CPU @ 3.10GHz Total Memory : 1024 MB (DDR3 1333MHz) Build Date : 05/16/2011 Speed :...
The EZ Mode provides you an overview of the basic system information, and allows you to the system. 2-8 ASUS P8H61-M LX Series Boot Menu(F8) Default(F5) Selects the boot device priority Silent mode Loads optimized default Displays the system properties of the BIOS setup ...program Clicks to decide the boot priority. EZ Mode Friday [10/08/2010] P8H61-M LX BIOS Version : 0206 CPU Type : Intel(R) Core(TM) i5-2400 CPU @ 3.10GHz Total Memory : 1024 MB (DDR3 1333MHz) Build Date : 05/16/2011 Speed :...
User Manual
Page 46
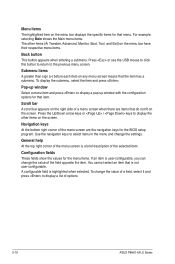
.... Back button This button appears when entering a submenu. Use the navigation keys to select items in the menu and change the value of options. 2-10 ASUS P8H61-M LX Series To change the value of a field, select it and press to display the other items (Ai Tweaker, Advanced, Monitor, Boot, Tool, and Exit) on...
.... Back button This button appears when entering a submenu. Use the navigation keys to select items in the menu and change the value of options. 2-10 ASUS P8H61-M LX Series To change the value of a field, select it and press to display the other items (Ai Tweaker, Advanced, Monitor, Boot, Tool, and Exit) on...

User Manual
Page 48
... administrator password, follow the same steps as in the BIOS setup program. The User Password item on top of the screen shows Not Installed. 2-12 ASUS P8H61-M LX Series To change an administrator password: 1. After you clear the password, the User Password item on top of the screen shows Not Installed. From the...
... administrator password, follow the same steps as in the BIOS setup program. The User Password item on top of the screen shows Not Installed. 2-12 ASUS P8H61-M LX Series To change an administrator password: 1. After you clear the password, the User Password item on top of the screen shows Not Installed. From the...


