
User Manual
Page 14
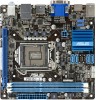
... use a more efficient memory cooling system to support a full memory load (2 U-DIMMs) or overclocking condition. To operate at the vendor-marked or at a lower frequency than the vendor-marked value. ASUS P8H61-I 1-4 Under the default state, some memory modules for overclocking may install varying memory sizes in Channel A and Channel B. 1.4.2 Memory configurations You may...
... use a more efficient memory cooling system to support a full memory load (2 U-DIMMs) or overclocking condition. To operate at the vendor-marked or at a lower frequency than the vendor-marked value. ASUS P8H61-I 1-4 Under the default state, some memory modules for overclocking may install varying memory sizes in Channel A and Channel B. 1.4.2 Memory configurations You may...
User Manual
Page 19
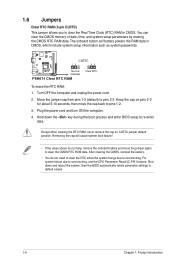
...steps above do not need to clear the RTC when the system hangs due to default values. 1-9 Chapter 1: Product introduction CLRTC 12 23 P8H61-I Normal (Default) P8H61-I Clear RTC RAM Clear RTC To erase the RTC RAM: 1. Move the jumper cap from pins 1-2 (default) to clear the CMOS...to pins 2-3. Turn OFF the computer and unplug the power cord. 2. Shut down the key during the boot process and enter BIOS setup to overclocking, use the CPU Parameter Recall (C.P.R.) feature. The onboard button cell battery powers the RAM data in CMOS. After clearing the CMOS, reinstall the...
...steps above do not need to clear the RTC when the system hangs due to default values. 1-9 Chapter 1: Product introduction CLRTC 12 23 P8H61-I Normal (Default) P8H61-I Clear RTC RAM Clear RTC To erase the RTC RAM: 1. Move the jumper cap from pins 1-2 (default) to clear the CMOS...to pins 2-3. Turn OFF the computer and unplug the power cord. 2. Shut down the key during the boot process and enter BIOS setup to overclocking, use the CPU Parameter Recall (C.P.R.) feature. The onboard button cell battery powers the RAM data in CMOS. After clearing the CMOS, reinstall the...

User Manual
Page 37
... experienced end-users to the following main items: Main Ai Tweaker Advanced Monitor Boot Tool Exit For changing the basic system configuration For changing the overclocking settings For changing the advanced system settings For displaying the system temperature, power status, and changing the fan settings For changing the system boot configuration...
... experienced end-users to the following main items: Main Ai Tweaker Advanced Monitor Boot Tool Exit For changing the basic system configuration For changing the overclocking settings For changing the advanced system settings For displaying the system temperature, power status, and changing the fan settings For changing the system boot configuration...

User Manual
Page 41
2.4 Ai Tweaker menu The Ai Tweaker menu items allow you to configure overclocking-related items. Be cautious when changing the settings of the Ai Tweaker menu items. Incorrect field values can cause the system to display ...Auto] [X.M.P.] Chapter 2: BIOS information 2-13 Advanced Mode Exit Main Ai Tweaker Advanced Monitor Target DRAM Speed: 1333MHz Ai Overclock Tuner Auto Memory Frequency Auto iGPU Max. Copyright (C) 2010 American Megatrends, Inc. 2.4.1 Ai Overclock Tuner [Auto] This item appears only when you installed on the CPU and DIMM model you use X.M.P. F1: General...
2.4 Ai Tweaker menu The Ai Tweaker menu items allow you to configure overclocking-related items. Be cautious when changing the settings of the Ai Tweaker menu items. Incorrect field values can cause the system to display ...Auto] [X.M.P.] Chapter 2: BIOS information 2-13 Advanced Mode Exit Main Ai Tweaker Advanced Monitor Target DRAM Speed: 1333MHz Ai Overclock Tuner Auto Memory Frequency Auto iGPU Max. Copyright (C) 2010 American Megatrends, Inc. 2.4.1 Ai Overclock Tuner [Auto] This item appears only when you installed on the CPU and DIMM model you use X.M.P. F1: General...


