

User Guide
Page 4
... 3.5.6 USB Configuration 3-19 3.5.7 Onboard Devices Configuration 3-20 3.5.8 APM 3-22 3.6 Monitor menu 3-24 3.7 Boot menu 3-27 3.8 Tool menu 3-28 3.8.1 ASUS EZ Flash Utility 3-28 3.8.2 ASUS O.C. Profile 3-29 3.8.3 Asus SPD Information 3-30 3.9 Exit menu 3-31 3.10 Updating BIOS 3-32 3.10.1 ASUS Update utility 3-33 3.10.2 ASUS EZ Flash Utility 3-36 3.10.3 ASUS CrashFree BIOS 3 utility 3-37 3.10.4 ASUS BIOS Updater 3-38 iv
... 3.5.6 USB Configuration 3-19 3.5.7 Onboard Devices Configuration 3-20 3.5.8 APM 3-22 3.6 Monitor menu 3-24 3.7 Boot menu 3-27 3.8 Tool menu 3-28 3.8.1 ASUS EZ Flash Utility 3-28 3.8.2 ASUS O.C. Profile 3-29 3.8.3 Asus SPD Information 3-30 3.9 Exit menu 3-31 3.10 Updating BIOS 3-32 3.10.1 ASUS Update utility 3-33 3.10.2 ASUS EZ Flash Utility 3-36 3.10.3 ASUS CrashFree BIOS 3 utility 3-37 3.10.4 ASUS BIOS Updater 3-38 iv

User Guide
Page 5
... 4-5 4.3.4 Probe II 4-6 4.3.5 Sensor Recorder 4-7 4.3.6 Ai Charger 4-8 4.3.7 Audio configurations 4-9 4.4 RAID configurations 4-11 4.4.1 RAID definitions 4-11 4.4.2 Installing Serial ATA hard disks 4-12 4.4.3 Setting the RAID item in BIOS 4-12 4.4.4 Intel® Rapid Storage Technology Option ROM utility..... 4-12 4.5 Creating a RAID driver disk 4-16 4.5.1 Creating a RAID driver disk without entering the OS.... 4-16 4.5.2 Creating...
... 4-5 4.3.4 Probe II 4-6 4.3.5 Sensor Recorder 4-7 4.3.6 Ai Charger 4-8 4.3.7 Audio configurations 4-9 4.4 RAID configurations 4-11 4.4.1 RAID definitions 4-11 4.4.2 Installing Serial ATA hard disks 4-12 4.4.3 Setting the RAID item in BIOS 4-12 4.4.4 Intel® Rapid Storage Technology Option ROM utility..... 4-12 4.5 Creating a RAID driver disk 4-16 4.5.1 Creating a RAID driver disk without entering the OS.... 4-16 4.5.2 Creating...

User Guide
Page 9
... are also provided. • Chapter 4: Software support This chapter describes the contents of the switches, jumpers, and connectors on ASUS hardware and software products. It includes description of the support DVD that you need when installing and configuring the motherboard. Detailed descriptions of... the BIOS parameters are not part of the motherboard and the new technology it supports. • Chapter 2: Hardware information This chapter ...
... are also provided. • Chapter 4: Software support This chapter describes the contents of the switches, jumpers, and connectors on ASUS hardware and software products. It includes description of the support DVD that you need when installing and configuring the motherboard. Detailed descriptions of... the BIOS parameters are not part of the motherboard and the new technology it supports. • Chapter 2: Hardware information This chapter ...

User Guide
Page 12
... DIY - Diagnosis Card bundled Quick Gate: 2 vertical USB 2.0 on the next page) xii P8B WS specifications summary Audio ASUS Unique Features ASUS Q-Design Workstation Unique Features BIOS Features Back Panel I /O GPU Boost with switch ASUS Power Design - 8+2 Phase Power Design ASUS EPU - Optical S/PDIF out port at back I /O Ports Realtek® ALC892 8-Channel High Definition Audio CODEC...
... DIY - Diagnosis Card bundled Quick Gate: 2 vertical USB 2.0 on the next page) xii P8B WS specifications summary Audio ASUS Unique Features ASUS Q-Design Workstation Unique Features BIOS Features Back Panel I /O GPU Boost with switch ASUS Power Design - 8+2 Phase Power Design ASUS EPU - Optical S/PDIF out port at back I /O Ports Realtek® ALC892 8-Channel High Definition Audio CODEC...

User Guide
Page 21
... and allows you easy ways to install computer components, update the BIOS or back up your mobile via Bluetooth technology. EFI BIOS(EZ Mode) Flexible, Easy BIOS Interface ASUS brand new EFI BIOS offers a user-friendly interface that the groundbreaking fanless design does not have lifetime problems as ... profiles offer flexible controls of the innovative heat pipe design on this motherboard is that goes beyond traditional keyboard BIOS input to different ambient temperature, which is the most reliable fanless thermal solution to achieve a quiet and cool environment. ASUS P8B WS 1-5
... and allows you easy ways to install computer components, update the BIOS or back up your mobile via Bluetooth technology. EFI BIOS(EZ Mode) Flexible, Easy BIOS Interface ASUS brand new EFI BIOS offers a user-friendly interface that the groundbreaking fanless design does not have lifetime problems as ... profiles offer flexible controls of the innovative heat pipe design on this motherboard is that goes beyond traditional keyboard BIOS input to different ambient temperature, which is the most reliable fanless thermal solution to achieve a quiet and cool environment. ASUS P8B WS 1-5

User Guide
Page 22
... module. S/PDIF-out on Back I/O Port This motherboard provides convenient connectivity to restore corrupted BIOS data from a USB flash disk containing the BIOS file. ASUS CrashFree BIOS 3 The ASUS CrashFree BIOS 3 allows users to external home theater audio systems via coaxial and optical S/PDIF-out (SONY...the best signal quality. 1-6 Chapter 1: Product Introduction ASUS Q-Design DIY quickly, DIY easily! ASUS EZ Flash Utility Simply update BIOS from a USB flash disk before entering the OS EZ Flash Utility is a user-friendly BIOS update utility. It allows to transfer digital audio without...
... module. S/PDIF-out on Back I/O Port This motherboard provides convenient connectivity to restore corrupted BIOS data from a USB flash disk containing the BIOS file. ASUS CrashFree BIOS 3 The ASUS CrashFree BIOS 3 allows users to external home theater audio systems via coaxial and optical S/PDIF-out (SONY...the best signal quality. 1-6 Chapter 1: Product Introduction ASUS Q-Design DIY quickly, DIY easily! ASUS EZ Flash Utility Simply update BIOS from a USB flash disk before entering the OS EZ Flash Utility is a user-friendly BIOS update utility. It allows to transfer digital audio without...

User Guide
Page 40
... Installing DIMMs that you download and update to section 2.2.6 Onboard LEDs for successful boot. • Refer to the latest BIOS version from the ASUS website at www.asus.com. • If you that the BIOS has been restored to its default settings. • We recommend that are incompatible with ones recommended in the Memory...
... Installing DIMMs that you download and update to section 2.2.6 Onboard LEDs for successful boot. • Refer to the latest BIOS version from the ASUS website at www.asus.com. • If you that the BIOS has been restored to its default settings. • We recommend that are incompatible with ones recommended in the Memory...

User Guide
Page 44
... battery. • You do not help, remove the onboard battery and move the cap back to enable C.P.R. Hold down and reboot the system so the BIOS can clear the CMOS memory of date, time, and system setup parameters by erasing the CMOS RTC RAM data. Removing the cap will cause system... Time Clock (RTC) RAM in CMOS, which include system setup information such as system passwords. Shut down the key during the boot process and enter BIOS setup to overclocking, use the C.P.R. (CPU Parameter Recall) feature. 2.2.8 Jumper 1.
... battery. • You do not help, remove the onboard battery and move the cap back to enable C.P.R. Hold down and reboot the system so the BIOS can clear the CMOS memory of date, time, and system setup parameters by erasing the CMOS RTC RAM data. Removing the cap will cause system... Time Clock (RTC) RAM in CMOS, which include system setup information such as system passwords. Shut down the key during the boot process and enter BIOS setup to overclocking, use the C.P.R. (CPU Parameter Recall) feature. 2.2.8 Jumper 1.
User Guide
Page 46
... to section 3.5.5 SATA Configuration for details. • Before creating a RAID set, refer to section 4.4 RAID configurations or the manual bundled in the BIOS to [RAID Mode]. 2.2.9 Internal connectors 1. If you are set the SATA Mode in the motherboard support DVD. • When using these connectors, set... the SATA Mode item in the BIOS to [AHCI Mode]. Refer to section 3.5.5 SATA Configuration for details. • You must install Windows® XP Service Pack 3 or later...
... to section 3.5.5 SATA Configuration for details. • Before creating a RAID set, refer to section 4.4 RAID configurations or the manual bundled in the BIOS to [RAID Mode]. 2.2.9 Internal connectors 1. If you are set the SATA Mode in the motherboard support DVD. • When using these connectors, set... the SATA Mode item in the BIOS to [AHCI Mode]. Refer to section 3.5.5 SATA Configuration for details. • You must install Windows® XP Service Pack 3 or later...

User Guide
Page 47
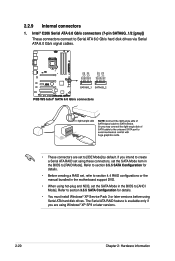
... SATA Configuration for details. • You must install Windows® XP Service Pack 3 or later versions before using Windows® XP SP3 or later versions. ASUS P8B WS 2-21 Intel® C206 Serial ATA 3.0 Gb/s connectors (7-pin SATA3G_3-6 [blue]) These connectors connect to [RAID Mode]. Refer to section 3.5.5 SATA Configuration for... feature is available only if you intend to create a Serial ATA RAID set using hot-plug and NCQ, set the SATA Mode in the BIOS to Serial ATA 3.0 Gb/s hard disk drives and optical disc drives via Serial ATA 3.0 Gb/s signal cables. If you are set the...
... SATA Configuration for details. • You must install Windows® XP Service Pack 3 or later versions before using Windows® XP SP3 or later versions. ASUS P8B WS 2-21 Intel® C206 Serial ATA 3.0 Gb/s connectors (7-pin SATA3G_3-6 [blue]) These connectors connect to [RAID Mode]. Refer to section 3.5.5 SATA Configuration for... feature is available only if you intend to create a Serial ATA RAID set using hot-plug and NCQ, set the SATA Mode in the BIOS to Serial ATA 3.0 Gb/s hard disk drives and optical disc drives via Serial ATA 3.0 Gb/s signal cables. If you are set the...

User Guide
Page 51
7. if you want to connect a high-definition front panel audio module to this connector, set the Front Panel Type item in the BIOS setup to this connector is purchased separately. ASUS P8B WS 2-25 Connect one end of the front panel audio I /O module that you want to connect an AC'97 front panel audio module...
7. if you want to connect a high-definition front panel audio module to this connector, set the Front Panel Type item in the BIOS setup to this connector is purchased separately. ASUS P8B WS 2-25 Connect one end of the front panel audio I /O module that you want to connect an AC'97 front panel audio module...

User Guide
Page 53
... IDE 30 B2 Initiate option ROM 40 OS in PIC mode OS in APIC mode Leave BIOS and pass control to OS S1 S3 S4 S5 Resume from S1 Resume from S3 Resume from S4 ASUS P8B WS 2-27 Code table for memory 00 detection and sizing 32 Early CPU initiation 01 34 Wake...
... IDE 30 B2 Initiate option ROM 40 OS in PIC mode OS in APIC mode Leave BIOS and pass control to OS S1 S3 S4 S5 Resume from S1 Resume from S3 Resume from S4 ASUS P8B WS 2-27 Code table for memory 00 detection and sizing 32 Early CPU initiation 01 34 Wake...

User Guide
Page 55
.... • Reset button (2-pin RESET) This 2-pin connector is for the chassis-mounted system warning speaker. Pressing the power button turns the system on the BIOS settings. ASUS P8B WS 2-29 Connect the chassis power LED cable to this connector. 11. System panel connector (20-8 pin PANEL) This connector supports several chassis-mounted functions...
.... • Reset button (2-pin RESET) This 2-pin connector is for the chassis-mounted system warning speaker. Pressing the power button turns the system on the BIOS settings. ASUS P8B WS 2-29 Connect the chassis power LED cable to this connector. 11. System panel connector (20-8 pin PANEL) This connector supports several chassis-mounted functions...

User Guide
Page 72
...starting with ATX power supplies, the system LED lights up when you press the ATX power button. For systems with the last device on . BIOS Beep Description One short beep VGA detected Quick boot set to green after the system LED turns on the chain) c. Be sure that is ...No VGA detected short beeps One continuous beep followed by four Hardware component failure short beeps 7. After making all switches are running, the BIOS beeps (refer to enter the BIOS Setup. If your retailer for the first time 1. While the tests are off. 3. 2.4 Starting up for assistance. If you ...
...starting with ATX power supplies, the system LED lights up when you press the ATX power button. For systems with the last device on . BIOS Beep Description One short beep VGA detected Quick boot set to green after the system LED turns on the chain) c. Be sure that is ...No VGA detected short beeps One continuous beep followed by four Hardware component failure short beeps 7. After making all switches are running, the BIOS beeps (refer to enter the BIOS Setup. If your retailer for the first time 1. While the tests are off. 3. 2.4 Starting up for assistance. If you ...

User Guide
Page 73
ASUS P8B WS 2-47 2.5 Turning off the computer While the system is ON, pressing the power switch for less than four seconds lets the system enter the soft-off mode, depending on sleep mode or soft-off mode regardless of the BIOS setting. Pressing the power switch for details. Refer to section 3.7 Power Menu for more than four seconds puts the system on the BIOS setting.
ASUS P8B WS 2-47 2.5 Turning off the computer While the system is ON, pressing the power switch for less than four seconds lets the system enter the soft-off mode, depending on sleep mode or soft-off mode regardless of the BIOS setting. Pressing the power switch for details. Refer to section 3.7 Power Menu for more than four seconds puts the system on the BIOS setting.

User Guide
Page 75
Detailed descriptions of the BIOS parameters are also provided. This chapter tells how to change the BIOS se3tup system settings through the BIOS Setup menus.
Detailed descriptions of the BIOS parameters are also provided. This chapter tells how to change the BIOS se3tup system settings through the BIOS Setup menus.

User Guide
Page 76
Chapter summary 3 3.1 Managing and updating your BIOS 3-1 3.2 BIOS setup program 3-1 3.3 Main menu 3-5 3.4....A.i .T.w.e.a.ke.r.�m.�.e�.n�.u 3-8 3.5 Advanced menu 3-13 3.6 Monitor menu 3-24 3.7 Boot menu 3-27 3.8 Tools menu 3-28 3.9 Exit menu 3-31 3.10 Updating BIOS 3-32 ASUS P8B WS
Chapter summary 3 3.1 Managing and updating your BIOS 3-1 3.2 BIOS setup program 3-1 3.3 Main menu 3-5 3.4....A.i .T.w.e.a.ke.r.�m.�.e�.n�.u 3-8 3.5 Advanced menu 3-13 3.6 Monitor menu 3-24 3.7 Boot menu 3-27 3.8 Tools menu 3-28 3.9 Exit menu 3-31 3.10 Updating BIOS 3-32 ASUS P8B WS

User Guide
Page 77
...; You have installed a new system component that you not change the default BIOS settings except in the EZ Mode/Advanced Mode screen. See section 3.9 Exit Menu for system startup in this program. ASUS P8B WS 3-1 Being a menu-driven program, it back on your motherboard if you ...see on to ensure system compatibility and stability. In normal circumstances, the default BIOS settings apply to most conditions to enter the Setup utility...
...; You have installed a new system component that you not change the default BIOS settings except in the EZ Mode/Advanced Mode screen. See section 3.9 Exit Menu for system startup in this program. ASUS P8B WS 3-1 Being a menu-driven program, it back on your motherboard if you ...see on to ensure system compatibility and stability. In normal circumstances, the default BIOS settings apply to most conditions to enter the Setup utility...

User Guide
Page 78
..., the EZ Mode screen appears when you to select the display language, system performance mode and boot device priority. EZ Mode Monday [01/24/2011] P8B WS BIOS Version : 0301 Build Date : 01/24/2011 CPU Type : Intel(R) Core(TM) i5-2300 CPU 0 @ 2.80GHz Speed : 2800 MHz Total Memory ... program Clicks to the system. 3-2 Chapter 3: BIOS setup The default screen for details. Selects the display language of the selected mode on the right hand side Normal mode Selects the boot device priority ASUS Optimal mode • The boot device options vary depending on the devices you installed...
..., the EZ Mode screen appears when you to select the display language, system performance mode and boot device priority. EZ Mode Monday [01/24/2011] P8B WS BIOS Version : 0301 Build Date : 01/24/2011 CPU Type : Intel(R) Core(TM) i5-2300 CPU 0 @ 2.80GHz Speed : 2800 MHz Total Memory ... program Clicks to the system. 3-2 Chapter 3: BIOS setup The default screen for details. Selects the display language of the selected mode on the right hand side Normal mode Selects the boot device priority ASUS Optimal mode • The boot device options vary depending on the devices you installed...

User Guide
Page 79
... fan settings. 3.2.2 Advanced Mode The Advanced Mode provides advanced options for special functions For selecting the exit options and loading default settings ASUS P8B WS 3-3 Frequency Auto EPU Power Saving Mode Disabled > GPU Boost > DRAM Timing Control Ai Overclock Tuner > CPU Power Management Auto CPU...keys Menu bar The menu bar on top of the Advanced Mode. Copyright (C) 2011 American Megatrends, Inc. Refer to configure the BIOS settings. F1: General Help F2: Previous Values F5: Optimized Defaults F10: Save ESC: Exit Submenu item Version 2.00.1201. Advanced...
... fan settings. 3.2.2 Advanced Mode The Advanced Mode provides advanced options for special functions For selecting the exit options and loading default settings ASUS P8B WS 3-3 Frequency Auto EPU Power Saving Mode Disabled > GPU Boost > DRAM Timing Control Ai Overclock Tuner > CPU Power Management Auto CPU...keys Menu bar The menu bar on top of the Advanced Mode. Copyright (C) 2011 American Megatrends, Inc. Refer to configure the BIOS settings. F1: General Help F2: Previous Values F5: Optimized Defaults F10: Save ESC: Exit Submenu item Version 2.00.1201. Advanced...


