User Manual
Page 6
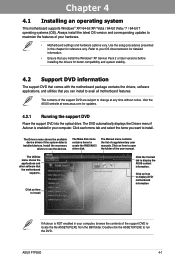
... DVD 4-1 4.2.2 Obtaining the software manuals 4-2 4.3 Software information 4-3 4.3.1 ASUS PC Probe II 4-3 4.3.2 ASUS AI Suite 4-4 4.3.3 ASUS Fan Xpert 4-5 4.3.4 ASUS EPU-6 Engine 4-6 4.3.5 ASUS Express Gate 4-7 4.3.6 VIA® High Definition Audio utility 4-8 4.4 ASUS Unique Overclocking Utility-TurboV EVO 4-9 4.4.1 Using ASUS TurboV 4-9 4.4.2 Using ASUS TurboV Auto Tuning Mode 4-10 4.4.3 Using ASUS Turbo Key 4-11 4.5 RAID configurations 4-12 4.5.1 RAID definitions 4-12 4.5.2 Installing Serial ATA hard disks...
... DVD 4-1 4.2.2 Obtaining the software manuals 4-2 4.3 Software information 4-3 4.3.1 ASUS PC Probe II 4-3 4.3.2 ASUS AI Suite 4-4 4.3.3 ASUS Fan Xpert 4-5 4.3.4 ASUS EPU-6 Engine 4-6 4.3.5 ASUS Express Gate 4-7 4.3.6 VIA® High Definition Audio utility 4-8 4.4 ASUS Unique Overclocking Utility-TurboV EVO 4-9 4.4.1 Using ASUS TurboV 4-9 4.4.2 Using ASUS TurboV Auto Tuning Mode 4-10 4.4.3 Using ASUS Turbo Key 4-11 4.5 RAID configurations 4-12 4.5.1 RAID definitions 4-12 4.5.2 Installing Serial ATA hard disks...

User Manual
Page 11
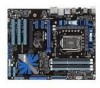
...x 240-pin DIMM sockets support unbuffered non-ECC DDR3 2133(O.C.)* / 1600 / 1333 / 1066 MHz memeory modules - Intel® Matrix Storage Technology supporting SATA RAID 0,1, 5, and 10 JMicron® JMB363 SATA & PATA controller - 1 x Ultra DMA 133/100/66 for the Memory QVL (Qualified Vendors Lists) 2 ... Jack-Retasking - Absolute Pitch BD192/24 - One slot at back I/O ASUS Q-Design: - P7P55D specifications summary CPU Chipset Memory Expansion Slots Multi-GPU Support Storage LAN USB IEEE 1394 Audio ASUS Q-Design LGA1156 socket for Intel® Core™ i7 Processors/ Core&#...
...x 240-pin DIMM sockets support unbuffered non-ECC DDR3 2133(O.C.)* / 1600 / 1333 / 1066 MHz memeory modules - Intel® Matrix Storage Technology supporting SATA RAID 0,1, 5, and 10 JMicron® JMB363 SATA & PATA controller - 1 x Ultra DMA 133/100/66 for the Memory QVL (Qualified Vendors Lists) 2 ... Jack-Retasking - Absolute Pitch BD192/24 - One slot at back I/O ASUS Q-Design: - P7P55D specifications summary CPU Chipset Memory Expansion Slots Multi-GPU Support Storage LAN USB IEEE 1394 Audio ASUS Q-Design LGA1156 socket for Intel® Core™ i7 Processors/ Core&#...
User Manual
Page 53
...data hard disk drives to these connectors, set to [AHCI]. ASUS P7P55D 2-33 See section 3.4.2 Storage Configuration for details. • Before creating a RAID set, refer to section 4.5 RAID configurations or the RAID manual bundled in the motherboard support DVD. • You must install Windows® XP ...set the Configure SATA as item in the BIOS to create a Serial ATA RAID set using these connectors. The Serial ATA RAID feature (RAID 0, 1, 5, and 10) is available only if you can create a RAID 0, 1, 5, and 10 configuration with the Intel® Matrix Storage Technology ...
...data hard disk drives to these connectors, set to [AHCI]. ASUS P7P55D 2-33 See section 3.4.2 Storage Configuration for details. • Before creating a RAID set, refer to section 4.5 RAID configurations or the RAID manual bundled in the motherboard support DVD. • You must install Windows® XP ...set the Configure SATA as item in the BIOS to create a Serial ATA RAID set using these connectors. The Serial ATA RAID feature (RAID 0, 1, 5, and 10) is available only if you can create a RAID 0, 1, 5, and 10 configuration with the Intel® Matrix Storage Technology ...
User Manual
Page 73
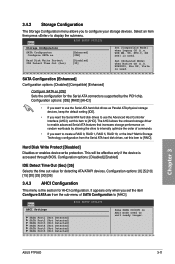
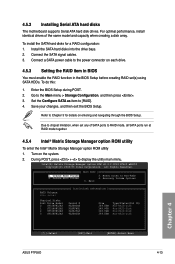
... [AHCI]. 3.4.2 Storage Configuration The Storage Configuration menu allows you want to create a RAID 0, RAID 1, RAID 5, RAID 10, or the Intel® Matrix Storage Technology configuration from the sub-menu of commands. • If you to [AHCI]. Chapter 3 ASUS P7P55D 3-11 Configuration options: [IDE] [RAID] [AHCI] • If you want the Serial ATA hard disk drives to use... UTILITY Storage Configuration SATA Configuraton Configure SATA as Parallel ATA physical storage devices, keep the default setting [IDE]. • If you set this item to [RAID].
... [AHCI]. 3.4.2 Storage Configuration The Storage Configuration menu allows you want to create a RAID 0, RAID 1, RAID 5, RAID 10, or the Intel® Matrix Storage Technology configuration from the sub-menu of commands. • If you to [AHCI]. Chapter 3 ASUS P7P55D 3-11 Configuration options: [IDE] [RAID] [AHCI] • If you want the Serial ATA hard disk drives to use... UTILITY Storage Configuration SATA Configuraton Configure SATA as Parallel ATA physical storage devices, keep the default setting [IDE]. • If you set this item to [RAID].
User Manual
Page 99
...create the RAID/AHCI driver disk. The Utilities menu shows the applications and other software that you install the Windows® XP Service Pack 2 or later versions before installing the drivers for reference only. Double-click the ASSETUP.EXE to use the devices. ASUS P7P55D 4-1 Install... install Click the Contact tab to maximize the features of your computer. Use the setup procedures presented in your hardware. • Motherboard settings and hardware options vary. Click an icon to your computer, browse the contents of the user manual. Always install the latest...
...create the RAID/AHCI driver disk. The Utilities menu shows the applications and other software that you install the Windows® XP Service Pack 2 or later versions before installing the drivers for reference only. Double-click the ASSETUP.EXE to use the devices. ASUS P7P55D 4-1 Install... install Click the Contact tab to maximize the features of your computer. Use the setup procedures presented in your hardware. • Motherboard settings and hardware options vary. Click an icon to your computer, browse the contents of the user manual. Always install the latest...
User Manual
Page 110
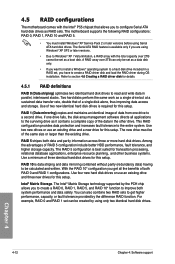
... than the existing drive. You can be created by the PCH chip allows you to create a RAID 0, RAID 1, RAID 5, and RAID 10* function to improve both system performance and data safety. The motherboard supports the following RAID configurations: RAID 0, RAID 1, RAID 10 and RAID 5. • You must be of a single disk alone, thus improving data access and storage. Refer to...
... than the existing drive. You can be created by the PCH chip allows you to create a RAID 0, RAID 1, RAID 5, and RAID 10* function to improve both system performance and data safety. The motherboard supports the following RAID configurations: RAID 0, RAID 1, RAID 10 and RAID 5. • You must be of a single disk alone, thus improving data access and storage. Refer to...
User Manual
Page 111
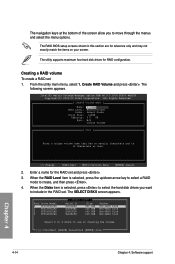
4.5.2 Installing Serial ATA hard disks The motherboard supports Serial ATA hard disk drives. Enter the BIOS Setup during POST. 2. During POST, press + to Non-RAID 4. Reset Disks to display the utility main menu. For optimal performance, install identical drives of SATA ports to chipset limitation...149.0GB 149.0GB Type/Status(Vol ID) Non-RAID Disk Non-RAID Disk Non-RAID Disk Non-RAID Disk Chapter 4 [↑↓]-Select [ESC]-Exit [ENTER]-Select Menu ASUS P7P55D 4-13 Refer to the power connector on the system. 2. Create RAID Volume 2. To install the SATA hard disks for...
4.5.2 Installing Serial ATA hard disks The motherboard supports Serial ATA hard disk drives. Enter the BIOS Setup during POST. 2. During POST, press + to Non-RAID 4. Reset Disks to display the utility main menu. For optimal performance, install identical drives of SATA ports to chipset limitation...149.0GB 149.0GB Type/Status(Vol ID) Non-RAID Disk Non-RAID Disk Non-RAID Disk Non-RAID Disk Chapter 4 [↑↓]-Select [ESC]-Exit [ENTER]-Select Menu ASUS P7P55D 4-13 Refer to the power connector on the system. 2. Create RAID Volume 2. To install the SATA hard disks for...
User Manual
Page 112
...3 ST3160812AS [ SELECT DISKS ] Serial # 9LS0HJA4 9LS0F4HL 3LS0JYL8 9LS0BJ5H Size 149.0GB 149.0GB 149.0GB 149.0GB Status Non-RAID Disk Non-RAID Disk Non-RAID Disk Non-RAID Disk Select 2 to 6 disks to include in this section are for reference only and may not exactly match the items on...Storage Manager option ROM v8.9.0.1014 PCH-D wRAID5 Copyright(C) 2003-09 Intel Corporation. The SELECT DISKS screen appears. Creating a RAID volume To create a RAID set . When the RAID Level item is 16 characters or less. [↑↓]Change [TAB]-Next [ESC]-Previous Menu [ENTER]-Select 2. The ...
...3 ST3160812AS [ SELECT DISKS ] Serial # 9LS0HJA4 9LS0F4HL 3LS0JYL8 9LS0BJ5H Size 149.0GB 149.0GB 149.0GB 149.0GB Status Non-RAID Disk Non-RAID Disk Non-RAID Disk Non-RAID Disk Select 2 to 6 disks to include in this section are for reference only and may not exactly match the items on...Storage Manager option ROM v8.9.0.1014 PCH-D wRAID5 Copyright(C) 2003-09 Intel Corporation. The SELECT DISKS screen appears. Creating a RAID volume To create a RAID set . When the RAID Level item is 16 characters or less. [↑↓]Change [TAB]-Next [ESC]-Previous Menu [ENTER]-Select 2. The ...
User Manual
Page 113
...key to select a drive, and then press to 128 KB. Press to create the RAID volume and return to the main menu, or to go back to select the stripe size for the RAID array (for audio and video editing. 7. Chapter 4 ASUS P7P55D 4-15 When the Create Volume item is selected, enter the... RAID volume capacity that you want and press . 5. Use the up /down arrow key to the...
...key to select a drive, and then press to 128 KB. Press to create the RAID volume and return to the main menu, or to go back to select the stripe size for the RAID array (for audio and video editing. 7. Chapter 4 ASUS P7P55D 4-15 When the Create Volume item is selected, enter the... RAID volume capacity that you want and press . 5. Use the up /down arrow key to the...
User Manual
Page 114
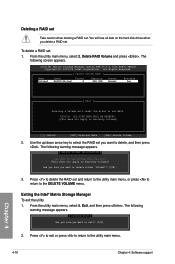
...(This does not apply to Recovery volumes) Are you sure you want to the DELETE VOLUME menu. Exit, and then press . To delete a RAID set and return to the utility main menu, or press to return to delete, and then press . From the utility main menu, select 2.... the utility main menu, select 5. The following screen appears. Exiting the Intel® Matrix Storage Manager To exit the utility 1. Deleting a RAID set Take caution when deleting a RAID set . WARNING: ALL DISK DATA WILL BE DELETED. (This does not apply to the utility main menu. 4-16 Chapter 4: Software support ...
...(This does not apply to Recovery volumes) Are you sure you want to the DELETE VOLUME menu. Exit, and then press . To delete a RAID set and return to the utility main menu, or press to return to delete, and then press . From the utility main menu, select 2.... the utility main menu, select 5. The following screen appears. Exiting the Intel® Matrix Storage Manager To exit the utility 1. Deleting a RAID set Take caution when deleting a RAID set . WARNING: ALL DISK DATA WILL BE DELETED. (This does not apply to the utility main menu. 4-16 Chapter 4: Software support ...
User Manual
Page 115
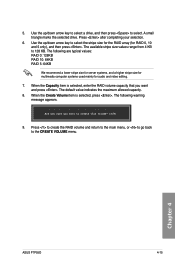
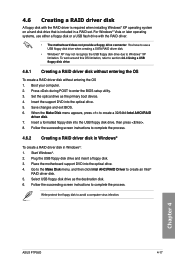
... Make Disk menu, and then click Intel AHCI/RAID Driver to section 4.6.4 Using a USB floppy disk drive. 4.6.1 Creating a RAID driver disk without entering the OS To create a RAID driver disk without entering the OS 1. Chapter 4 ASUS P7P55D 4-17 4.6 Creating a RAID driver disk A floppy disk with the RAID driver. • The motherboard does not provide a floppy drive connector. For...
... Make Disk menu, and then click Intel AHCI/RAID Driver to section 4.6.4 Using a USB floppy disk drive. 4.6.1 Creating a RAID driver disk without entering the OS To create a RAID driver disk without entering the OS 1. Chapter 4 ASUS P7P55D 4-17 4.6 Creating a RAID driver disk A floppy disk with the RAID driver. • The motherboard does not provide a floppy drive connector. For...
User Manual
Page 116
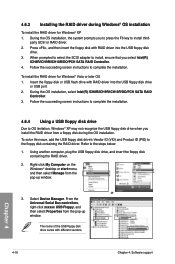
...(VID) and Product ID (PID) to complete the installation. Press , and then insert the floppy disk with different vendors. To install the RAID driver for Windows® XP 1. From the Universal Serial Bus controllers, right-click xxxxxx USB Floppy, and then select Properties from the pop...1. Using another computer, plug the USB floppy disk drive, and insert the floppy disk containing the RAID driver. 2. party SCSI or RAID driver. 2. Insert the floppy disk or USB flash drive with RAID driver into the USB floppy disk drive. 3. Refer to install third- During the OS installation, ...
...(VID) and Product ID (PID) to complete the installation. Press , and then insert the floppy disk with different vendors. To install the RAID driver for Windows® XP 1. From the Universal Serial Bus controllers, right-click xxxxxx USB Floppy, and then select Properties from the pop...1. Using another computer, plug the USB floppy disk drive, and insert the floppy disk containing the RAID driver. 2. party SCSI or RAID driver. 2. Insert the floppy disk or USB flash drive with RAID driver into the USB floppy disk drive. 3. Refer to install third- During the OS installation, ...
User Manual
Page 117
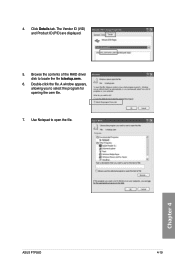
A window appears, allowing you to open the file. Use Notepad to select the program for opening the oem file. 7. Chapter 4 ASUS P7P55D 4-19 The Vendor ID (VID) and Product ID (PID) are displayed. 5. Browse the contents of the RAID driver disk to locate the file txtsetup.oem. 6. Double-click the file. Click Details tab. 4.
A window appears, allowing you to open the file. Use Notepad to select the program for opening the oem file. 7. Chapter 4 ASUS P7P55D 4-19 The Vendor ID (VID) and Product ID (PID) are displayed. 5. Browse the contents of the RAID driver disk to locate the file txtsetup.oem. 6. Double-click the file. Click Details tab. 4.


