User Manual
Page 6
...Fan Xpert 4-5 4.3.4 ASUS EPU-6 Engine 4-6 4.3.5 ASUS Express Gate 4-7 4.3.6 VIA® High Definition Audio utility 4-8 4.4 ASUS Unique Overclocking Utility-TurboV EVO 4-9 4.4.1 Using ASUS TurboV 4-9 4.4.2 Using ASUS TurboV Auto Tuning Mode 4-10 4.4.3 Using ASUS Turbo Key 4-11 4.5 RAID configurations 4-12 4.5.1 RAID definitions 4-12 4.5.2 Installing Serial ATA hard disks 4-13 4.5.3 Setting the RAID item in BIOS 4-13 4.5.4 Intel® Matrix Storage Manager option ROM utility 4-13 4.6 Creating a RAID driver disk 4-17 4.6.1 Creating a RAID driver disk without entering...
...Fan Xpert 4-5 4.3.4 ASUS EPU-6 Engine 4-6 4.3.5 ASUS Express Gate 4-7 4.3.6 VIA® High Definition Audio utility 4-8 4.4 ASUS Unique Overclocking Utility-TurboV EVO 4-9 4.4.1 Using ASUS TurboV 4-9 4.4.2 Using ASUS TurboV Auto Tuning Mode 4-10 4.4.3 Using ASUS Turbo Key 4-11 4.5 RAID configurations 4-12 4.5.1 RAID definitions 4-12 4.5.2 Installing Serial ATA hard disks 4-13 4.5.3 Setting the RAID item in BIOS 4-13 4.5.4 Intel® Matrix Storage Manager option ROM utility 4-13 4.6 Creating a RAID driver disk 4-17 4.6.1 Creating a RAID driver disk without entering...
User Manual
Page 31
... Intel CPU spec, CPUs with a 2.66G CPU, enable the DRAM O.C. To operate at the vendor-marked or at a higher frequency, refer to section 3.5 Ai Tweaker menu for manual memory frequency adjustment. • For system stability, use a more efficient memory cooling system to install 4GB or more on the motherboard. Profile feature in Channel A and Channel B. For optimum compatibility, we recommend that you want to support a full memory load (4 DIMMs) or overclocking...
... Intel CPU spec, CPUs with a 2.66G CPU, enable the DRAM O.C. To operate at the vendor-marked or at a higher frequency, refer to section 3.5 Ai Tweaker menu for manual memory frequency adjustment. • For system stability, use a more efficient memory cooling system to install 4GB or more on the motherboard. Profile feature in Channel A and Channel B. For optimum compatibility, we recommend that you want to support a full memory load (4 DIMMs) or overclocking...
User Manual
Page 63
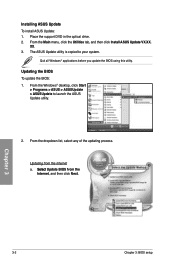
..., save, and update the motherboard BIOS in Windows® environment. 2. Chapter 3 Chapter 3: 3.1 Knowing BIOS BIOS setup BIOS (Basic Input and Output System) stores system hardware settings such as storage device configuration, overclocking settings, advanced power management, and boot device configuration that requires further BIOS settings or update. ASUS Update: Updates the BIOS in Windows® environment. Save a copy of BIOS, DO NOT manually update the BIOS. ASUS Update requires an Internet connection either through a network or an Internet Service Provider (ISP).
..., save, and update the motherboard BIOS in Windows® environment. 2. Chapter 3 Chapter 3: 3.1 Knowing BIOS BIOS setup BIOS (Basic Input and Output System) stores system hardware settings such as storage device configuration, overclocking settings, advanced power management, and boot device configuration that requires further BIOS settings or update. ASUS Update: Updates the BIOS in Windows® environment. Save a copy of BIOS, DO NOT manually update the BIOS. ASUS Update requires an Internet connection either through a network or an Internet Service Provider (ISP).
User Manual
Page 64
... Install ASUS Update VX.XX. Updating the BIOS To update the BIOS: 1. XX. 3. Quit all Windows® applications before you update the BIOS using this utility. Place the support DVD in the optical drive. 2. Chapter 3 3-2 Chapter 3: BIOS setup The ASUS Update utility is copied to launch the ASUS Update utility. 2. Updating from the Internet a. ��S�e��le�c�t Update BIOS from the Internet, and then click Next. Installing ASUS Update To install ASUS Update: 1. From the Windows® desktop, click Start...
... Install ASUS Update VX.XX. Updating the BIOS To update the BIOS: 1. XX. 3. Quit all Windows® applications before you update the BIOS using this utility. Place the support DVD in the optical drive. 2. Chapter 3 3-2 Chapter 3: BIOS setup The ASUS Update utility is copied to launch the ASUS Update utility. 2. Updating from the Internet a. ��S�e��le�c�t Update BIOS from the Internet, and then click Next. Installing ASUS Update To install ASUS Update: 1. From the Windows® desktop, click Start...
User Manual
Page 67
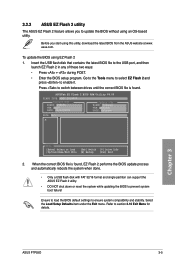
... while updating the BIOS to the USB port, and then launch EZ Flash 2 in any of these two ways: • Press + during POST. • Enter the BIOS setup program. To update the BIOS using an OS-based utility. Chapter 3 ASUS P7P55D 3-5 Go to the Tools menu to select EZ Flash 2 and press to switch between drives until the correct BIOS file is found . Press to enable it. asus.com. Ensure to load the BIOS default settings to...
... while updating the BIOS to the USB port, and then launch EZ Flash 2 in any of these two ways: • Press + during POST. • Enter the BIOS setup program. To update the BIOS using an OS-based utility. Chapter 3 ASUS P7P55D 3-5 Go to the Tools menu to select EZ Flash 2 and press to switch between drives until the correct BIOS file is found . Press to enable it. asus.com. Ensure to load the BIOS default settings to...
User Manual
Page 68
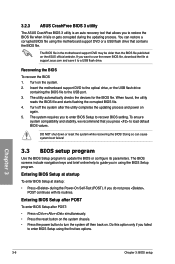
... navigation keys and brief online help to guide you to enter BIOS Setup to recover BIOS setting. Entering BIOS Setup at startup To enter BIOS Setup at support.asus.com and save it fails or gets corrupted during the Power-On Self-Test (POST). You can cause system boot failure! 3.3 BIOS setup program Use the BIOS Setup program to update the BIOS or configure its routines. 3.2.3 ASUS CrashFree BIOS 3 utility The ASUS CrashFree BIOS 3 utility is an auto recovery tool that allows you press to load default BIOS...
... navigation keys and brief online help to guide you to enter BIOS Setup to recover BIOS setting. Entering BIOS Setup at startup To enter BIOS Setup at support.asus.com and save it fails or gets corrupted during the Power-On Self-Test (POST). You can cause system boot failure! 3.3 BIOS setup program Use the BIOS Setup program to update the BIOS or configure its routines. 3.2.3 ASUS CrashFree BIOS 3 utility The ASUS CrashFree BIOS 3 utility is an auto recovery tool that allows you press to load default BIOS...
User Manual
Page 70
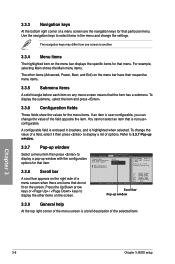
... keys At the bottom right corner of a menu screen are items that do not fit on any menu screen means that menu. Use [+] or [-] to select a field. Chapter 3 3-8 Chapter 3: BIOS setup Main Advanced BIOS SETUP UTILITY Power Boot Tools Exit Suspend Mode ACPI Version Features ACPI APIC support APM Configuration Hardware Monitor [Auto] [Disabled] [EDniasbalbelde]d Enabled Use [ENTER], [TAB] or [SHIFT-TAB] to configure system Time. For example, selecting Main shows the Main menu items. The other items on the menu bar displays...
... keys At the bottom right corner of a menu screen are items that do not fit on any menu screen means that menu. Use [+] or [-] to select a field. Chapter 3 3-8 Chapter 3: BIOS setup Main Advanced BIOS SETUP UTILITY Power Boot Tools Exit Suspend Mode ACPI Version Features ACPI APIC support APM Configuration Hardware Monitor [Auto] [Disabled] [EDniasbalbelde]d Enabled Use [ENTER], [TAB] or [SHIFT-TAB] to configure system Time. For example, selecting Main shows the Main menu items. The other items on the menu bar displays...

User Manual
Page 72
... and to the processor. When set to [Auto], the data transfer from the hard disk into a single 32-bit double word transfer to the device occurs one sector at a time if the device supports the multi-sector transfer feature. DMA Mode [Auto] DMA (Direct Memory Access) allows your device is installed. This makes more efficient use of the PCI bus as fewer transactions are specifically configuring a CD-ROM drive. Allows automatic selection...
... and to the processor. When set to [Auto], the data transfer from the hard disk into a single 32-bit double word transfer to the device occurs one sector at a time if the device supports the multi-sector transfer feature. DMA Mode [Auto] DMA (Direct Memory Access) allows your device is installed. This makes more efficient use of the PCI bus as fewer transactions are specifically configuring a CD-ROM drive. Allows automatic selection...
User Manual
Page 73
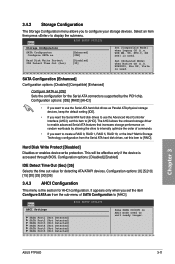
...onboard storage driver to enable advanced Serial ATA features that increases storage performance on random workloads by the PCH chip. Configuration options: [0] [5] [10] [15] [20] [25] [30] [35] 3.4.3 AHCI Configuration This menu is accessed through BIOS. 3.4.2 Storage Configuration The Storage Configuration menu allows you to [AHCI]. Main BIOS SETUP UTILITY Storage Configuration SATA Configuraton Configure SATA as from the Serial ATA hard disk drives, set the item Configure SATA as [Enhanced] [IDE] Set [Compatible Mode] when Legacy OS (i.e. Hard Disk Write Protect [Disabled...
...onboard storage driver to enable advanced Serial ATA features that increases storage performance on random workloads by the PCH chip. Configuration options: [0] [5] [10] [15] [20] [25] [30] [35] 3.4.3 AHCI Configuration This menu is accessed through BIOS. 3.4.2 Storage Configuration The Storage Configuration menu allows you to [AHCI]. Main BIOS SETUP UTILITY Storage Configuration SATA Configuraton Configure SATA as from the Serial ATA hard disk drives, set the item Configure SATA as [Enhanced] [IDE] Set [Compatible Mode] when Legacy OS (i.e. Hard Disk Write Protect [Disabled...
User Manual
Page 82
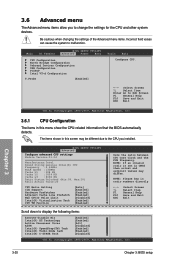
...:20 CPU Ratio Setting C1E Support Hardware Prefetcher Adjacent Cache Line Prefetch Max CPUID Value Limit Intel(R) Virtualization Tech CPU TM function [Auto] [Enabled] [Enabled] [Enabled] [Disabled] [Enabled] [Enabled] Sets the ratio between CPU Core Clock and the FSB Frequency. The items shown in this screen may differ. NOTE: Please key in CMOS then actual and setpoint values may be different due to display the following items: Execute-Disable Bit Intel(R) HT Technology Active Processor Cores A20M...
...:20 CPU Ratio Setting C1E Support Hardware Prefetcher Adjacent Cache Line Prefetch Max CPUID Value Limit Intel(R) Virtualization Tech CPU TM function [Auto] [Enabled] [Enabled] [Enabled] [Disabled] [Enabled] [Enabled] Sets the ratio between CPU Core Clock and the FSB Frequency. The items shown in this screen may differ. NOTE: Please key in CMOS then actual and setpoint values may be different due to display the following items: Execute-Disable Bit Intel(R) HT Technology Active Processor Cores A20M...
User Manual
Page 85
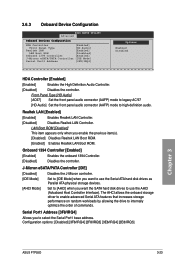
... [IDE Mode] when you want the SATA hard disk drives to select the Serial Port1 base address. The AHCI allows the onboard storage driver to enable advanced Serial ATA features that increases storage performance on random workloads by allowing the drive to high-definition audio. Serial Port1 Address [3F8/IRQ4] Allows you want to use the Serial ATA hard disk drives as Parallel ATA physical storage devices. [AHCI Mode] Set to [AHCI] when you to use the AHCI (Advabced Host Controller Interface). LAN Boot ROM [Disabled...
... [IDE Mode] when you want the SATA hard disk drives to select the Serial Port1 base address. The AHCI allows the onboard storage driver to enable advanced Serial ATA features that increases storage performance on random workloads by allowing the drive to high-definition audio. Serial Port1 Address [3F8/IRQ4] Allows you want to use the Serial ATA hard disk drives as Parallel ATA physical storage devices. [AHCI Mode] Set to [AHCI] when you to use the AHCI (Advabced Host Controller Interface). LAN Boot ROM [Disabled...
User Manual
Page 86
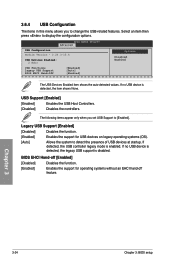
...SETUP UTILITY Advanced USB Configuration Module Version - 2.24.3-13.4 USB Devices Enabled: 2 Hubs Options Disabled Enabled USB Functions Legacy USB Support BIOS EHCI Hand-Off [Enabled] [Auto] [Enabled] The USB Devices Enabled item shows the auto-detected values. The following items appear only when you to change the USB-related features. If no USB device is detected, the item shows None. Chapter 3 3-24 Chapter 3: BIOS setup USB Support [Enabled] [Enabled] Enables the USB Host Controllers. [Disabled] Disables the controllers. If detected, the USB controller legacy mode is disabled...
...SETUP UTILITY Advanced USB Configuration Module Version - 2.24.3-13.4 USB Devices Enabled: 2 Hubs Options Disabled Enabled USB Functions Legacy USB Support BIOS EHCI Hand-Off [Enabled] [Auto] [Enabled] The USB Devices Enabled item shows the auto-detected values. The following items appear only when you to change the USB-related features. If no USB device is detected, the item shows None. Chapter 3 3-24 Chapter 3: BIOS setup USB Support [Enabled] [Enabled] Enables the USB Host Controllers. [Disabled] Disables the controllers. If detected, the USB controller legacy mode is disabled...
User Manual
Page 87
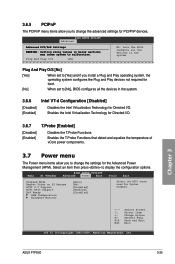
... I /O. Chapter 3 ASUS P7P55D 3-25 BIOS SETUP UTILITY Advanced Advanced PCI/PnP Settings WARNING: Setting wrong values in the system. Plug And Play O/S [No] [Yes] When set to [No], BIOS configures all the devices in below sections may cause system to malfunction. Main Ai Tweaker BIOS SETUP UTILITY Advanced Power Boot Tools Exit Suspend Mode Repost Video on S3 Resume ACPI 2.0 Support ACPI APIC Support EuP Ready APM Configuration Hardware Monitor [Auto] [No] [Disabled] [Enabled] [Disabled] Select the ACPI state used for PCI/PnP devices. Change Option F1...
... I /O. Chapter 3 ASUS P7P55D 3-25 BIOS SETUP UTILITY Advanced Advanced PCI/PnP Settings WARNING: Setting wrong values in the system. Plug And Play O/S [No] [Yes] When set to [No], BIOS configures all the devices in below sections may cause system to malfunction. Main Ai Tweaker BIOS SETUP UTILITY Advanced Power Boot Tools Exit Suspend Mode Repost Video on S3 Resume ACPI 2.0 Support ACPI APIC Support EuP Ready APM Configuration Hardware Monitor [Auto] [No] [Disabled] [Enabled] [Disabled] Select the ACPI state used for PCI/PnP devices. Change Option F1...
User Manual
Page 91
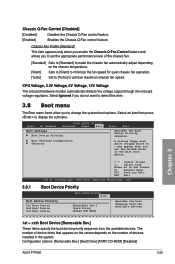
... Screen ↑↓ Select Item Enter Go to achieve maximum chassis fan speed. The number of devices installed in the system. Select an item then press to change the system boot options. Main Ai Tweaker BIOS SETUP UTILITY Advanced Power Boot Boot Settings Boot Device Priority Boot Settings Configuration Security Tools Exit Specifies the Boot Device Priority sequence. Configuration options: [Removable Dev.] [Hard Drive] [ATAPI CD-ROM] [Disabled] ASUS P7P55D 3-29 A virtual floppy disk drive (Floppy Drive B: ) may appear when you to display the submenu. Chassis...
... Screen ↑↓ Select Item Enter Go to achieve maximum chassis fan speed. The number of devices installed in the system. Select an item then press to change the system boot options. Main Ai Tweaker BIOS SETUP UTILITY Advanced Power Boot Boot Settings Boot Device Priority Boot Settings Configuration Security Tools Exit Specifies the Boot Device Priority sequence. Configuration options: [Removable Dev.] [Hard Drive] [ATAPI CD-ROM] [Disabled] ASUS P7P55D 3-29 A virtual floppy disk drive (Floppy Drive B: ) may appear when you to display the submenu. Chassis...
User Manual
Page 93
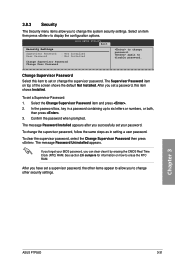
... to display the configuration options. After you forget your password. In the password box, key in setting a user password. See section 2.6 Jumpers for information on top of the screen shows the default Not Installed. The Supervisor Password item on how to change the system security settings. The message Password Installed appears after you can clear clear it by erasing the CMOS Real Time Clock (RTC) RAM. After you have set your BIOS password, you successfully set a supervisor password...
... to display the configuration options. After you forget your password. In the password box, key in setting a user password. See section 2.6 Jumpers for information on top of the screen shows the default Not Installed. The Supervisor Password item on how to change the system security settings. The message Password Installed appears after you can clear clear it by erasing the CMOS Real Time Clock (RTC) RAM. After you have set your BIOS password, you successfully set a supervisor password...
User Manual
Page 99
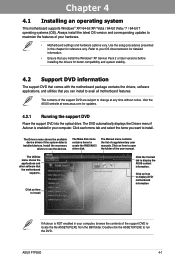
... the RAID/AHCI driver disk. The Drivers menu shows the available device drivers if the system detects installed devices. The Make disk menu contains items to install. Click an item to install Click the Contact tab to use the devices. Always install the latest OS version and corresponding updates to maximize the features of the user manual. Install the necessary drivers to display the ASUS contact information. Refer to avail all motherboard features. The DVD automatically displays the Drivers menu...
... the RAID/AHCI driver disk. The Drivers menu shows the available device drivers if the system detects installed devices. The Make disk menu contains items to install. Click an item to install Click the Contact tab to use the devices. Always install the latest OS version and corresponding updates to maximize the features of the user manual. Install the necessary drivers to display the ASUS contact information. Refer to avail all motherboard features. The DVD automatically displays the Drivers menu...

User Manual
Page 105
... monitor must support the screen resolution of available disk space. 4.3.5 ASUS Express Gate ASUS Express Gate is recommended for BIOS setup details. • ASUS Express Gate supports SATA devices connected to motherboard chipsetcontrolled onboard SATA ports only. See chapter 3 for better performance. ASUS P7P55D 4-7 Notices about ASUS Express Gate • Ensure to install ASUS Express Gate from ODD and USB drives and downloading to zero (0); See chapter 2 for the exact location of onboard SATA ports. • ASUS Express Gate supports file uploading from the motherboard support DVD...
... monitor must support the screen resolution of available disk space. 4.3.5 ASUS Express Gate ASUS Express Gate is recommended for BIOS setup details. • ASUS Express Gate supports SATA devices connected to motherboard chipsetcontrolled onboard SATA ports only. See chapter 3 for better performance. ASUS P7P55D 4-7 Notices about ASUS Express Gate • Ensure to install ASUS Express Gate from ODD and USB drives and downloading to zero (0); See chapter 2 for the exact location of onboard SATA ports. • ASUS Express Gate supports file uploading from the motherboard support DVD...
User Manual
Page 111
... [ENTER]-Select Menu ASUS P7P55D 4-13 Enter the BIOS Setup during POST. 2. Refer to chipset limitation, when set (s) using SATA HDDs. Create RAID Volume 2. Intel(R) Matrix Storage Manager option ROM v8.9.0.1014 PCH-D wRAID5 Copyright(C) 2003-09 Intel Corporation. Connect a SATA power cable to RAID mode, all SATA ports run at RAID mode together. 4.5.4 Intel® Matrix Storage Manager option ROM utility To enter the Intel® Matrix Storage Manager option ROM utility 1. 4.5.2 Installing Serial ATA hard disks The motherboard supports Serial ATA hard disk drives. For...
... [ENTER]-Select Menu ASUS P7P55D 4-13 Enter the BIOS Setup during POST. 2. Refer to chipset limitation, when set (s) using SATA HDDs. Create RAID Volume 2. Intel(R) Matrix Storage Manager option ROM v8.9.0.1014 PCH-D wRAID5 Copyright(C) 2003-09 Intel Corporation. Connect a SATA power cable to RAID mode, all SATA ports run at RAID mode together. 4.5.4 Intel® Matrix Storage Manager option ROM utility To enter the Intel® Matrix Storage Manager option ROM utility 1. 4.5.2 Installing Serial ATA hard disks The motherboard supports Serial ATA hard disk drives. For...
User Manual
Page 115
...boot device. 4. Chapter 4 ASUS P7P55D 4-17 Insert the support DVD into the optical drive. 4. Insert a formatted floppy disk into the USB floppy disk drive, then press . 8. Start Windows®. 2. Save changes and exit BIOS. 6. Write-protect the floppy disk to create a 32/64bit Intel AHCI/RAID driver disk. 7. 4.6 Creating a RAID driver disk A floppy disk with the RAID driver. • The motherboard does not provide a floppy drive connector. Boot your computer. 2. Follow the succeeding screen instructions to create an Intel® RAID driver disk. 5. Go to the Make Disk menu...
...boot device. 4. Chapter 4 ASUS P7P55D 4-17 Insert the support DVD into the optical drive. 4. Insert a formatted floppy disk into the USB floppy disk drive, then press . 8. Start Windows®. 2. Save changes and exit BIOS. 6. Write-protect the floppy disk to create a 32/64bit Intel AHCI/RAID driver disk. 7. 4.6 Creating a RAID driver disk A floppy disk with the RAID driver. • The motherboard does not provide a floppy drive connector. Boot your computer. 2. Follow the succeeding screen instructions to create an Intel® RAID driver disk. 5. Go to the Make Disk menu...
User Manual
Page 116
... the floppy disk with RAID driver into the USB floppy disk drive or USB port. 2. Follow the succeeding screen instructions to complete the installation. 4.6.4 Using a USB floppy disk drive Due to the steps below: 1. Chapter 4 4-18 Chapter 4: Software support Insert the floppy disk or USB flash drive with different vendors. Refer to OS limitation, Windows® XP may not recognize the USB floppy disk drive when you select Intel(R) ICH8R/ICH9R/ICH10R/DO/PCH SATA RAID Controller. 4. From the Universal Serial Bus controllers, right-click xxxxxx USB Floppy...
... the floppy disk with RAID driver into the USB floppy disk drive or USB port. 2. Follow the succeeding screen instructions to complete the installation. 4.6.4 Using a USB floppy disk drive Due to the steps below: 1. Chapter 4 4-18 Chapter 4: Software support Insert the floppy disk or USB flash drive with different vendors. Refer to OS limitation, Windows® XP may not recognize the USB floppy disk drive when you select Intel(R) ICH8R/ICH9R/ICH10R/DO/PCH SATA RAID Controller. 4. From the Universal Serial Bus controllers, right-click xxxxxx USB Floppy...


