

User Manual
Page 6
... 4-3 4.3.2 ASUS AI Suite 4-4 4.3.3 ASUS Fan Xpert 4-5 4.3.4 ASUS EPU 4-6 4.3.5 ASUS Express Gate 4-7 4.3.6 VIA® High Definition Audio utility 4-8 4.3.7 ASUS T.Probe 4-9 4.3.8 Intel® Extreme Tuning Utility 4-10 4.4 RAID configurations 4-11 4.4.1 RAID definitions 4-11 4.4.2 Installing Serial ATA hard disks 4-12 4.4.3 Setting the RAID item in BIOS 4-12 4.4.4 Intel® Matrix Storage Manager option ROM utility 4-12 4.5 Creating a RAID driver...
... 4-3 4.3.2 ASUS AI Suite 4-4 4.3.3 ASUS Fan Xpert 4-5 4.3.4 ASUS EPU 4-6 4.3.5 ASUS Express Gate 4-7 4.3.6 VIA® High Definition Audio utility 4-8 4.3.7 ASUS T.Probe 4-9 4.3.8 Intel® Extreme Tuning Utility 4-10 4.4 RAID configurations 4-11 4.4.1 RAID definitions 4-11 4.4.2 Installing Serial ATA hard disks 4-12 4.4.3 Setting the RAID item in BIOS 4-12 4.4.4 Intel® Matrix Storage Manager option ROM utility 4-12 4.5 Creating a RAID driver...

User Manual
Page 7
Contents Chapter 5: Multiple GPU technology support 5.1 ATI® CrossFireX™ technology 5-1 5.1.1 Requirements 5-1 5.1.2 Before you begin 5-1 5.1.3 Installing two CrossFireX™ graphics cards 5-2 5.1.4 Installing the device drivers 5-3 5.1.5 Enabling the ATI® CrossFireX™ technology 5-3 5.2 NVIDIA® SLI™ technology 5-4 5.2.1 Requirements 5-4 5.2.2 Installing two SLI-ready graphics cards 5-4 5.2.3 Installing the device drivers 5-5 5.2.4 Enabling the NVIDIA® SLI™ technology 5-5 vii
Contents Chapter 5: Multiple GPU technology support 5.1 ATI® CrossFireX™ technology 5-1 5.1.1 Requirements 5-1 5.1.2 Before you begin 5-1 5.1.3 Installing two CrossFireX™ graphics cards 5-2 5.1.4 Installing the device drivers 5-3 5.1.5 Enabling the ATI® CrossFireX™ technology 5-3 5.2 NVIDIA® SLI™ technology 5-4 5.2.1 Requirements 5-4 5.2.2 Installing two SLI-ready graphics cards 5-4 5.2.3 Installing the device drivers 5-5 5.2.4 Enabling the NVIDIA® SLI™ technology 5-5 vii

User Manual
Page 14
... BIOS 2.5, ACPI 2.0a, Multi-language BIOS, ASUS EZ Flash 2, ASUS CrashFree BIOS 3 WfM 2.0, DMI 2.0, WOL by PME, WOR by PME, PXE Drivers ASUS Utilities ASUS Update Anti-virus software (OEM version) ATX form factor: 12 in . (30.5 cm x 24.4 cm) *Specifications are subject to change without notice. x 9.6 in . P7P55D-E EVO specifications summary Back panel I/O ports Internal I/O connectors...
... BIOS 2.5, ACPI 2.0a, Multi-language BIOS, ASUS EZ Flash 2, ASUS CrashFree BIOS 3 WfM 2.0, DMI 2.0, WOL by PME, WOR by PME, PXE Drivers ASUS Utilities ASUS Update Anti-virus software (OEM version) ATX form factor: 12 in . (30.5 cm x 24.4 cm) *Specifications are subject to change without notice. x 9.6 in . P7P55D-E EVO specifications summary Back panel I/O ports Internal I/O connectors...

User Manual
Page 38
... card to the chassis with the slot and press firmly until the card is already installed in a chassis). 3. Install the software drivers for information on shared slots, ensure that the drivers support "Share IRQ" or that came with it by adjusting the software settings. 1. When using PCI cards on BIOS setup. 2. Refer...
... card to the chassis with the slot and press firmly until the card is already installed in a chassis). 3. Install the software drivers for information on shared slots, ensure that the drivers support "Share IRQ" or that came with it by adjusting the software settings. 1. When using PCI cards on BIOS setup. 2. Refer...

User Manual
Page 73
The AHCI allows the onboard storage driver to enable advanced Serial ATA features that increases storage performance on random workloads by allowing the drive to configure your storage devices. IDE Detect Time ... to [RAID] when you want the SATA hard disk drives to create a RAID configuration from the following options: [0] [5] [10] [15] [20] [25] [30] [35] Chapter 3 ASUS P7P55D-E EVO 3-13 Hard Disk Write Protect [Disabled] [Enabled] Enables device write protection. This function will be effective only if the device is accessed through BIOS. [Disabled...
The AHCI allows the onboard storage driver to enable advanced Serial ATA features that increases storage performance on random workloads by allowing the drive to configure your storage devices. IDE Detect Time ... to [RAID] when you want the SATA hard disk drives to create a RAID configuration from the following options: [0] [5] [10] [15] [20] [25] [30] [35] Chapter 3 ASUS P7P55D-E EVO 3-13 Hard Disk Write Protect [Disabled] [Enabled] Enables device write protection. This function will be effective only if the device is accessed through BIOS. [Disabled...

User Manual
Page 86
...] Disables the controllers. The following items appear only when you want to use the AHCI (Advanced Host Controller Interface). The AHCI allows the onboard storage driver to enable advanced Serial ATA features that increases storage performance on legacy operating systems (OS). [Disabled] Disables the function. Select an item and press to...
...] Disables the controllers. The following items appear only when you want to use the AHCI (Advanced Host Controller Interface). The AHCI allows the onboard storage driver to enable advanced Serial ATA features that increases storage performance on legacy operating systems (OS). [Disabled] Disables the function. Select an item and press to...
User Manual
Page 101
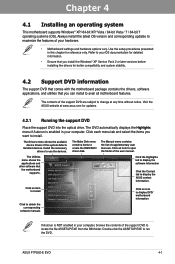
... browse the contents of the user manual. Double-click the ASSETUP.EXE to display the ASUS contact information. Click an item to create the RAID/AHCI driver disk. Chapter 4 ASUS P7P55D-E EVO 4-1 Click each menu tab and select the items you install the Windows® XP Service... Pack 2 or later versions before installing the drivers for updates. 4.2.1 Running the support DVD Place the support ...
... browse the contents of the user manual. Double-click the ASSETUP.EXE to display the ASUS contact information. Click an item to create the RAID/AHCI driver disk. Chapter 4 ASUS P7P55D-E EVO 4-1 Click each menu tab and select the items you install the Windows® XP Service... Pack 2 or later versions before installing the drivers for updates. 4.2.1 Running the support DVD Place the support ...

User Manual
Page 108
...Advanced Options Display panel and volume control Minimize button Chapter 4 Refer to the software manual in the support DVD or visit the ASUS website at www.asus.com for Windows® Vista™ / Windows® 7™ Device volume control Minimize button Exit button Analog and digital...capability to deliver the ultimate audio experience on the Windows® notification area. Click on the icon to install the VIA® Audio Driver from the support CD/DVD that came with the motherboard package. VIA HD Audio Deck for detailed software configuration. 4-8 Chapter 4: Software ...
...Advanced Options Display panel and volume control Minimize button Chapter 4 Refer to the software manual in the support DVD or visit the ASUS website at www.asus.com for Windows® Vista™ / Windows® 7™ Device volume control Minimize button Exit button Analog and digital...capability to deliver the ultimate audio experience on the Windows® notification area. Click on the icon to install the VIA® Audio Driver from the support CD/DVD that came with the motherboard package. VIA HD Audio Deck for detailed software configuration. 4-8 Chapter 4: Software ...

User Manual
Page 109
... instructions of the power phase gradually levels to configure BIOS settings before using ASUS T.Probe. 1. You can monitor the power phase loading and temperature in real-time. ASUS P7P55D-E EVO 4-9 Before using ASUS T.Probe You have to the center AVG (average) area. Save BIOS ...settings and restart the computer. Chapter 4 With T.Probe enabled, the temperature of BIOS settings Using ASUS T.Probe Click the T.Probe icon in the Advanced menu to complete installation. The Drivers...
... instructions of the power phase gradually levels to configure BIOS settings before using ASUS T.Probe. 1. You can monitor the power phase loading and temperature in real-time. ASUS P7P55D-E EVO 4-9 Before using ASUS T.Probe You have to the center AVG (average) area. Save BIOS ...settings and restart the computer. Chapter 4 With T.Probe enabled, the temperature of BIOS settings Using ASUS T.Probe Click the T.Probe icon in the Advanced menu to complete installation. The Drivers...

User Manual
Page 111
... XP / Vista limitation, a RAID array with the Intel® P55 chipset that of the data in parallel, interleaved stacks. Chapter 4 ASUS P7P55D-E EVO 4-11 RAID 5 stripes both data and parity information across three or more hard disk drives. The RAID 5 configuration is available only if you...8226; You must be calculated and written. The Serial ATA RAID feature is best suited for this setup. Refer to section 4.5 Creating a RAID driver disk for details. 4.4.1 RAID definitions RAID 0 (Data striping) optimizes two identical hard disk drives to a second drive. If one drive to ...
... XP / Vista limitation, a RAID array with the Intel® P55 chipset that of the data in parallel, interleaved stacks. Chapter 4 ASUS P7P55D-E EVO 4-11 RAID 5 stripes both data and parity information across three or more hard disk drives. The RAID 5 configuration is available only if you...8226; You must be calculated and written. The Serial ATA RAID feature is best suited for this setup. Refer to section 4.5 Creating a RAID driver disk for details. 4.4.1 RAID definitions RAID 0 (Data striping) optimizes two identical hard disk drives to a second drive. If one drive to ...

User Manual
Page 116
... 5. During the OS installation, the system prompts you select Intel(R) ICH8R/ICH9R/ICH10R/DO/PCH SATA RAID Controller. 4. party SCSI or RAID driver. 2. Boot your computer. 2. Follow the succeeding screen instructions to install third- Write-protect the floppy disk to Windows® XP limitation. ...virus infection. Plug the USB floppy disk drive and insert a floppy disk. 3. Press during Windows® OS installation To install the RAID driver for Windows® XP 1. Insert a formatted floppy disk into the USB floppy disk drive. 3. When prompted to select the SCSI adapter...
... 5. During the OS installation, the system prompts you select Intel(R) ICH8R/ICH9R/ICH10R/DO/PCH SATA RAID Controller. 4. party SCSI or RAID driver. 2. Boot your computer. 2. Follow the succeeding screen instructions to install third- Write-protect the floppy disk to Windows® XP limitation. ...virus infection. Plug the USB floppy disk drive and insert a floppy disk. 3. Press during Windows® OS installation To install the RAID driver for Windows® XP 1. Insert a formatted floppy disk into the USB floppy disk drive. 3. When prompted to select the SCSI adapter...

User Manual
Page 117
... the pop-up window. The name of the USB floppy disk drive varies with RAID driver into the USB floppy disk drive or USB port. 2. To install the RAID driver for Windows® Vista or later OS 1. Chapter 4 ASUS P7P55D-E EVO 4-17 Insert the floppy disk or USB flash drive with different vendors. 4. Follow the...
... the pop-up window. The name of the USB floppy disk drive varies with RAID driver into the USB floppy disk drive or USB port. 2. To install the RAID driver for Windows® Vista or later OS 1. Chapter 4 ASUS P7P55D-E EVO 4-17 Insert the floppy disk or USB flash drive with different vendors. 4. Follow the...

User Manual
Page 118
Use Notepad to select the program for opening the oem file. 7. Type the following line to the bottom of the RAID driver disk to both sections. Double-click the file. A window appears, allowing you to open the file. Chapter 4 8. Find the [HardwareIds.scsi.iaAHCI_PCH] and [HardwareIds.scsi....
Use Notepad to select the program for opening the oem file. 7. Type the following line to the bottom of the RAID driver disk to both sections. Double-click the file. A window appears, allowing you to open the file. Chapter 4 8. Find the [HardwareIds.scsi.iaAHCI_PCH] and [HardwareIds.scsi....

User Manual
Page 119
...Remove Programs. For Windows Vista, go to uninstall all current applications. 2. Turn off your current graphics card driver/s. 4. ASUS P7P55D-E EVO 5-1 Download the latest driver from the AMD website (www.amd.com). • Ensure that you install additional chassis fans for better .... For Windows Vista, select Uninstall. 5. For Windows XP, select Add/Remove. To uninstall existing graphics card drivers: 1. Close all existing graphics card drivers before installing ATI CrossFireX graphics cards to install multi-graphics processing units (GPU) graphics cards. Chapter 5: Chapter ...
...Remove Programs. For Windows Vista, go to uninstall all current applications. 2. Turn off your current graphics card driver/s. 4. ASUS P7P55D-E EVO 5-1 Download the latest driver from the AMD website (www.amd.com). • Ensure that you install additional chassis fans for better .... For Windows Vista, select Uninstall. 5. For Windows XP, select Add/Remove. To uninstall existing graphics card drivers: 1. Close all existing graphics card drivers before installing ATI CrossFireX graphics cards to install multi-graphics processing units (GPU) graphics cards. Chapter 5: Chapter ...
User Manual
Page 121
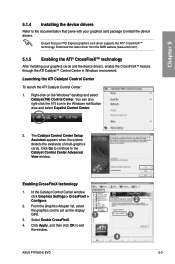
...came with your graphics card package to install the device drivers. Click Apply, and then click OK to the Catalyst Control Center Advanced View window. Click Go to continue to exit the window. 2 3 4 ASUS P7P55D-E EVO 5-3 From the Graphics Adapter list, select the graphics card... to act as the display GPU. 1 3. Right-click on the Windows® desktop and select Catalyst(TM) Control Center. Chapter 5 5.1.4 Installing the device drivers Refer to the documentation that your...
...came with your graphics card package to install the device drivers. Click Apply, and then click OK to the Catalyst Control Center Advanced View window. Click Go to continue to exit the window. 2 3 4 ASUS P7P55D-E EVO 5-3 From the Graphics Adapter list, select the graphics card... to act as the display GPU. 1 3. Right-click on the Windows® desktop and select Catalyst(TM) Control Center. Chapter 5 5.1.4 Installing the device drivers Refer to the documentation that your...

User Manual
Page 122
... but the installation steps remain the same. 1. Ensure that the cards are NVIDIA® certified. • Ensure that your graphics card driver supports the NVIDIA SLI technology. Insert the two graphics card into the PCIEX16 slots. Follow the installation procedures in this section. 5.2.1 Requirements ...have two identical SLI-ready graphics cards that are properly seated on the slots. 5-4 Chapter 5: Multiple GPU technology support Download the latest driver from the NVIDIA website (www.nvidia.com). • Ensure that you to Chapter 2 in this user manual for the locations of...
... but the installation steps remain the same. 1. Ensure that the cards are NVIDIA® certified. • Ensure that your graphics card driver supports the NVIDIA SLI technology. Insert the two graphics card into the PCIEX16 slots. Follow the installation procedures in this section. 5.2.1 Requirements ...have two identical SLI-ready graphics cards that are properly seated on the slots. 5-4 Chapter 5: Multiple GPU technology support Download the latest driver from the NVIDIA website (www.nvidia.com). • Ensure that you to Chapter 2 in this user manual for the locations of...
User Manual
Page 123
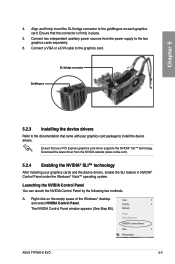
... (www.nvidia.com). 5.2.4 Enabling the NVIDIA® SLI™ technology After installing your graphics cards and the device drivers, enable the SLI feature in place. 5. ASUS P7P55D-E EVO 5-5 Goldfingers SLI bridge connector 5.2.3 Installing the device drivers Refer to the documentation that your graphics card package to the goldfingers on the empty space of the Windows...
... (www.nvidia.com). 5.2.4 Enabling the NVIDIA® SLI™ technology After installing your graphics cards and the device drivers, enable the SLI feature in place. 5. ASUS P7P55D-E EVO 5-5 Goldfingers SLI bridge connector 5.2.3 Installing the device drivers Refer to the documentation that your graphics card package to the goldfingers on the empty space of the Windows...


