
User Manual
Page 3
... Safety information...ix About this guide...x P7P55D-E Deluxe specifications summary xii Chapter 1: Product introduction 1.1 Welcome!...1-1 1.2 Package contents 1-1 1.3 Special features 1-2 1.3.1 Product highlights 1-2 1.3.2 ASUS Xtreme Design-Hybrid Processor 1-3 1.3.3 ASUS Xtreme Design-24 Hybrid Phase 1-3 1.3.4 ASUS Xtreme Design-Hybrid OS 1-3 1.3.5 ASUS Exclusive Features 1-4 Chapter 2: Hardware information 2.1 Before you proceed 2-1 2.2 Motherboard overview 2-2 2.2.1 Motherboard layout 2-2 2.2.2 Layout contents 2-3 2.2.3 Placement direction 2-4 2.2.4 Screw...
... Safety information...ix About this guide...x P7P55D-E Deluxe specifications summary xii Chapter 1: Product introduction 1.1 Welcome!...1-1 1.2 Package contents 1-1 1.3 Special features 1-2 1.3.1 Product highlights 1-2 1.3.2 ASUS Xtreme Design-Hybrid Processor 1-3 1.3.3 ASUS Xtreme Design-24 Hybrid Phase 1-3 1.3.4 ASUS Xtreme Design-Hybrid OS 1-3 1.3.5 ASUS Exclusive Features 1-4 Chapter 2: Hardware information 2.1 Before you proceed 2-1 2.2 Motherboard overview 2-2 2.2.1 Motherboard layout 2-2 2.2.2 Layout contents 2-3 2.2.3 Placement direction 2-4 2.2.4 Screw...
User Manual
Page 8
...out wheeled bin indicates that the product (electrical and electronic equipment) should not be placed in municipal waste. DO NOT throw the motherboard in municipal waste. viii However, there is connected. • Consult the dealer or an experienced radio/TV technician for compliance could ...not expressly approved by one or more of Chemicals) regulatory framework, we published the chemical substances in our products at ASUS REACH website at http://green.asus.com/english/REACH.htm. DO NOT throw the mercury-containing button cell battery in accordance with the REACH (Registration,...
...out wheeled bin indicates that the product (electrical and electronic equipment) should not be placed in municipal waste. DO NOT throw the motherboard in municipal waste. viii However, there is connected. • Consult the dealer or an experienced radio/TV technician for compliance could ...not expressly approved by one or more of Chemicals) regulatory framework, we published the chemical substances in our products at ASUS REACH website at http://green.asus.com/english/REACH.htm. DO NOT throw the mercury-containing button cell battery in accordance with the REACH (Registration,...

User Manual
Page 9
...• Ensure that the power cables for the devices are unplugged before the signal cables are connected. Operation safety • Before installing the motherboard and adding devices on a stable surface. • If you are using, contact your local power company. • If the power supply ... Do not place the product in your area. ix If you add a device. • Before connecting or removing signal cables from the motherboard, ensure that came with the product, contact a qualified service technician or your retailer. If possible, disconnect all cables are correctly connected and the...
...• Ensure that the power cables for the devices are unplugged before the signal cables are connected. Operation safety • Before installing the motherboard and adding devices on a stable surface. • If you are using, contact your local power company. • If the power supply ... Do not place the product in your area. ix If you add a device. • Before connecting or removing signal cables from the motherboard, ensure that came with the product, contact a qualified service technician or your retailer. If possible, disconnect all cables are correctly connected and the...

User Manual
Page 10
...to install and configure multiple ATI® CrossFireX™ and NVIDIA® SLI™ graphics cards. ASUS websites The ASUS website provides updated information on the motherboard. • Chapter 3: BIOS setup This chapter tells how to perform when installing system components. Detailed ...descriptions of the BIOS parameters are not part of the switches, jumpers, and connectors on ASUS hardware and software products....
...to install and configure multiple ATI® CrossFireX™ and NVIDIA® SLI™ graphics cards. ASUS websites The ASUS website provides updated information on the motherboard. • Chapter 3: BIOS setup This chapter tells how to perform when installing system components. Detailed ...descriptions of the BIOS parameters are not part of the switches, jumpers, and connectors on ASUS hardware and software products....
User Manual
Page 15
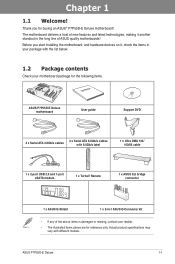
... of the above items is damaged or missing, contact your motherboard package for the following items. User Manual ASUS P7P55D-E Deluxe motherboard User guide Support DVD 4 x Serial ATA 3.0Gb/s cables 2 x Serial ATA 6.0Gb/s cables with different models. Chapter 1: Chapter 1 1.1 Welcome! ASUS P7P55D-E Deluxe 1-1 Before you for reference only. The motherboard delivers a host of new features and latest technologies, making...
... of the above items is damaged or missing, contact your motherboard package for the following items. User Manual ASUS P7P55D-E Deluxe motherboard User guide Support DVD 4 x Serial ATA 3.0Gb/s cables 2 x Serial ATA 6.0Gb/s cables with different models. Chapter 1: Chapter 1 1.1 Welcome! ASUS P7P55D-E Deluxe 1-1 Before you for reference only. The motherboard delivers a host of new features and latest technologies, making...

User Manual
Page 16
...; P55 Express Chipset is also backward compatible with USB 2.0 components. P7P55D-E Deluxe brings you 've never experienced before! Dual-Channel DDR3 2200(O.C.) / 1600 / 1333 / 1066 support The motherboard supports DDR3 memory that enhances system performance. Intel® Lynnfield / ... increased bandwidth and stability. Chapter 1 1.3 Special features 1.3.1 Product highlights Intel® LGA1156 Lynnfield / Clarkdale Processor Ready This motherboard supports the latest Intel® Lynnfield / Clarkdale processors in the world. Quad-GPU SLI™ and Quad-GPU CrossFireX™...
...; P55 Express Chipset is also backward compatible with USB 2.0 components. P7P55D-E Deluxe brings you 've never experienced before! Dual-Channel DDR3 2200(O.C.) / 1600 / 1333 / 1066 support The motherboard supports DDR3 memory that enhances system performance. Intel® Lynnfield / ... increased bandwidth and stability. Chapter 1 1.3 Special features 1.3.1 Product highlights Intel® LGA1156 Lynnfield / Clarkdale Processor Ready This motherboard supports the latest Intel® Lynnfield / Clarkdale processors in the world. Quad-GPU SLI™ and Quad-GPU CrossFireX™...

User Manual
Page 17
... controller without interrupting ongoing work and games. Express Gate is brought to the ASUS motherboards. 16+3 phase power design, 16-phase for vCore and extra 3-phase for details. 1.3.3 ASUS Xtreme Design-24 Hybrid Phase* T.Probe Leading Active Cooling Technology The T.Probe microchip... to page 3-39 and 4-7 for Best Performance The groundbreaking 16+3 phase VRM design is an ASUS exclusive OS that automates overclocking to achieve world O.C. ASUS P7P55D-E Deluxe 1-3 Auto tuning intelligently pushes the system to beginners. while TurboV offers more options to advanced overclockers...
... controller without interrupting ongoing work and games. Express Gate is brought to the ASUS motherboards. 16+3 phase power design, 16-phase for vCore and extra 3-phase for details. 1.3.3 ASUS Xtreme Design-24 Hybrid Phase* T.Probe Leading Active Cooling Technology The T.Probe microchip... to page 3-39 and 4-7 for Best Performance The groundbreaking 16+3 phase VRM design is an ASUS exclusive OS that automates overclocking to achieve world O.C. ASUS P7P55D-E Deluxe 1-3 Auto tuning intelligently pushes the system to beginners. while TurboV offers more options to advanced overclockers...

User Manual
Page 18
...adjust both the CPU and chassis fan speed according to patch memory issues and get your system booting success. Chapter 1 1.3.5 ASUS Exclusive Features MemOK! Memory compatibility is the most appropriate power usage via intelligent acceleration and overclocking-helping save power and money. ...This remarkable memory rescue tool requires nothing but a push of the innovative heat pipe design on this motherboard is a fanless cooling solution offered exclusively by yourself. Refer to 20ºC (36ºF) Cooler-Stack Cool 3+ Effective Fanless ...
...adjust both the CPU and chassis fan speed according to patch memory issues and get your system booting success. Chapter 1 1.3.5 ASUS Exclusive Features MemOK! Memory compatibility is the most appropriate power usage via intelligent acceleration and overclocking-helping save power and money. ...This remarkable memory rescue tool requires nothing but a push of the innovative heat pipe design on this motherboard is a fanless cooling solution offered exclusively by yourself. Refer to 20ºC (36ºF) Cooler-Stack Cool 3+ Effective Fanless ...

User Manual
Page 19
... with loud background sound. All of Q-LED, Q-Slot and Q-DIMM design speed up your motherboard against Electronic Magnetic Interference (EMI). ASUS P7P55D-E Deluxe 1-5 With these technologies, you easy ways to install. ASUS Q-Shield Easy and Comfortable Installations The specially designed ASUS Q-Shield does without having to deliver the most common PC audio setups-your DIY experience...
... with loud background sound. All of Q-LED, Q-Slot and Q-DIMM design speed up your motherboard against Electronic Magnetic Interference (EMI). ASUS P7P55D-E Deluxe 1-5 With these technologies, you easy ways to install. ASUS Q-Shield Easy and Comfortable Installations The specially designed ASUS Q-Shield does without having to deliver the most common PC audio setups-your DIY experience...

User Manual
Page 20
...use of plugging in the CMOS or a separate file, giving users freedom to conveniently store or load multiple BIOS settings. Green ASUS This motherboard and its packaging comply with one cable at a time, making connection quick and accurate. The BIOS settings can update your ... you to page 3-4 for details. Refer to convert your favorite photo into a 256-color boot logo for details. The motherboard features the ASUS O.C. The ASUS Q-Connector allows you configure your screen. This unique module eliminates the trouble of Hazardous Substances (RoHS). You can be stored in...
...use of plugging in the CMOS or a separate file, giving users freedom to conveniently store or load multiple BIOS settings. Green ASUS This motherboard and its packaging comply with one cable at a time, making connection quick and accurate. The BIOS settings can update your ... you to page 3-4 for details. Refer to convert your favorite photo into a 256-color boot logo for details. The motherboard features the ASUS O.C. The ASUS Q-Connector allows you configure your screen. This unique module eliminates the trouble of Hazardous Substances (RoHS). You can be stored in...

User Manual
Page 21
ASUS P7P55D-E Deluxe 2-1 Chapter 2: Chapter 2 2.1 Before you proceed Hardware information Take note of the following precautions before you install motherboard components or change any motherboard settings. • Unplug the power cord from the power supply. Failure to do so may cause severe damage to avoid touching the ICs on them. &#... or a metal object, such as the power supply case, to avoid damaging them due to static electricity. • Hold components by the edges to the motherboard, peripherals, or components.
ASUS P7P55D-E Deluxe 2-1 Chapter 2: Chapter 2 2.1 Before you proceed Hardware information Take note of the following precautions before you install motherboard components or change any motherboard settings. • Unplug the power cord from the power supply. Failure to do so may cause severe damage to avoid touching the ICs on them. &#... or a metal object, such as the power supply case, to avoid damaging them due to static electricity. • Hold components by the edges to the motherboard, peripherals, or components.

User Manual
Page 22
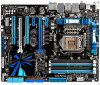
2.2 Motherboard overview 2.2.1 Motherboard layout Chapter 2 Refer to 2.7 Connectors for more information about rear panel connectors and internal connectors. 2-2 Chapter 2: Hardware information
2.2 Motherboard overview 2.2.1 Motherboard layout Chapter 2 Refer to 2.7 Connectors for more information about rear panel connectors and internal connectors. 2-2 Chapter 2: Hardware information

User Manual
Page 24
Doing so can damage the motherboard. 2.2.3 Placement direction When installing the motherboard, ensure that you place it into the holes indicated by circles to secure the motherboard to the rear part of the chassis Chapter 2 2-4 Chapter 2: Hardware information The edge with external ports goes to the chassis. DO NOT overtighten the screws! Place this side towards the rear of the chassis as indicated in the image below. 2.2.4 Screw holes Place nine screws into the chassis in the correct orientation.
Doing so can damage the motherboard. 2.2.3 Placement direction When installing the motherboard, ensure that you place it into the holes indicated by circles to secure the motherboard to the rear part of the chassis Chapter 2 2-4 Chapter 2: Hardware information The edge with external ports goes to the chassis. DO NOT overtighten the screws! Place this side towards the rear of the chassis as indicated in the image below. 2.2.4 Screw holes Place nine screws into the chassis in the correct orientation.

User Manual
Page 25
... is shipment/ transit-related. • Keep the cap after installing the motherboard. To prevent damage to the socket contacts resulting from the retention tab. ASUS P7P55D-E Deluxe Load lever A B Retention tab 2-5 ASUS will shoulder the cost of repair only if the damage is on the... cap unless you see any damage to the PnP cap/socket contacts/motherboard components. Ensure that all power cables are installing a CPU. ASUS will process Return Merchandise Authorization (RMA) requests only if the motherboard comes with a surface mount LGA1156 socket designed for the Intel®...
... is shipment/ transit-related. • Keep the cap after installing the motherboard. To prevent damage to the socket contacts resulting from the retention tab. ASUS P7P55D-E Deluxe Load lever A B Retention tab 2-5 ASUS will shoulder the cost of repair only if the damage is on the... cap unless you see any damage to the PnP cap/socket contacts/motherboard components. Ensure that all power cables are installing a CPU. ASUS will process Return Merchandise Authorization (RMA) requests only if the motherboard comes with a surface mount LGA1156 socket designed for the Intel®...

User Manual
Page 28
...cable is closest to ensure optimum thermal condition and performance. • When you buy a CPU separately, ensure that you have installed the motherboard to the CPU heatsink or CPU before you buy a boxed Intel® processor, the package includes the CPU fan and heatsink assembly.... and heatsink assembly. Ensure that you purchased a separate CPU heatsink and fan assembly, ensure that the four fasteners match the holes on the motherboard. 2. Push down two fasteners at a time in size and dimension. If you use only Intel®‑certified multi‑directional heatsink...
...cable is closest to ensure optimum thermal condition and performance. • When you buy a CPU separately, ensure that you have installed the motherboard to the CPU heatsink or CPU before you buy a boxed Intel® processor, the package includes the CPU fan and heatsink assembly.... and heatsink assembly. Ensure that you purchased a separate CPU heatsink and fan assembly, ensure that the four fasteners match the holes on the motherboard. 2. Push down two fasteners at a time in size and dimension. If you use only Intel®‑certified multi‑directional heatsink...

User Manual
Page 29
... connector! Rotate each fastener counterclockwise. 3. A B A A B B A 4. Carefully remove the heatsink and fan assembly from the motherboard. ASUS P7P55D-E Deluxe 2-9 Disconnect the CPU fan cable from the connector on the motherboard labeled CPU_FAN. Chapter 2 DO NOT forget to the connector on the motherboard. 2. Hardware monitoring errors can occur if you fail to disengage the heatsink and fan assembly...
... connector! Rotate each fastener counterclockwise. 3. A B A A B B A 4. Carefully remove the heatsink and fan assembly from the motherboard. ASUS P7P55D-E Deluxe 2-9 Disconnect the CPU fan cable from the connector on the motherboard labeled CPU_FAN. Chapter 2 DO NOT forget to the connector on the motherboard. 2. Hardware monitoring errors can occur if you fail to disengage the heatsink and fan assembly...

User Manual
Page 30
... operation. DDR3 modules are developed for better performance with four Double Data Rate 3 (DDR3) Dual In-line Memory Modules (DIMM) sockets. 2.4 System memory 2.4.1 Overview The motherboard comes with less power consumption. The figure illustrates the location of the DDR3 DIMM sockets: Chapter 2 Recommended memory configurations One DIMM: Install only one memory...
... operation. DDR3 modules are developed for better performance with four Double Data Rate 3 (DDR3) Dual In-line Memory Modules (DIMM) sockets. 2.4 System memory 2.4.1 Overview The motherboard comes with less power consumption. The figure illustrates the location of the DDR3 DIMM sockets: Chapter 2 Recommended memory configurations One DIMM: Install only one memory...

User Manual
Page 31
... latency. Under the default state, some memory modules for the OS can be about 3GB or less. ASUS P7P55D-E Deluxe 2-11 For optimum compatibility, we recommend that you want to install 4GB or more memory on the motherboard, the actual usable memory for overclocking may install varying memory sizes in Channel A and Channel B. For...
... latency. Under the default state, some memory modules for the OS can be about 3GB or less. ASUS P7P55D-E Deluxe 2-11 For optimum compatibility, we recommend that you want to install 4GB or more memory on the motherboard, the actual usable memory for overclocking may install varying memory sizes in Channel A and Channel B. For...

User Manual
Page 32
...8226; KINGSTON KHX2133C9D3T1K2/4GX(XMP) 4GB(2x2GB) DS N/A Heat-Sink Package 9(1333-9-9-9-24) 1.65 ••• Chapter 2 P7P55D-E Deluxe Motherboard Qualified Vendors Lists (QVL) DDR3-2133MHz capability for CPU at 2.8GHz and 2.93GHz Vendor G.SKILL G.SKILL G.SKILL ADATA Part No....) 1.65 • 9-9-9-24(1333-9-9-9-24) 1.65 • 9-9-9-24 1.65 • • 8-8-8-24 1.55~1.65 • • P7P55D-E Deluxe Motherboard Qualified Vendors Lists (QVL) DDR3-2133MHz capability for CPU at 2.8GHz and 2.93GHz Vendor Part No. DS Brand Timing Lable(Bios) Voltage G.SKILL...
...8226; KINGSTON KHX2133C9D3T1K2/4GX(XMP) 4GB(2x2GB) DS N/A Heat-Sink Package 9(1333-9-9-9-24) 1.65 ••• Chapter 2 P7P55D-E Deluxe Motherboard Qualified Vendors Lists (QVL) DDR3-2133MHz capability for CPU at 2.8GHz and 2.93GHz Vendor G.SKILL G.SKILL G.SKILL ADATA Part No....) 1.65 • 9-9-9-24(1333-9-9-9-24) 1.65 • 9-9-9-24 1.65 • • 8-8-8-24 1.55~1.65 • • P7P55D-E Deluxe Motherboard Qualified Vendors Lists (QVL) DDR3-2133MHz capability for CPU at 2.8GHz and 2.93GHz Vendor Part No. DS Brand Timing Lable(Bios) Voltage G.SKILL...

User Manual
Page 33
...9 1.9 • • 9-8-8(1066-8-7-7-20) 1.8 • • • 7-8-7(1066-9-9-9-24) 1.65 • 9-9-9-24 N/A • • • 9-9-9-24(1066-7-7-7-20) 2 • • P7P55D-E Deluxe Motherboard Qualified Vendors Lists (QVL) DDR3-1866MHz capability for CPU at 2.66GHz Vendor Part No. Timing Dimm(Bios) DIMM socket Voltage support (Optional) A* B* C* Heat-Sink Package...; • 1.65 • • 1.65 •• 1.65 • • • N/A ••• 1.9 • 1.9 ••• ASUS P7P55D-E Deluxe 2-13
...9 1.9 • • 9-8-8(1066-8-7-7-20) 1.8 • • • 7-8-7(1066-9-9-9-24) 1.65 • 9-9-9-24 N/A • • • 9-9-9-24(1066-7-7-7-20) 2 • • P7P55D-E Deluxe Motherboard Qualified Vendors Lists (QVL) DDR3-1866MHz capability for CPU at 2.66GHz Vendor Part No. Timing Dimm(Bios) DIMM socket Voltage support (Optional) A* B* C* Heat-Sink Package...; • 1.65 • • 1.65 •• 1.65 • • • N/A ••• 1.9 • 1.9 ••• ASUS P7P55D-E Deluxe 2-13


