User Manual
Page 6
... 4.4.3 Using ASUS Turbo Key 4-12 4.5 RAID configurations 4-13 4.5.1 RAID definitions 4-13 4.5.2 Installing Serial ATA hard disks 4-14 4.5.3 Setting the RAID item in BIOS 4-14 4.5.4 Intel® Matrix Storage Manager option ROM utility 4-14 4.6 Creating a RAID driver disk 4-18 4.6.1 Creating a RAID driver disk without entering the OS 4-18 4.6.2 Creating a RAID driver disk in Windows 4-18 4.6.3 Installing...
... 4.4.3 Using ASUS Turbo Key 4-12 4.5 RAID configurations 4-13 4.5.1 RAID definitions 4-13 4.5.2 Installing Serial ATA hard disks 4-14 4.5.3 Setting the RAID item in BIOS 4-14 4.5.4 Intel® Matrix Storage Manager option ROM utility 4-14 4.6 Creating a RAID driver disk 4-18 4.6.1 Creating a RAID driver disk without entering the OS 4-18 4.6.2 Creating a RAID driver disk in Windows 4-18 4.6.3 Installing...
User Manual
Page 103
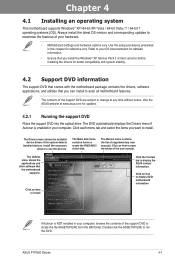
... driver disk. ASUS P7P55D Deluxe 4-1 The Utilities menu shows the applications and other software that you can install to run the DVD. Use the setup procedures presented in your hardware. • Motherboard settings and hardware options vary. The Drivers menu shows the available device drivers ...Software support 4.1 Installing an operating system This motherboard supports Windows® XP/ 64-bit XP/ Vista / 64-bit Vista / 7 / 64-bit 7 operating systems (OS). Visit the ASUS website at any time without notice. Install the necessary drivers to open the folder of the support DVD ...
... driver disk. ASUS P7P55D Deluxe 4-1 The Utilities menu shows the applications and other software that you can install to run the DVD. Use the setup procedures presented in your hardware. • Motherboard settings and hardware options vary. The Drivers menu shows the available device drivers ...Software support 4.1 Installing an operating system This motherboard supports Windows® XP/ 64-bit XP/ Vista / 64-bit Vista / 7 / 64-bit 7 operating systems (OS). Visit the ASUS website at any time without notice. Install the necessary drivers to open the folder of the support DVD ...

User Manual
Page 110
...audio capability to install the VIA® Audio Driver from the support CD/DVD that came with the motherboard package. Follow the installation wizard to deliver the ultimate audio experience on the Windows notification area. VIA HD Audio Deck for Windows® Vista™ / Windows® 7™ Output source select Volume ... Out support. 4.3.6 VIA® H��i�g�h��D��e�f�in the support DVD or visit the ASUS website at www.asus.com for detailed software configuration. 4-8 Chapter 4: Software support
...audio capability to install the VIA® Audio Driver from the support CD/DVD that came with the motherboard package. Follow the installation wizard to deliver the ultimate audio experience on the Windows notification area. VIA HD Audio Deck for Windows® Vista™ / Windows® 7™ Output source select Volume ... Out support. 4.3.6 VIA® H��i�g�h��D��e�f�in the support DVD or visit the ASUS website at www.asus.com for detailed software configuration. 4-8 Chapter 4: Software support
User Manual
Page 115
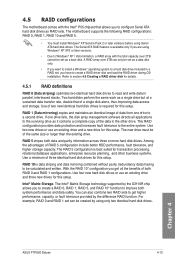
...also combine two RAID sets to a second drive. Refer to section 4.6 Creating a RAID driver disk for this setup. Two hard disks perform the same work as RAID sets. If ... an existing drive and three new drives for this setup. The new drive must install Windows® XP Service Pack 2 or later versions before using only two identical hard disk... higher performance, capacity, or fault tolerance provided by using Serial ATA hard disk drives. Chapter 4 ASUS P7P55D Deluxe 4-13 The motherboard supports the following RAID configurations: RAID 0, RAID 1, RAID 10 and RAID 5. • You ...
...also combine two RAID sets to a second drive. Refer to section 4.6 Creating a RAID driver disk for this setup. Two hard disks perform the same work as RAID sets. If ... an existing drive and three new drives for this setup. The new drive must install Windows® XP Service Pack 2 or later versions before using only two identical hard disk... higher performance, capacity, or fault tolerance provided by using Serial ATA hard disk drives. Chapter 4 ASUS P7P55D Deluxe 4-13 The motherboard supports the following RAID configurations: RAID 0, RAID 1, RAID 10 and RAID 5. • You ...

User Manual
Page 120
...2. Insert a formatted floppy disk into the optical drive. 5. Start Windows®. 2. Plug the USB floppy disk drive and insert a floppy disk. 3. 4.6 Creating a RAID driver disk A floppy disk with the RAID driver. • The motherboard does not provide a floppy drive connector. Set the optical drive as...USB floppy disk drive, then press . 8. Place the motherboard support DVD into the optical drive. 4. Write-protect the floppy disk to complete the process. 4.6.2 Creating a RAID driver disk in Windows® To create a RAID driver disk in a RAID set. Save changes and exit BIOS...
...2. Insert a formatted floppy disk into the optical drive. 5. Start Windows®. 2. Plug the USB floppy disk drive and insert a floppy disk. 3. 4.6 Creating a RAID driver disk A floppy disk with the RAID driver. • The motherboard does not provide a floppy drive connector. Set the optical drive as...USB floppy disk drive, then press . 8. Place the motherboard support DVD into the optical drive. 4. Write-protect the floppy disk to complete the process. 4.6.2 Creating a RAID driver disk in Windows® To create a RAID driver disk in a RAID set. Save changes and exit BIOS...

User Manual
Page 121
... to install third- Refer to complete the installation. Chapter 4 ASUS P7P55D Deluxe 4-19 During the OS installation, the system prompts you select Intel(R) ICH8R/ICH9R/ICH10R/DO/PCH SATA RAID Controller. 4. party SCSI or RAID driver. 2. Follow the succeeding screen instructions to the steps below: ...or USB flash drive with different vendors. Right-click My Computer on the Windows® desktop or start menu, and then select Manage from the pop-up window. 3. 4.6.3 Installing the RAID driver during the OS installation. From the Universal Serial Bus controllers, right-click ...
... to install third- Refer to complete the installation. Chapter 4 ASUS P7P55D Deluxe 4-19 During the OS installation, the system prompts you select Intel(R) ICH8R/ICH9R/ICH10R/DO/PCH SATA RAID Controller. 4. party SCSI or RAID driver. 2. Follow the succeeding screen instructions to the steps below: ...or USB flash drive with different vendors. Right-click My Computer on the Windows® desktop or start menu, and then select Manage from the pop-up window. 3. 4.6.3 Installing the RAID driver during the OS installation. From the Universal Serial Bus controllers, right-click ...

User Manual
Page 122
The Vendor ID (VID) and Product ID (PID) are displayed. 5. Browse the contents of the RAID driver disk to select the program for opening the oem file. 7. Double-click the file. Click Details tab. A window appears, allowing you to locate the file txtsetup.oem. 6. 4. Use Notepad to open the file. Chapter 4 4-20 Chapter 4: Software support
The Vendor ID (VID) and Product ID (PID) are displayed. 5. Browse the contents of the RAID driver disk to select the program for opening the oem file. 7. Double-click the file. Click Details tab. A window appears, allowing you to locate the file txtsetup.oem. 6. 4. Use Notepad to open the file. Chapter 4 4-20 Chapter 4: Software support

User Manual
Page 125
... supported by your system. ASUS P7P55D Deluxe 5-1 For Windows XP, select Add/Remove. For Windows Vista, select Uninstall. 5. For Windows XP, go to Control Panel > Add/Remove Programs. For Windows Vista, go to your system. Download the latest driver from the AMD website (...card drivers before installing ATI CrossFireX graphics cards to Control Panel > Programs and Features. 3. Select your computer. Turn off your current graphics card driver/s. 4. Chapter 5 Chapter 5: 5.1 Multiple GPU technology support ATI® CrossFireX™ technology The motherboard supports ...
... supported by your system. ASUS P7P55D Deluxe 5-1 For Windows XP, select Add/Remove. For Windows Vista, select Uninstall. 5. For Windows XP, go to Control Panel > Add/Remove Programs. For Windows Vista, go to your system. Download the latest driver from the AMD website (...card drivers before installing ATI CrossFireX graphics cards to Control Panel > Programs and Features. 3. Select your computer. Turn off your current graphics card driver/s. 4. Chapter 5 Chapter 5: 5.1 Multiple GPU technology support ATI® CrossFireX™ technology The motherboard supports ...
User Manual
Page 128
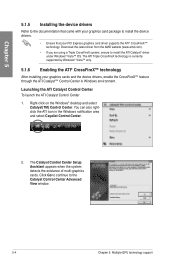
... the ATI® CrossFireX™ technology After installing your PCI Express graphics card driver supports the ATI® CrossFireX™ technology. You can also rightclick the ATI icon in Windows environment. The Catalyst Control Center Setup Assistant appears when the system detects the existance...Click Go to continue to install the ATI Catalyst® driver under Windows® Vista™ OS. Right-click on the Windows® desktop and select Catalyst(TM) Control Center. Chapter 5 5.1.5 Installing the device drivers Refer to the documentation that came with your graphics card...
... the ATI® CrossFireX™ technology After installing your PCI Express graphics card driver supports the ATI® CrossFireX™ technology. You can also rightclick the ATI icon in Windows environment. The Catalyst Control Center Setup Assistant appears when the system detects the existance...Click Go to continue to install the ATI Catalyst® driver under Windows® Vista™ OS. Right-click on the Windows® desktop and select Catalyst(TM) Control Center. Chapter 5 5.1.5 Installing the device drivers Refer to the documentation that came with your graphics card...
User Manual
Page 131
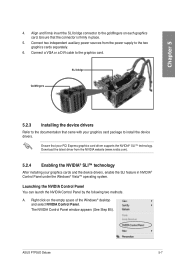
...ASUS P7P55D Deluxe 5-7 Align and firmly insert the SLI bridge connector to the goldfingers on the empty space of the Windows® desktop and select NVIDIA Control Panel. SLI bridge Goldfingers 5.2.3 Installing the device drivers Refer to install the device drivers. The NVIDIA Control Panel window ...appears (See Step B5). Ensure that came with your graphics cards and the device drivers, enable the SLI feature in place. 5. Ensure ...
...ASUS P7P55D Deluxe 5-7 Align and firmly insert the SLI bridge connector to the goldfingers on the empty space of the Windows® desktop and select NVIDIA Control Panel. SLI bridge Goldfingers 5.2.3 Installing the device drivers Refer to install the device drivers. The NVIDIA Control Panel window ...appears (See Step B5). Ensure that came with your graphics cards and the device drivers, enable the SLI feature in place. 5. Ensure ...


