User Manual
Page 6
...-TurboV EVO 4-10 4.4.1 Using ASUS TurboV 4-10 4.4.2 Using ASUS TurboV Auto Tuning Mode 4-11 4.4.3 Using ASUS Turbo Key 4-12 4.5 RAID configurations 4-13 4.5.1 RAID definitions 4-13 4.5.2 Installing Serial ATA hard disks 4-14 4.5.3 Setting the RAID item in BIOS 4-14 4.5.4 Intel® Matrix Storage Manager option ROM utility 4-14 4.6 Creating a RAID driver disk 4-18 4.6.1 Creating a RAID...
...-TurboV EVO 4-10 4.4.1 Using ASUS TurboV 4-10 4.4.2 Using ASUS TurboV Auto Tuning Mode 4-11 4.4.3 Using ASUS Turbo Key 4-12 4.5 RAID configurations 4-13 4.5.1 RAID definitions 4-13 4.5.2 Installing Serial ATA hard disks 4-14 4.5.3 Setting the RAID item in BIOS 4-14 4.5.4 Intel® Matrix Storage Manager option ROM utility 4-14 4.6 Creating a RAID driver disk 4-18 4.6.1 Creating a RAID...
User Manual
Page 7
Contents 5.2 NVIDIA® SLI™ technology 5-6 5.2.1 Requirements 5-6 5.2.2 Installing two SLI-ready graphics cards 5-6 5.2.3 Installing the device drivers 5-7 5.2.4 Enabling the NVIDIA® SLI™ technology 5-7 vii
Contents 5.2 NVIDIA® SLI™ technology 5-6 5.2.1 Requirements 5-6 5.2.2 Installing two SLI-ready graphics cards 5-6 5.2.3 Installing the device drivers 5-7 5.2.4 Enabling the NVIDIA® SLI™ technology 5-7 vii
User Manual
Page 14
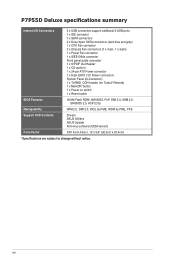
...P7P55D Deluxe specifications summary Internal I/O Connectors 3 x USB connectors support additional 6 USB ports 1 x IDE connector 7 x SATA connectors 2 x Drive Xpert SATA connectors (dark blue and gray) 1 x CPU Fan connector 2 x Chassis Fan connectors (1 x 4-pin, 1 x 3-pin) 1 x Power Fan connector 1 x IEEE1394a connector Front panel audio connector 1 x S/PDIF Out Header 1 x CD audio in 1 x 24-pin ATX...2.0, WOL by PME, WOR by PME, PXE Support DVD Contents Drivers ASUS Utilities ASUS Update Anti-virus software (OEM version) Form Factor ATX Form Factor, 12"x 9.6" (30.5cm x 24.4cm) *Specifications ...
...P7P55D Deluxe specifications summary Internal I/O Connectors 3 x USB connectors support additional 6 USB ports 1 x IDE connector 7 x SATA connectors 2 x Drive Xpert SATA connectors (dark blue and gray) 1 x CPU Fan connector 2 x Chassis Fan connectors (1 x 4-pin, 1 x 3-pin) 1 x Power Fan connector 1 x IEEE1394a connector Front panel audio connector 1 x S/PDIF Out Header 1 x CD audio in 1 x 24-pin ATX...2.0, WOL by PME, WOR by PME, PXE Support DVD Contents Drivers ASUS Utilities ASUS Update Anti-virus software (OEM version) Form Factor ATX Form Factor, 12"x 9.6" (30.5cm x 24.4cm) *Specifications ...
User Manual
Page 40
... on BIOS setup. 2. When using PCI cards on the slot. 5. Remove the system unit cover (if your motherboard is completely seated on shared slots, ensure that the drivers support "Share IRQ" or that came with the screw you removed earlier. 6. Turn on the next page. 3.... need IRQ assignments. Failure to install expansion cards. Chapter 2 2.5 Expansion slots In the future, you may cause you physical injury and damage motherboard components. 2.5.1 Installing an expansion card To install an expansion card 1. Remove the bracket opposite the slot that they support. Assign an IRQ to...
... on BIOS setup. 2. When using PCI cards on the slot. 5. Remove the system unit cover (if your motherboard is completely seated on shared slots, ensure that the drivers support "Share IRQ" or that came with the screw you removed earlier. 6. Turn on the next page. 3.... need IRQ assignments. Failure to install expansion cards. Chapter 2 2.5 Expansion slots In the future, you may cause you physical injury and damage motherboard components. 2.5.1 Installing an expansion card To install an expansion card 1. Remove the bracket opposite the slot that they support. Assign an IRQ to...
User Manual
Page 54
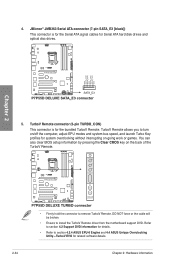
...cables for system overclocking without interrupting on the back of the TurboV Remote. • Firmly hold the connector to install the TurboV Remote driver from the motherboard support DVD. DO NOT force or the cable will be broken. • Ensure to remove TurboV Remote. Refer to section 4.2 ... launch Turbo Key profiles for Serial ATA hard disk drives and optical disc drives. 4. TurboV Remote allows you to section 4.3.4 ASUS EPU-6 Engine and 4.4 ASUS Unique Overclocking Utlity-TurboV EVO for the bundled TurboV Remote. You can also clear BIOS setup information by pressing the Clear CMOS ...
...cables for system overclocking without interrupting on the back of the TurboV Remote. • Firmly hold the connector to install the TurboV Remote driver from the motherboard support DVD. DO NOT force or the cable will be broken. • Ensure to remove TurboV Remote. Refer to section 4.2 ... launch Turbo Key profiles for Serial ATA hard disk drives and optical disc drives. 4. TurboV Remote allows you to section 4.3.4 ASUS EPU-6 Engine and 4.4 ASUS Unique Overclocking Utlity-TurboV EVO for the bundled TurboV Remote. You can also clear BIOS setup information by pressing the Clear CMOS ...
User Manual
Page 74
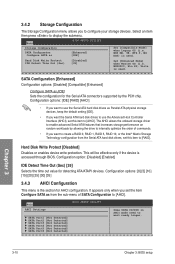
... BIOS. WIN ME, 98, NT4.0, MS DOS) is used . It appears only when you set this item to [RAID]. The AHCI allows the onboard storage driver to enable advanced Serial ATA features that increases storage performance on random workloads by the PCH chip. Hard Disk Write Protect [Disabled] IDE Detect Time...
... BIOS. WIN ME, 98, NT4.0, MS DOS) is used . It appears only when you set this item to [RAID]. The AHCI allows the onboard storage driver to enable advanced Serial ATA features that increases storage performance on random workloads by the PCH chip. Hard Disk Write Protect [Disabled] IDE Detect Time...
User Manual
Page 86
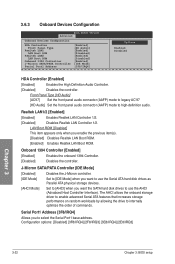
... 1/2. [Disabled] Disables Realtek LAN Controller 1/2. Onboard 1394 Controller [Enabled] [Enabled] Enables the onboard 1394 Controller. [Disabled] Disables the controller. The AHCI allows the onboard storage driver to enable advanced Serial ATA features that increases storage performance on random workloads by allowing the drive to high-definition audio.
... 1/2. [Disabled] Disables Realtek LAN Controller 1/2. Onboard 1394 Controller [Enabled] [Enabled] Enables the onboard 1394 Controller. [Disabled] Disables the controller. The AHCI allows the onboard storage driver to enable advanced Serial ATA features that increases storage performance on random workloads by allowing the drive to high-definition audio.
User Manual
Page 98
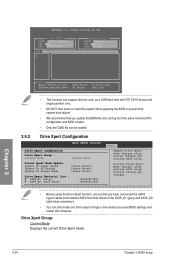
...8226; You can be loaded. 3.9.2 Drive Xpert Configuration BIOS SETUP UTILITY Drive Xpert configuration Drive Xpert Group : Current Mode :Normal Mode Driver Xpert Mode Update: Update To Super Speed Update To EZ Backup Update To Normal Mode [Press Enter] [Press Enter] [Press Enter]...: [ST380817AS] : [ST380817AS] Tools Update Drive Xpert Mode changes after saving changes and exiting BIOS setup. Profile Utility V2.00b Current CMOS BOARD: P7P55D Deluxe VER: 0166 DATE: 07/08/2009 Restore CMOS BOARD: Unknown VER: Unknown DATE: Unknown PATH: A:\ A: Chapter 3 Note [Enter] Select or...
...8226; You can be loaded. 3.9.2 Drive Xpert Configuration BIOS SETUP UTILITY Drive Xpert configuration Drive Xpert Group : Current Mode :Normal Mode Driver Xpert Mode Update: Update To Super Speed Update To EZ Backup Update To Normal Mode [Press Enter] [Press Enter] [Press Enter]...: [ST380817AS] : [ST380817AS] Tools Update Drive Xpert Mode changes after saving changes and exiting BIOS setup. Profile Utility V2.00b Current CMOS BOARD: P7P55D Deluxe VER: 0166 DATE: 07/08/2009 Restore CMOS BOARD: Unknown VER: Unknown DATE: Unknown PATH: A:\ A: Chapter 3 Note [Enter] Select or...
User Manual
Page 103
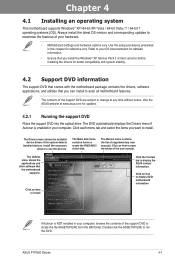
...® XP Service Pack 2 or later versions before installing the drivers for better compatibility and system stability. 4.2 Support DVD information The support DVD that comes with the motherboard package contains the drivers, software applications, and utilities that the motherboard supports. The Make disk menu contains items to change at www.asus.com for reference only. ASUS P7P55D Deluxe 4-1
...® XP Service Pack 2 or later versions before installing the drivers for better compatibility and system stability. 4.2 Support DVD information The support DVD that comes with the motherboard package contains the drivers, software applications, and utilities that the motherboard supports. The Make disk menu contains items to change at www.asus.com for reference only. ASUS P7P55D Deluxe 4-1

User Manual
Page 110
... your computer. 4.3.6 VIA® H��i�g�h��D��e�f�in the support DVD or visit the ASUS website at www.asus.com for detailed software configuration. 4-8 Chapter 4: Software support VIA HD Audio Deck for Windows® Vista™ / Windows®...settings window Display panel and volume control Minimize button Chapter 4 Refer to install the VIA® Audio Driver from the support CD/DVD that came with the motherboard package. VIA HD Audio Deck A. If the VIA audio software is correctly installed, you will find...
... your computer. 4.3.6 VIA® H��i�g�h��D��e�f�in the support DVD or visit the ASUS website at www.asus.com for detailed software configuration. 4-8 Chapter 4: Software support VIA HD Audio Deck for Windows® Vista™ / Windows®...settings window Display panel and volume control Minimize button Chapter 4 Refer to install the VIA® Audio Driver from the support CD/DVD that came with the motherboard package. VIA HD Audio Deck A. If the VIA audio software is correctly installed, you will find...
User Manual
Page 115
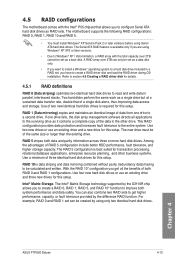
...Matrix Storage. The Intel® Matrix Storage technology supported by using Serial ATA hard disk drives. Chapter 4 ASUS P7P55D Deluxe 4-13 Refer to section 4.6 Creating a RAID driver disk for this setup. Use of three identical hard disk drives for this setup. Use two new drives or...of two new identical hard disk drives is best suited for transaction processing, relational database applications, enterprise resource planning, and other drive. The motherboard supports the following RAID configurations: RAID 0, RAID 1, RAID 10 and RAID 5. • You must be of the data in parallel,...
...Matrix Storage. The Intel® Matrix Storage technology supported by using Serial ATA hard disk drives. Chapter 4 ASUS P7P55D Deluxe 4-13 Refer to section 4.6 Creating a RAID driver disk for this setup. Use of three identical hard disk drives for this setup. Use two new drives or...of two new identical hard disk drives is best suited for transaction processing, relational database applications, enterprise resource planning, and other drive. The motherboard supports the following RAID configurations: RAID 0, RAID 1, RAID 10 and RAID 5. • You must be of the data in parallel,...

User Manual
Page 120
... the optical drive. 4. To work around this OS limitation, refer to create an Intel® RAID driver disk. 5. Save changes and exit BIOS. 6. Select USB floppy disk drive as the primary boot device. 4. Place the motherboard support DVD into the USB floppy disk drive, then press . 8. Go to the Make Disk menu...
... the optical drive. 4. To work around this OS limitation, refer to create an Intel® RAID driver disk. 5. Save changes and exit BIOS. 6. Select USB floppy disk drive as the primary boot device. 4. Place the motherboard support DVD into the USB floppy disk drive, then press . 8. Go to the Make Disk menu...

User Manual
Page 121
... complete the installation. Follow the succeeding screen instructions to the floppy disk containing the RAID driver. Select Device Manager. Chapter 4 ASUS P7P55D Deluxe 4-19 Using another computer, plug the USB floppy disk drive, and insert the floppy disk containing the RAID... driver. 2. To install the RAID driver for Windows® XP 1. Follow the succeeding screen instructions to complete the installation. 4.6.4 Using a...
... complete the installation. Follow the succeeding screen instructions to the floppy disk containing the RAID driver. Select Device Manager. Chapter 4 ASUS P7P55D Deluxe 4-19 Using another computer, plug the USB floppy disk drive, and insert the floppy disk containing the RAID... driver. 2. To install the RAID driver for Windows® XP 1. Follow the succeeding screen instructions to complete the installation. 4.6.4 Using a...

User Manual
Page 122
4. Use Notepad to locate the file txtsetup.oem. 6. Double-click the file. Browse the contents of the RAID driver disk to open the file. A window appears, allowing you to select the program for opening the oem file. 7. Click Details tab. Chapter 4 4-20 Chapter 4: Software support The Vendor ID (VID) and Product ID (PID) are displayed. 5.
4. Use Notepad to locate the file txtsetup.oem. 6. Double-click the file. Browse the contents of the RAID driver disk to open the file. A window appears, allowing you to select the program for opening the oem file. 7. Click Details tab. Chapter 4 4-20 Chapter 4: Software support The Vendor ID (VID) and Product ID (PID) are displayed. 5.

User Manual
Page 125
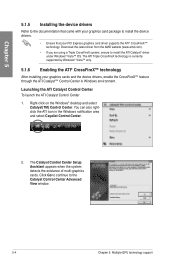
...ASUS P7P55D Deluxe 5-1 For Windows Vista, select Uninstall. 5. Follow the installation procedures in this section. 5.1.1 Requirements • In CrossFireX mode, you should have three identical CrossFireX-ready graphics cards that are ATI® certified. • Ensure that your graphics card driver... supported by your system. To uninstall existing graphics card drivers 1. Select your computer. Chapter 5 Chapter 5: 5.1 Multiple GPU technology support ATI® CrossFireX™ technology The motherboard supports the ATI® CrossFireX™ technology that allows...
...ASUS P7P55D Deluxe 5-1 For Windows Vista, select Uninstall. 5. Follow the installation procedures in this section. 5.1.1 Requirements • In CrossFireX mode, you should have three identical CrossFireX-ready graphics cards that are ATI® certified. • Ensure that your graphics card driver... supported by your system. To uninstall existing graphics card drivers 1. Select your computer. Chapter 5 Chapter 5: 5.1 Multiple GPU technology support ATI® CrossFireX™ technology The motherboard supports the ATI® CrossFireX™ technology that allows...
User Manual
Page 128
... Catalyst Control Center Setup Assistant appears when the system detects the existance of multi-graphics cards. Chapter 5 5.1.5 Installing the device drivers Refer to the documentation that came with your graphics card package to the Catalyst Control Center Advanced View window. 5-4 Chapter 5: ...Multiple GPU technology support Click Go to continue to install the device drivers. • Ensure that your graphics cards and the device drivers, enable the CrossFireX™ feature through the ATI Catalyst™ Control Center in the Windows notification...
... Catalyst Control Center Setup Assistant appears when the system detects the existance of multi-graphics cards. Chapter 5 5.1.5 Installing the device drivers Refer to the documentation that came with your graphics card package to the Catalyst Control Center Advanced View window. 5-4 Chapter 5: ...Multiple GPU technology support Click Go to continue to install the device drivers. • Ensure that your graphics cards and the device drivers, enable the CrossFireX™ feature through the ATI Catalyst™ Control Center in the Windows notification...
User Manual
Page 130
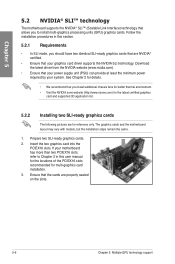
...ready graphics cards that are NVIDIA® certified. • Ensure that your graphics card driver supports the NVIDIA SLI technology. Prepare two SLI-ready graphics cards. 2. Download the latest driver from the NVIDIA website (www.nvidia.com). • Ensure that you install additional ...5-6 Chapter 5: Multiple GPU technology support Insert the two graphics card into the PCIEX16 slots. If your system. The graphics cards and the motherboard layout may vary with models, but the installation steps remain the same. 1. Ensure that the cards are for reference only. Chapter 5 5.2...
...ready graphics cards that are NVIDIA® certified. • Ensure that your graphics card driver supports the NVIDIA SLI technology. Prepare two SLI-ready graphics cards. 2. Download the latest driver from the NVIDIA website (www.nvidia.com). • Ensure that you install additional ...5-6 Chapter 5: Multiple GPU technology support Insert the two graphics card into the PCIEX16 slots. If your system. The graphics cards and the motherboard layout may vary with models, but the installation steps remain the same. 1. Ensure that the cards are for reference only. Chapter 5 5.2...
User Manual
Page 131
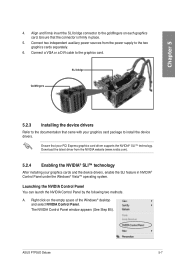
....nvidia.com). 5.2.4 Enabling the NVIDIA® SLI™ technology After installing your graphics cards and the device drivers, enable the SLI feature in place. 5. ASUS P7P55D Deluxe 5-7 Ensure that your graphics card package to the graphics card. Ensure that the connector is firmly in NVIDIA&#...174; Control Panel under the Windows® Vista™ operating system. Download the latest driver from the power supply to...
....nvidia.com). 5.2.4 Enabling the NVIDIA® SLI™ technology After installing your graphics cards and the device drivers, enable the SLI feature in place. 5. ASUS P7P55D Deluxe 5-7 Ensure that your graphics card package to the graphics card. Ensure that the connector is firmly in NVIDIA&#...174; Control Panel under the Windows® Vista™ operating system. Download the latest driver from the power supply to...


