User Manual
Page 4
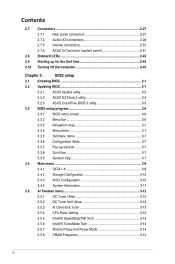
... BIOS setup 3.1 Knowing BIOS 3-1 3.2 Updating BIOS 3-1 3.2.1 ASUS Update utility 3-2 3.2.2 ASUS EZ Flash 2 utility 3-4 3.2.3 ASUS CrashFree BIOS 3 utility 3-5 3.3 BIOS setup program 3-6 3.3.1 BIOS menu screen 3-6 3.3.2 Menu bar 3-6 3.3.3 Navigation keys 3-7 3.3.4 Menu items 3-7 3.3.5 Submenu items 3-7 3.3.6 Configuration fields 3-7 3.3.7 Pop-up window 3-7 3.3.8 Scroll bar 3-7 3.3.9 General help 3-7 3.4 Main menu 3-8 3.4.1 SATA 1-6 3-8 3.4.2 Storage Configuration 3-10 3.4.3 AHCI Configuration 3-10 3.4.4 System Information 3-11 3.5 Ai Tweaker menu 3-12...
... BIOS setup 3.1 Knowing BIOS 3-1 3.2 Updating BIOS 3-1 3.2.1 ASUS Update utility 3-2 3.2.2 ASUS EZ Flash 2 utility 3-4 3.2.3 ASUS CrashFree BIOS 3 utility 3-5 3.3 BIOS setup program 3-6 3.3.1 BIOS menu screen 3-6 3.3.2 Menu bar 3-6 3.3.3 Navigation keys 3-7 3.3.4 Menu items 3-7 3.3.5 Submenu items 3-7 3.3.6 Configuration fields 3-7 3.3.7 Pop-up window 3-7 3.3.8 Scroll bar 3-7 3.3.9 General help 3-7 3.4 Main menu 3-8 3.4.1 SATA 1-6 3-8 3.4.2 Storage Configuration 3-10 3.4.3 AHCI Configuration 3-10 3.4.4 System Information 3-11 3.5 Ai Tweaker menu 3-12...
User Manual
Page 6
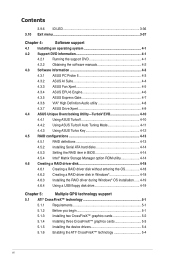
...ASUS PC Probe II 4-3 4.3.2 ASUS AI Suite 4-4 4.3.3 ASUS Fan Xpert 4-5 4.3.4 ASUS EPU-6 Engine 4-6 4.3.5 ASUS Express Gate 4-7 4.3.6 VIA® High Definition Audio utility 4-8 4.3.7 ASUS Drive Xpert 4-9 4.4 ASUS Unique Overclocking Utility-TurboV EVO 4-10 4.4.1 Using ASUS TurboV 4-10 4.4.2 Using ASUS TurboV Auto Tuning Mode 4-11 4.4.3 Using ASUS...RAID driver disk without entering the OS 4-18 4.6.2 Creating a RAID driver disk in Windows 4-18 4.6.3 Installing the RAID driver during Windows® OS installation....... 4-19 4.6.4 Using a USB floppy disk drive 4-19 Chapter...
...ASUS PC Probe II 4-3 4.3.2 ASUS AI Suite 4-4 4.3.3 ASUS Fan Xpert 4-5 4.3.4 ASUS EPU-6 Engine 4-6 4.3.5 ASUS Express Gate 4-7 4.3.6 VIA® High Definition Audio utility 4-8 4.3.7 ASUS Drive Xpert 4-9 4.4 ASUS Unique Overclocking Utility-TurboV EVO 4-10 4.4.1 Using ASUS TurboV 4-10 4.4.2 Using ASUS TurboV Auto Tuning Mode 4-11 4.4.3 Using ASUS...RAID driver disk without entering the OS 4-18 4.6.2 Creating a RAID driver disk in Windows 4-18 4.6.3 Installing the RAID driver during Windows® OS installation....... 4-19 4.6.4 Using a USB floppy disk drive 4-19 Chapter...

User Manual
Page 17
... to the Internet and key applications before entering the Windows® OS. Turbo Key boosts performance with quick access to the ASUS motherboards. 16+3 phase power design, 16-phase for vCore and extra 3-phase for details. 1.3.3 ASUS Xtreme Design-Hybrid Phase T.Probe Leading Active Cooling Technology...and 4-12 for Memory controller inside CPU can provide the highest power efficiency, and hence generates less heat to page 4-10 for details. ASUS P7P55D Deluxe 1-3 Auto Tuning Auto System Level Up Auto Tuning is an intelligent tool that provides you can achieve extreme yet stable ...
... to the Internet and key applications before entering the Windows® OS. Turbo Key boosts performance with quick access to the ASUS motherboards. 16+3 phase power design, 16-phase for vCore and extra 3-phase for details. 1.3.3 ASUS Xtreme Design-Hybrid Phase T.Probe Leading Active Cooling Technology...and 4-12 for Memory controller inside CPU can provide the highest power efficiency, and hence generates less heat to page 4-10 for details. ASUS P7P55D Deluxe 1-3 Auto Tuning Auto System Level Up Auto Tuning is an intelligent tool that provides you can achieve extreme yet stable ...
User Manual
Page 45
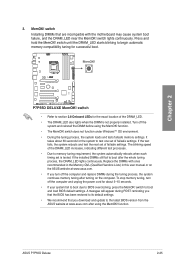
...the computer and unplog the power cord for about 30 seconds for the system to boot after turning on the computer. ASUS P7P55D Deluxe 2-25 switch does not function under Windows™ OS environment. • During the tuning process, the system loads and tests failsafe memory settings. If the ... reboots when each timing set is not properly installed. Replace the DIMMs with the motherboard may cause system boot failure, and the DRAM_LED near the MemOK! Press and hold the MemOK! It takes about 5-10 seconds. • If your system fail to boot due to section 2.8 Onboard...
...the computer and unplog the power cord for about 30 seconds for the system to boot after turning on the computer. ASUS P7P55D Deluxe 2-25 switch does not function under Windows™ OS environment. • During the tuning process, the system loads and tests failsafe memory settings. If the ... reboots when each timing set is not properly installed. Replace the DIMMs with the motherboard may cause system boot failure, and the DRAM_LED near the MemOK! Press and hold the MemOK! It takes about 5-10 seconds. • If your system fail to boot due to section 2.8 Onboard...

User Manual
Page 52
.... • Before creating a RAID set the Configure SATA as item in the BIOS to [RAID]. Refer to [AHCI]. If you can create a RAID 0, 1, 5, and 10 configuration with the Intel® Matrix Storage Technology through the onboard Intel® P55 chipset. If you installed Serial ATA hard disk drives, you are... is available only if you can connect Serial ATA boot/data hard disk drives to these connectors, set the Configure SATA as in the motherboard support DVD. • You must install Windows® XP Service Pack 2 or later versions before using Serial ATA hard disk drives.
.... • Before creating a RAID set the Configure SATA as item in the BIOS to [RAID]. Refer to [AHCI]. If you can create a RAID 0, 1, 5, and 10 configuration with the Intel® Matrix Storage Technology through the onboard Intel® P55 chipset. If you installed Serial ATA hard disk drives, you are... is available only if you can connect Serial ATA boot/data hard disk drives to these connectors, set the Configure SATA as in the motherboard support DVD. • You must install Windows® XP Service Pack 2 or later versions before using Serial ATA hard disk drives.

User Manual
Page 67
...the Windows® desktop, click Start > Programs > ASUS > ASUSUpdate > ASUSUpdate. The ASUS Update main window appears. 2. 3. Click Next. 4. Chapter 3 5. Always update the utility to download. Select the ASUS FTP ...a file from the Open window, then click Open. 4. Follow the onscreen instructions to ensure system compatibility and stability. P7P55DD.ROM ASUS P7P55D Deluxe P7P55DD Ensure to load the ...BIOS default settings to complete the update process. Select the Load Setup Defaults item under the Exit menu. The ASUS Update ...
...the Windows® desktop, click Start > Programs > ASUS > ASUSUpdate > ASUSUpdate. The ASUS Update main window appears. 2. 3. Click Next. 4. Chapter 3 5. Always update the utility to download. Select the ASUS FTP ...a file from the Open window, then click Open. 4. Follow the onscreen instructions to ensure system compatibility and stability. P7P55DD.ROM ASUS P7P55D Deluxe P7P55DD Ensure to load the ...BIOS default settings to complete the update process. Select the Load Setup Defaults item under the Exit menu. The ASUS Update ...

User Manual
Page 100
...to confirm your choice. Enables the onboard ID LEDs under the chipset heatsink. Configuration options: [Disabled] [Enabled] [Auto] Enter OS Timer [10 Seconds] Sets countdown duration that provides quick access to the Internet browser and Skype. Choose [Prompt User] to stay at the Express Gate's... first screen before starting Windows or other installed OS. Check Realtek LAN Cable [Disabled] [Disabled] BIOS will run ASUS EZ Flash 2. When you press , a confirmation message appears. 3.9.3 AI NET 2 AI NET 2...
...to confirm your choice. Enables the onboard ID LEDs under the chipset heatsink. Configuration options: [Disabled] [Enabled] [Auto] Enter OS Timer [10 Seconds] Sets countdown duration that provides quick access to the Internet browser and Skype. Choose [Prompt User] to stay at the Express Gate's... first screen before starting Windows or other installed OS. Check Realtek LAN Cable [Disabled] [Disabled] BIOS will run ASUS EZ Flash 2. When you press , a confirmation message appears. 3.9.3 AI NET 2 AI NET 2...

User Manual
Page 101
... it stays on the Setup menus. Exit & Discard Changes Select this option, a confirmation window appears. Select Ok to discard any changes and load the previously saved values. Chapter 3 ASUS P7P55D Deluxe 3-37 If you made changes to fields other changes before exiting. Select Ok to save ...message asking if you selected are finished making your selections, choose this option from this menu. When you press , a confirmation window appears. 3.10 Exit menu The Exit menu items allow you to load the optimal or failsafe default values for the BIOS items, and save ...
... it stays on the Setup menus. Exit & Discard Changes Select this option, a confirmation window appears. Select Ok to discard any changes and load the previously saved values. Chapter 3 ASUS P7P55D Deluxe 3-37 If you made changes to fields other changes before exiting. Select Ok to save ...message asking if you selected are finished making your selections, choose this option from this menu. When you press , a confirmation window appears. 3.10 Exit menu The Exit menu items allow you to load the optimal or failsafe default values for the BIOS items, and save ...

User Manual
Page 110
... Software information Advanced Options Configuration options Control settings window Display panel and volume control Minimize button Chapter 4 ... provides 10-channel audio capability to install the VIA® Audio Driver from the support CD/DVD that came with the motherboard package. VIA HD Audio Deck A. VIA HD Audio Deck for Windows® Vista™ / Windows®... support. Follow the installation wizard to deliver the ultimate audio experience on the Windows notification area. 4.3.6 VIA® H��i�g�h��D��e�f�in the...
... Software information Advanced Options Configuration options Control settings window Display panel and volume control Minimize button Chapter 4 ... provides 10-channel audio capability to install the VIA® Audio Driver from the support CD/DVD that came with the motherboard package. VIA HD Audio Deck A. VIA HD Audio Deck for Windows® Vista™ / Windows®... support. Follow the installation wizard to deliver the ultimate audio experience on the Windows notification area. 4.3.6 VIA® H��i�g�h��D��e�f�in the...

User Manual
Page 112
... for Auto Tuning) will not be kept on the Windows notification area. Refer to save your system effectively. Use the Save Profile function to the CPU documentation before using TurboV. 4-10 Chapter 4: Software support 4.4 ASUS Unique Overclocking Utility- See Chapter 3 for details. • For advanced overclock ...will find the TurboV EVO icon on the next system boot. TurboV EVO ASUS TurboV EVO introduces TurboV and Turbo Key-two powerful tools that came with the motherboard package. Install ASUS TurboV EVO from the support DVD that allow you will not be saved to...
... for Auto Tuning) will not be kept on the Windows notification area. Refer to save your system effectively. Use the Save Profile function to the CPU documentation before using TurboV. 4-10 Chapter 4: Software support 4.4 ASUS Unique Overclocking Utility- See Chapter 3 for details. • For advanced overclock ...will find the TurboV EVO icon on the next system boot. TurboV EVO ASUS TurboV EVO introduces TurboV and Turbo Key-two powerful tools that came with the motherboard package. Install ASUS TurboV EVO from the support DVD that allow you will not be saved to...
User Manual
Page 115
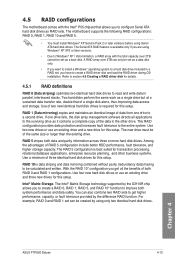
... disk drives or use an existing drive and a new drive for this setup. Chapter 4 ASUS P7P55D Deluxe 4-13 RAID 5 stripes both system performance and data safety. The Intel® Matrix Storage ... set can only be created by the difference RAID function. RAID 10 is available only if you want to install a Windows® operating system to create a RAID driver disk and load ... and storage. Intel® Matrix Storage. The motherboard supports the following RAID configurations: RAID 0, RAID 1, RAID 10 and RAID 5. • You must be calculated and written.
... disk drives or use an existing drive and a new drive for this setup. Chapter 4 ASUS P7P55D Deluxe 4-13 RAID 5 stripes both system performance and data safety. The Intel® Matrix Storage ... set can only be created by the difference RAID function. RAID 10 is available only if you want to install a Windows® operating system to create a RAID driver disk and load ... and storage. Intel® Matrix Storage. The motherboard supports the following RAID configurations: RAID 0, RAID 1, RAID 10 and RAID 5. • You must be calculated and written.

