
User Manual
Page 1
Motherboard P7H55D-M PRO
Motherboard P7H55D-M PRO

User Manual
Page 3
...information...viii About this guide...ix P7H55D-M PRO specifications summary xi Chapter 1: Product introduction 1.1 Welcome!...1-1 1.2 Package contents 1-1 1.3 Special features 1-2 1.3.1 Product highlights 1-2 1.3.2 ASUS Overclocking Features 1-3 1.3.3 ASUS Unique Features 1-3 1.3.4 ASUS Power Solutions 1-3 1.3.5 ASUS Quiet Thermal Solutions 1-4 1.3.6 ASUS Crystal Sound 1-4 1.3.7 ASUS EZ DIY 1-4 Chapter 2: Hardware information 2.1 Before you proceed 2-1 2.2 Motherboard overview 2-2 2.2.1 Motherboard layout 2-2 2.2.2 Layout contents 2-3 2.2.3 Placement direction...
...information...viii About this guide...ix P7H55D-M PRO specifications summary xi Chapter 1: Product introduction 1.1 Welcome!...1-1 1.2 Package contents 1-1 1.3 Special features 1-2 1.3.1 Product highlights 1-2 1.3.2 ASUS Overclocking Features 1-3 1.3.3 ASUS Unique Features 1-3 1.3.4 ASUS Power Solutions 1-3 1.3.5 ASUS Quiet Thermal Solutions 1-4 1.3.6 ASUS Crystal Sound 1-4 1.3.7 ASUS EZ DIY 1-4 Chapter 2: Hardware information 2.1 Before you proceed 2-1 2.2 Motherboard overview 2-2 2.2.1 Motherboard layout 2-2 2.2.2 Layout contents 2-3 2.2.3 Placement direction...

User Manual
Page 7
...the crossed out wheeled bin indicates that the product (electrical and electronic equipment) should not be placed in our products at ASUS REACH website at http://green.asus.com/english/REACH.htm. If this unit not expressly approved by one or more of electronic products. Changes or modifications ...'s instructions, may cause undesired operation. DO NOT throw the mercury-containing button cell battery in a residential installation. DO NOT throw the motherboard in accordance with the REACH (Registration, Evaluation, Authorisation, and Restriction of parts and recycling.
...the crossed out wheeled bin indicates that the product (electrical and electronic equipment) should not be placed in our products at ASUS REACH website at http://green.asus.com/english/REACH.htm. If this unit not expressly approved by one or more of electronic products. Changes or modifications ...'s instructions, may cause undesired operation. DO NOT throw the mercury-containing button cell battery in a residential installation. DO NOT throw the motherboard in accordance with the REACH (Registration, Evaluation, Authorisation, and Restriction of parts and recycling.

User Manual
Page 8
... from the system, ensure that came with the package. • Before using an adapter or extension cord. Operation safety • Before installing the motherboard and adding devices on a stable surface. • If you detect any area where it may become wet. • Place the product on it... If you are not sure about the voltage of the electrical outlet you add a device. • Before connecting or removing signal cables from the motherboard, ensure that your power supply is broken, do not try to or from connectors, slots, sockets and circuitry. • Avoid dust, humidity, ...
... from the system, ensure that came with the package. • Before using an adapter or extension cord. Operation safety • Before installing the motherboard and adding devices on a stable surface. • If you detect any area where it may become wet. • Place the product on it... If you are not sure about the voltage of the electrical outlet you add a device. • Before connecting or removing signal cables from the motherboard, ensure that your power supply is broken, do not try to or from connectors, slots, sockets and circuitry. • Avoid dust, humidity, ...

User Manual
Page 9
... is organized This guide contains the following sources for additional information and for product and software updates. 1. ASUS websites The ASUS website provides updated information on the motherboard. • Chapter 3: BIOS setup This chapter tells how to the following parts: • Chapter ... DVD that may include optional documentation, such as warranty flyers, that comes with the motherboard package and the software. Optional documentation Your product package may have to the ASUS contact information. 2. These documents are also provided. • Chapter 4: Software support...
... is organized This guide contains the following sources for additional information and for product and software updates. 1. ASUS websites The ASUS website provides updated information on the motherboard. • Chapter 3: BIOS setup This chapter tells how to the following parts: • Chapter ... DVD that may include optional documentation, such as warranty flyers, that comes with the motherboard package and the software. Optional documentation Your product package may have to the ASUS contact information. 2. These documents are also provided. • Chapter 4: Software support...
User Manual
Page 15
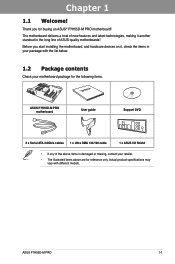
... long line of the above items is damaged or missing, contact your motherboard package for the following items. User Manual ASUS P7H55D-M PRO motherboard User guide Support DVD 2 x Serial ATA 3.0Gb/s cables 1 x Ultra DMA 133/100 cable 1 x ASUS I/O Shield • If any of ASUS quality motherboards! Actual product specifications may vary with the list below. 1.2 Package contents Check...
... long line of the above items is damaged or missing, contact your motherboard package for the following items. User Manual ASUS P7H55D-M PRO motherboard User guide Support DVD 2 x Serial ATA 3.0Gb/s cables 1 x Ultra DMA 133/100 cable 1 x ASUS I/O Shield • If any of ASUS quality motherboards! Actual product specifications may vary with the list below. 1.2 Package contents Check...

User Manual
Page 16
...Refer to the whole new experience of digital video standards that delivers multi-channel audio and uncompressed digital video for details. P7H55D-M PRO and CPU match-up table CPU with H55 Express Chipset to page 2-10 for details. Refer to enjoy the latest ...chipset design to boost system performance. Chapter 1 1.3 Special features 1.3.1 Product highlights Intel® LGA1156 Lynnfield / Clarkdale Processor Ready This motherboard supports the latest Intel® Lynnfield and Clarkdale processors in LGA1156 package, which goes with Intel® H55 chipset with the highest-...
...Refer to the whole new experience of digital video standards that delivers multi-channel audio and uncompressed digital video for details. P7H55D-M PRO and CPU match-up table CPU with H55 Express Chipset to page 2-10 for details. Refer to enjoy the latest ...chipset design to boost system performance. Chapter 1 1.3 Special features 1.3.1 Product highlights Intel® LGA1156 Lynnfield / Clarkdale Processor Ready This motherboard supports the latest Intel® Lynnfield and Clarkdale processors in LGA1156 package, which goes with Intel® H55 chipset with the highest-...

User Manual
Page 17
... the best graphics performance. ASUS P7H55D-M PRO 1-3 Refer to page 4-8 for details. GPU Boost GPU Boost overclocks the integrated GPU in line with the European Union's Restriction on the environment. 1.3.2 ASUS Overclocking Features TurboV Feel the adrenaline rush of real-time O.C. - Refer to page 4-6 for details. Chapter 1 Green ASUS This motherboard and its user-friendly interface...
... the best graphics performance. ASUS P7H55D-M PRO 1-3 Refer to page 4-8 for details. GPU Boost GPU Boost overclocks the integrated GPU in line with the European Union's Restriction on the environment. 1.3.2 ASUS Overclocking Features TurboV Feel the adrenaline rush of real-time O.C. - Refer to page 4-6 for details. Chapter 1 Green ASUS This motherboard and its user-friendly interface...

User Manual
Page 18
... to page 4-5 for details. Up to achieve a quiet and cool environment. It effectively and noiselessly transfers heat generated by ASUS. ASUS Fanless Design-Heat-sink solution The crystal-shaped heatsink features 0-dB thermal solution that offers users a noiseless PC environment. Stack Cool...3 is caused by up your favorite settings. 1-4 Chapter 1: Product Introduction Not only the beautiful shape upgrades the visual enjoyment for motherboard users, but also the heatsink design lowers the temperature of the specially designed PCB (printed circuit board) for effective heat dissipation ...
... to page 4-5 for details. Up to achieve a quiet and cool environment. It effectively and noiselessly transfers heat generated by ASUS. ASUS Fanless Design-Heat-sink solution The crystal-shaped heatsink features 0-dB thermal solution that offers users a noiseless PC environment. Stack Cool...3 is caused by up your favorite settings. 1-4 Chapter 1: Product Introduction Not only the beautiful shape upgrades the visual enjoyment for motherboard users, but also the heatsink design lowers the temperature of the specially designed PCB (printed circuit board) for effective heat dissipation ...

User Manual
Page 19
...update your DIY experience by speeding up and simplifying the DIY process! Chapter 1 ASUS EZ-Flash 2 Simply update BIOS from a USB flash drive before entering the OS. ASUS Q-DIMM ASUS Q-DIMM enhances your BIOS only in the CMOS or a separate file, giving...update utility. The motherboard features the ASUS O.C. You can be stored in a few clicks without preparing an additional floppy diskette or using an OS-based flash utility. Refer to page 3-35 for details. Profile Freely share and distribute favorite overclocking settings. ASUS P7H55D-M PRO 1-5 ASUS O.C. Simply launch...
...update your DIY experience by speeding up and simplifying the DIY process! Chapter 1 ASUS EZ-Flash 2 Simply update BIOS from a USB flash drive before entering the OS. ASUS Q-DIMM ASUS Q-DIMM enhances your BIOS only in the CMOS or a separate file, giving...update utility. The motherboard features the ASUS O.C. You can be stored in a few clicks without preparing an additional floppy diskette or using an OS-based flash utility. Refer to page 3-35 for details. Profile Freely share and distribute favorite overclocking settings. ASUS P7H55D-M PRO 1-5 ASUS O.C. Simply launch...

User Manual
Page 21
ASUS P7H55D-M PRO 2-1 Onboard LED The motherboard comes with a standby power LED that lights up to avoid touching the ICs on them due to static electricity. • Hold components by the edges ..., such as the power supply case, to avoid damaging them . • Whenever you uninstall any component, place it on a grounded antistatic pad or in any motherboard component. Chapter 2: Chapter 2 2.1 Before you proceed Hardware information Take note of the onboard LED. The illustration below shows the location of the following precautions before...
ASUS P7H55D-M PRO 2-1 Onboard LED The motherboard comes with a standby power LED that lights up to avoid touching the ICs on them due to static electricity. • Hold components by the edges ..., such as the power supply case, to avoid damaging them . • Whenever you uninstall any component, place it on a grounded antistatic pad or in any motherboard component. Chapter 2: Chapter 2 2.1 Before you proceed Hardware information Take note of the onboard LED. The illustration below shows the location of the following precautions before...

User Manual
Page 22
2.2 Motherboard overview 2.2.1 Motherboard layout Chapter 2 Refer to 2.7 Connectors for more information about rear panel connectors and internal connectors. 2-2 Chapter 2: Hardware information
2.2 Motherboard overview 2.2.1 Motherboard layout Chapter 2 Refer to 2.7 Connectors for more information about rear panel connectors and internal connectors. 2-2 Chapter 2: Hardware information

User Manual
Page 24
2.2.3 Placement direction When installing the motherboard, ensure that you place it into the holes indicated by circles to secure the motherboard to the rear part of the chassis Chapter 2 2-4 Chapter 2: Hardware information Doing so can damage the motherboard. Place this side towards the rear of the chassis as indicated in the image below. 2.2.4 Screw holes Place eight screws into the chassis in the correct orientation. The edge with external ports goes to the chassis. DO NOT overtighten the screws!
2.2.3 Placement direction When installing the motherboard, ensure that you place it into the holes indicated by circles to secure the motherboard to the rear part of the chassis Chapter 2 2-4 Chapter 2: Hardware information Doing so can damage the motherboard. Place this side towards the rear of the chassis as indicated in the image below. 2.2.4 Screw holes Place eight screws into the chassis in the correct orientation. The edge with external ports goes to the chassis. DO NOT overtighten the screws!

User Manual
Page 25
ASUS P7H55D-M PRO Load lever A B Retention tab 2-5 Press the load lever with the cap on the LGA1156 socket. • The product warranty does not cover damage to the socket contacts resulting from the retention tab. ASUS will process Return Merchandise Authorization (RMA) requests only if the motherboard comes ... if the PnP cap is shipment/ transit-related. • Keep the cap after installing the motherboard. Locate the CPU socket on the socket and the socket contacts are installing a CPU. ASUS will shoulder the cost of the PnP cap. 2.3.1 Installing the CPU To install a CPU: ...
ASUS P7H55D-M PRO Load lever A B Retention tab 2-5 Press the load lever with the cap on the LGA1156 socket. • The product warranty does not cover damage to the socket contacts resulting from the retention tab. ASUS will process Return Merchandise Authorization (RMA) requests only if the motherboard comes ... if the PnP cap is shipment/ transit-related. • Keep the cap after installing the motherboard. Locate the CPU socket on the socket and the socket contacts are installing a CPU. ASUS will shoulder the cost of the PnP cap. 2.3.1 Installing the CPU To install a CPU: ...

User Manual
Page 28
... with the LGA775 and LGA1366 sockets in place. Place the heatsink on top of the installed CPU, ensuring that you have installed the motherboard to the chassis before you use only Intel®‑certified multi‑directional heatsink and fan. • Your Intel® LGA1156 ... Interface Material is closest to secure the heatsink and fan assembly in size and dimension. Ensure that the four fasteners match the holes on the motherboard. 2. To install the CPU heatsink and fan: 1. Push down two fasteners at a time in B a diagonal sequence to the CPU fan connector. ...
... with the LGA775 and LGA1366 sockets in place. Place the heatsink on top of the installed CPU, ensuring that you have installed the motherboard to the chassis before you use only Intel®‑certified multi‑directional heatsink and fan. • Your Intel® LGA1156 ... Interface Material is closest to secure the heatsink and fan assembly in size and dimension. Ensure that the four fasteners match the holes on the motherboard. 2. To install the CPU heatsink and fan: 1. Push down two fasteners at a time in B a diagonal sequence to the CPU fan connector. ...

User Manual
Page 29
A B A A B B A 4. ASUS P7H55D-M PRO 2-9 Chapter 2 DO NOT forget to plug this connector. 2.3.3 Uninstalling the CPU heatsink and fan To uninstall the CPU heatsink and fan: 1. Carefully remove the heatsink and fan assembly from the motherboard. Hardware monitoring errors can occur if you fail to connect ...Pull up two fasteners at a time in a B diagonal sequence to the connector on the motherboard. 2. Disconnect the CPU fan cable from the connector on the motherboard labeled CPU_FAN. 3. Connect the CPU fan cable to disengage the heatsink and fan assembly from ...
A B A A B B A 4. ASUS P7H55D-M PRO 2-9 Chapter 2 DO NOT forget to plug this connector. 2.3.3 Uninstalling the CPU heatsink and fan To uninstall the CPU heatsink and fan: 1. Carefully remove the heatsink and fan assembly from the motherboard. Hardware monitoring errors can occur if you fail to connect ...Pull up two fasteners at a time in a B diagonal sequence to the connector on the motherboard. 2. Disconnect the CPU fan cable from the connector on the motherboard labeled CPU_FAN. 3. Connect the CPU fan cable to disengage the heatsink and fan assembly from ...

User Manual
Page 30
2.4 System memory 2.4.1 Overview The motherboard comes with less power consumption. The figure illustrates the location of the DDR3 DIMM sockets: Chapter 2 Recommended memory configurations One DIMM: Install only one memory ...
2.4 System memory 2.4.1 Overview The motherboard comes with less power consumption. The figure illustrates the location of the DDR3 DIMM sockets: Chapter 2 Recommended memory configurations One DIMM: Install only one memory ...

User Manual
Page 31
...4GB or more details, refer to the Microsoft® support site at http://support.microsoft.com/kb/929605/en-us. • This motherboard does not support DIMMs made up to DDR3-1333. Refer to section 3.5 Ai Tweaker menu for manual memory frequency adjustment. •... the OS can be about 3GB or less. For more on the motherboard, the actual usable memory for the dual-channel configuration. For effective use of the following: - ASUS P7H55D-M PRO 2-11 To use a more memory on the motherboard. Profile feature in Channel A and Channel B. Chapter 2 2.4.2 Memory ...
...4GB or more details, refer to the Microsoft® support site at http://support.microsoft.com/kb/929605/en-us. • This motherboard does not support DIMMs made up to DDR3-1333. Refer to section 3.5 Ai Tweaker menu for manual memory frequency adjustment. •... the OS can be about 3GB or less. For more on the motherboard, the actual usable memory for the dual-channel configuration. For effective use of the following: - ASUS P7H55D-M PRO 2-11 To use a more memory on the motherboard. Profile feature in Channel A and Channel B. Chapter 2 2.4.2 Memory ...

User Manual
Page 32
... 8-8-8-24 8-8-8-24 9-9-9-24 8-8-8-24 9-9-9-24 7-7-7-20 7-7-7-20 9-9-9-24 9-9-9-24 9-9-9-24 7-7-7-20 8-8-8-24 8-8-8-24 9-9-9-24 7-7-7-20 9-9-9-24 8-8-8-24 9-9-9-24 8-8-8-24 9-9-9-24 8-8-8-24 7-7-7-24 8-8-8-21 9-9-9-24 8 8 8 9 8-8-8 7-7-7 9-9-9 7-7-7 7-7-7 8-8-8 7-7-7 8-8-8 8-8-8 8-8-8 - Chapter 2 P7H55D-M PRO Motherboard Qualified Vendors Lists (QVL) DDR3-1600MHz capability for Intel CPU with integrated GPU (Clarkdale) Vendor Part No. A-DATA AX3U1600GB1G9-3G 3GB(3 x 1GB) SS - - A-DATA AX3U1600XB2G7...
... 8-8-8-24 8-8-8-24 9-9-9-24 8-8-8-24 9-9-9-24 7-7-7-20 7-7-7-20 9-9-9-24 9-9-9-24 9-9-9-24 7-7-7-20 8-8-8-24 8-8-8-24 9-9-9-24 7-7-7-20 9-9-9-24 8-8-8-24 9-9-9-24 8-8-8-24 9-9-9-24 8-8-8-24 7-7-7-24 8-8-8-21 9-9-9-24 8 8 8 9 8-8-8 7-7-7 9-9-9 7-7-7 7-7-7 8-8-8 7-7-7 8-8-8 8-8-8 8-8-8 - Chapter 2 P7H55D-M PRO Motherboard Qualified Vendors Lists (QVL) DDR3-1600MHz capability for Intel CPU with integrated GPU (Clarkdale) Vendor Part No. A-DATA AX3U1600GB1G9-3G 3GB(3 x 1GB) SS - - A-DATA AX3U1600XB2G7...

User Manual
Page 34
... H5TQ1G83AFPG7C 7 - SS MICRON 8ZF22 D9KPV 7 - DIMM socket support (Optional) A* B* C 2-14 Chapter 2: Hardware information Chapter 2 P7H55D-M PRO Motherboard Qualified Vendors Lists (QVL) DDR3-1333MHz capability for Intel CPU with integrated GPU (Clarkdale) Vendor Part No. K4B1G0846D - DIMM socket support ...;• ••• •• ••• ••• •• P7H55D-M PRO Motherboard Qualified Vendors Lists (QVL) DDR3-1067MHz capability for Intel CPU with integrated GPU (Clarkdale) Vendor Part No. SS...
... H5TQ1G83AFPG7C 7 - SS MICRON 8ZF22 D9KPV 7 - DIMM socket support (Optional) A* B* C 2-14 Chapter 2: Hardware information Chapter 2 P7H55D-M PRO Motherboard Qualified Vendors Lists (QVL) DDR3-1333MHz capability for Intel CPU with integrated GPU (Clarkdale) Vendor Part No. K4B1G0846D - DIMM socket support ...;• ••• •• ••• ••• •• P7H55D-M PRO Motherboard Qualified Vendors Lists (QVL) DDR3-1067MHz capability for Intel CPU with integrated GPU (Clarkdale) Vendor Part No. SS...


