User Guide
Page 13
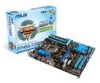
... the ICs on them due to static electricity. • Hold components by the edges to page ix for buying an ASUS® P7H55/USB3 motherboard! The illustration below shows the location of accessories. ASUS P7H55/USB3 1-1 If any of the following precautions before you install motherboard components or change any component, place it on it, check...
... the ICs on them due to static electricity. • Hold components by the edges to page ix for buying an ASUS® P7H55/USB3 motherboard! The illustration below shows the location of accessories. ASUS P7H55/USB3 1-1 If any of the following precautions before you install motherboard components or change any component, place it on it, check...
User Guide
Page 15
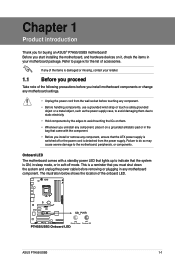
... not remove the PnP cap unless you see any damage to the PnP cap/socket contacts/motherboard components. Load lever A B Retention tab ASUS P7H55/USB3 1-3 ASUS will shoulder the cost of repair only if the damage is on the socket and the socket contacts are not bent. Contact your thumb ... socket. • The product warranty does not cover damage to the right (B) until it is missing, or if you are installing a CPU. ASUS will process Return Merchandise Authorization (RMA) requests only if the motherboard comes with the cap on the motherboard. 2. 1.3 Central Processing Unit (CPU) ...
... not remove the PnP cap unless you see any damage to the PnP cap/socket contacts/motherboard components. Load lever A B Retention tab ASUS P7H55/USB3 1-3 ASUS will shoulder the cost of repair only if the damage is on the socket and the socket contacts are not bent. Contact your thumb ... socket. • The product warranty does not cover damage to the right (B) until it is missing, or if you are installing a CPU. ASUS will process Return Merchandise Authorization (RMA) requests only if the motherboard comes with the cap on the motherboard. 2. 1.3 Central Processing Unit (CPU) ...
User Guide
Page 17
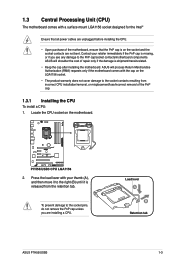
If so, skip this step. If it gets into your eyes or touches your skin, wash it . ASUS P7H55/USB3 1-5 The Thermal Interface Material is spread in contact with preapplied thermal paste. Close the load plate (A), and then push down the load lever (B), ensuring that ...
If so, skip this step. If it gets into your eyes or touches your skin, wash it . ASUS P7H55/USB3 1-5 The Thermal Interface Material is spread in contact with preapplied thermal paste. Close the load plate (A), and then push down the load lever (B), ensuring that ...
User Guide
Page 19
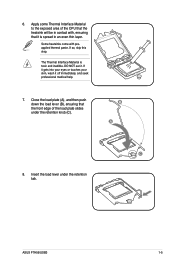
... the motherboard labeled CPU_FAN. Disconnect the CPU fan cable from the motherboard. 3. Rotate each fastener counterclockwise. 3. DO NOT forget to the connector on the motherboard. 2. A B A A B B A 4. ASUS P7H55/USB3 1-7 Connect the CPU fan cable to connect the CPU fan connector!
... the motherboard labeled CPU_FAN. Disconnect the CPU fan cable from the motherboard. 3. Rotate each fastener counterclockwise. 3. DO NOT forget to the connector on the motherboard. 2. A B A A B B A 4. ASUS P7H55/USB3 1-7 Connect the CPU fan cable to connect the CPU fan connector!
User Guide
Page 21
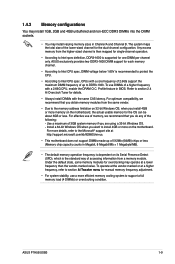
... CPU spec, DIMM voltage below 1.65V is recommended to protect the CPU. • According to Intel CPU spec, CPUs with a 2.66G CPU, enable the DRAM O.C. ASUS P7H55/USB3 1-9 Refer to section 2.4 Ai Overclock Tuner for the dual-channel configuration. 1.4.2 Memory configurations You may install 1GB, 2GB and 4GB unbuffered and non‑ECC...
... CPU spec, DIMM voltage below 1.65V is recommended to protect the CPU. • According to Intel CPU spec, CPUs with a 2.66G CPU, enable the DRAM O.C. ASUS P7H55/USB3 1-9 Refer to section 2.4 Ai Overclock Tuner for the dual-channel configuration. 1.4.2 Memory configurations You may install 1GB, 2GB and 4GB unbuffered and non‑ECC...
User Guide
Page 27
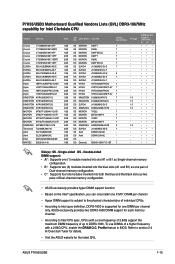
...- 7 - 7 - - - 8 - 7 - - - 7 - 7 - 7 - 7 - 7 1.5 7 1.5 - 1.5 - 1.5 7 - 7 - 7 - 7 - 8 1.5 7 - - - - - - - 7 - ASUS P7H55/USB3 1-15 Single-sided DS - To use DIMMs of a higher frequency with a core frequency of 2.66G support the maximum DIMM frequency of individual CPUs. • According ...-AE DS - - Refer to DDR3-1333. DIMM socket support (Optional) A* B* C Side(s): SS - P7H55/USB3 Motherboard Qualified Vendors Lists (QVL) DDR3-1067MHz capability for the latest QVL. Size Crucial CT12864BA1067.8FF 1GB Crucial CT12864BA1067...
...- 7 - 7 - - - 8 - 7 - - - 7 - 7 - 7 - 7 - 7 1.5 7 1.5 - 1.5 - 1.5 7 - 7 - 7 - 7 - 8 1.5 7 - - - - - - - 7 - ASUS P7H55/USB3 1-15 Single-sided DS - To use DIMMs of a higher frequency with a core frequency of 2.66G support the maximum DIMM frequency of individual CPUs. • According ...-AE DS - - Refer to DDR3-1333. DIMM socket support (Optional) A* B* C Side(s): SS - P7H55/USB3 Motherboard Qualified Vendors Lists (QVL) DDR3-1067MHz capability for the latest QVL. Size Crucial CT12864BA1067.8FF 1GB Crucial CT12864BA1067...
User Guide
Page 29
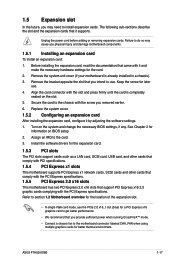
... the expansion card, configure it and make the necessary hardware settings for the location of the expansion slot. • In single VGA card mode, use . 4. ASUS P7H55/USB3 1-17
... the expansion card, configure it and make the necessary hardware settings for the location of the expansion slot. • In single VGA card mode, use . 4. ASUS P7H55/USB3 1-17
User Guide
Page 31
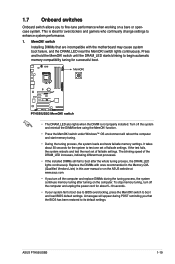
... with ones recommended in the Memory QVL (Qualified Vendors Lists) in this user manual or on the ASUS website at www.asus.com. • If you to boot after turning on a bare or opencase system. ASUS P7H55/USB3 1-19 1.7 Onboard switches Onboard switch allows you turn off the system and reinstall the DIMM before using...
... with ones recommended in the Memory QVL (Qualified Vendors Lists) in this user manual or on the ASUS website at www.asus.com. • If you to boot after turning on a bare or opencase system. ASUS P7H55/USB3 1-19 1.7 Onboard switches Onboard switch allows you turn off the system and reinstall the DIMM before using...
User Guide
Page 33
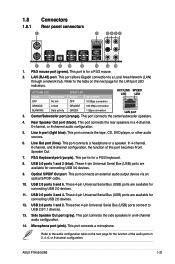
... to a Local Area Network (LAN) through a network hub. This port connects the side speakers in a 4-channel, 6-channel, or 8-channel audio configuration. 5. This port connects a microphone. ASUS P7H55/USB3 1-21 This port is for connecting USB 2.0 devices. 12. Refer to the audio configuration table on the next page for a PS/2 mouse. 2. Line In port...
... to a Local Area Network (LAN) through a network hub. This port connects the side speakers in a 4-channel, 6-channel, or 8-channel audio configuration. 5. This port connects a microphone. ASUS P7H55/USB3 1-21 This port is for connecting USB 2.0 devices. 12. Refer to the audio configuration table on the next page for a PS/2 mouse. 2. Line In port...
User Guide
Page 35
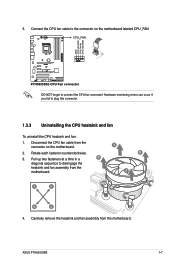
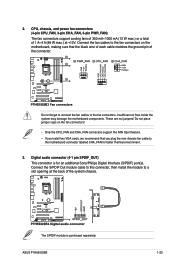
The S/PDIF module is for better thermal environment. 3. ASUS P7H55/USB3 1-23 2. Connect the S/PDIF Out module cable to this connector, then install the module to a slot opening at +12V. Digital audio connector (4-1 pin SPDIF_OUT) This ...
The S/PDIF module is for better thermal environment. 3. ASUS P7H55/USB3 1-23 2. Connect the S/PDIF Out module cable to this connector, then install the module to a slot opening at +12V. Digital audio connector (4-1 pin SPDIF_OUT) This ...
User Guide
Page 37
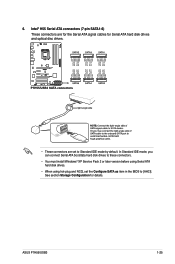
6. Intel® H55 Serial ATA connectors (7-pin SATA1-6) These connectors are for the Serial ATA signal cables for details. ASUS P7H55/USB3 1-25 In Standard IDE mode, you can connect Serial ATA boot/data hard disk drives to these connectors. • You must install Windows® XP ...
6. Intel® H55 Serial ATA connectors (7-pin SATA1-6) These connectors are for the Serial ATA signal cables for details. ASUS P7H55/USB3 1-25 In Standard IDE mode, you can connect Serial ATA boot/data hard disk drives to these connectors. • You must install Windows® XP ...
User Guide
Page 39
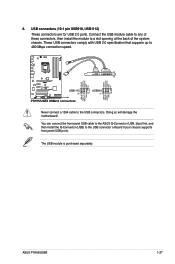
Never connect a 1394 cable to 480 Mbps connection speed. ASUS P7H55/USB3 1-27 These USB connectors comply with USB 2.0 specification that supports up to the USB connectors. You can connect the front panel USB cable to the ASUS Q-Connector (USB, blue) first, and then install the Q-Connector (USB) to a slot opening at the back of...
Never connect a 1394 cable to 480 Mbps connection speed. ASUS P7H55/USB3 1-27 These USB connectors comply with USB 2.0 specification that supports up to the USB connectors. You can connect the front panel USB cable to the ASUS Q-Connector (USB, blue) first, and then install the Q-Connector (USB) to a slot opening at the back of...
User Guide
Page 41
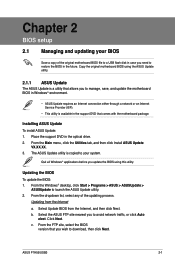
...an Internet Service Provider (ISP). • This utility is copied to manage, save, and update the motherboard BIOS in the future. b. ASUS P7H55/USB3 2-1 Chapter 2 BIOS setup 2.1 Managing and updating your system. Place the support DVD in case you wish to avoid network traffic, or click... Auto elect. Installing ASUS Update To install ASUS Update: 1. Quit all Windows® applications before you update the BIOS using the ASUS Update utility. 2.1.1 ASUS Update The ASUS Update is a utility that allows you to download, then click Next...
...an Internet Service Provider (ISP). • This utility is copied to manage, save, and update the motherboard BIOS in the future. b. ASUS P7H55/USB3 2-1 Chapter 2 BIOS setup 2.1 Managing and updating your system. Place the support DVD in case you wish to avoid network traffic, or click... Auto elect. Installing ASUS Update To install ASUS Update: 1. Quit all Windows® applications before you update the BIOS using the ASUS Update utility. 2.1.1 ASUS Update The ASUS Update is a utility that allows you to download, then click Next...
User Guide
Page 43
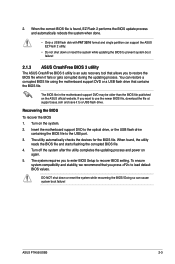
... recovering the BIOS! DO NOT shut down or reset the system while updating the BIOS to prevent system boot failure! 2.1.3 ASUS CrashFree BIOS 3 utility The ASUS CrashFree BIOS 3 utility is an auto recovery tool that allows you want to use the newer BIOS file, download the file...and power on the system. 2. The BIOS file in the motherboard support DVD may be older than the BIOS file published on the ASUS official website. ASUS P7H55/USB3 2-3 2. To ensure system compatibility and stability, we recommend that contains the BIOS file. Doing so can restore a corrupted BIOS file using...
... recovering the BIOS! DO NOT shut down or reset the system while updating the BIOS to prevent system boot failure! 2.1.3 ASUS CrashFree BIOS 3 utility The ASUS CrashFree BIOS 3 utility is an auto recovery tool that allows you want to use the newer BIOS file, download the file...and power on the system. 2. The BIOS file in the motherboard support DVD may be older than the BIOS file published on the ASUS official website. ASUS P7H55/USB3 2-3 2. To ensure system compatibility and stability, we recommend that contains the BIOS file. Doing so can restore a corrupted BIOS file using...
User Guide
Page 45
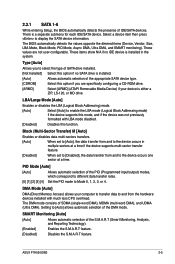
... with LBA mode disabled. [Disabled] Disables this option if you to [Disabled], the data transfer from the hardware devices installed with much less CPU overhead. ASUS P7H55/USB3 2-5 The DMA mode consists of the S.M.A.R.T (Smart Monitoring, Analysis, and Reporting Technology). [Enabled] Enables the S.M.A.R.T feature. [Disabled] Disables the S.M.A.R.T feature. These items show N/A if no...
... with LBA mode disabled. [Disabled] Disables this option if you to [Disabled], the data transfer from the hardware devices installed with much less CPU overhead. ASUS P7H55/USB3 2-5 The DMA mode consists of the S.M.A.R.T (Smart Monitoring, Analysis, and Reporting Technology). [Enabled] Enables the S.M.A.R.T feature. [Disabled] Disables the S.M.A.R.T feature. These items show N/A if no...
User Guide
Page 47
The BIOS automatically detects the BIOS information, CPU specification, and system memory in this menu. ASUS P7H55/USB3 2-7 2.3.4 System Information This menu gives you an overview of the general system specifications.
The BIOS automatically detects the BIOS information, CPU specification, and system memory in this menu. ASUS P7H55/USB3 2-7 2.3.4 System Information This menu gives you an overview of the general system specifications.
User Guide
Page 49
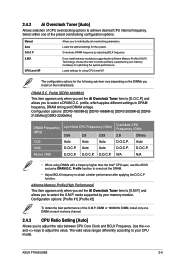
...channel. 2.4.3 CPU Ratio Setting [Auto] Allows you install memory module(s) supporting the eXtreme Memory Profile (X.M.P.) Technology, choose this ASUS exclusive DRAM O.C. CPU Level UP If you to achieve desired CPU internal frequency. The configuration options for using DIMMs with ... Overclock Tuner item to [X.M.P.] and allows you to set the Ai Overclock Tuner item to [D.O.C.P.] and allows you to adjust the value. ASUS P7H55/USB3 2-9 DRAM O.C. profile, which applies different settings to select the X.M.P. Configuration options: [DDR3-1800MHz] [DDR3-1866MHz] [DDR3-2000MHz] [...
...channel. 2.4.3 CPU Ratio Setting [Auto] Allows you install memory module(s) supporting the eXtreme Memory Profile (X.M.P.) Technology, choose this ASUS exclusive DRAM O.C. CPU Level UP If you to achieve desired CPU internal frequency. The configuration options for using DIMMs with ... Overclock Tuner item to [X.M.P.] and allows you to set the Ai Overclock Tuner item to [D.O.C.P.] and allows you to adjust the value. ASUS P7H55/USB3 2-9 DRAM O.C. profile, which applies different settings to select the X.M.P. Configuration options: [DDR3-1800MHz] [DDR3-1866MHz] [DDR3-2000MHz] [...
User Guide
Page 51
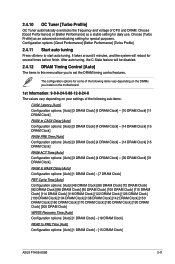
...] WRITE Recovery Time [Auto] Configuration options: [Auto] [1 DRAM Clock] - [18 DRAM Clock] READ to PRE Time [Auto] Configuration options: [Auto] [1 DRAM Clock] - [15 DRAM Clock] ASUS P7H55/USB3 2-11
...] WRITE Recovery Time [Auto] Configuration options: [Auto] [1 DRAM Clock] - [18 DRAM Clock] READ to PRE Time [Auto] Configuration options: [Auto] [1 DRAM Clock] - [15 DRAM Clock] ASUS P7H55/USB3 2-11
User Guide
Page 53
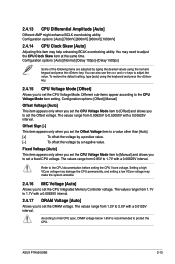
.... The values range from 1.2V to set the DRAM voltage. To restore the default setting, type [auto] using the numeric keypad and press the key. ASUS P7H55/USB3 2-13 Configuration options: [Auto] [700mV] [800mV] [900mV] [1000mV] 2.4.14 CPU Clock Skew [Auto] Adjusting this item may need to set the CPU Voltage Mode. Fixed...
.... The values range from 1.2V to set the DRAM voltage. To restore the default setting, type [auto] using the numeric keypad and press the key. ASUS P7H55/USB3 2-13 Configuration options: [Auto] [700mV] [800mV] [900mV] [1000mV] 2.4.14 CPU Clock Skew [Auto] Adjusting this item may need to set the CPU Voltage Mode. Fixed...
User Guide
Page 55
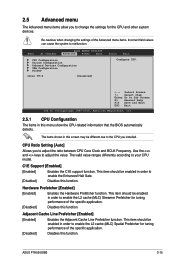
... to malfunction. CPU Ratio Setting [Auto] Allows you to your CPU model. Adjacent Cache Line Prefetcher [Enabled] [Enabled] Enables the Adjacent Cache Line Prefetcher function. ASUS P7H55/USB3 2-15 C1E Support [Enabled] [Enabled] Enables the C1E support function. This item should be enabled in order to enable the L2 cache (MLC) Streamer Prefetcher...
... to malfunction. CPU Ratio Setting [Auto] Allows you to your CPU model. Adjacent Cache Line Prefetcher [Enabled] [Enabled] Enables the Adjacent Cache Line Prefetcher function. ASUS P7H55/USB3 2-15 C1E Support [Enabled] [Enabled] Enables the C1E support function. This item should be enabled in order to enable the L2 cache (MLC) Streamer Prefetcher...


