
User Manual
Page 8
..., sockets and circuitry. • Avoid dust, humidity, and temperature extremes. Operation safety • Before installing the motherboard and adding devices on it, carefully read all the manuals that your power supply is broken, do not try to fix it may become wet. • Place the product...system, ensure that all power cables are connected. If you add a device. • Before connecting or removing signal cables from the motherboard, ensure that the power cables for the devices are unplugged before the signal cables are unplugged. • Seek professional assistance before using...
..., sockets and circuitry. • Avoid dust, humidity, and temperature extremes. Operation safety • Before installing the motherboard and adding devices on it, carefully read all the manuals that your power supply is broken, do not try to fix it may become wet. • Place the product...system, ensure that all power cables are connected. If you add a device. • Before connecting or removing signal cables from the motherboard, ensure that the power cables for the devices are unplugged before the signal cables are unplugged. • Seek professional assistance before using...
User Manual
Page 15
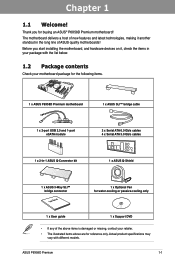
... items. Chapter 1 1 x ASUS P6X58D Premium motherboard 1 x ASUS SLI™ bridge cable 1 x 2-port USB 2.0 and 1-port eSATA module 2 x Serial ATA 6.0 Gb/s cables 4 x Serial ATA 3.0 Gb/s cables 1 x 2-in-1 ASUS Q-Connector kit 1 x ASUS Q-Shield 1 x ASUS 3-Way SLI™ bridge connector User Manual 1 x Optional Fan for water-cooling or passive-cooling only 1 x User guide 1 x Support DVD • If any of ASUS quality motherboards! ASUS P6X58D Premium 1-1 Before you...
... items. Chapter 1 1 x ASUS P6X58D Premium motherboard 1 x ASUS SLI™ bridge cable 1 x 2-port USB 2.0 and 1-port eSATA module 2 x Serial ATA 6.0 Gb/s cables 4 x Serial ATA 3.0 Gb/s cables 1 x 2-in-1 ASUS Q-Connector kit 1 x ASUS Q-Shield 1 x ASUS 3-Way SLI™ bridge connector User Manual 1 x Optional Fan for water-cooling or passive-cooling only 1 x User guide 1 x Support DVD • If any of ASUS quality motherboards! ASUS P6X58D Premium 1-1 Before you...
User Manual
Page 31
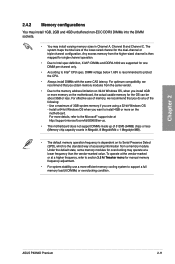
...at a lower frequency than the vendor-marked value. Use a maximum of 3GB system memory if you install 4GB or more on the motherboard. Under the default state, some memory modules for overclocking may install varying memory sizes in Megabit, 8 Megabit/Mb = 1 Megabyte/...manual memory frequency adjustment. • For system stability, use of memory, we recommend that you want to install 4GB or more memory on the motherboard, the actual usable memory for single-channel operation. • Due to support a full memory load (6 DIMMs) or overclocking condition. ASUS P6X58D Premium...
...at a lower frequency than the vendor-marked value. Use a maximum of 3GB system memory if you install 4GB or more on the motherboard. Under the default state, some memory modules for overclocking may install varying memory sizes in Megabit, 8 Megabit/Mb = 1 Megabyte/...manual memory frequency adjustment. • For system stability, use of memory, we recommend that you want to install 4GB or more memory on the motherboard, the actual usable memory for single-channel operation. • Due to support a full memory load (6 DIMMs) or overclocking condition. ASUS P6X58D Premium...
User Manual
Page 41
... link as the default. • If you provide sufficient power when running CrossFireX™ or SLI™ mode. ASUS P6X58D Premium 2-21 See page 2-35 for details. • Connect a chassis fan to the motherboard connector labeled CHA_FAN1/2/3 when using multiple graphics cards for details. • We recommend that you install a PCIe x16 ... to the PCIe x16_3 slot, the three PCIe x16 slots will work at x16, x8, x8 link as the default. • You may manually reassign the link width of PCIe x16_2 and PCIe x16_3 slots in BIOS settings. See page 3-22 for better thermal environment.
... link as the default. • If you provide sufficient power when running CrossFireX™ or SLI™ mode. ASUS P6X58D Premium 2-21 See page 2-35 for details. • Connect a chassis fan to the motherboard connector labeled CHA_FAN1/2/3 when using multiple graphics cards for details. • We recommend that you install a PCIe x16 ... to the PCIe x16_3 slot, the three PCIe x16 slots will work at x16, x8, x8 link as the default. • You may manually reassign the link width of PCIe x16_2 and PCIe x16_3 slots in BIOS settings. See page 3-22 for better thermal environment.

User Manual
Page 44
...its default settings. • We recommend that are incompaible with ones recommended in the Memory QVL (Qualified Vendors Lists) in this user manual or on the computer. switch Installing DIMMs that you turn off the system and reinstall the DIMM before using the MemOK! Press and ...DIMMs still fail to boot after turning on the ASUS website at www.asus.com. • If you download and update to test one set is not properly installed. function. 2-24 Chapter 2: Hardware information Replace the DIMMs with the motherboard may cause system boot failure, and the DRAM_LED near...
...its default settings. • We recommend that are incompaible with ones recommended in the Memory QVL (Qualified Vendors Lists) in this user manual or on the computer. switch Installing DIMMs that you turn off the system and reinstall the DIMM before using the MemOK! Press and ...DIMMs still fail to boot after turning on the ASUS website at www.asus.com. • If you download and update to test one set is not properly installed. function. 2-24 Chapter 2: Hardware information Replace the DIMMs with the motherboard may cause system boot failure, and the DRAM_LED near...
User Manual
Page 49
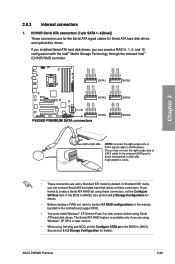
2.8.3 Internal connectors 1. See section 3.4.2 Storage Configuration for details. • Before creating a RAID set, refer to [AHCI]. ASUS P6X58D Premium 2-29 If you installed Serial ATA hard disk drives, you can create a RAID 0, 1, 5, and 10 configuration with the Intel® Matrix ...the Configure SATA as in the BIOS to section 4.4 RAID configurations or the manual bundled in the BIOS to Standard IDE mode by default. Chapter 2 • These connectors are set the Configure SATA as item in the motherboard support DVD. • You must install Windows® XP Service Pack ...
2.8.3 Internal connectors 1. See section 3.4.2 Storage Configuration for details. • Before creating a RAID set, refer to [AHCI]. ASUS P6X58D Premium 2-29 If you installed Serial ATA hard disk drives, you can create a RAID 0, 1, 5, and 10 configuration with the Intel® Matrix ...the Configure SATA as in the BIOS to section 4.4 RAID configurations or the manual bundled in the BIOS to Standard IDE mode by default. Chapter 2 • These connectors are set the Configure SATA as item in the motherboard support DVD. • You must install Windows® XP Service Pack ...
User Manual
Page 59
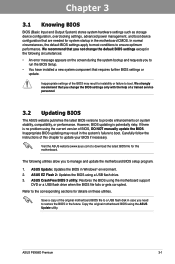
Chapter 3 ASUS P6X58D Premium 3-1 We strongly recommend that you to run the BIOS Setup. • You have installed a new system component that requires further BIOS settings or update. If there is potentially risky. Carefully follow the instructions of this motherboard. The following circumstances: • An error message appears on these utilities. In normal circumstances, the... not change the default BIOS settings except in the following utilities allow you change the BIOS settings only with the help of BIOS, DO NOT manually update the BIOS.
Chapter 3 ASUS P6X58D Premium 3-1 We strongly recommend that you to run the BIOS Setup. • You have installed a new system component that requires further BIOS settings or update. If there is potentially risky. Carefully follow the instructions of this motherboard. The following circumstances: • An error message appears on these utilities. In normal circumstances, the... not change the default BIOS settings except in the following utilities allow you change the BIOS settings only with the help of BIOS, DO NOT manually update the BIOS.
User Manual
Page 70
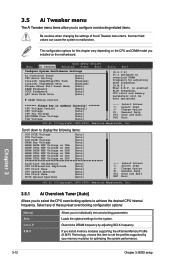
... [Auto] DRAM CTRL REF Voltage on CHB [Auto] DRAM DATA REF Voltage on CHC [Auto] DRAM CTRL REF Voltage on the motherboard. Chapter 3 3-12 Chapter 3: BIOS setup Overclocks DRAM frequency by adjusting BCLK frequency. 3.5 Ai Tweaker menu The Ai Tweaker menu items... allow you to configure overclocking-related items. Be cautious when changing the settings of these preset overclocking configuration options: Manual Auto D.O.C.P X.M.P. is enabled BLCK frequency, CPU ratio and memory parameters will be auto optimized. ←→ Select Screen ↑&#...
... [Auto] DRAM CTRL REF Voltage on CHB [Auto] DRAM DATA REF Voltage on CHC [Auto] DRAM CTRL REF Voltage on the motherboard. Chapter 3 3-12 Chapter 3: BIOS setup Overclocks DRAM frequency by adjusting BCLK frequency. 3.5 Ai Tweaker menu The Ai Tweaker menu items... allow you to configure overclocking-related items. Be cautious when changing the settings of these preset overclocking configuration options: Manual Auto D.O.C.P X.M.P. is enabled BLCK frequency, CPU ratio and memory parameters will be auto optimized. ←→ Select Screen ↑&#...
User Manual
Page 71
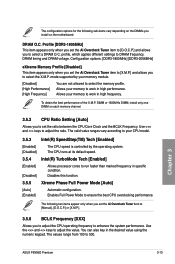
... default speed. The values range from 100 to select a DRAM O.C. Chapter 3 ASUS P6X58D Premium 3-13 DRAM O.C. Profile [DDR3-1805MHz] This item appears only when you set... Power Mode [Auto] Automatic configuration. DIMM or 1600MHz DIMM, install only one DIMM on the motherboard. Intel(R) TurboMode Tech [Enabled] Allows processor cores to work in the desired value using the numeric...options for the following two items appear only when you set the Ai Overclock Tuner item to [Manual], [D.O.C.P.] or [X.M.P.]. 3.5.6 BCLK Frequency [XXX] Allows you to adjust the CPU operating frequency to...
... default speed. The values range from 100 to select a DRAM O.C. Chapter 3 ASUS P6X58D Premium 3-13 DRAM O.C. Profile [DDR3-1805MHz] This item appears only when you set... Power Mode [Auto] Automatic configuration. DIMM or 1600MHz DIMM, install only one DIMM on the motherboard. Intel(R) TurboMode Tech [Enabled] Allows processor cores to work in the desired value using the numeric...options for the following two items appear only when you set the Ai Overclock Tuner item to [Manual], [D.O.C.P.] or [X.M.P.]. 3.5.6 BCLK Frequency [XXX] Allows you to adjust the CPU operating frequency to...
User Manual
Page 97
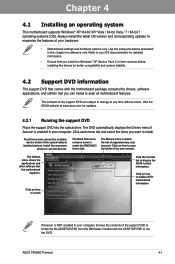
The Manual menu contains the list of the support DVD are subject to change at www.asus.com for updates. 4.2.1 Running the support DVD Place the support DVD into the optical drive. ASUS P6X58D Premium 4-1 Click each menu tab and select the items you want to create the RAID.../AHCI driver disk. Chapter 4: Chapter 4 Software support 4.1 Installing an operating system This motherboard supports Windows® XP/ 64-bit XP/ Vista / 64...
The Manual menu contains the list of the support DVD are subject to change at www.asus.com for updates. 4.2.1 Running the support DVD Place the support DVD into the optical drive. ASUS P6X58D Premium 4-1 Click each menu tab and select the items you want to create the RAID.../AHCI driver disk. Chapter 4: Chapter 4 Software support 4.1 Installing an operating system This motherboard supports Windows® XP/ 64-bit XP/ Vista / 64...

User Manual
Page 98
Click the Manual tab. Some software manuals are in different languages. The software manual files are provided in Portable Document Format (PDF). Click ASUS Motherboard Utility Guide from the Utilities menu before opening the files. 1. The Manual folder of your selected software. Double-click the language to get the necessary software manuals. The actual software manuals containing in the...
Click the Manual tab. Some software manuals are in different languages. The software manual files are provided in Portable Document Format (PDF). Click ASUS Motherboard Utility Guide from the Utilities menu before opening the files. 1. The Manual folder of your selected software. Double-click the language to get the necessary software manuals. The actual software manuals containing in the...

User Manual
Page 99
... > PC Probe II v1.xx.xx. Click this utility, you turn it on. ASUS P6X58D Premium 4-3 View the online help or readme file that your computer is always at www.asus.com for more information. 4.3.1 ASUS PC Probe II PC Probe II is software-based, you can start monitoring your computer... area. 4.3 Software information Most of any problem with the software application for detailed software configuration. Install PC Probe II from the motherboard support DVD. 2. With this icon to the software manual in the support DVD or visit the ASUS website at a healthy operating condition.
... > PC Probe II v1.xx.xx. Click this utility, you turn it on. ASUS P6X58D Premium 4-3 View the online help or readme file that your computer is always at www.asus.com for more information. 4.3.1 ASUS PC Probe II PC Probe II is software-based, you can start monitoring your computer... area. 4.3 Software information Most of any problem with the software application for detailed software configuration. Install PC Probe II from the motherboard support DVD. 2. With this icon to the software manual in the support DVD or visit the ASUS website at a healthy operating condition.

User Manual
Page 100
The AI Suite main window appears. 3. The AI Suite icon appears in this icon to the software manual in the support DVD or visit the ASUS website at www.asus.com for reference only. Click to open the monitor window that displays system information such as CPU temperature, CPU...• Refer to restore the window. xx. Install AI Suite from the motherboard support DVD. 2. The actual utility buttons vary by clicking Start > All Programs > ASUS > AI Suite > AI Suite v1.xx. 4.3.2 ASUS AI Suite ASUS AI Suite allows you minimize the application main window, click this section are ...
The AI Suite main window appears. 3. The AI Suite icon appears in this icon to the software manual in the support DVD or visit the ASUS website at www.asus.com for reference only. Click to open the monitor window that displays system information such as CPU temperature, CPU...• Refer to restore the window. xx. Install AI Suite from the motherboard support DVD. 2. The actual utility buttons vary by clicking Start > All Programs > ASUS > AI Suite > AI Suite v1.xx. 4.3.2 ASUS AI Suite ASUS AI Suite allows you minimize the application main window, click this section are ...

User Manual
Page 101
...or visit the ASUS website at www.asus.com for each mode. With auto phase switching for a few seconds. ASUS EPU provides you with a total system power-saving solution. Then, the EPU main menu appears. Launching EPU After installing EPU from the motherboard support DVD, ...EPU, the following message will appear, asking you select Auto Mode , the system shifts modes automatically according to the software manual in real-time. ASUS P6X58D Premium 4-5 Running calibration allows the system to detect CPU properties to run Calibration first. EPU main menu Chapter 4 Refer to...
...or visit the ASUS website at www.asus.com for each mode. With auto phase switching for a few seconds. ASUS EPU provides you with a total system power-saving solution. Then, the EPU main menu appears. Launching EPU After installing EPU from the motherboard support DVD, ...EPU, the following message will appear, asking you select Auto Mode , the system shifts modes automatically according to the software manual in real-time. ASUS P6X58D Premium 4-5 Running calibration allows the system to detect CPU properties to run Calibration first. EPU main menu Chapter 4 Refer to...
User Manual
Page 103
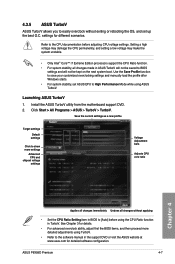
Install the ASUS TurboV utility from the motherboard support DVD. 2. Save the current settings as a new profile Target settings Default settings Click to show more detailed adjustments using ASUS TurboV. Setting a high voltage may damage the CPU permanently, and setting a low voltage ...Ratio Setting item in BIOS to the software manual in the support DVD or visit the ASUS website at www.asus.com for different scenarios. Launching ASUS TurboV 1. settings for detailed software configuration. ASUS P6X58D Premium 4-7 4.3.5 ASUS TurboV ASUS TurboV allows you to the CPU documentation ...
Install the ASUS TurboV utility from the motherboard support DVD. 2. Save the current settings as a new profile Target settings Default settings Click to show more detailed adjustments using ASUS TurboV. Setting a high voltage may damage the CPU permanently, and setting a low voltage ...Ratio Setting item in BIOS to the software manual in the support DVD or visit the ASUS website at www.asus.com for different scenarios. Launching ASUS TurboV 1. settings for detailed software configuration. ASUS P6X58D Premium 4-7 4.3.5 ASUS TurboV ASUS TurboV allows you to the CPU documentation ...
User Manual
Page 104
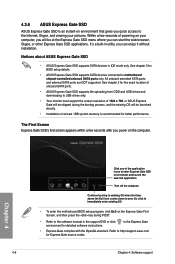
...USB drives only. • Your monitor must support the screen resolution of 1024 x 768, or ASUS Express Gate will be skipped during POST. • Refer to the software manual in utility, you quick access to the Internet, Skype, and viewing your computer, you will ...onboard extended SATA ports and external SATA ports are NOT supported. 4.3.6 ASUS Express Gate SSD ASUS Express Gate SSD is recommended for BIOS setup details. • ASUS Express Gate SSD supports SATA devices connected to motherboard chipset-controlled onboard SATA ports only. Refer to immediately enter existing OS ...
...USB drives only. • Your monitor must support the screen resolution of 1024 x 768, or ASUS Express Gate will be skipped during POST. • Refer to the software manual in utility, you quick access to the Internet, Skype, and viewing your computer, you will ...onboard extended SATA ports and external SATA ports are NOT supported. 4.3.6 ASUS Express Gate SSD ASUS Express Gate SSD is recommended for BIOS setup details. • ASUS Express Gate SSD supports SATA devices connected to motherboard chipset-controlled onboard SATA ports only. Refer to immediately enter existing OS ...

User Manual
Page 116
... graphics cards The following pictures are properly seated on each graphics card. Insert the two graphics card into the PCIEX16 slots. If your motherboard has more than two PCIEX16 slots, refer to the goldfingers on the slots. 4. Ensure that the cards are for multi-graphics card ...graphics card. Align and firmly insert the CrossFireX bridge connector to Chapter 2 in place. Ensure that the connector is firmly in this user manual for the locations of the PCIEX16 slots recommended for reference only. Connect a VGA or a DVI cable to the two graphics cards separately....
... graphics cards The following pictures are properly seated on each graphics card. Insert the two graphics card into the PCIEX16 slots. If your motherboard has more than two PCIEX16 slots, refer to the goldfingers on the slots. 4. Ensure that the cards are for multi-graphics card ...graphics card. Align and firmly insert the CrossFireX bridge connector to Chapter 2 in place. Ensure that the connector is firmly in this user manual for the locations of the PCIEX16 slots recommended for reference only. Connect a VGA or a DVI cable to the two graphics cards separately....

User Manual
Page 117
If your motherboard has more than three PCIEX16 slots, refer to the goldfingers on the slots. 4. Connect three independent auxiliary power sources from the power supply to the ... graphics card. Prepare three CrossFireX-ready graphics cards. 2. Ensure that the cards are firmly in this user manual for the locations of the PCIEX16 slots recommended for multi-graphics card installation. 3. Align and firmly insert the two CrossFireX bridge connectors to Chapter 2 in place. 5. ASUS P6X58D Premium 5-3 Chapter 5 5.1.4 Installing three CrossFireX™ graphics cards 1.
If your motherboard has more than three PCIEX16 slots, refer to the goldfingers on the slots. 4. Connect three independent auxiliary power sources from the power supply to the ... graphics card. Prepare three CrossFireX-ready graphics cards. 2. Ensure that the cards are firmly in this user manual for the locations of the PCIEX16 slots recommended for multi-graphics card installation. 3. Align and firmly insert the two CrossFireX bridge connectors to Chapter 2 in place. 5. ASUS P6X58D Premium 5-3 Chapter 5 5.1.4 Installing three CrossFireX™ graphics cards 1.

User Manual
Page 121
...-ready graphics cards. 2. Connect two independent auxiliary power sources from the power supply to Chapter 2 in place. 5. SLI bridge Goldfingers ASUS P6X58D Premium 5-7 If your motherboard has more than two PCIEX16 slots, refer to the two graphics cards separately. 6. Connect a VGA or a DVI cable to the ...card into the PCIEX16 slots. Ensure that the connector is firmly in this user manual for the locations of the PCIEX16 slots recommended for reference only. The graphics cards and the motherboard layout may vary with models, but the installation steps remain the same. 1.
...-ready graphics cards. 2. Connect two independent auxiliary power sources from the power supply to Chapter 2 in place. 5. SLI bridge Goldfingers ASUS P6X58D Premium 5-7 If your motherboard has more than two PCIEX16 slots, refer to the two graphics cards separately. 6. Connect a VGA or a DVI cable to the ...card into the PCIEX16 slots. Ensure that the connector is firmly in this user manual for the locations of the PCIEX16 slots recommended for reference only. The graphics cards and the motherboard layout may vary with models, but the installation steps remain the same. 1.

User Manual
Page 122
Insert the three graphics card into the PCIEX16 slots. If your motherboard has more than two PCIEX16 slots, refer to the three graphics cards separately. 6. Connect three independent auxiliary power sources from the power supply to Chapter... 5-8 Chapter 5: Multiple GPU technology support Ensure that the cards are properly seated on each graphics card. Ensure that the connector is firmly in this user manual for the locations of the PCIEX16 slots recommended for multi-graphics card installation. 3. Prepare three SLI-ready graphics cards. 2. Chapter 5 5.2.3 Installing three SLI-...
Insert the three graphics card into the PCIEX16 slots. If your motherboard has more than two PCIEX16 slots, refer to the three graphics cards separately. 6. Connect three independent auxiliary power sources from the power supply to Chapter... 5-8 Chapter 5: Multiple GPU technology support Ensure that the cards are properly seated on each graphics card. Ensure that the connector is firmly in this user manual for the locations of the PCIEX16 slots recommended for multi-graphics card installation. 3. Prepare three SLI-ready graphics cards. 2. Chapter 5 5.2.3 Installing three SLI-...


