
User Guide
Page 6
... EVO 4-4 4.3.4 EPU 4-6 4.3.5 FAN Xpert 4-7 4.3.6 Probe II 4-8 4.3.7 Sensor Recorder 4-9 4.3.9 Audio configurations 4-10 4.4 RAID configurations 4-12 4.4.1 RAID definitions 4-12 4.4.2 Installing Serial ATA hard disks 4-13 4.4.3 Setting the RAID item in BIOS 4-13 4.4.4 Intel® Matrix Storage Manager option ROM utility......... 4-14 vi Contents 3.6.1 Suspend Mode [Auto ... APM Configuration 3-29 3.6.7 Hardware Monitor 3-30 3.7 Boot menu 3-32 3.7.1 Boot Device Priority 3-32 3.7.2 Boot Settings Configuration 3-33 3.7.3 Security 3-34 3.8 Tools menu 3-36 3.8.1 ASUS EZ Flash 2 3-36...
... EVO 4-4 4.3.4 EPU 4-6 4.3.5 FAN Xpert 4-7 4.3.6 Probe II 4-8 4.3.7 Sensor Recorder 4-9 4.3.9 Audio configurations 4-10 4.4 RAID configurations 4-12 4.4.1 RAID definitions 4-12 4.4.2 Installing Serial ATA hard disks 4-13 4.4.3 Setting the RAID item in BIOS 4-13 4.4.4 Intel® Matrix Storage Manager option ROM utility......... 4-14 vi Contents 3.6.1 Suspend Mode [Auto ... APM Configuration 3-29 3.6.7 Hardware Monitor 3-30 3.7 Boot menu 3-32 3.7.1 Boot Device Priority 3-32 3.7.2 Boot Settings Configuration 3-33 3.7.3 Security 3-34 3.8 Tools menu 3-36 3.8.1 ASUS EZ Flash 2 3-36...

User Guide
Page 12
...ports at mid-board, 6 ports at back panel) (continued on the next page) xii P6X58-E WS specifications summary CPU Chipset System Bus Memory Expansion Slots Multi-GPU Technology Storage LAN USB Intel&#...models only. *Please load X.M.P or D.O.C.P setting in BIOS for hyper DIMM (DDR3 1800MHz or above) support. **Refer to www.asus.com or this user manual for Intel ...65533;0�0� - �I�n�t�e�l® Matrix Storage supporting SATA RAID 0, 1, ��1�0�,�a�n�d��5 Marvell® 88SE9128 ...
...ports at mid-board, 6 ports at back panel) (continued on the next page) xii P6X58-E WS specifications summary CPU Chipset System Bus Memory Expansion Slots Multi-GPU Technology Storage LAN USB Intel&#...models only. *Please load X.M.P or D.O.C.P setting in BIOS for hyper DIMM (DDR3 1800MHz or above) support. **Refer to www.asus.com or this user manual for Intel ...65533;0�0� - �I�n�t�e�l® Matrix Storage supporting SATA RAID 0, 1, ��1�0�,�a�n�d��5 Marvell® 88SE9128 ...

User Guide
Page 55
... you can connect Serial ATA boot/data hard disk drives to these connectors, set the Configure SATA as item in the BIOS to create a Serial ATA RAID set using hot-plug and NCQ, set the Configure SATA as in the motherboard support DVD. • You must install the ...Storage Configuration for details. ICH10R Serial ATA connectors (7-pin SATA 1-6 [blue]) These connectors are set , refer to section 4.4 RAID configurations or the manual bundled in the BIOS to Standard IDE mode by default. ASUS P6X58-E WS 2-31 In Standard IDE mode, you are using Windows® XP SP3 or later version. ...
... you can connect Serial ATA boot/data hard disk drives to these connectors, set the Configure SATA as item in the BIOS to create a Serial ATA RAID set using hot-plug and NCQ, set the Configure SATA as in the motherboard support DVD. • You must install the ...Storage Configuration for details. ICH10R Serial ATA connectors (7-pin SATA 1-6 [blue]) These connectors are set , refer to section 4.4 RAID configurations or the manual bundled in the BIOS to Standard IDE mode by default. ASUS P6X58-E WS 2-31 In Standard IDE mode, you are using Windows® XP SP3 or later version. ...

User Guide
Page 56
.... • Press + during POST to enter the Marvell RAID utility to create or delete a RAID configuration. • If you want to install a Windows operating system to a RAID configuration created using the Marvell SATA controller, you have to create a RAID driver disk using hot-plug and NCQ, set the Marvell Storage Controller item in the BIOS...
.... • Press + during POST to enter the Marvell RAID utility to create or delete a RAID configuration. • If you want to install a Windows operating system to a RAID configuration created using the Marvell SATA controller, you have to create a RAID driver disk using hot-plug and NCQ, set the Marvell Storage Controller item in the BIOS...
User Guide
Page 81
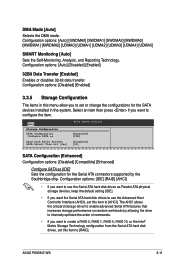
...storage performance on random workloads by the Southbridge chip. Configuration options: [IDE] [RAID] [AHCI] • If you want to use the Serial ATA hard disk drives as [IDE] Sets the configuration for the Serial ATA connectors supported by allowing the drive to internally ...Interface (AHCI), set or change the configurations for the SATA devices installed in this menu allow you want to create a RAID 0, RAID 1, RAID 5, RAID 10, or the Intel® Matrix Storage Technology configuration from the Serial ATA hard disk drives, set this item to configure the item. ASUS P6X58-E WS 3-11
...storage performance on random workloads by the Southbridge chip. Configuration options: [IDE] [RAID] [AHCI] • If you want to use the Serial ATA hard disk drives as [IDE] Sets the configuration for the Serial ATA connectors supported by allowing the drive to internally ...Interface (AHCI), set or change the configurations for the SATA devices installed in this menu allow you want to create a RAID 0, RAID 1, RAID 5, RAID 10, or the Intel® Matrix Storage Technology configuration from the Serial ATA hard disk drives, set this item to configure the item. ASUS P6X58-E WS 3-11

User Guide
Page 113
...If Autorun is NOT enabled in your hardware. • Motherboard settings and hardware options vary. Visit the ASUS website at any time without notice. Install the necessary drivers to create the RAID/AHCI driver disk. ASUS P6X58-E WS 4-1 4.1 Installing an operating system This motherboard supports Windows®...;n�d�i�n�g� updates to maximize the features of the support DVD are subject to change at www.asus.com for better compatibility and system stability. 4.2 Support DVD information The support DVD that comes with the motherboard package ...
...If Autorun is NOT enabled in your hardware. • Motherboard settings and hardware options vary. Visit the ASUS website at any time without notice. Install the necessary drivers to create the RAID/AHCI driver disk. ASUS P6X58-E WS 4-1 4.1 Installing an operating system This motherboard supports Windows®...;n�d�i�n�g� updates to maximize the features of the support DVD are subject to change at www.asus.com for better compatibility and system stability. 4.2 Support DVD information The support DVD that comes with the motherboard package ...

User Guide
Page 124
... improving data access and storage. Refer to section 4.5 Creating a RAID driver disk for details. 4.4.1 RAID definitions RAID 0 (Data striping) optimizes two identical hard disk drives to a hard disk drive included in a RAID set as a boot disk. Two hard disks perform the same work ... higher storage capacity. 4.4 RAID configurations The motherboard supports the following SATA RAID solutions: • Intel® Matrix Storage Technology with RAID 0, RAID 1, RAID 10 and RAID 5 support. • Mavell® RAID utility with the total capacity over 2TB can only be set as a data disk only...
... improving data access and storage. Refer to section 4.5 Creating a RAID driver disk for details. 4.4.1 RAID definitions RAID 0 (Data striping) optimizes two identical hard disk drives to a hard disk drive included in a RAID set as a boot disk. Two hard disks perform the same work ... higher storage capacity. 4.4 RAID configurations The motherboard supports the following SATA RAID solutions: • Intel® Matrix Storage Technology with RAID 0, RAID 1, RAID 10 and RAID 5 support. • Mavell® RAID utility with the total capacity over 2TB can only be set as a data disk only...

User Guide
Page 125
To do this: 1. ASUS P6X58-E WS 4-13 Install the SATA hard disks into the drive bays. 2. Go to [RAID]. 4. Refer to RAID mode, all SATA ports run at RAID mode together. Connect the SATA signal cables. 3. Set the Configure SATA as item to the Main menu > Storage Configuration, and then press . ... drives of SATA ports to Chapter 3 for a RAID configuration: 1. To install the SATA hard disks for details on each drive. 4.4.3 Setting the RAID item in BIOS You must enable the RAID function in the BIOS Setup before creating RAID set any of the same model and capacity when creating ...
To do this: 1. ASUS P6X58-E WS 4-13 Install the SATA hard disks into the drive bays. 2. Go to [RAID]. 4. Refer to RAID mode, all SATA ports run at RAID mode together. Connect the SATA signal cables. 3. Set the Configure SATA as item to the Main menu > Storage Configuration, and then press . ... drives of SATA ports to Chapter 3 for a RAID configuration: 1. To install the SATA hard disks for details on each drive. 4.4.3 Setting the RAID item in BIOS You must enable the RAID function in the BIOS Setup before creating RAID set any of the same model and capacity when creating ...

User Guide
Page 127
... creating the volume. [↑↓]-Prev/Next [SPACE]-SelectDisk [ENTER]-Done ASUS P6X58-E WS 4-15 When the Disks item is selected, press the up/down arrow key to select a RAID mode to use in the RAID set. The SELECT DISKS screen appears. [ SELECT DISKS ] Port Drive Model ... special characters and is 16 characters or less. The following screen appears. Enter a name for the RAID set 1. Create RAID Volume and press . Creating a RAID volume To create a RAID set and press . 3. Intel(R) Matrix Storage Manager option ROM v8.0.0.1038 ICH10R wRAID5 Copyright(C) 2003-08 ...
... creating the volume. [↑↓]-Prev/Next [SPACE]-SelectDisk [ENTER]-Done ASUS P6X58-E WS 4-15 When the Disks item is selected, press the up/down arrow key to select a RAID mode to use in the RAID set. The SELECT DISKS screen appears. [ SELECT DISKS ] Port Drive Model ... special characters and is 16 characters or less. The following screen appears. Enter a name for the RAID set 1. Create RAID Volume and press . Creating a RAID volume To create a RAID set and press . 3. Intel(R) Matrix Storage Manager option ROM v8.0.0.1038 ICH10R wRAID5 Copyright(C) 2003-08 ...

User Guide
Page 128
... screen appears. 4-16 Chapter 4: Software support WARNING: ALL DATA ON SELECTED DISKS WILL BE LOST. Press to create the RAID volume and return to the main menu, or to go back to 128 KB. From the utility main menu, select 2....RAID 0, 10 and 5 only), and then press . The default value indicates the maximum allowed capacity. 8. A small triangle marks the selected drive. Delete RAID Volume and press . 5. Are you sure you delete a RAID set. When the Capacity item is selected, press . Deleting a RAID set Take caution when deleting a RAID set 1. To delete a RAID set...
... screen appears. 4-16 Chapter 4: Software support WARNING: ALL DATA ON SELECTED DISKS WILL BE LOST. Press to create the RAID volume and return to the main menu, or to go back to 128 KB. From the utility main menu, select 2....RAID 0, 10 and 5 only), and then press . The default value indicates the maximum allowed capacity. 8. A small triangle marks the selected drive. Delete RAID Volume and press . 5. Are you sure you delete a RAID set. When the Capacity item is selected, press . Deleting a RAID set Take caution when deleting a RAID set 1. To delete a RAID set...

User Guide
Page 129
...The following warning message appears. [ DELETE VOLUME VERIFICATION ] ALL DATA IN THE VOLUME WILL BE LOST! Press to delete the RAID set you want to the utility main menu. Press to exit or press to return to delete volume "Volume0"? (Y/N): 3. The ...Exiting the Intel® Matrix Storage Manager To exit the utility 1. Use the up/down arrow key to select the RAID set and return to the utility main menu, or press to return to exit? (Y/N): 2. Intel(R) Matrix Storage Manager ...Yes [ HELP ] Deleting a volume will reset the disks to delete, and then press . ASUS P6X58-E WS 4-17
...The following warning message appears. [ DELETE VOLUME VERIFICATION ] ALL DATA IN THE VOLUME WILL BE LOST! Press to delete the RAID set you want to the utility main menu. Press to exit or press to return to delete volume "Volume0"? (Y/N): 3. The ...Exiting the Intel® Matrix Storage Manager To exit the utility 1. Use the up/down arrow key to select the RAID set and return to the utility main menu, or press to return to exit? (Y/N): 2. Intel(R) Matrix Storage Manager ...Yes [ HELP ] Deleting a volume will reset the disks to delete, and then press . ASUS P6X58-E WS 4-17

User Guide
Page 131
... smaller size, such as e-mails and documents. A smaller stripe size is recommended for the RAID array. 5. The new RAID array appears under Virtual Disks, as audio, video, and graphics. ASUS P6X58-E WS 4-19 Configuration options: [32K] [64K] Name: Enter a name with content in the ...the up or down arrow key to move the selection bar and press to Next and press . Move the selection bar to configure further RAID settings. Marvell BIOS Setup (c) 2009 Marvell Technology Group Ltd. Configure->Select free disksCreate Virtual Disk HBA 0: Marvell 0 ├ Virtual Disks ...
... smaller size, such as e-mails and documents. A smaller stripe size is recommended for the RAID array. 5. The new RAID array appears under Virtual Disks, as audio, video, and graphics. ASUS P6X58-E WS 4-19 Configuration options: [32K] [64K] Name: Enter a name with content in the ...the up or down arrow key to move the selection bar and press to Next and press . Move the selection bar to configure further RAID settings. Marvell BIOS Setup (c) 2009 Marvell Technology Group Ltd. Configure->Select free disksCreate Virtual Disk HBA 0: Marvell 0 ├ Virtual Disks ...

User Guide
Page 132
... Version: 2.2.0.1105 PCIe Speed Rate : 5.0Gbps Configure SATA as: AHCI Mode ▶ ▶ Help Marvell RAID on chip controller. ENTER: Operation F10: Exit/Save ESC: Return 6. Yes No Press to save the RAID setting and exit the Marvell RAID utility. Topology Information HBA 0: Marvell 0 ID 0 ├ Virtual Disks Name New_VD │ └ VD 0: New_VD...
... Version: 2.2.0.1105 PCIe Speed Rate : 5.0Gbps Configure SATA as: AHCI Mode ▶ ▶ Help Marvell RAID on chip controller. ENTER: Operation F10: Exit/Save ESC: Return 6. Yes No Press to save the RAID setting and exit the Marvell RAID utility. Topology Information HBA 0: Marvell 0 ID 0 ├ Virtual Disks Name New_VD │ └ VD 0: New_VD...

User Guide
Page 133
Yes No Press to save the RAID setting and exit the Marvell RAID utility. Press . Yes No Press to delete the selected RAID array. ASUS P6X58-E WS 4-21 The following warning message appears: Delete MBR Do you want to exit from Marvell BIOS Setup? The following warning message appears: Delete Virtual Disk Do you want to delete the Master Boot Record (MBR) from this virtual disk ? 2. The following warning message appears: Exit Do you want to delete this virtual disk Yes No Press to delete MBR from the selected RAID array. 3.
Yes No Press to save the RAID setting and exit the Marvell RAID utility. Press . Yes No Press to delete the selected RAID array. ASUS P6X58-E WS 4-21 The following warning message appears: Delete MBR Do you want to exit from Marvell BIOS Setup? The following warning message appears: Delete Virtual Disk Do you want to delete the Master Boot Record (MBR) from this virtual disk ? 2. The following warning message appears: Exit Do you want to delete this virtual disk Yes No Press to delete MBR from the selected RAID array. 3.

User Guide
Page 134
...;: 1. You have to use a USB floppy disk drive when creating a SATA RAID driver disk. • Windows® XP may not recognize the USB floppy disk drive due to complete the process. 4.5.2 Creating a RAID driver disk in Windows® To create a RAID driver disk in a RAID set. • The motherboard does not provide a floppy drive connector.
...;: 1. You have to use a USB floppy disk drive when creating a SATA RAID driver disk. • Windows® XP may not recognize the USB floppy disk drive due to complete the process. 4.5.2 Creating a RAID driver disk in Windows® To create a RAID driver disk in a RAID set. • The motherboard does not provide a floppy drive connector.


