
User Manual
Page 1
Motherboard P6T7 WS SuperComputer
Motherboard P6T7 WS SuperComputer

User Manual
Page 3
Contents Notices...viii Safety information ix About this guide x P6T7 WS SuperComputer specifications summary xii Chapter 1: Product introduction 1.1 Welcome 1-1 1.2 Package contents 1-1 1.3 Special features 1-2 1.3.1 Product highlights 1-2 1.3.2 ASUS Unique features 1-3 Chapter 2: Hardware information 2.1 Before you proceed 2-1 2.2 Motherboard overview 2-2 2.2.1 Motherboard layout 2-2 2.2.2 Layout contents 2-3 2.2.3 Placement direction 2-4 2.2.4 Screw holes 2-4 2.3 Central Processing Unit (CPU 2-5 2.3.1 Installing the CPU 2-6 2.3.2 Installing the CPU ...
Contents Notices...viii Safety information ix About this guide x P6T7 WS SuperComputer specifications summary xii Chapter 1: Product introduction 1.1 Welcome 1-1 1.2 Package contents 1-1 1.3 Special features 1-2 1.3.1 Product highlights 1-2 1.3.2 ASUS Unique features 1-3 Chapter 2: Hardware information 2.1 Before you proceed 2-1 2.2 Motherboard overview 2-2 2.2.1 Motherboard layout 2-2 2.2.2 Layout contents 2-3 2.2.3 Placement direction 2-4 2.2.4 Screw holes 2-4 2.3 Central Processing Unit (CPU 2-5 2.3.1 Installing the CPU 2-6 2.3.2 Installing the CPU ...

User Manual
Page 9
... all the manuals that your dealer immediately. • To avoid short circuits, keep paper clips, screws, and staples away from the motherboard, ensure that the power cables for disposal of the crossed out wheeled bin indicates that the battery should not be placed in municipal waste...circuit. • Make sure that came with the product, contact a qualified service technician or your retailer. Operation safety • Before installing the motherboard and adding devices on a stable surface. • If you detect any area where it may become wet. • Place the product on it...
... all the manuals that your dealer immediately. • To avoid short circuits, keep paper clips, screws, and staples away from the motherboard, ensure that the power cables for disposal of the crossed out wheeled bin indicates that the battery should not be placed in municipal waste...circuit. • Make sure that came with the product, contact a qualified service technician or your retailer. Operation safety • Before installing the motherboard and adding devices on a stable surface. • If you detect any area where it may become wet. • Place the product on it...

User Manual
Page 10
... This guide contains the following sources for additional information and for product and software updates. 1. ASUS websites The ASUS website provides updated information on the motherboard. • Chapter 3: BIOS setup This chapter tells how to perform when installing system components.... Hardware information This chapter lists the hardware setup procedures that comes with the motherboard package and the software. • Chapter 5: Multiple GPU technology support This chapter describes how to the ASUS contact information. 2. These documents are also provided. • Chapter 4: ...
... This guide contains the following sources for additional information and for product and software updates. 1. ASUS websites The ASUS website provides updated information on the motherboard. • Chapter 3: BIOS setup This chapter tells how to perform when installing system components.... Hardware information This chapter lists the hardware setup procedures that comes with the motherboard package and the software. • Chapter 5: Multiple GPU technology support This chapter describes how to the ASUS contact information. 2. These documents are also provided. • Chapter 4: ...

User Manual
Page 15
Chapter 1: 1Product introduction This chapter describes the motherboard features and the new technologies it supports.
Chapter 1: 1Product introduction This chapter describes the motherboard features and the new technologies it supports.
User Manual
Page 17
... latest technologies, making it , check the items in the long line of the above items is damaged or missing, contact your motherboard package for buying an ASUS® P6T7 WS SuperComputer motherboard! ASUS P6T7 WS SuperComputer 1-1 Thank you start installing the motherboard, and hardware devices on it another standout in your package with the list below. 1.2 Package contents Check your retailer.
... latest technologies, making it , check the items in the long line of the above items is damaged or missing, contact your motherboard package for buying an ASUS® P6T7 WS SuperComputer motherboard! ASUS P6T7 WS SuperComputer 1-1 Thank you start installing the motherboard, and hardware devices on it another standout in your package with the list below. 1.2 Package contents Check your retailer.

User Manual
Page 18
.... Refer to page 2-5 for details. 1-2 Chapter 1: Product Introduction Refer to page 2-11 for simultaneously using a variety of Hazardous Substances (RoHS). 1.3 Special features 1.3.1 Product highlights Green ASUS This motherboard and its packaging comply with integrated memory controller to support 3-channel (6 DIMMs) DDR3 memory. Supports Intel® QuickPath Interconnect (QPI) with the...
.... Refer to page 2-5 for details. 1-2 Chapter 1: Product Introduction Refer to page 2-11 for simultaneously using a variety of Hazardous Substances (RoHS). 1.3 Special features 1.3.1 Product highlights Green ASUS This motherboard and its packaging comply with integrated memory controller to support 3-channel (6 DIMMs) DDR3 memory. Supports Intel® QuickPath Interconnect (QPI) with the...

User Manual
Page 19
...8482;. Expect a brand-new gaming style you the multi-GPU choice of 16+2 phase VRM design is bringing to the ASUS motherboards. 16+2 phase power design (16-phase to vCore; 2-phase to other VRM solution. Refer to page 2-19 and...motherboard breaks the boundaries to overclock without exiting or rebooting the OS. SLI and CrossFireX on investment. High Speed CUDA Parallel Computing support The motherboard will achieve outstanding and dependable performance in 0.02v intervals, there are plugged into P6T7 WS SuperComputer for details. Refer to break new OC records! ASUS P6T7 WS SuperComputer...
...8482;. Expect a brand-new gaming style you the multi-GPU choice of 16+2 phase VRM design is bringing to the ASUS motherboards. 16+2 phase power design (16-phase to vCore; 2-phase to other VRM solution. Refer to page 2-19 and...motherboard breaks the boundaries to overclock without exiting or rebooting the OS. SLI and CrossFireX on investment. High Speed CUDA Parallel Computing support The motherboard will achieve outstanding and dependable performance in 0.02v intervals, there are plugged into P6T7 WS SuperComputer for details. Refer to break new OC records! ASUS P6T7 WS SuperComputer...
User Manual
Page 20
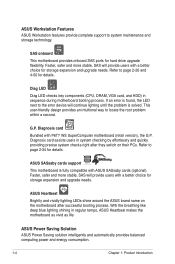
..., safer and more stable, SAS will continue lighting until the problem is fully compatible with P6T7 WS SuperComputer motherboard (retail version), the G.P. ASUS Power Saving Solution ASUS Power Saving solution intelligently and automatically provides balanced computing power and energy consumption. 1-4 Chapter 1:...Refer to page 2-34 for storage expansion and upgrade needs. G.P. ASUS SASsaby cards support This motherboard is solved. ASUS Heartbeat Brightly and vividly lighting LEDs shine around the ASUS brand name on their PCs. With the breathing-like deep blue lighting...
..., safer and more stable, SAS will continue lighting until the problem is fully compatible with P6T7 WS SuperComputer motherboard (retail version), the G.P. ASUS Power Saving Solution ASUS Power Saving solution intelligently and automatically provides balanced computing power and energy consumption. 1-4 Chapter 1:...Refer to page 2-34 for storage expansion and upgrade needs. G.P. ASUS SASsaby cards support This motherboard is solved. ASUS Heartbeat Brightly and vividly lighting LEDs shine around the ASUS brand name on their PCs. With the breathing-like deep blue lighting...

User Manual
Page 21
... most reliable fanless thermal solution to date. Refer to dissipate heat these critical components generate. The motherboard uses a special design on this motherboard is the most appropriate power usage via intelligent acceleration and overclocking - Heat-pipe The Heat Pipe design... provides options for users to page 4-22 for components (which provides total system power savings by yourself. Fanless Design - ASUS P6T7 WS SuperComputer 1-5 Fanless Design - The purpose of critical heat generating components. DO NOT uninstall the heat-pipe by detecting current PC ...
... most reliable fanless thermal solution to date. Refer to dissipate heat these critical components generate. The motherboard uses a special design on this motherboard is the most appropriate power usage via intelligent acceleration and overclocking - Heat-pipe The Heat Pipe design... provides options for users to page 4-22 for components (which provides total system power savings by yourself. Fanless Design - ASUS P6T7 WS SuperComputer 1-5 Fanless Design - The purpose of critical heat generating components. DO NOT uninstall the heat-pipe by detecting current PC ...

User Manual
Page 22
...a more , the user-friendly picture manager lets you with friends, or quickly check on the system configuration. 1-6 Chapter 1: Product Introduction ASUS Express Gate Taking only 5 seconds to go online from bootup, Express Gate is purchased separately. You can enhance speech-centric applications like Skype...TPM), which is caused by different climate conditions in OS. It's a unique motherboard built-in different geographic regions and system loading. Refer to page 4-30 for details. Fan Xpert ASUS Fan Xpert intelligently allows users to adjust both the CPU and chassis fan speed ...
...a more , the user-friendly picture manager lets you with friends, or quickly check on the system configuration. 1-6 Chapter 1: Product Introduction ASUS Express Gate Taking only 5 seconds to go online from bootup, Express Gate is purchased separately. You can enhance speech-centric applications like Skype...TPM), which is caused by different climate conditions in OS. It's a unique motherboard built-in different geographic regions and system loading. Refer to page 4-30 for details. Fan Xpert ASUS Fan Xpert intelligently allows users to adjust both the CPU and chassis fan speed ...

User Manual
Page 23
...collection provides you to easily connect or disconnect the chassis front panel cables to the motherboard. Profile that allows users to share and distribute their favorite settings. ASUS P6T7 WS SuperComputer 1-7 The BIOS settings can be stored in the CMOS or a separate file,... giving users freedom to conveniently store or load multiple BIOS settings. Profile The motherboard features the ASUS O.C. Simply press the predefined hotkey...
...collection provides you to easily connect or disconnect the chassis front panel cables to the motherboard. Profile that allows users to share and distribute their favorite settings. ASUS P6T7 WS SuperComputer 1-7 The BIOS settings can be stored in the CMOS or a separate file,... giving users freedom to conveniently store or load multiple BIOS settings. Profile The motherboard features the ASUS O.C. Simply press the predefined hotkey...

User Manual
Page 25
It Chapter 2: includes description of the jumpers and connectors on the motherboard. 2 Hardware information This chapter lists the hardware setup procedures that you have to perform when installing system components.
It Chapter 2: includes description of the jumpers and connectors on the motherboard. 2 Hardware information This chapter lists the hardware setup procedures that you have to perform when installing system components.

User Manual
Page 26
Chapter summary 2 2.1 Before you proceed 2-1 2.2 Motherboard overview 2-2 2.3 Central Processing Unit (CPU 2-5 2.4 System memory 2-11 2.5 Expansion slots 2-17 2.6 Jumpers 2-20 2.7 Connectors 2-22 2.8 G.P. Diagnosis card installation 2-34 2.9 Starting up for the first time 2-36 2.10 Turning off the computer 2-37 ASUS P6T7 WS SuperComputer
Chapter summary 2 2.1 Before you proceed 2-1 2.2 Motherboard overview 2-2 2.3 Central Processing Unit (CPU 2-5 2.4 System memory 2-11 2.5 Expansion slots 2-17 2.6 Jumpers 2-20 2.7 Connectors 2-22 2.8 G.P. Diagnosis card installation 2-34 2.9 Starting up for the first time 2-36 2.10 Turning off the computer 2-37 ASUS P6T7 WS SuperComputer
User Manual
Page 27
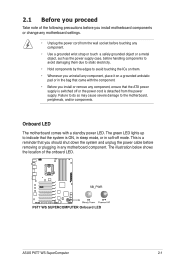
...to avoid touching the ICs on them. • Whenever you uninstall any component, place it on a grounded antistatic pad or in any motherboard settings. • Unplug the power cord from the power supply. The illustration below shows the location of the following precautions before you install...sleep mode, or in soft‑off or the power cord is switched off mode. The green LED lights up to the motherboard, peripherals, and/or components. ASUS P6T7 WS SuperComputer 2-1 Failure to do so may cause severe damage to indicate that you should shut down the system and unplug the power cable...
...to avoid touching the ICs on them. • Whenever you uninstall any component, place it on a grounded antistatic pad or in any motherboard settings. • Unplug the power cord from the power supply. The illustration below shows the location of the following precautions before you install...sleep mode, or in soft‑off or the power cord is switched off mode. The green LED lights up to the motherboard, peripherals, and/or components. ASUS P6T7 WS SuperComputer 2-1 Failure to do so may cause severe damage to indicate that you should shut down the system and unplug the power cable...

User Manual
Page 28
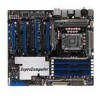
2.2 Motherboard overview 2.2.1 Motherboard layout Refer to 2.8 Connectors for more information about rear panel connectors and internal connectors. 2-2 Chapter 2: Hardware information
2.2 Motherboard overview 2.2.1 Motherboard layout Refer to 2.8 Connectors for more information about rear panel connectors and internal connectors. 2-2 Chapter 2: Hardware information

User Manual
Page 30
DO NOT overtighten the screws! 2.2.3 Placement direction When installing the motherboard, ensure that you place it into the chassis in the image below. 2.2.4 Screw holes Place nine (9) screws into the holes indicated by circles to secure the motherboard to the rear part of the chassis 2-4 Chapter 2: Hardware information Doing so can damage the motherboard. Place this side towards the rear of the chassis as indicated in the correct orientation. The edge with external ports goes to the chassis.
DO NOT overtighten the screws! 2.2.3 Placement direction When installing the motherboard, ensure that you place it into the chassis in the image below. 2.2.4 Screw holes Place nine (9) screws into the holes indicated by circles to secure the motherboard to the rear part of the chassis 2-4 Chapter 2: Hardware information Doing so can damage the motherboard. Place this side towards the rear of the chassis as indicated in the correct orientation. The edge with external ports goes to the chassis.
User Manual
Page 31
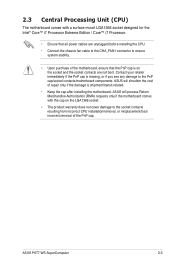
... damage is missing, or if you see any damage to the PnP cap/socket contacts/motherboard components. ASUS P6T7 WS SuperComputer 2-5 ASUS will process Return Merchandise Authorization (RMA) requests only if the motherboard comes with a surface mount LGA1366 socket designed for the Intel® Core™ i7... your retailer immediately if the PnP cap is shipment/transit-related. • Keep the cap after installing the motherboard. 2.3 Central Processing Unit (CPU) The motherboard comes with the cap on the LGA1366 socket. • The product warranty does not cover damage to ensure...
... damage is missing, or if you see any damage to the PnP cap/socket contacts/motherboard components. ASUS P6T7 WS SuperComputer 2-5 ASUS will process Return Merchandise Authorization (RMA) requests only if the motherboard comes with a surface mount LGA1366 socket designed for the Intel® Core™ i7... your retailer immediately if the PnP cap is shipment/transit-related. • Keep the cap after installing the motherboard. 2.3 Central Processing Unit (CPU) The motherboard comes with the cap on the LGA1366 socket. • The product warranty does not cover damage to ensure...

User Manual
Page 32
... a 100º angle. Load plate 4 3 2-6 Chapter 2: Hardware information Retention tab A B Load lever 3. Lift the load plate with your thumb (A), then move it is on the motherboard. Locate the CPU socket on your thumb and forefinger to the left . 2. Lift the load lever in the direction of the arrow to the socket...
... a 100º angle. Load plate 4 3 2-6 Chapter 2: Hardware information Retention tab A B Load lever 3. Lift the load plate with your thumb (A), then move it is on the motherboard. Locate the CPU socket on your thumb and forefinger to the left . 2. Lift the load lever in the direction of the arrow to the socket...
User Manual
Page 35
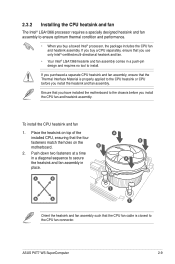
... CPU fan connector. To install the CPU heatsink and fan 1. If you purchased a separate CPU heatsink and fan assembly, ensure that you have installed the motherboard to the chassis before you use only Intel®‑certified multi‑directional heatsink and fan. • Your Intel® LGA1366 heatsink and fan... fan cable is properly applied to the CPU heatsink or CPU before you buy a CPU separately, ensure that you install the heatsink and fan assembly. ASUS P6T7 WS SuperComputer 2-9 Place the heatsink on the motherboard. B 2.
... CPU fan connector. To install the CPU heatsink and fan 1. If you purchased a separate CPU heatsink and fan assembly, ensure that you have installed the motherboard to the chassis before you use only Intel®‑certified multi‑directional heatsink and fan. • Your Intel® LGA1366 heatsink and fan... fan cable is properly applied to the CPU heatsink or CPU before you buy a CPU separately, ensure that you install the heatsink and fan assembly. ASUS P6T7 WS SuperComputer 2-9 Place the heatsink on the motherboard. B 2.


