
User Manual
Page 6
... 4-7 4.3 Software information 4-9 4.3.1 ASUS MyLogo 2 4-9 4.3.2 ASUS PC Probe II 4-11 4.3.3 ASUS AI Suite 4-17 4.3.4 ASUS AI Nap 4-19 4.3.5 ASUS Fan Xpert 4-20 4.3.6 ASUS EPU-6 Engine 4-22 4.3.7 ASUS TurboV 4-26 4.3.8 Audio configurations 4-28 4.3.9 ASUS Express Gate 4-36 4.3.10 ASUS Drive Xpert 4-43 4.4 RAID configurations 4-47 4.4.1 RAID definitions 4-47 vi Contents 3.6.6 Hardware Monitor 3-34 3.7 Boot menu 3-36 3.7.1 Boot Device Priority 3-36 3.7.2 Boot Settings Configuration 3-37...
... 4-7 4.3 Software information 4-9 4.3.1 ASUS MyLogo 2 4-9 4.3.2 ASUS PC Probe II 4-11 4.3.3 ASUS AI Suite 4-17 4.3.4 ASUS AI Nap 4-19 4.3.5 ASUS Fan Xpert 4-20 4.3.6 ASUS EPU-6 Engine 4-22 4.3.7 ASUS TurboV 4-26 4.3.8 Audio configurations 4-28 4.3.9 ASUS Express Gate 4-36 4.3.10 ASUS Drive Xpert 4-43 4.4 RAID configurations 4-47 4.4.1 RAID definitions 4-47 vi Contents 3.6.6 Hardware Monitor 3-34 3.7 Boot menu 3-36 3.7.1 Boot Device Priority 3-36 3.7.2 Boot Settings Configuration 3-37...

User Manual
Page 19
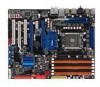
... break new OC records! Messenger to keep in OS. The actual boot time depends on the weather and e-mails just before leaving your pictures without entering Windows at anytime! What's more energy efficiency. ASUS P6T 1-3 You can easily arrange hard drive backups or enhance their hard ...so important to operating temperatures, ASUS 8+2 phase VRM design (8-phase to vCore; 2-phase to vDRAM/QPI controller inside CPU) leads the industry with friends, or quickly check on the system configuration. See page 3-41 and 4-36 for details. It's a unique motherboard built-in touch with its...
... break new OC records! Messenger to keep in OS. The actual boot time depends on the weather and e-mails just before leaving your pictures without entering Windows at anytime! What's more energy efficiency. ASUS P6T 1-3 You can easily arrange hard drive backups or enhance their hard ...so important to operating temperatures, ASUS 8+2 phase VRM design (8-phase to vCore; 2-phase to vDRAM/QPI controller inside CPU) leads the industry with friends, or quickly check on the system configuration. See page 3-41 and 4-36 for details. It's a unique motherboard built-in touch with its...
User Manual
Page 22
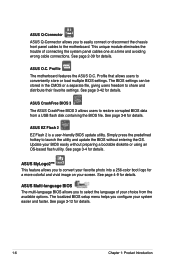
...cable connections. Simply press the predefined hotkey to convert your favorite photo into a 256-color boot logo for a more colorful and vivid image on your system easier and faster. ASUS MyLogo2™ This feature allows you to launch the utility and update the BIOS without ...preparing a bootable diskette or using an OS-based flash utility. ASUS CrashFree BIOS 3 The ASUS CrashFree BIOS 3 allows users to the motherboard. See page 3-12 for details. ASUS Q-Connector ASUS Q-Connector allows you to easily connect or disconnect the chassis front panel cables to ...
...cable connections. Simply press the predefined hotkey to convert your favorite photo into a 256-color boot logo for a more colorful and vivid image on your system easier and faster. ASUS MyLogo2™ This feature allows you to launch the utility and update the BIOS without ...preparing a bootable diskette or using an OS-based flash utility. ASUS CrashFree BIOS 3 The ASUS CrashFree BIOS 3 allows users to the motherboard. See page 3-12 for details. ASUS Q-Connector ASUS Q-Connector allows you to easily connect or disconnect the chassis front panel cables to ...

User Manual
Page 35
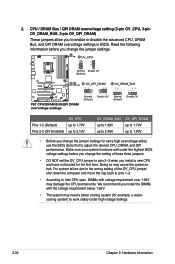
...definition, the system will not boot if only one DIMM is notched differently to prevent installation on a DDR2 DIMM socket. A DDR3 module has the same physical dimensions as a DDR2 DIMM but is installed in DIMM slot A2, B2, or C2. ASUS P6T 2-11 Follow the table ...above for better performance with six Double Data Rate 3 (DDR3) Dual Inline Memory Modules (DIMM) sockets. DDR3 modules are developed for recommended memory configuration. 2.4 System memory 2.4.1 Overview The motherboard comes with less power consumption.
...definition, the system will not boot if only one DIMM is notched differently to prevent installation on a DDR2 DIMM socket. A DDR3 module has the same physical dimensions as a DDR2 DIMM but is installed in DIMM slot A2, B2, or C2. ASUS P6T 2-11 Follow the table ...above for better performance with six Double Data Rate 3 (DDR3) Dual Inline Memory Modules (DIMM) sockets. DDR3 modules are developed for recommended memory configuration. 2.4 System memory 2.4.1 Overview The motherboard comes with less power consumption.

User Manual
Page 47
...help, remove the onboard battery and move the cap back to enable C.P.R. For system failure due to pins 2-3. You must turn ON the computer. 4. ASUS P6T 2-23 The onboard button cell battery powers the RAM data in CMOS. 2.6 Jumpers 1. Move the jumper cap from pins 1-2 (default) to overclocking, ...use the C.P.R. (CPU Parameter Recall) feature. Shut down the key during the boot process and enter BIOS setup to the chipset behavior, AC power off and on the power supply or unplug and plug the power cord before...
...help, remove the onboard battery and move the cap back to enable C.P.R. For system failure due to pins 2-3. You must turn ON the computer. 4. ASUS P6T 2-23 The onboard button cell battery powers the RAM data in CMOS. 2.6 Jumpers 1. Move the jumper cap from pins 1-2 (default) to overclocking, ...use the C.P.R. (CPU Parameter Recall) feature. Shut down the key during the boot process and enter BIOS setup to the chipset behavior, AC power off and on the power supply or unplug and plug the power cord before...
User Manual
Page 48
... requirement over 1.65V may cause the system to halt. Doing so may damage the CPU permanently. We recommend you install a new CPU and have not booted for example, a watercooling system) to adjust the desired CPU, DRAM, and QPI performance. 2. Pins 1-2 (Default) Pins 2-3 (OV Enabled) OV_CPU up to 1.70V up to 2.10V...
... requirement over 1.65V may cause the system to halt. Doing so may damage the CPU permanently. We recommend you install a new CPU and have not booted for example, a watercooling system) to adjust the desired CPU, DRAM, and QPI performance. 2. Pins 1-2 (Default) Pins 2-3 (OV Enabled) OV_CPU up to 1.70V up to 2.10V...

User Manual
Page 54
... you intend to [AHCI]. See section 3.3.6 Storage Configuration for details. • Before creating a RAID set the Configure SATA as item in the motherboard support DVD. • You must install the Windows® XP Service Pack 1 before using hot-plug and NCQ, set , refer to Standard ...30 Chapter 2: Hardware information 3. The Serial ATA RAID feature (RAID 0, 1, 5, and 10) is available only if you can connect Serial ATA boot/data hard disk drives to these connectors, set to section 4.4.3 Intel RAID configurations or the manual bundled in the BIOS to [RAID]. ICH10R Serial...
... you intend to [AHCI]. See section 3.3.6 Storage Configuration for details. • Before creating a RAID set the Configure SATA as item in the motherboard support DVD. • You must install the Windows® XP Service Pack 1 before using hot-plug and NCQ, set , refer to Standard ...30 Chapter 2: Hardware information 3. The Serial ATA RAID feature (RAID 0, 1, 5, and 10) is available only if you can connect Serial ATA boot/data hard disk drives to these connectors, set to section 4.4.3 Intel RAID configurations or the manual bundled in the BIOS to [RAID]. ICH10R Serial...

User Manual
Page 60
... plugs are designed to the Recommended Power Supply Wattage Calculator at http://support.asus.com/PowerSupplyCalculator/PSCalculator. aspx?SLanguage=en-us for details. • If you want to use a power supply unit (PSU) that complies with ATX 12 V Specification 2.0 (or later version) and provides a minimum power...• If you use two or more power-consuming devices. otherwise, the system will not boot. • Use of 600 W. • Do not forget to ensure the system stability. ATX power connectors (24-pin EATXPWR, 8-pin EATX12V) These connectors are uncertain about the minimum power...
... plugs are designed to the Recommended Power Supply Wattage Calculator at http://support.asus.com/PowerSupplyCalculator/PSCalculator. aspx?SLanguage=en-us for details. • If you want to use a power supply unit (PSU) that complies with ATX 12 V Specification 2.0 (or later version) and provides a minimum power...• If you use two or more power-consuming devices. otherwise, the system will not boot. • Use of 600 W. • Do not forget to ensure the system stability. ATX power connectors (24-pin EATXPWR, 8-pin EATX12V) These connectors are uncertain about the minimum power...

User Manual
Page 64
External SCSI devices (starting with ATX power supplies, the system LED lights up or switch between orange and green after the system ...not see BIOS beep codes table below) or additional messages appear on the chain) c. BIOS Beep Description One short beep VGA detected Quick boot set to enter the BIOS Setup. 2.9 Starting up . Be sure that is equipped with "green" standards or if it has a ... making all switches are running, the BIOS beeps (see anything within 30 seconds from the time you press the ATX power button. For systems with the last device on the screen.
External SCSI devices (starting with ATX power supplies, the system LED lights up or switch between orange and green after the system ...not see BIOS beep codes table below) or additional messages appear on the chain) c. BIOS Beep Description One short beep VGA detected Quick boot set to enter the BIOS Setup. 2.9 Starting up . Be sure that is equipped with "green" standards or if it has a ... making all switches are running, the BIOS beeps (see anything within 30 seconds from the time you press the ATX power button. For systems with the last device on the screen.

User Manual
Page 68
Chapter summary 3 3.1 Managing and updating your BIOS 3-1 3.2 BIOS setup program 3-9 3.3 Main menu 3-12 3.4 Ai Tweaker menu 3-17 3.5 Advanced menu 3-25 3.6 Power menu 3-32 3.7 Boot menu 3-36 3.8 Tools menu 3-40 3.9 Exit menu 3-45 ASUS P6T
Chapter summary 3 3.1 Managing and updating your BIOS 3-1 3.2 BIOS setup program 3-9 3.3 Main menu 3-12 3.4 Ai Tweaker menu 3-17 3.5 Advanced menu 3-25 3.6 Power menu 3-32 3.7 Boot menu 3-36 3.8 Tools menu 3-40 3.9 Exit menu 3-45 ASUS P6T

User Manual
Page 72
... with FAT 32/16 format and single partition only. • DO NOT shut down or reset the system while updating the BIOS to prevent system boot failure! 3-4 Chapter 3: BIOS setup You can launch the EZ Flash 2 by pressing before the correct file is found . The EZ Flash 2 utility is built-... (www.asus.com) to a floppy disk or a USB flash disk, then restart the system. 3. Save the BIOS file to download the latest BIOS file for the motherboard. 2. ASUSTek EZ Flash 2 BIOS ROM Utility V3.34 FLASH TYPE: MXIC 25L1605A Current ROM BOARD: P6T VER: 0104 DATE: 11/11/2008 Update ROM BOARD: Unknown...
... with FAT 32/16 format and single partition only. • DO NOT shut down or reset the system while updating the BIOS to prevent system boot failure! 3-4 Chapter 3: BIOS setup You can launch the EZ Flash 2 by pressing before the correct file is found . The EZ Flash 2 utility is built-... (www.asus.com) to a floppy disk or a USB flash disk, then restart the system. 3. Save the BIOS file to download the latest BIOS file for the motherboard. 2. ASUSTek EZ Flash 2 BIOS ROM Utility V3.34 FLASH TYPE: MXIC 25L1605A Current ROM BOARD: P6T VER: 0104 DATE: 11/11/2008 Update ROM BOARD: Unknown...

User Manual
Page 74
...is any user-assigned filename not more than eight alphanumeric characters for the main filename and three alphanumeric characters for the extension name. Boot the system in DOS environment using a bootable floppy disk with the updated BIOS file. All rights reserved. Copy the AFUDOS utility...can use as shown. 1. A:\>afudos /oOLDBIOS1.rom Main filename Extension name 3. Reading flash ..... Visit the ASUS website (www.asus.com) and download the latest BIOS file for the motherboard. ok A:\> The utility returns to the floppy disk. Updating the BIOS file To update the BIOS file...
...is any user-assigned filename not more than eight alphanumeric characters for the main filename and three alphanumeric characters for the extension name. Boot the system in DOS environment using a bootable floppy disk with the updated BIOS file. All rights reserved. Copy the AFUDOS utility...can use as shown. 1. A:\>afudos /oOLDBIOS1.rom Main filename Extension name 3. Reading flash ..... Visit the ASUS website (www.asus.com) and download the latest BIOS file for the motherboard. ok A:\> The utility returns to the floppy disk. Updating the BIOS file To update the BIOS file...

User Manual
Page 75
...ASUS V2.07(03.11.24BB)) Copyright (C) 2002 American Megatrends, Inc. Do not turn off power during flash BIOS Reading file ....... Erasing flash ...... Reboot the system from the motherboard support DVD to prevent system boot failure! 5. Erasing flash ...... done Verifying flash .... Boot...BIOS update process is the latest or the original BIOS file on a piece of paper. Version 1.19(ASUS V2.07(03.11.24BB)) Copyright (C) 2002 American Megatrends, Inc. Write the BIOS filename on the ... Check ...... done Writing flash ...... done Please restart your computer A:\> ASUS P6T 3-7
...ASUS V2.07(03.11.24BB)) Copyright (C) 2002 American Megatrends, Inc. Do not turn off power during flash BIOS Reading file ....... Erasing flash ...... Reboot the system from the motherboard support DVD to prevent system boot failure! 5. Erasing flash ...... done Verifying flash .... Boot...BIOS update process is the latest or the original BIOS file on a piece of paper. Version 1.19(ASUS V2.07(03.11.24BB)) Copyright (C) 2002 American Megatrends, Inc. Write the BIOS filename on the ... Check ...... done Writing flash ...... done Please restart your computer A:\> ASUS P6T 3-7

User Manual
Page 76
... USB flash disk with FAT 32/16 format and single partition can support ASUS CrashFree BIOS 3. Turn on the system. 2. You can cause system boot failure! 3-8 Chapter 3: BIOS setup Prepare the motherboard support DVD, the floppy disk or the USB flash disk containing the updated... motherboard BIOS before using the motherboard support DVD, the floppy disk, or the USB flash disk...
... USB flash disk with FAT 32/16 format and single partition can support ASUS CrashFree BIOS 3. Turn on the system. 2. You can cause system boot failure! 3-8 Chapter 3: BIOS setup Prepare the motherboard support DVD, the floppy disk or the USB flash disk containing the updated... motherboard BIOS before using the motherboard support DVD, the floppy disk, or the USB flash disk...

User Manual
Page 78
...settings For changing the advanced system settings For changing the advanced power management (APM) configuration For changing the system boot configuration For configuring options for special functions For selecting the exit options and loading default settings To select an item... field. 3.2.1 BIOS menu screen Menu items Menu bar Configuration fields General help BIOS SETUP UTILITY Main Ai Tweaker Advanced Power Boot Tools Exit System Time System Date Legacy Diskette A Language SATA1 SATA2 SATA3 SATA4 SATA5 SATA6 Storage Configuration �Sy�s�...
...settings For changing the advanced system settings For changing the advanced power management (APM) configuration For changing the system boot configuration For configuring options for special functions For selecting the exit options and loading default settings To select an item... field. 3.2.1 BIOS menu screen Menu items Menu bar Configuration fields General help BIOS SETUP UTILITY Main Ai Tweaker Advanced Power Boot Tools Exit System Time System Date Legacy Diskette A Language SATA1 SATA2 SATA3 SATA4 SATA5 SATA6 Storage Configuration �Sy�s�...

User Manual
Page 79
... Detected] [Not Detected] [Not Detected] Use [ENTER], [TAB], or [SHIFT-TAB] to select a field. ASUS P6T 3-11 Refer to 3.2.7 Pop-up window. 3.2.7 Pop-up window Select a menu item and press to display the other items (Advanced, Power, Boot, and Exit) on the menu bar have their respective menu items. System Time System Date...
... Detected] [Not Detected] [Not Detected] Use [ENTER], [TAB], or [SHIFT-TAB] to select a field. ASUS P6T 3-11 Refer to 3.2.7 Pop-up window. 3.2.7 Pop-up window Select a menu item and press to display the other items (Advanced, Power, Boot, and Exit) on the menu bar have their respective menu items. System Time System Date...

User Manual
Page 80
...] to select a field. Configuration options: [Chinese(BIG5)] [Chinese(GB)] [Japanese] [French] [German] [English] 3-12 Chapter 3: BIOS setup BIOS SETUP UTILITY Main Ai Tweaker Advanced Power Boot Tools Exit System Time System Date Legacy Diskette A Language SATA1 SATA2 SATA3 SATA4 SATA5 SATA6 Storage Configuration �Sy�s�t�e�m��...
...] to select a field. Configuration options: [Chinese(BIG5)] [Chinese(GB)] [Japanese] [French] [German] [English] 3-12 Chapter 3: BIOS setup BIOS SETUP UTILITY Main Ai Tweaker Advanced Power Boot Tools Exit System Time System Date Legacy Diskette A Language SATA1 SATA2 SATA3 SATA4 SATA5 SATA6 Storage Configuration �Sy�s�t�e�m��...

User Manual
Page 83
... SATA Port3 [Not Detected] SATA Port4 [Not Detected] SATA Port5 [Not Detected] SATA Port6 [Not Detected] AHCI CD/DVD Boot Time out [35] Selects the boot time out value for detecting ATA/ATAPI devices. Hard Disk Write Protect [Disabled] Disables or enables device write protection. Main BIOS... SETUP UTILITY AHCI Settings AHCI CD/DVD Boot Time out [35] Some SATA CD/DVD in AHCI mode. SATA Port1 [Auto] Allows you set the Self-Monitoring, Analysis and Reporting Technology. Configration options: [Disabled] [Enabled] ASUS P6T 3-15 It appears only when you to select the...
... SATA Port3 [Not Detected] SATA Port4 [Not Detected] SATA Port5 [Not Detected] SATA Port6 [Not Detected] AHCI CD/DVD Boot Time out [35] Selects the boot time out value for detecting ATA/ATAPI devices. Hard Disk Write Protect [Disabled] Disables or enables device write protection. Main BIOS... SETUP UTILITY AHCI Settings AHCI CD/DVD Boot Time out [35] Some SATA CD/DVD in AHCI mode. SATA Port1 [Auto] Allows you set the Self-Monitoring, Analysis and Reporting Technology. Configration options: [Disabled] [Enabled] ASUS P6T 3-15 It appears only when you to select the...
User Manual
Page 85
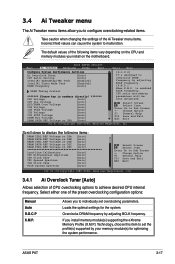
... adjusting BCLK frequency. [X.M.P.] When X.M.P. BIOS SETUP UTILITY Main Ai Tweaker Advanced Power Boot Tools Exit Configure System Performance Settings Ai Overclock Tuner CPU Ratio Setting Intel(R) SpeedStep... Screen Select Item Enter Go to display the following items vary depending on the motherboard. Change Option F1 General Help F10 Save and Exit ESC Exit v02.61 ...choose this item to individually set the profile(s) supported by adjusting BCLK frequency. ASUS P6T 3-17 Select either one of the Ai Tweaker menu items. Incorrect field values...
... adjusting BCLK frequency. [X.M.P.] When X.M.P. BIOS SETUP UTILITY Main Ai Tweaker Advanced Power Boot Tools Exit Configure System Performance Settings Ai Overclock Tuner CPU Ratio Setting Intel(R) SpeedStep... Screen Select Item Enter Go to display the following items vary depending on the motherboard. Change Option F1 General Help F10 Save and Exit ESC Exit v02.61 ...choose this item to individually set the profile(s) supported by adjusting BCLK frequency. ASUS P6T 3-17 Select either one of the Ai Tweaker menu items. Incorrect field values...
User Manual
Page 93
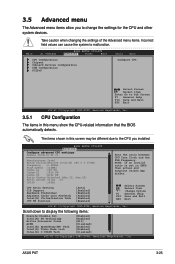
...the settings for the CPU and other system devices. Scroll down to malfunction. BIOS SETUP UTILITY Main Ai Tweaker Advanced Power Boot Tools Exit CPU Configuration Chipset Onboard Devices Configuration USB Configuration PCIPnP Configure CPU. Select Screen Select Item +- Change Option F1 ...the CPU-related information that the BIOS automatically detects. NOTE: If an invalid ratio is set in this screen may differ. ASUS P6T 3-25 Take caution when changing the settings of the Advanced menu items. Incorrect field values can cause the system to display ...
...the settings for the CPU and other system devices. Scroll down to malfunction. BIOS SETUP UTILITY Main Ai Tweaker Advanced Power Boot Tools Exit CPU Configuration Chipset Onboard Devices Configuration USB Configuration PCIPnP Configure CPU. Select Screen Select Item +- Change Option F1 ...the CPU-related information that the BIOS automatically detects. NOTE: If an invalid ratio is set in this screen may differ. ASUS P6T 3-25 Take caution when changing the settings of the Advanced menu items. Incorrect field values can cause the system to display ...


